Git tags are highlights in project development used to denote specific points in the project's history. Tags usually mark a feature release but can also indicate commits.
Git tags are similar to Git branches, except no changes can be made to a tag after creation.
In this tutorial, you will learn to create tags in Git.

Prerequisites
- Git installed (see how to install Git on CentOS, Ubuntu, macOS, Windows)
- A Git repository.
Note: Bare Metal Cloud servers integrate perfectly with GitHub development using Bare Metal Cloud GitHub Actions. Choose a preconfigured server instance and automate your software development project.
What Are Tags in Git?
Git tags represent specific reference points in a software development project's history. Use Git tags to mark a commit and highlight it for future reference.
You can tag any commit but typically users tag release versions. For example, a tag can mark a project's initial stable version, such as v1.0. Once a tag is created, it includes all the changes made to the project and it acts as a git branch that doesn't change. Git tags are excellent for comparing commits.
Note: See how to create and manage a Git tag with a release status.
How to Create a Tag in Git?
There are two types of Git tags:
- Annotated tags. They contain metadata about the user creating the tag, such name, email address, and date.
- Lightweight tags. Does not contain any additional metadata. It just points to a commit.
The sections below explain how to create each type of tag in Git, as well as how to relate a tag to a commit.
Creating an Annotated Tag
Annotated tags are usually used for public releases as they contain detailed metadata about the tagger and an optional message about the commit.
Create an annotated tag by specifying the -a flag with the git tag command:
git tag -a [tag name]For [tag name], specify the name of the tag. While there are no limitations for setting a tag name, the best practice is to follow semantic versioning and name the tag as follows:
v[major].[minor].[patch][major]. The current public version number; modifications aren't compatible with previous versions.[minor]. The current functional release. The modifications are compatible with previous versions.[patch]. An increment for bug fixes or patches that don't impact overall software functionality.
For example:
git tag -a v1.2The command creates a new annotated tag identified as v1.2. The configured default text editor then opens to prompt for a tag description:

Alternatively, use the -m flag to add a message right away instead of prompting. For example:
git tag -a v1.5 -m "Release v1.5 created"
The command creates the tag with the provided message.
Creating a Lightweight Tag
A lightweight tag doesn't contain any additional metadata found in annotated tags.
Create a lightweight tag when the release isn't public, and you need private or temporary labels with only basic tag information. Some Git commands for naming objects, such as git describe, ignore lightweight tags by default.
Create a lightweight tag using the following syntax:
git tag [tag name]For example:

The command creates a new Git tag named v1.0.
Note: If you are just starting out with Git, follow our Git beginner's guide.
Create Git Tag For a Commit
Create a Git tag for a particular commit from Git history by specifying the commit SHA. Obtain the commit SHA by running:
git log --oneline
After obtaining the commit SHA, create a tag using the following syntax:
git tag [tag name] [commit SHA]For example:

The command creates a tag for the specified commit in your Git history.
Push Tags to Remote Repository
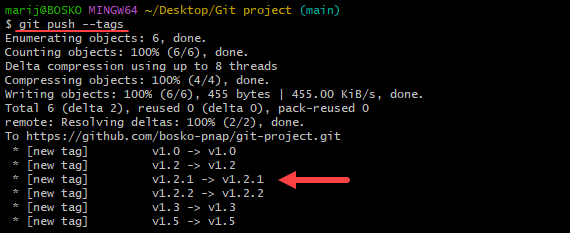
The git push command doesn't automatically push the tags to a remote repository. To make the local tags available in a remote repository, specify the --tags flag:
git push --tags
The command pushes all local tags to the connected remote repository.
Alternatively, to push a specific tag to a remote repository, use the following syntax:
git push [tag name]How to View Tags in Git?
To view all Git tags, run the following command:
git tag
The command outputs all the tags created in the project, listed in alphabetical order. If the tag list is long, search the tag names by specifying the -l flag and outputting only the tags for a specific version.
For example:
git tag -l "v1.2*"
The output contains only the tags starting with v1.2. Check out our Git List Tags guide to learn more about listing git tags from local or remote repositories.
Note: Refer also to our guide on how to clone git tags.
Conclusion
This tutorial showed how to create annotated and lightweight Git tags for your project. For more Git guides, check out how to rename tags in Git, revert the last commit, resolve merge conflicts in Git, or restore a deleted repository.


