The Bash (Bourne Again Shell) shell is an enhanced version of the Bourne shell distributed with Linux and other operating systems built on GNU. Basic Bash commands allow users to navigate through a system and effectively manage files, directories, and different data types.
This article lists 30 Bash commands and provides a downloadable PDF cheat sheet so you always have them at hand.

Note: Check out our guide to Linux shells.
Basic Bash Commands
This section lists the most common Bash commands for managing files and directories, searching and sorting data, changing file permissions, and more.
Refer to the end of the article to download all the commands as a PDF cheat sheet for future use.
Basic File and Directory Operations
The following commands are used for basic file and directory operations.
ls Command
The ls command lists all files and directories in the current directory. It provides valuable information about the files and directories within a specified directory, such as their names, permissions, timestamps, and more.
The syntax of the ls command is:
ls [options] [file|dir]The most commonly used options are:
| Option | Description |
|---|---|
-l | Provide detailed information about files and directories. |
-a | By default, ls omits hidden files from the output. To include hidden files, specify the -a option. |
-h | Modifies the output to display file sizes in a more human-friendly format. Instead of using bytes, the -h option formats sizes using units such as kilobytes (KB), megabytes (MB), gigabytes (GB), etc. |
The following example shows the output of the ls -l command:

cd Command
The cd command changes the current directory to the directory specified as its argument. It allows users to move to different locations in the file system and access files, directories, and resources in those directories.
The command is essential for efficient command-line navigation and for executing commands or accessing files in specific directories without having to provide full paths each time.
The syntax for the cd command is:
cd [directory]The most common options are:
| Option | Description |
|---|---|
- | Switches to the previous directory. |
~ | Switches to the home directory. |
The following example shows how to return to the home directory using the ~ option:

pwd Command
The pwd command prints the path of the current working directory. It is useful when you need to navigate the Linux file system or pass the working directory in a Bash script.
The syntax for the pwd command is:
pwd [options]The most commonly used options are:
| Option | Description |
|---|---|
-L | Prints the logical path of the current directory. |
-P | Prints the physical path of the current directory. |
The following example shows the output of the pwd command:

File Manipulation
Use the commands listed in this section for file manipulation, including file creation, copying, moving, renaming, deleting, searching, modifying files, etc.
cat Command
The cat command (concatenate) displays the contents of a file or multiple files in the terminal without opening the file for editing. It is convenient for viewing the contents of small text files, joining multiple files' contents, or piping the output into other commands for further processing.
The syntax for the cat command is:
cat [options] [file path]The most commonly used options are:
| Option | Description |
|---|---|
-n | Numbers all the output lines. |
-b | Numbers all non-blank output lines. |
The following example shows an example output of the cat command with numbered lines:

touch Command
The touch command creates a new, empty file or updates the timestamp of an existing file. The command is useful when you want to create a new file with no content or when you need to set a file's timestamps to the current time without changing its contents.
The syntax of the touch command is:
touch [file]The most commonly used options are:
| Option | Description |
|---|---|
-a | Changes access time only. |
-m | Changes the modification time only. |
The following example shows how to create a new blank file using the touch command:

rm Command
The rm command removes files or directories to free up storage space and organize the file system.
Important: Use rm with caution, as deleted files are not recoverable by default, and unintended removals can result in data loss. The command deletes files without prompting for confirmation. Check out our article for other dangerous Linux commands.
The syntax for the rm command is:
rm [options] [file|dir path]The most commonly used options are:
| Option | Description |
|---|---|
-r | Recursive deletion, which removes directories and their contents, including subdirectories and files within them. Use this option to delete a directory and all its contents. |
-f | Forcefully remove files and directories without asking for confirmation, even if they are write-protected or otherwise restricted. It suppresses most error messages that would typically prompt for confirmation. |
mkdir Command
The mkdir command creates a new, empty directory. mkdir also allows users to set permissions, create multiple directories at once, and much more. The tool is handy for setting up a new project structure or creating nested directories to maintain a well-organized file system.
The syntax of the mkdir command is:
mkdir [options] [dir]The commonly used options that provide additional functionality are:
| Option | Description |
|---|---|
-p | A necessary option if you want to create subdirectories. Without the -p option, the output is an error if one of the directories in the string does not exist. |
-m [mode] | Sets the permissions (mode) for the newly created directory. For [mode], specify the permission mode using the octal representation, like 777, to add read, write, and execute permission for all users. |
rmdir Command
The rmdir command removes only empty directories via the terminal. It is useful when you need to clean up the file system by removing empty directories that are no longer needed, thereby maintaining a tidy directory structure.
The syntax for the rmdir command is:
rmdir [options] [dir]The command is simple and has few options, since it is used only to remove empty directories. The most common option is -p, which removes the specified directory and its parent directories if they become empty as a result.
For example:

cp Command
The cp command is used to copy files and directories using the CLI. It enables users to duplicate files and directories within the same location or to a different one while preserving their content, permissions, and attributes.
The cp command is essential when creating backups, replicating data, or organizing files across different directories. The syntax is:
cp [options] [source] [destination]The commonly used options are:
| Option | Description |
|---|---|
-r | Enforces recursive mode. It allows the cp command to copy the specified directory and its entire contents, including subdirectories and their contents. |
-i | Enforces the interactive mode, prompting the user for confirmation before overwriting any existing files. |
-n | The -n option stands for no clobber and prevents the cp command from overwriting existing files. |
The following example shows how the interactive mode prompts the user for confirmation before overwriting an existing file:

mv Command
The mv command allows users to move directories and files within the same file system, effectively changing their path. Additionally, it can rename files or directories, providing a way to efficiently organize and manage data within the file system.
The syntax for the mv command is:
mv [options] [source] [destination]The common command options are:
| Option | Description |
|---|---|
-i | Enforces the interactive mode and prompts the user for confirmation before overwriting any existing files at the specified [destination]. |
-n | The -n option stands for no clobber and prevents the mv command from overwriting existing files. |
The following example shows how to use the mv command interactive mode and move a file to a different directory:

Searching and Sorting
The commands listed in this section are useful when searching for files or data in a file system and sorting the results in a specific way.
find Command
The find command searches for files or a specific string of characters in a directory hierarchy. It allows users to search the entire file system or specified directories for files or strings based on factors such as name patterns, file types, sizes, modification times, and more.
Note: Learn how to determine the type of a file using the Linux file command.
The syntax of the find command is:
find [location] [expression] [options][location]is the directory where the search will begin. If not specified, the search starts from the current directory.[expression]is used to combine multiple search criteria using logical operators (-and,-or,-not). It can be used to create complex search conditions.
The most common command options are:
| Option | Description |
|---|---|
-name [pattern] | Used to search for files and directories based on their names. Provide a pattern or a complete name as an argument to the -name option, and the find command locates and displays the files or directories that match the specified name. |
-type [file type] | Filters files based on their type. Provide a single-character argument to the -type option to indicate the type of file you're searching for. For example, f are regular files, d are directories, l are symbolic links, etc. |
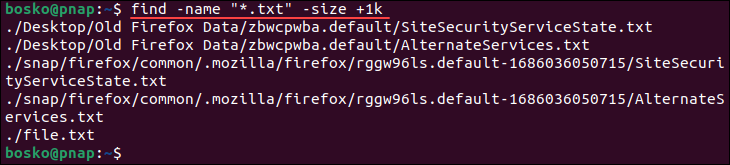
-size [size] | Searches for files based on their size. The command accepts modifiers like c (bytes), k (kilobytes), M (megabytes), etc. |
The following example shows how to find all .txt documents larger than 1 kilobyte:
grep Command
The grep command searches files for lines that match a given regular expression. It is particularly valuable for analyzing log files, code, or other text-based data, as it helps quickly identify relevant information and extract useful insights from large amounts of text.
The command syntax is:
grep [options] [search pattern] [file][search pattern]is the text or regular expression you're searching for. It can be a simple string or a more complex regular expression.[file]are the files in which you want to search for the pattern. You can specify one or multiple files. If no files are specified,grepreads from standard input.
For additional functionality, use the following options:
| Option | Description |
|---|---|
-i | Ignores case when performing a search. |
-r | Enforces a recursive search and searches through directories and their subdirectories. With this option, grep searches for the specified pattern in files within the specified directory and all its subdirectories. |
-l | Displays only the file names that contain the specified pattern instead of showing the matching lines within those files. |
The following example shows how to search for a string in a specific file and ignore case:

sort Command
The sort command sorts the lines in text files in a specific order, for example, alphabetically or numerically, which facilitates data organizing and analysis. The command is particularly useful for handling large datasets, logs, lists, or other text-based information that needs to be presented in a systematic, orderly manner.
The syntax for the sort command is:
sort [options] [file]The most common options are:
| Option | Description |
|---|---|
-n | Used to sort lines of text based on numerical values. When applied, the sort command interprets the data as numbers and arranges them in ascending order. |
-r | Used to reverse the sorting order, causing sort to arrange the lines in descending order rather than ascending order. |
-k [argument] | Used to sort the lines based on a specific field within the lines of text. Provide an argument to the -k option in the form of start_field,end_field, where start_field and end_field are the fields you want to use for sorting. |
In the following example, we use the sort command to reverse the sorting order in a file in descending order:

Changing Permissions
Changing file permissions in Linux involves modifying a file or directory's access rights for different user groups (owner, group, and others).
chmod Command
The chmod command modifies the permissions of files and directories. It allows users to specify the access levels for the owner, group, and other users to a file or directory. The command assigns read, write, and execute permissions using symbolic or octal notation. The tool is particularly useful for securing sensitive data, controlling user access to files, and managing script and program execution.
The syntax for the chmod command is:
chmod [options] [mode] [file][mode] is the permission mode you want to set for the specified [file/s] or directory. Use symbolic notation (e.g., u+rwx) or octal notation (e.g., 755).
The commonly used options are:
| Option | Description |
|---|---|
-R | chmod recursive mode, applies the permission changes to the specified file or directory, but also to all of its subdirectories and their contents. |
-v | The verbose option makes chmod display a message for each file or directory it modifies, showing the permission changes. |
Important: Use the chmod command with caution when dealing with sensitive data as it modifies file permissions and could provide read or write access to users who should not have it.
chown Command
The chown command changes the ownership of files and directories. It allows users with appropriate permissions to reassign ownership of a file or directory to another user or group. The command is useful when system administrators need to transfer files between users or change the ownership of system files. This ensures proper access control and data management in the file system.
The chown command syntax is:
chown [options] owner[:group] fileowneris the name or numeric user ID of the new owner you want to assign to the file(s) or directory.groupis the name or numeric group ID of the new group you want to assign to the file(s) or directory. Omitting this part keeps the group unchanged.
The commonly used options are:
| Option | Description |
|---|---|
-R | Recursive mode, applies ownership changes to the specified file or directory, but also to all its subdirectories and their contents. |
-v | The verbose option makes chown display a message for each file or directory it modifies, showing the changes it makes to the ownership. |
Important: Use the command with caution when changing ownership of files and directories with sensitive data.
Archiving and Compression
Archiving and compression reduce file sizes to facilitate data management, storage, or transmission. This section lists the most used Bash commands for archiving and compression.
tar Command
The tar command is an archiving tool for creating, extracting, and manipulating tarball archives. It combines multiple files and directories into a single file, preserving their structure and permissions. The command helps create backups, distribute, and transfer groups of files efficiently.
The syntax for the tar command is:
tar [options] [archive-file] [file | dir...][archive-file]is the name of the archive file you want to create, extract from, or manipulate. Omitting this causestarto default to using the standard input/output.[file | dir …]are the files and/or directories you want to include in the archive. You can specify one or more file/directory names. When creating an archive, list the files and directories you want to include. When extracting, this part is usually omitted, and the command extracts the archive's contents into the current directory.
The common tar options are:
| Option | Description |
|---|---|
-c | Create a new archive. |
-x | Extract from an existing archive. |
-v | Verbose mode. Displays a detailed output while tar is processing files. |
-f [archive-file] | Use the -f option to specify the name of the archive file you're creating or manipulating. For [archive-file], specify the name of the archive you want to work with. |
-z | Enable gzip compression when creating or extracting an archive. |
-j | Enable bzip2 compression when creating or extracting an archive. |
For example, the following command creates a new archive named new-archive from the file named file.txt:
tar -cf new-archive file.txtgzip Command
The gzip command is a file compression utility that uses the gzip compression algorithm to reduce the size of files while preserving the content. The command helps you save storage space or accelerate file transfer over networks.
gzip is commonly used to compress log files, text documents, configuration files, and other text-based data files.
The gzip command syntax is:
gzip [options] [file...]The common gzip options are:
| Option | Description |
|---|---|
-d | Decompress a compressed file. Using this option reverses the compression process performed by gzip and restores the original file to its uncompressed state. |
-k | Use the -k option to retain the original files when performing an operation. It's useful when you want to preserve both the original and processed versions of a file without overwriting the original file. |
Note: By default, gzip replaces the original files unless the -k option is used.
gunzip Command
The gunzip command is a utility for decompressing files that have been compressed using the gzip compression algorithm. Use it to restore files to their original uncompressed state. The command is necessary for managing file compression and decompression tasks in Unix-based environments.
The syntax is:
gunzip [options] [file...]The default behavior is to replace the original compressed files. If you want to keep the original as well, add the -k option.
Viewing File and System Details
Gaining insight into file and system details is essential for efficient navigation and troubleshooting. This section provides several powerful Bash commands that provide information on file content, permissions, system resources, and more.
head Command
The head command is a Bash utility that allows users to preview the beginning section of a text file or input stream. Use a filename or input source as an argument to display the first few lines of the content and see a quick overview of the file's structure, formatting, or initial data.
The command is particularly useful for assessing log files, configuration files, and large documents, providing fast access to content without having to process the entire file.
The syntax of the head command is:
head [options] [file...]The most common options are:
| Option | Description |
|---|---|
-n [num] | Show the first [num] number of lines. |
-c [num] | Shows the first [num] bytes of a file. |
In the following example, we use the head command to show the first three lines of a file:

tail Command
The tail command is a Bash utility that displays the end of a text file or an input stream. By default, tail displays the last ten lines of a file, but it can be adjusted to show a specified number of lines or bytes from the end of the file. The command is particularly useful for monitoring log files in real time, tracking file changes, and obtaining the latest updates without having to examine the entire file.
The tail command syntax is:
tail [options] [file...]The common tail command options are:
| Option | Description |
|---|---|
-n [num] | Show the last [num] number of lines. |
-c [num] | Shows the last [num] bytes of a file. |
The following example shows how to use tail to show the last five lines of a file:

echo Command
The echo command is a built-in Bash utility that displays text or variables in the terminal as the standard output. It is useful for generating output messages, displaying variable values, or in Bash scripts.
Note: Check out our guide on how to write a Bash script.
echo allows users to perform basic string manipulation, create prompts, generate user notifications, and create formatted output. The command is essential for both interactive use and automation.
The syntax is:
echo [options] [string]The commonly used options are:
| Option | Description |
|---|---|
-n | Instructs echo not to print the trailing newline character after displaying the specified text or variable. By default, echo adds a newline character at the end of the output. |
-e | Enables the interpretation of certain escape sequences within the text or variable being echoed. |
The following example shows how to use echo to print a string and a variable in the standard output:

date Command
The date command is a Bash utility that prints the system date and time. It also allows users to format and manipulate date and time information. The date command is useful for timestamping files, generating time-sensitive output in scripts, setting system clocks, calculating time intervals, and more.
The date command syntax is:
date [options] [+format][+format] is an optional argument that specifies the output format of the date and time. The format string can include various placeholders that represent different components of the date and time (e.g., %Y for years, %m for months, %H for hours, %M for minutes, etc.).
The common command options are:
| Option | Description |
|---|---|
-u | Display UTC (Coordinated Universal Time) instead of the local time. |
-R | Display the date and time in RFC 2822 format. |
The following example shows the output of the date command:

df Command
The df command is a Bash utility that allows users to check disk space usage on a filesystem basis. When invoked without arguments, df provides a summary of disk space usage across all mounted filesystems.
The command syntax is:
df [options] [filesystem][filesystem] is an optional argument that allows you to specify filesystems. df then displays information only for those filesystems. Omitting these arguments causes df to display information for all mounted filesystems.
The common options are:
| Option | Description |
|---|---|
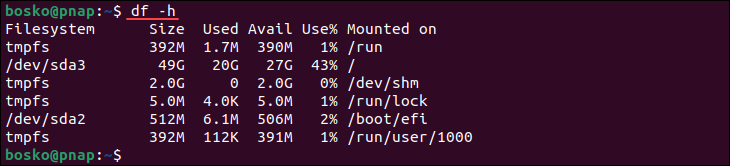
-h | Display sizes in a human-readable format (e.g., KB, MB, GB). |
-T | Display the file system type along with other information. |
The following image shows an example of the df command output in a human-readable format:
du Command
The du command estimates and displays the disk space usage of files and directories. By default, du provides the space used by the specified files and directories in bytes. It is useful for identifying which files or directories consume the most disk space on a filesystem.
The du command syntax is:
du [options] [file][file] is an optional argument that allows you to specify specific files or directories to analyze. If no file or directory path is provided, du analyzes the current directory by default.
The commonly used options are:
| Option | Description |
|---|---|
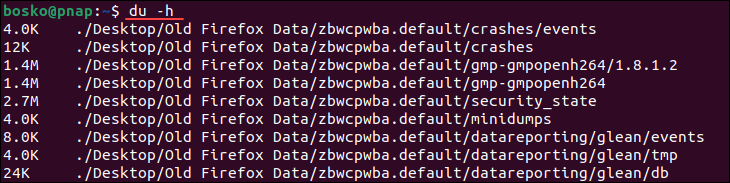
-h | Display sizes in a human-readable format (e.g., KB, MB, GB). |
-s | Display only the total size for each argument (directory or file). |
The following image is a partial du command output:
ps Command
The ps command lists processes currently running on the system. By default, it displays a list of processes associated with the current terminal session, including their process IDs (PIDs), resource utilization, and other attributes. Use the tool to monitor system activity, identify misbehaving processes, investigate resource consumption, and manage process-related tasks.
The command syntax is:
ps [options]The [options] allow users to customize the output to display detailed information about all processes on the system, filter processes by user or attribute, and format the output.
The most common options are:
| Option | Description |
|---|---|
-e | Display information about all processes on the system, regardless of whether they are associated with the current terminal session. |
-f | Change the output format to provide a more detailed and comprehensive view of each process. This includes information on the user who started the process, the process ID (PID), the parent process ID (PPID), CPU and memory usage, the terminal associated with the process, and more. |
The following example shows the ps command output:

Control Operations
Certain Bash commands are crucial for controlling processes and managing sessions effectively. Those commands allow users to manage running processes, review command history, and end sessions with precision, contributing to efficient, organized Linux use. This section lists the key Bash commands for system management.
kill Command
The kill command is a Bash utility that terminates processes by sending signals. It is useful for stopping misbehaving or unresponsive programs that might otherwise require a system restart.
By specifying a Process ID (PID) or job control identifier along with a signal number or name, users can halt processes or prompt them to perform specific actions.
The command syntax is:
kill [options] pid…pid… is the Process IDs (PIDs) of the processes you want to terminate. The command accepts one or more PIDs separated by spaces.
The commonly used options are:
| Option | Description |
|---|---|
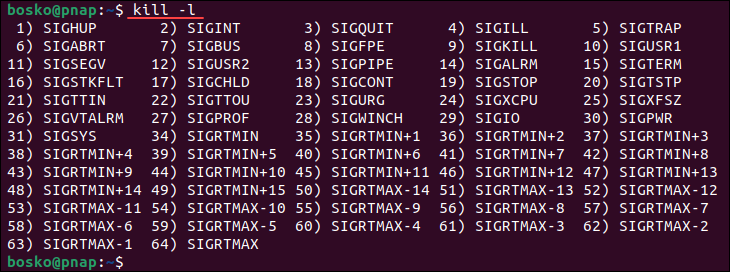
-l | Lists available signals and their corresponding numeric values. |
-9 | Sends the SIGKILL signal to the target process. |
The following image shows all acceptable kill command signals:
Important: Be careful when terminating system processes, as the action can cause system instability.
history Command
The history command is a Bash utility that displays a list of recently executed commands within a terminal session. It provides a chronological record of command-line inputs and their corresponding line numbers.
The command is useful for recalling and re-executing previously used commands, streamlining repetitive tasks, and maintaining a record of your actions for reference or documentation.
The command syntax is:
history [options]The commonly used options are:
| Option | Description |
|---|---|
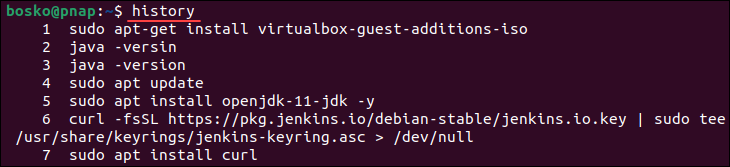
-c | Clears the command history, deleting all previously executed commands from the history list. |
-w | Writes the current history list to the history file (~/.bash_history by default) and saves any changes made during the session. |
The following example shows a partial history command output:
exit Command
The exit command is a Bash utility used to end a terminal session or script. Running the command in the command-line interface instructs the shell to terminate the current session or script. The action closes the terminal window or returns control to the parent process.
The command is useful for concluding tasks, scripts, or interactive sessions, and it ensures that all resources are properly released and processes are terminated.
The command syntax is:
exit [n][n] is an optional argument that specifies the exit status that the shell or script returns after termination.
Pipe Utility
The | (pipe) utility is a powerful tool that allows users to connect the standard output of one command to the standard input of another, thus enabling the flow of data between commands. It is beneficial when performing tasks that involve multiple commands, data transformation, filtering, or data aggregation.
The basic syntax is:
[command1] | [command 2]In the following example, the output of the echo command is piped into grep, which filters out the months that start with "J":

Redirect Operator
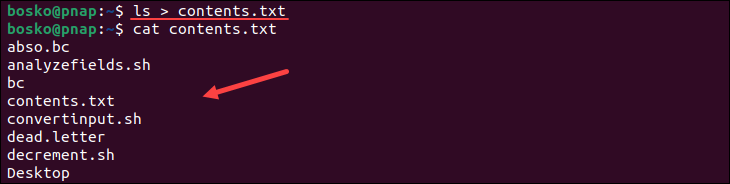
The redirect operator (>, <, >>, 2>, etc.) is a mechanism that allows users to control the input and output of commands. > redirects the standard output of a command to a file, overwriting its content if the file already exists. The >> operator appends the standard output to the specified file.
< operator redirects the standard input of a command from a file. The 2> operator redirects standard error messages to a file. These operators enable users to manage data flow, perform file-based operations, and ensure precise error handling.
In the following example, the output of the ls command is redirected to a new file called contents.txt. After redirection, check the file's contents using cat:
Bash Cheat Sheet
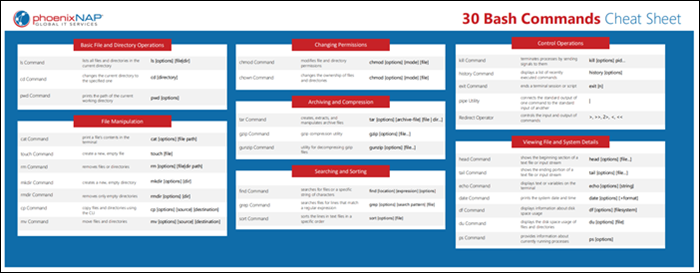
The downloadable PDF cheat sheet below contains all the listed commands in a convenient reference sheet. Save the PDF for future use and have all the commands at your disposal:
Conclusion
This article has listed the 30 most common Bash commands any Linux user should know. Use the commands to improve your file system management, automate and facilitate scripting, and level up your file management skills. We also provided a PDF cheat sheet of Bash commands for your future reference.
For more useful commands, check out our ultimate list of Linux commands all users should know.