The Linux file command helps determine the type of a file and its data. The command doesn't account for the file extension and instead runs a series of tests to determine the file type.
In this tutorial, we will show you how the file command works and how to use it.
Prerequisites
- A system running Linux.
- Access to the terminal window.
File Command Syntax
The file command uses the following basic syntax:
file [option] [file name]In the syntax above, [file name] represents the name of the file you want to test. The file command performs three sets of tests trying to determine the file type, in this order:
- Filesystem tests perform a stat(2) system call and check the result against the system header file. This way, the
filecommand determines if the file is a common type for your system (such as a text file, image, directory, etc.). - Magic tests use a short string of numbers stored near the beginning of the file ("magic number") to test if the file is a binary executable and, if so, determine its type. The information needed to perform these tests is stored in /etc/magic or /usr/share/misc/magic from a compiled magic file.
- Language tests use a special tag to determine which programming language a binary executable file is written in.
The command output provides a short description of the file and data type. For instance, using the file command to test a text file:
file example.txt
File Command Options
The file command uses the following options:
| Option | Description |
|---|---|
--apple | Changes the command output to a MIME type string and displays only the specified element (type or encoding). |
-b, --brief | Changes command output to brief mode. |
-C, --compile | Creates an output file that contains a pre-parsed version of the magic file or directory. |
-c, --checking-printout | Checks the printout for the parsed version of the magic file. |
-d | Prints internal debugging information in the standard error format. |
-E | On filesystem error, issues an error message and exits. |
-e, --exclude | Excludes a test from the list of tests performed on a file. |
--exclude-quiet | Excludes tests that the file command doesn't know about. |
--extension | Prints a list of valid extensions for the file type. |
-F, --separator | Uses the provided string as a separator between the file name and file type. |
-f, --files-from | Uses a provided text file as a list of files to test. The list must contain only one file name per line. |
-h, --no-deference | Disables following symbolic links. |
-i, --mime | Changes the command output to a MIME-type string. |
--mime-type, --mime-encoding | Changes the command output to a MIME-type string and only displays the specified element (type or encoding). |
-k, --keep-going | Keeps the test going after the first results match. |
-l, --list | Shows a list of matching patterns in descending order of strength. |
-L, --deference | Enables following symbolic links. |
-m, --magic-file | Uses an alternative magic file provided by the user. |
-N, --no-pad | Doesn't pad the file names to align with the output. |
-n, --no-buffer | Flushes the output after checking each file. |
-p, --preserve-date | Attempts to preserve the last time the file was accessed to make it look like the file command didn't test it. |
-P, --parameter | Sets various parameters, such as max bytes or recursion, count, and length limit. |
-r, --raw | Disables translating unprintable characters. |
-s, --special-files | Enables reading special files. |
-S, --no-sandbox | Disables sandboxing on systems that support it. |
-v, --version | Displays the version of the file command. |
-z, --uncompress | Checks compressed files. |
-Z, --uncompress-noreport | Checks compressed files and only displays file type without the compression. |
-0, --print0 | Displays a null character after the end of the file name. |
--help | Displays the help message. |
File Command Examples
Below are examples of common use cases for the file command.
Test Multiple Files
To test multiple files simultaneously, append the file names to the end of the file command:
file [file name 1] [file name 2] … [file name n]For instance, to test a directory, a text file, an image, and a webpage, run:
file Example example.txt sample.png index.html
Test All Files in a Directory
Add a wildcard character (*) to the file command to test all the files and directories in the current working directory:
file *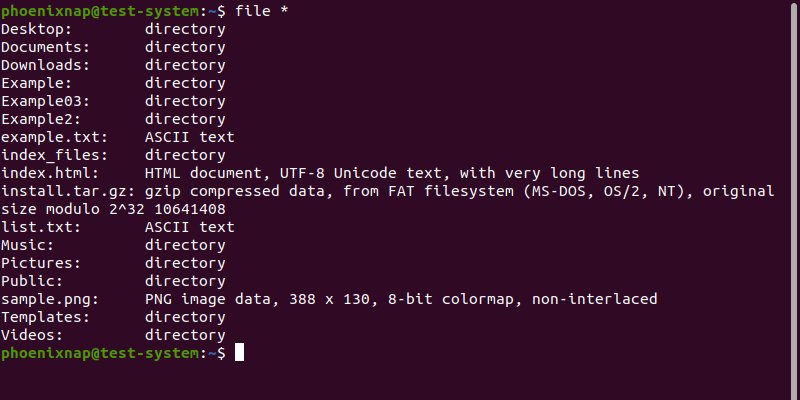
Add the path to a directory to the wildcard character to test the contents of that directory:
file [path to directory]/*For instance, to test the contents of the Example directory, use:
file Example/*
Test Files in a Range
The file command lets you test a subset of files in a directory using Regex-style ranges. Select a range by placing the values in brackets. For instance, testing files and directories with names in the a-l range:
file [a-l]*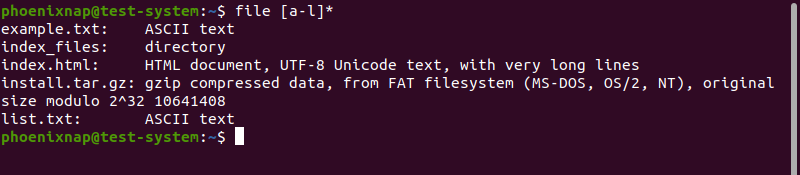
Since Regex-style ranges are case-sensitive, the output in the example above only shows file types for files starting with lowercase a-l. Adding another range lets you include uppercase characters as well:
file [a-l]* [A-L]*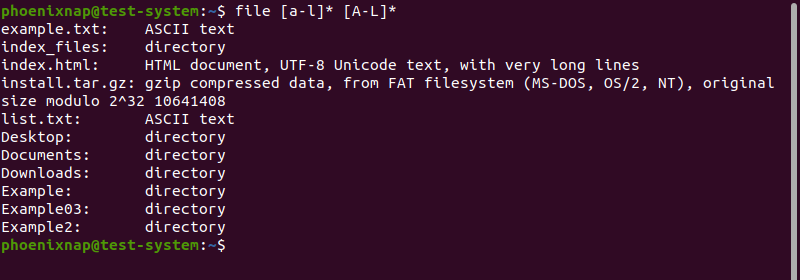
Test Files from a List
The file command lets you use a text file as a list of files to test. The text file must contain only one filename per line.

Use the -f option and add the path to the list file to file command:
file -f list.txt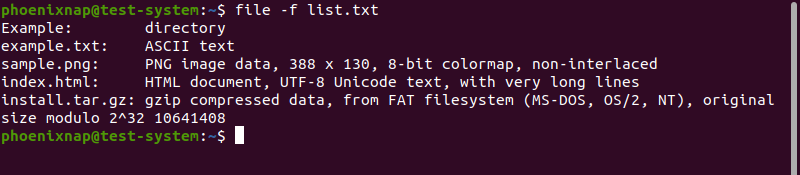
Test Special Files
The file command is not always able to read special files, such as system files:
file /dev/sda5
In the example above, the file command output shows that /dev/sda5 is a block special file but doesn't offer additional details. Use the -s option lets you fully test special files:
sudo file -s /dev/sda5
Note: If you are not logged in as the root user, attempting to test a special file results in a no read permission error message. Add sudo to the file command to prevent this.
Test Compressed Files
Use the -z option to fully test compressed files, trying to detect their content:
file -z install.tar.gz
Test Parsed Version of File
Use the -c option to show the check printout for the parsed version of the file:
file -c example.txt
This option is usually used with the -m option to debug and install a new magic file.
Display Brief Output
Using the -b option displays the brief version of the output. This version of the output only shows file types and omits file names.
file -b Example example.txt sample.png index.html
Add Separators to Output
Using the -F option lets you define a character that acts as a separator between the file name and file type sections of the output. For instance, add a plus sign (+) as a separator with:
file -F + Example example.txt sample.png index.html
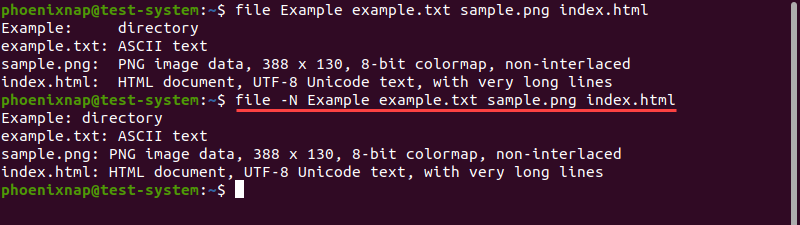
Remove File Name Padding from Output
Use the -N option to remove the padding between the file name and file type sections of the output:
file -N Example example.txt sample.png index.htmlThe resulting output is no longer vertically aligned:
Conclusion
This tutorial explained how to use the Linux file command to find out the types of files on your system.
If you're interested in learning more about Linux commands, have a look at our Linux commands cheat sheet.