Checking a directory's size in Linux is a crucial task in storage management.
Large directories are hard to navigate and take up system resources. Therefore, knowing a directory's size determines whether to take any actions and free up disk space.
This guide explains how to find the size of a directory in Linux.

Prerequisites
- A system running Linux (this tutorial uses Ubuntu 22.04).
- Access to the terminal.
- A user account with sudo or root privileges.
Note: In Linux, the ls -l command shows file and directory information, including names, dates, and sizes (disk usage). However, the displayed size is consistently 4096 bytes irrespective of containing files larger than 4 KB. This discrepancy arises because ls provides metadata for the directory (information about the directory itself, such as its structure, permissions, timestamps, and other attributes), not their actual size.
How to Check the Size of a Directory in Linux
Apart from the ls -l command, there are other, more reliable ways to check the size of a directory in Linux. The following text presents four methods for determining the directory size.
du Command
The du (disk usage) command in Linux operating systems estimates and displays the disk space usage of files and directories. The basic du command syntax is:
du [option] [directory-or-file]The du command works without any options. However, using the options listed in the table below allows you to customize the command's output:
| Option | Description |
|---|---|
-h, --human-readable | Shows file/directory size in a human-friendly format. |
-s, --summarize | Shows only the total size of the specified directories rather than breaking down the sizes for each subdirectory and file within them. |
-S, --separate-dirs | Excludes subdirectories. |
-x, --one-file-system | Skips directories on different file systems. |
-a, --all | Shows file sizes as well as directory sizes. |
-c, --total | Displays the total disk usage in the last line. |
-X, --exclude=[pattern] | Excludes files/directories that match the specified [pattern]. |
d, --max-depth=[N] | Limits the depth of the directory tree du travels to [N] levels. |
--time | Shows the last modification time for any file or directory. |
–apparent-size | Prints apparent size and disregards the additional space occupied by metadata. |
Print the Size of the Current Directory
Display the current directory size by running du without any arguments:
du
The system lists the contents of the current directory and its subdirectories, with a number representing the object size in kilobytes. The current directory size is the last line.

Print the Current Directory Size in a Human-Friendly Format
Add the -h option to the du command to make the output easily readable:
du -h
Each entry starts with a number and a letter. The number is the space used, and the letter K, M, or G indicates Kilobytes, Megabytes, or Gigabytes.
Find the Size of a Specific Directory
Find the size of a directory different from the current working directory with the du command and the directory path. This example shows how to find the size of the example1 directory located in Home:
du -h ./example1
The output shows the sizes of the example1 subdirectories (example2, example3, and example4) and the size of example1 on the last line.
However, in some cases, the output shows entries with errors. For example, check the size of the var directory with:
du -h /var
The error occurs when the user account lacks permission to access a specific directory. Use the sudo or su command to get access privileges:
sudo du -h /var
The output now shows the size of every var subdirectory.
Show Only the Total Disk Usage of a Directory
To print an extra total line at the end of the output and summarize the disk space usage for all files and directories, use the -c argument:
du -c ./example1
To repeat the same command but print the output in human-readable format, enter the following:
du -hc ./example1
Scan up to a Chosen Subdirectory Level
Limit the scan to a certain subdirectory level with the --max-depth option. For example, to scan only the top-level directory (example1), use --max-depth=0:
du -h --max-depth=0 ./example1
To list the top directory (example1) and the first layer of subdirectories (example2 and example3), use --max-depth=1:
du -h --max-depth=1 ./example1
Print the Disk Usage Summary for a Directory
The -s option prints the disk usage summary for a directory. For instance, print the example1 usage summary with:
du -s ./example1
Print all File and Directory Sizes
Use the -a argument to print the sizes of all subdirectories and files contained in the directory of choice. For example, show the sizes of every file and subdirectory in example1 in a human-readable format with:
du -ha ./example1
tree Command
The tree command displays a visual representation of directories. It uses lines to indicate the location of subdirectories and colors to distinguish directories and files. When used with specific arguments, the command provides directory sizes.
The tree command syntax is:
tree [options]Note: By default, the tree command is not included in some Linux distributions. To install it on Debian/Ubuntu, run sudo apt install tree. To get tree on CentOS/RedHat, execute sudo yum install tree.
Print Current Directory Size
The tree command, when run without any arguments, doesn't show directory size. However, using tree with -h displays directories and files in a human-readable format, including their sizes. To print only directory sizes (without file sizes), add the -d argument. Therefore, print the current directory size with:
tree -hd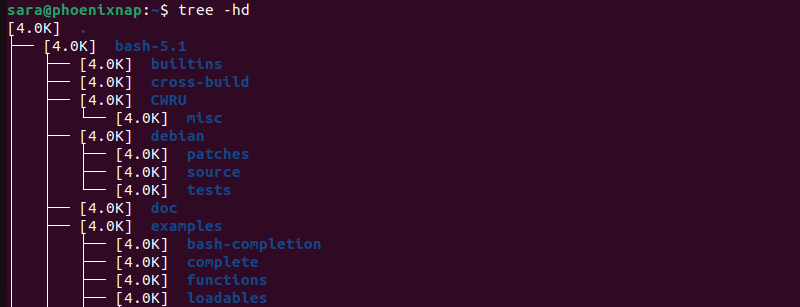
Print a Specific Directory Size
To get the size of a specific directory, run tree with -h and -d arguments. For instance, get the example1 size with:
tree -hd ./example1
The output shows all example1 subdirectories and their sizes in a human-readable format.
Combine tree with du
The tree command also works in combination with du. For instance, find the size of example1 with:
tree -h --du ./example1
The output shows the sizes of example1 and its subdirectories (in blue) and all the files they contain (in red).
ncdu Command
ncdu is a command-line utility that stands for NCurses Disk Usage. It is a text-based disk usage analyzer that provides an interactive interface to analyze disk space usage on the system. The ncdu syntax is:
ncdu [options] [directory-or-file]Note: ncdu is not installed by default on some versions of Linux. To install it on Debian/Ubuntu, run sudo apt install ncdu. To get ncdu on CentOS/RedHat, execute sudo yum install ncdu.
Print the Current Directory Size
Run ncdu without any arguments to see the current directory size. Execute the following:
ncdu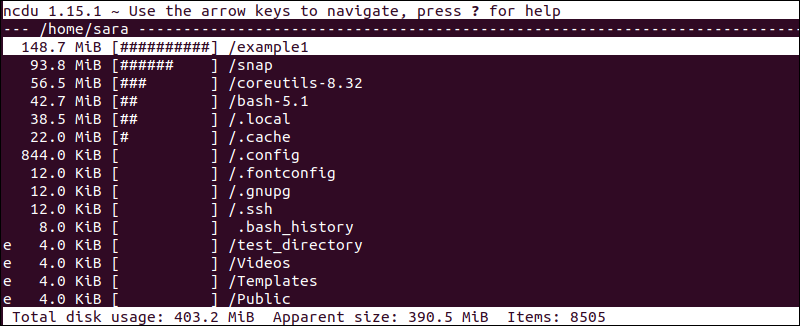
In the upper-left corner, the output displays the current directory being scanned. The output also contains:
- A column that displays the size of directories.
- The visual representation of space usage in square brackets
[##########]. - The file or directory path.
The up and down arrows allow users to select different lines. The right arrow browses into a directory, and the left arrow takes users back.
Find Specific Directory Size
The ncdu command also provides the information of a specific directory. For instance, check Example1 size with:
ncdu ./example1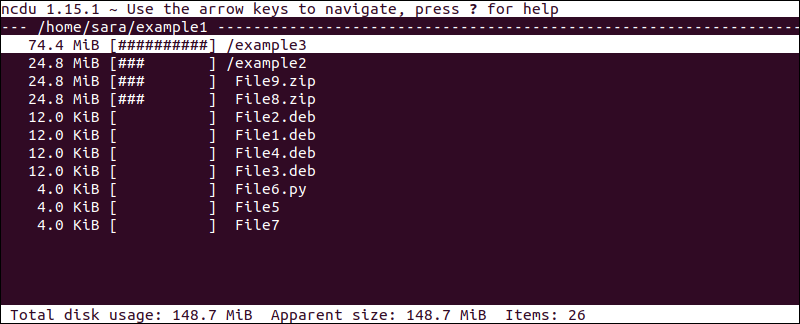
For help, press the ? key inside the ncdu interface. To quit, press the letter q.
GUI Tools
To find the size of a directory in Linux via a graphical user interface (GUI), use the file manager or a disk usage analyzer tool. Both methods are easy to use and are explained in the sections below.
File Manager
To check the directory size via a file manager, take the following steps:
1. Access the Applications menu and search for file.
2. Open the Files tool. The tool name varies depending on the file manager you're using.
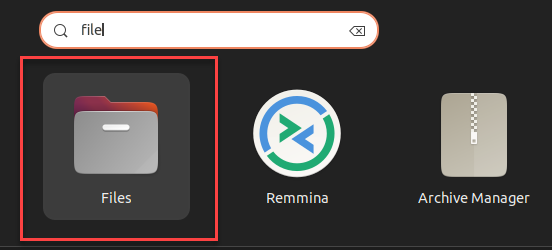
3. Navigate to the directory for which you want to find the size. In this case, it's example1.
4. Right-click the directory.
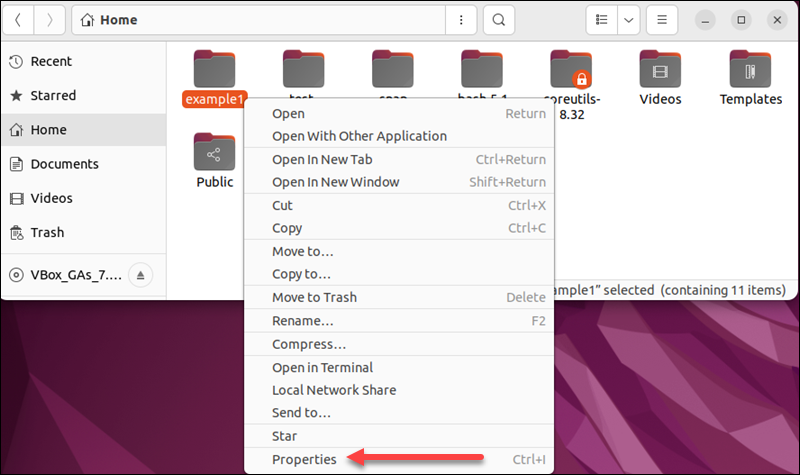
5. Choose Properties or a similar option to view the information about the directory size.
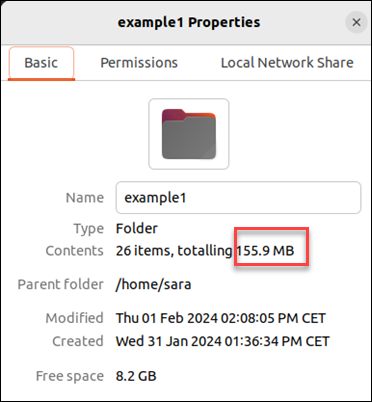
Disk Usage Analyzer
Some Linux distributions include a disk usage analyzer tool that visually displays disk space usage.
1. Open the Applications menu.
2. Search for a disk usage analyzer.
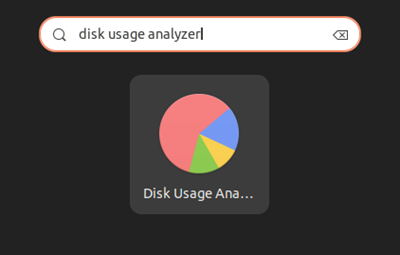
3. Launch the Disk Usage Analyzer application.
4. Select the directory to analyze. In this case, it's example1.
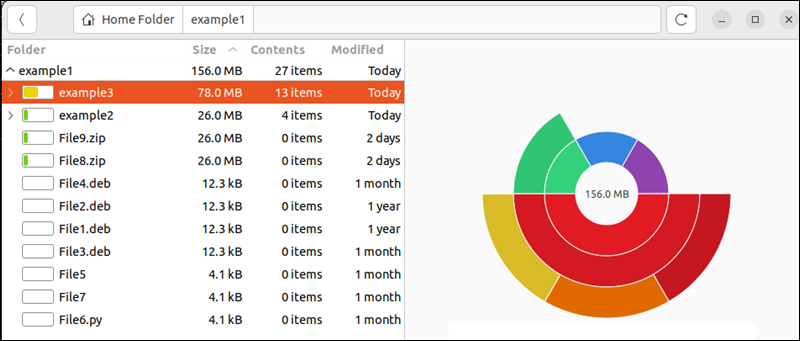
The tool shows a graphical representation of disk space usage.
Conclusion
After reading this article, you know how to use five different options to find the size of a directory in Linux operating systems.
To learn more about directories in Linux, read our article on how to rename directories in Linux.


