In Linux, much of your work is done at the command prompt, also known as the shell, or BASH (Bourne-Again Shell). The shell interprets your commands and passes them to the operating system for execution.
This tutorial will show you how to customize or change your Linux BASH prompt.

Prerequisites
Default BASH Prompt
The default BASH prompt is the one you see when you first open a terminal or command line. It usually looks something like this:
username@hostname:~$Alternatively, it may look like this:
(base) [username@localhost ~]$The first part of the prompt tells you the user who’s currently logged in. The second part identifies the system's hostname.
The tilde sign ~ indicates that the current working directory is the current user’s home directory.
The dollar sign $ means the current user is a standard user.
A root user would be identified with a hash sign #.
Customize Bash Prompt In Linux
Like most Linux applications, BASH reads a configuration file to determine its behavior. This file is in the home directory:
~/.bashrcBefore you make any changes, create a backup copy of your configuration file. Open a terminal window, and enter the following:
cp ~/.bashrc ~/.bashrc.bakNote: The system uses the .bak file extension to indicate a backup.
Change Bash Prompt in Linux Permanently
Open the BASH configuration file for editing:
sudo nano ~/.bashrcIn this file, you should see several different settings. Some of them are descriptive lines in blue, uncommented with a # sign. Some are white, which indicates that they are enabled.
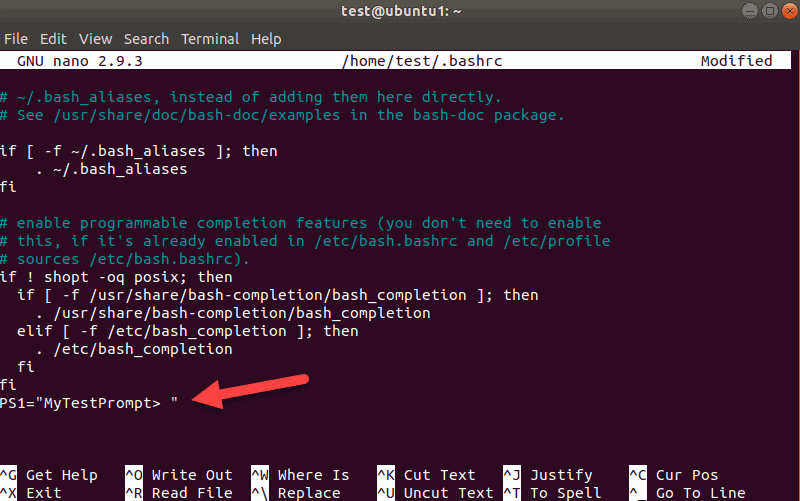
Scroll to the bottom of the configuration file. Add the following line:
PS1="MyTestPrompt> "
You can replace MyTestPrompt> with any string of text you like.
Save the file (ctrl-o > Enter) and exit (ctrl-x).
Refresh the BASH service to apply your changes. Enter the following:
source ~/.bashrcYour command-line prompt should change to the following:
MyTestPrompt>
Note: Learn everything you need to know about working with Bash comments.
Create a Temporary Change to the BASH Prompt
You can temporarily change the BASH prompt using the export command. This command changes the prompt until the user logs out.
Set the BASH prompt to only display the username by entering the following:
export PS1="\u >"The prompt should immediately change to look like this:
username >
You can reset the prompt by logging out, then logging back in.
Popular Custom Options for BASH Prompts
You can use these options in either method: temporarily with the export command, or permanently by editing the ~/.bashrc file.
Display Username and Domain Name
Use the –H option to display a full hostname:
export PS1="\u\H "You should see the hostname in the prompt.

Add Special Characters
Add special characters to the prompt by placing them in order around the special options:
export PS1="\u@\H :"This should display the following:
username@domain:Note: We recommend ending the prompt with a special character or space. You should also place a space, colon, or angle-bracket just before the final quote mark. This method helps users tell the difference between the prompt and the command they’re typing.
Display Username Plus Shell Name and Version
Enter the following to show username, shell name, and version:
export PS1="\u >\s\v "The prompt should change to the following:
username >bash4.4
Add Date and Time to The BASH Prompt
Use the following options to display different formats for date and time:
d. Displays today’s date in [weekday]/[month]/[day]
export PS1="\u@\H>\d "t. Shows the current time in 24-hour notation
export PS1="\u@\H>\t "T. Prints the current time in 12-hour notation
export PS1="\u@\H>\T "A. Shows the current time in 24-hour notation, with just hours and minutes
export PS1="\u@\H>\A "Note: The \u@\H options preceding the date and time option add the username and full domain name.
Hide All Information in the BASH Prompt
Use this to prevent usernames or hostnames from displaying at the prompt:
export PS1="\W > "The output shows the following:
~ >Differentiate Root User From Normal User
The normal BASH prompt displays a $ sign for a normal user. If you log in as a root user, a # sign is displayed. Use the $ code to indicate that the current user is not a root user:
export PS1="\u@\H \W:\$ "More BASH Prompt Options
Here is a list of most of the options you can use for the BASH prompt.
Some of these commands may not work on all versions of Linux.
\a. A bell character.- \
d. Date (day/month/date). \D{format}. Use this to call the system to respond with the current time.\e. Escape character.\h. Hostname (short).\H. Full hostname (domain name).\j. Number of jobs being managed by the shell.\l. The basename of the shell's terminal device.\n. New line.\r. Carriage return.\s. The name of the shell.\t. Time (hour:minute:second).\@. Time, 12-hour AM/PM.\A. Time, 24-hour, without seconds.\u. Current username.\v. BASH version.\V. Extra information about the BASH version.\w. Current working directory ($HOME is represented by ~).\W. The basename of the working directory ($HOME is represented by ~).\!. Lists this command’s number in the history.\#. This command’s command number.- \
$. Specifies whether the user is root (#) or otherwise ($). - \\. Backslash.
\[. Start a sequence of non-displayed characters (useful if you want to add a command or instruction set to the prompt).\]. Close or end a sequence of non-displayed characters.
How to Change BASH Prompt Color
You can change the text color of your BASH prompt. For example, to temporarily change the text of your BASH prompt to green, enter the following:
export PS1="\e[0;32m[\u@\h \W]\$ \e[0m"
Your prompt should have the same text as normal, but be colored green.
Here’s a breakdown of the commands:
• \e[. Begin color changes.
• 0;32m. Specify the color code.
• [\u@\h \W]\$. This is the code for your normal BASH prompt (username@hostname Workingdirectory $).
• \e[0m. Exit color-change mode.
The first number in the color code specifies the typeface:
• 0. Normal.
• 1. Bold (bright).
• 2. Dim.
• 4. Underlined.
The second number indicates the color you want:
• 30. Black.
• 31. Red.
• 32. Green.
• 33. Brown.
• 34. Blue.
• 35. Purple.
• 36. Cyan.
• 37. Light gray.
Additionally, if you combine the bright option with a color code, you get a lighter version of that color. For example, if you use color code 1;32, you would get light green instead of the normal green. If you use 1;33, you get yellow instead of brown.
How to Reset BASH Changes to Default Settings
There are two ways to reset the changes. For temporary changes (using the export PS1="" command), you can reset the default by logging out.
If you edited the \.bashrc file to make permanent changes, there are two methods to revert to default settings:
- Render your changes as comments by editing the file and adding a
#before each change you made. - Restore default settings from your backup by entering:
sudo cp ~/.bashrc.bak ~/.bashrcUnderstanding Different Parts of BASH Prompt
Before you continue, reset your BASH prompt to the default. If you used the export command, log out and log back in. If you edited your ~/.bashrc file, place a # sign before each edit you made and save the file.
The BASH prompt contains four different values: PS1, PS2, PS3, and PS4.
The PS stands for Prompt Statement. So far, we’ve been working with the PS1 value. To see the current PS1 value, enter the following:
echo $PS1Depending on the system, the terminal returns something like this for the default settings:

You might recognize the \u@\h options as the username and host. The w option displays the current working directory.
Now, display the PS2 value:
echo $PS2The system should display just an angle-bracket:
>Repeating the same command for PS3 should be blank.
For PS4, you’ll see a + sign.
Here are the different meanings for the different parts of the BASH prompt:
- PS1. This is the primary prompt display. This is where you set special characters or important information.
- PS2. This is the secondary prompt string. This is usually set as a divider between the prompt display and the text entry. It is also used to display when a long command is broken into sections with the \ sign.
- PS3. This is the prompt for the
selectcommand. - PS4. This is the prompt for running a shell script in debug mode.
Under most circumstances, you’ll be working with just the PS1 option and maybe the PS2 option as well.
Note: Refer to our article Bash Function & How to Use It to learn how to optimize your coding and scripting.
Conclusion
This article explained how to customize your BASH prompt. You can combine the commands and options to get the look and feel you want. Every time you start a shell session in Linux, the system goes through configuration files and sets up the environment accordingly. Check out our guide on how to set, view, and unset environment variables in Linux.
Next, Vim users may want to customize Vim and apply custom color schemes.


