rsync is a versatile command-line utility that synchronizes and backs up files and directories in Linux systems. It allows for efficient data transfers by copying only the differences between the source and destination.
With options for local and remote backups, it supports secure transfers via SSH.
This tutorial will explain how to use rsync to back up data.

Prerequisites
- A Linux system.
- Sudo or root privileges.
- SSH access to a server.
rsyncinstalled on the local and destination machines.
What Is rsync?
rsync synchronizes files and directories across systems, commonly used in Linux. It enables file transfers by copying only the differences between the source and destination, minimizing data transfer time and bandwidth usage.
The tool supports both local file synchronization and remote transfers over secure protocols like SSH. rsync is configurable, allowing users to preserve file permissions, timestamps, and symbolic links during the process. It is used to create backups, mirror directories, and perform incremental updates to large datasets.
How Does rsync Work?
rsync works by comparing the source and destination files to identify differences in content, size, or timestamps. It uses a specific algorithm to ensure only the changed file portions are transferred rather than the entire file.
The process begins with establishing a connection between the source and destination on the same machine or over a network. Once differences are identified, rsync updates the destination to match the source while preserving metadata such as permissions and ownership if configured.
Basic rsync Syntax for Local and External Transfers
The syntax for using the rsync tool is different for local and remote transfers.
For local backups, the syntax follows this basic pattern:
rsync OPTIONS SOURCE DESTINATIONTo transfer files to an external location, use the following syntax:
rsync OPTIONS SOURCE user@IP_or_hostname:DESTINATIONIn both cases, the source and destination are a directory or a file path.
Backing up Data with rsync
rsync simplifies the process of backing up and synchronizing files. It supports local backups and remote transfers, making it versatile for different storage needs.
By using options like archive mode and secure protocols like SSH rsync ensures data integrity while being efficient by transferring only changed portions of files.
The following text explains the precautions you need to take when using rsync. It also elaborates on how to use the command to back up directories both locally and on remote machines.
Rsync Dry Run - Precautions
The rsync utility allows you to manipulate your data in different ways. If you use the wrong option or destination, you may mix your data or overwrite or delete files.
Therefore, use the --dry-run option to confirm the tool does what you want to do and prevent accidental data loss.
While not necessary for simple transfers, use --dry-run when a larger dataset is in question.
Use the basic syntax format and add --dry-run:
rsync OPTIONS --dry-run SOURCE DESTINATIONUse rsync to Back up Data Locally
Backing up data locally with rsync allows you to copy files and directories from one location to another on the same machine. This is useful for creating backups on separate partitions, external drives, or other storage media.
To test how this works, take the following steps:
1. Use mkdir to create a directory to back up:
mkdir -p /home/sara/Documents/Dir1This creates a directory named Dir1 inside the Documents directory, which acts as the source directory for the backup. The -p option ensures the parent directories are created if they don't already exist.
2. Use the echo command to add two sample text files to Dir1 to simulate the data you want to back up:
echo "File 1 content" > /home/sara/Documents/Dir1/file1.txt
echo "File 2 content" > /home/sara/Documents/Dir1/file2.txt
3. Create an empty directory at the backup location where Dir1 will be copied. For this example, the destination is /media/hdd2/rsync_backup:
sudo mkdir -p /media/hdd2/rsync_backup4. Run the following command to copy Dir1 to the backup directory:
sudo rsync -av /home/sara/Documents/Dir1 /media/hdd2/rsync_backup
Use the -v (verbose) option to display detailed output. Also, add -a (archive mode) to ensure files are backed up recursively while preserving their permissions, timestamps, and symbolic links.
5. Confirm that all files in Dir1 are successfully backed up to /media/hdd2/rsync_backup with the ls command:
ls /media/hdd2/rsync_backup/Dir1
Note: To create a new directory at the destination and back up your files there, add a trailing slash (/) at the end of the destination path. If you add the trailing slash to the source, then the source directory will not be created at the destination. rsync only transfers its content in that case.
Use rsync to Back up Data over Network
To back up data over the network with rsync, use SSH for secure file transfers. The remote machine must have an SSH server running, and you need SSH access to that machine to perform the backup.
To ensure the remote machine is set up to allow SSH connections, you need the username and IP address of the remote machine.
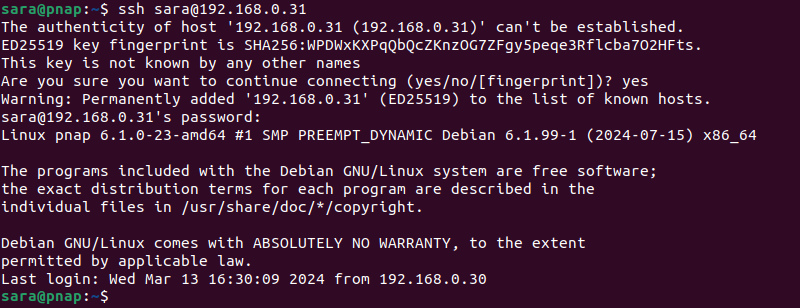
Test the connection by SSH-ing into the remote machine:
ssh [email protected]
Once you connect to the remote machine over SSH, start backing up your data to a location on that machine by taking the following steps:
1. Ensure the destination directory (/home/sara/backup) exists on the remote machine. If it doesn't, access the remote machine and create it with:
sudo mkdir -p /home/sara/backupThe mkdir -p command creates the directory structure, including any necessary parent directories, if they don't already exist.
Note: You can also create this directory by SSH-ing from your local machine and running mkdir.
2. Ensure the directory you want to back up (/home/sara/Documents/Dir1) already exists and contains the files you want to back up.
3. Use rsync to back up the data from the local machine to the remote machine:
sudo rsync -av /home/sara/Documents/Dir1 [email protected]:/home/sara/backup
The output lists the directories and files rsync transferred to another machine.
4. Check if the files are on the remote server by accessing it and running:
ls /home/sara/backup/Dir1
The example we used here assumes that SSH uses the default port. If you need to specify a different port for the SSH connection, use the -e flag and enter SSH options.
To specify port 4455, for example, run the above command in this format:
sudo rsync -av -e 'ssh -p 4455' /home/sara/Documents/Dir1 [email protected]:/home/sara/backupWhen needed, you can delete the source files after you transfer them to another location.
Compress Data when Backing up with rsync
To save space, compress your data before transferring it to another location. You can use the rsync built-in option to compress data or a different tool before running rsync.
To compress data during transfer, use the -z switch with the rsync command.
sudo rsync -avz /home/sara/Documents/Dir1 [email protected]:/home/sara/backup
Another option is to use the zip command to zip your files or directory and then run rsync. For example, zip Dir1 into Dir.zip:
zip -r /home/sara/Documents/Dir1.zip /home/sara/Documents/Dir1
The process creates the ZIP file with the contents of Dir1. Next, transfer that file to another location:
sudo rsync -avz /home/sara/Documents/Dir1.zip [email protected]:/home/sara/backup
Now, you have a zipped copy of your directory on a remote server. You can also do this for local transfers if you want a backup on another drive or partition.
Conclusion
This tutorial showed you how to back up data using rsync locally and over a network. Take caution when using this tool, and do a dry run if you are unsure about the rsync options you want to use.
Next, learn how to exclude files and directories with rsync.


