Netris offers a comprehensive software tool for streamlined network management and enhanced security. This provider-agnostic solution can be deployed on any type of on-premises or cloud infrastructure but requires manual installation and completing multiple steps on each node.
However, phoenixNAP's partnership with Netris brings an automated process of installing Netris software on the servers you provision via the Bare Metal Cloud portal. This integration is a one-stop shop for all clients who want hassle-free Netris Controller and SoftGate node deployment.
Follow the steps in this article to learn how to deploy Netris Controller and SoftGate BMC servers using the BMC portal and how to enable the integration.
What is Netris?
Netris provides the tools necessary for Virtual Private Cloud (VPC) networking abstraction that allows users to create an environment that spans across regions and cloud providers. This software-defined networking solution contains all the features you need to create a secure and robust VPC network. This includes advanced load balancing, firewall, NAT, DHCP, routing, and more.
The Netris software consists of two main components that operate on top of the existing physical network:
- Netris Controller manages the whole Netris environment in all regions and infrastructures. The tool runs on an Ubuntu server and offers centralized networking management via a web console. Only one controller is required, and even if it goes offline, there is no downtime as your network stays operational.
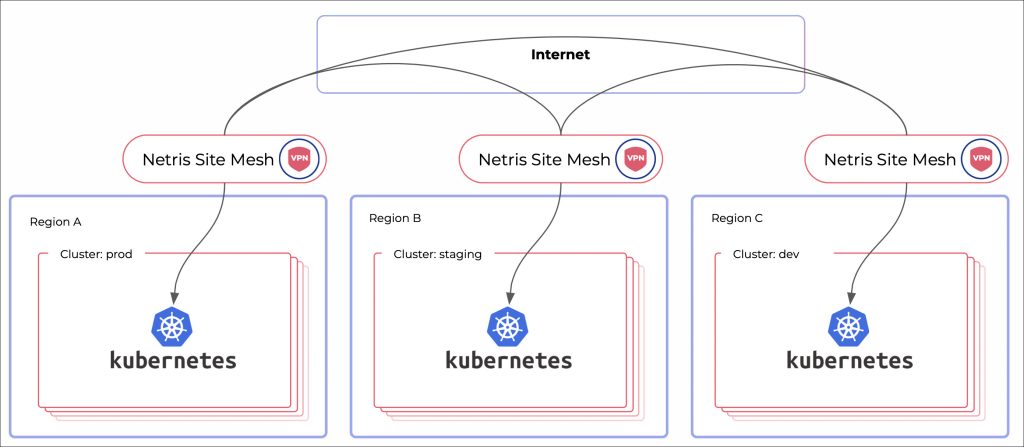
- Netris SoftGate nodes provide all the networking functionalities Netris offers. The essential SoftGate feature is a Netris Site Mesh, which is responsible for forwarding traffic via the public network to other SoftGate nodes in different locations. This allows users to have a unified, secure, and reliable network regardless of the location or hosting solution.
Deploy Netris Controller in BMC Portal
The BMC portal allows you to deploy an Ubuntu Jammy BMC server that automatically installs the Netris Controller software. Only one Netris Controller is required to manage the whole Netris environment across all regions. Follow the regular procedure to deploy a Bare Metal Cloud server with Netris Controller software.
Log into the BMC portal and:
1. Click the Deploy New Server button.
2. Choose a data center location for the Netris Controller server.
3. Select a billing model for the server.
4. Adjust the server quantity if deploying multiple servers.
5. Choose a BMC server configuration. The Netris Controller is optimized to work on any BMC instance.
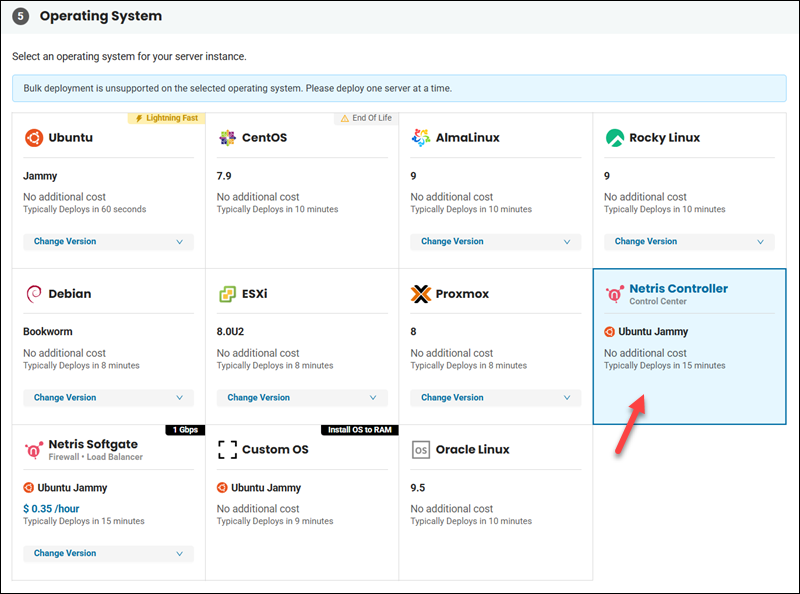
6. Select Netris Controller in the Operating System section. The Netris Controller license is free. Click Next to continue to the Configure Instance page.
7. Enter a hostname. For example, netris-controller. The description is optional, as well as editing the root partition settings.
8. Add a new public SSH key if you want to have SSH access. Since the server runs on Ubuntu Jammy, the SSH access works the same as on a regular Ubuntu Jammy server. Click Next to proceed to the Network & IP Settings page.
9. Assign a previously purchased public IP allocation or buy a new public IP block. The minimum size is /31. Netris Controllers require internet access to work.
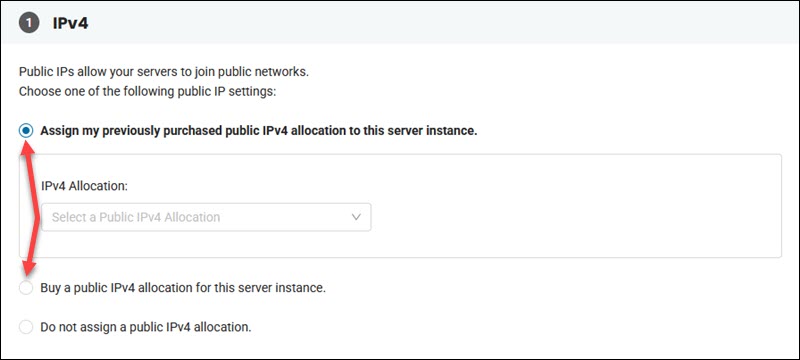
If you choose Do not assign a public IP allocation, you must add the server to a public network and assign a public IP in the next step.
10. The step to add a server to a public network is mandatory if you didn't assign or buy a public IP allocation in the previous step. In that case, click + Add To Network, select a previously created public network, and specify a CIDR and IP address.
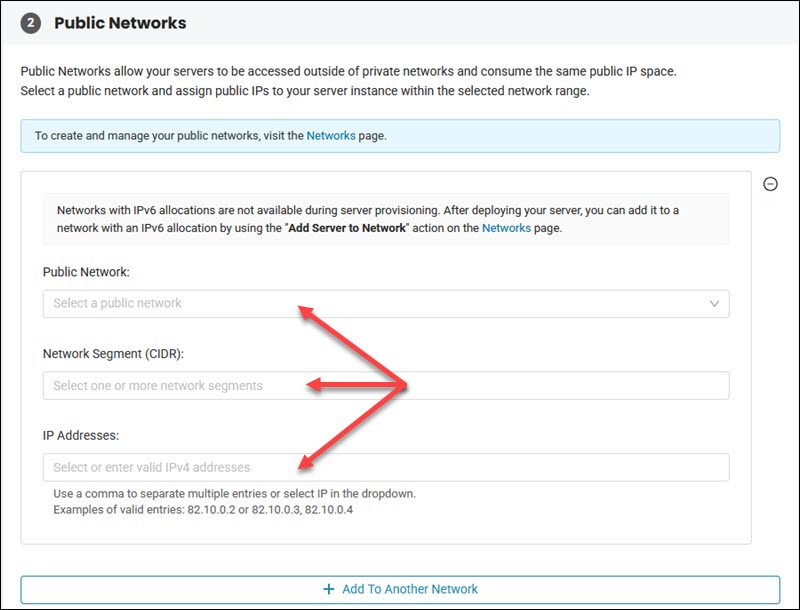
The server automatically gets a private IP address, but you can select a private network and assign up to ten private IPs to the Netris Controller. Specifying a default gateway is optional.
11. Click the Deploy New Server button to get the Netris web console IP and credentials and start the provisioning process. The default username is netris. Check the box to acknowledge and copy the password. We highly recommend changing the password upon initial login.
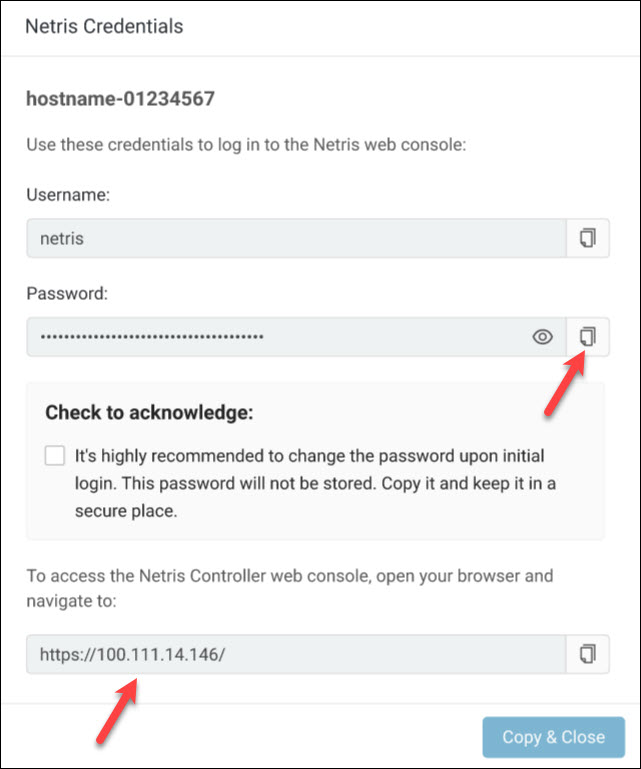
Important: phoenixNAP does not store your credentials. If you lose your password, it is not possible to recover it. Use our free tool to generate a strong random password.
Log into the Netris Web Console and Change Password
Use the provided IP address to access the Netris Controller console via a web browser.
Enter the credentials you saved previously and click the Login button.
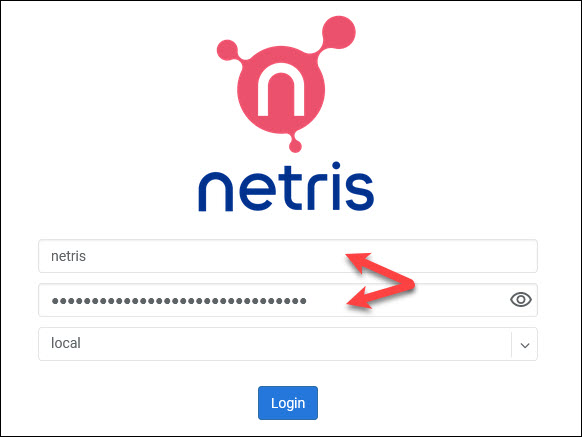
The Netris Dashboard loads and shows the overview of the system. The information populates once you finish setting up the environment.
To change the password, click Settings on the lower left side of the screen and select My Account.
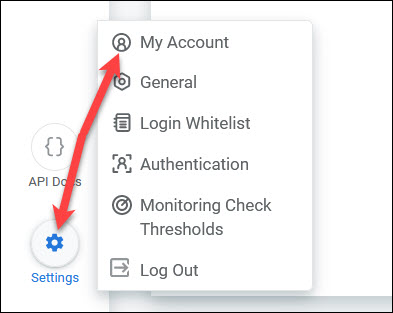
Choose the Change Password tab. Enter the current password and then the desired new password. Click Save to apply the changes.
Add Netris Admin User
To create a new Netris admin user, log into the web console and follow these steps:
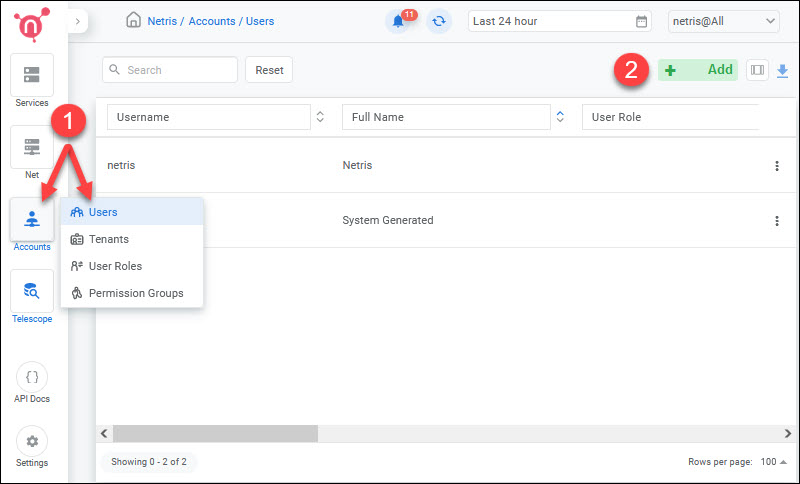
1. Hover over Account and click Users.
2. Click the Add button to open the new user details box.
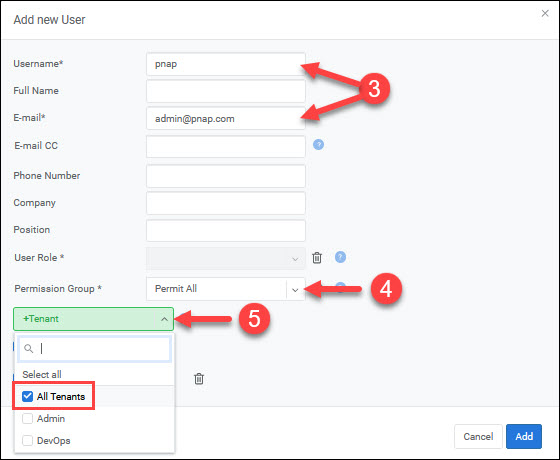
3. Enter a username and email. Other fields are optional.
4. Choose Permit All in the Permission Group dropdown list.
5. Click +Tenant and select All Tenants from the dropdown list.
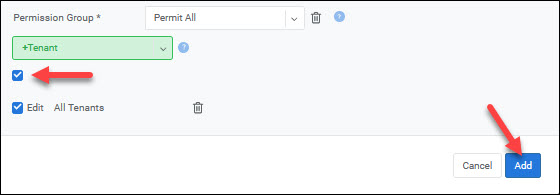
6. Check the box to select the permissions and click Add.
7. Locate the new user on the Users list. Click the three dots on the left side of the screen and choose Set Password.

8. Enter a new password and click Set to save.
Enable phoenixNAP BMC API Integration
Configure the phoenixNAP's Bare Metal Cloud integration with the Netris platform by adding API credentials and defining an individual site for each BMC location you want Netris to manage.
You need the Client ID and Client Secret from the BMC Portal to create a new site in the Netris web console.
Create BMC API Credentials
Log into the BMC portal and follow the steps below to create BMC API credentials for your Netris Controller.
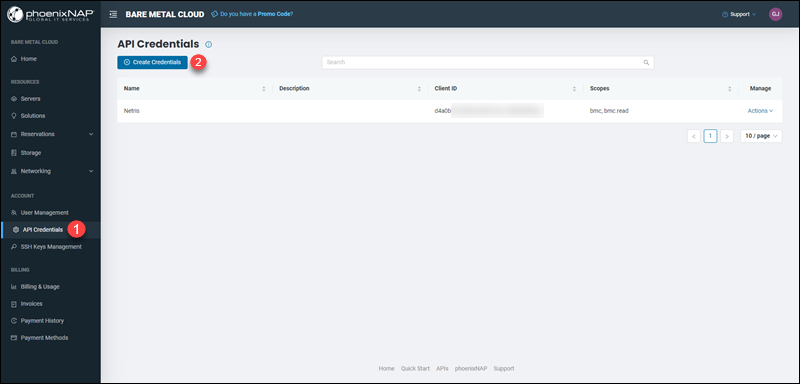
1. Navigate to the API Credentials page.
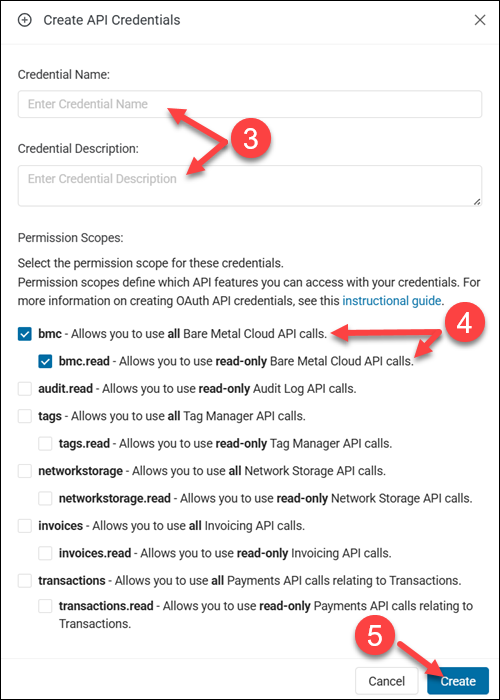
2. Click the Create Credentials button.
3. Add the credential name and optional description.
4. Check the box next to bmc and bmc.read to assign BMC permissions scopes.
5. Click Create.
6. Copy and save the Client ID and Client Secret from the confirmation window. You will enter these credentials in the Netris console.
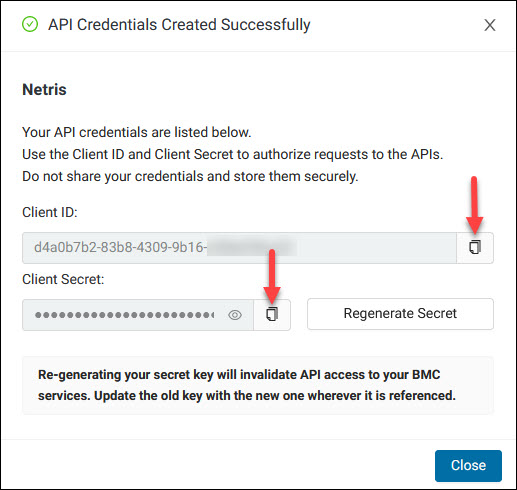
Note: When you enter the API credentials in the Netris web console, the controller will have access to all your resources in the BMC environment and will be able to create networks, manage IPs, etc.
Add New Site in Netris
For the integration to work, you must add a site in the Netris Controller for each BMC location. In the Netris web console:
1. Hover over Net and click Sites.
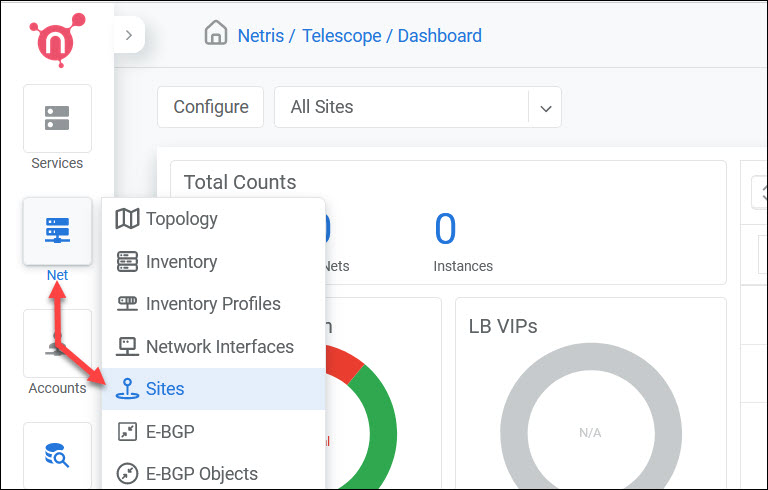
2. Click the + Add button to load the Add new Site popup.
3. Configure the following five fields and leave the default value for the rest:
- Name. Specify a name for the site. We advise you to use the location in this entry. For example, BMC-PHX.
- Switch Fabric. Select PhoenixNAP BMC from the dropdown list. This selection reveals additional fields.
- PhoenixNAP Client ID. Paste the Client ID you saved earlier from the BMC portal.
- PhoenixNAP Client Secret. Paste the Client Secret you saved earlier from the BMC portal.
PhoenixNAP Location. Choose your BMC location from the dropdown list.
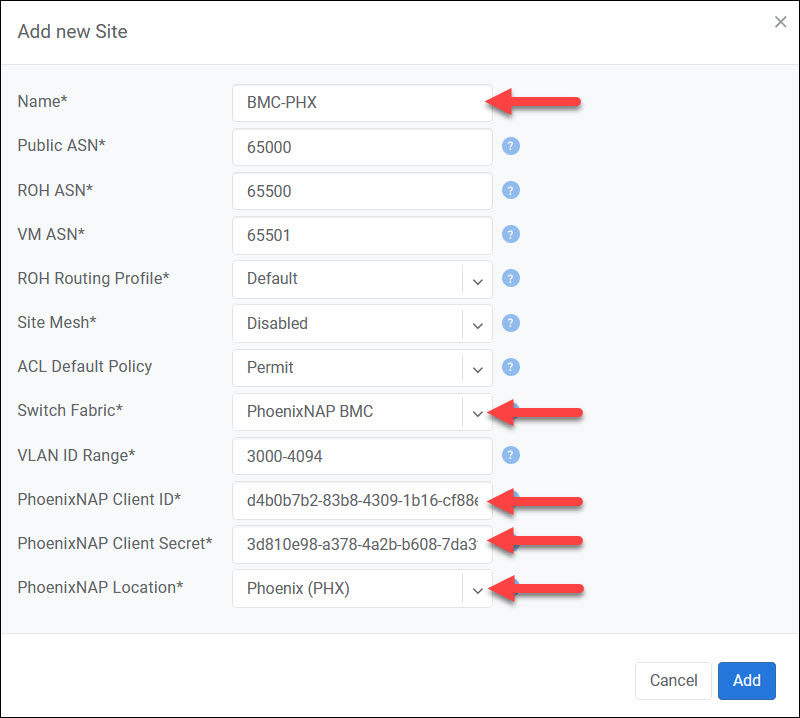
4. Click Add to add the new site.
Repeat the steps for every BMC location.
Deploy Netris SoftGate Nodes in BMC Portal
SoftGate nodes are the components that provide networking functionality in the Netris environment. These nodes require internet access and a private network within that region.
Netris suggests deploying at least two SoftGate nodes per region to achieve the necessary redundancy. The secondary SoftGate takes over seamlessly if there is an issue with the other SoftGate server.
Log into the BMC portal and follow the steps below to provision a Netris SoftGate BMC server:
1. Click the Deploy New Server button.
2. Choose a data center location for the Netris SoftGate server.
3. Select a billing model.
4. Set the server quantity.
5. Choose a BMC server instance. Netris SoftGates are optimized to work on any BMC server configuration.
6. Select Netris Softgate in the Operating System section, choose 1 Gbps, 10 Gbps, or 25 Gbps license, and click Next.
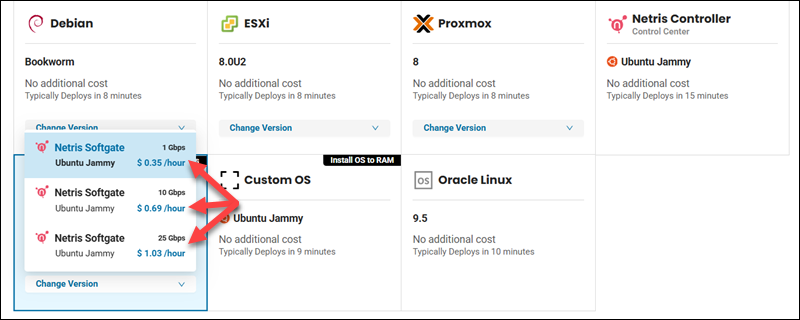
7. Read the advisory note and click Continue to go to the second page.
8. Enter a hostname. For example, netris-softgate1. The description is optional, as well as editing the root partition settings.
9. Fill in Netris Softgate Configuration details:
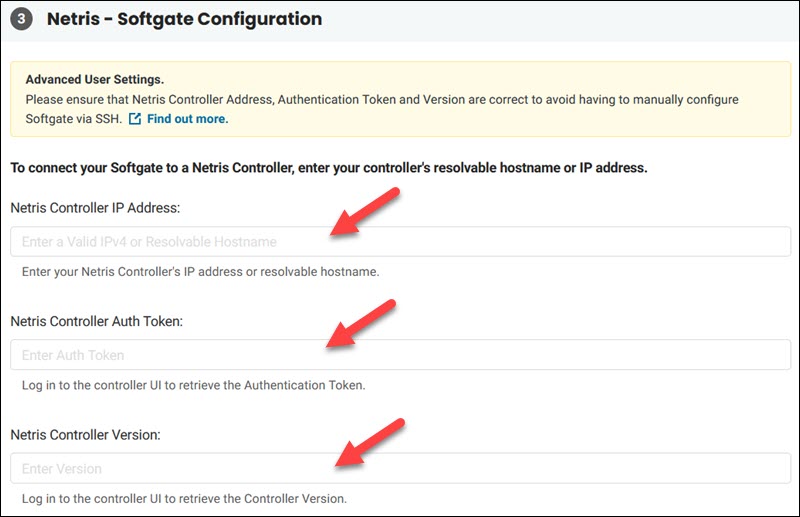
- Netris Controller IP address. Enter the IP you use to access the Netris Controller web console. The information is also available on the BMC portal Servers page. The field also accepts a resolvable hostname.
- Netris Controller Auth Token. Enter the controller Authentication Token. You can find the auth token in the Netris web console Net -> Inventory section. Locate a SoftGate node, click the three dots on the right side of the screen, and click Install Agent. Copy the auth key from the popup box.

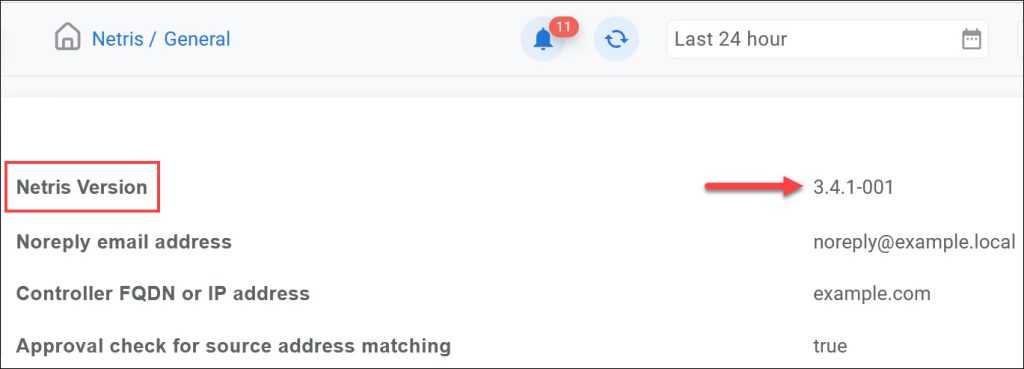
- Netris Controller Version. Enter the Netris Controller version. You can find this information in the Settings -> General section of the Netris web console.
10. Add a new public SSH key if you want to have SSH access. Since the server runs on Ubuntu Jammy, the SSH access works the same as on a regular Ubuntu Jammy server. Click Next to proceed to the Network & IP Settings page.
11. Assign a previously purchased public IP allocation or buy a new public IP block. The minimum size is /31. Netris SoftGate nodes require internet access to work.
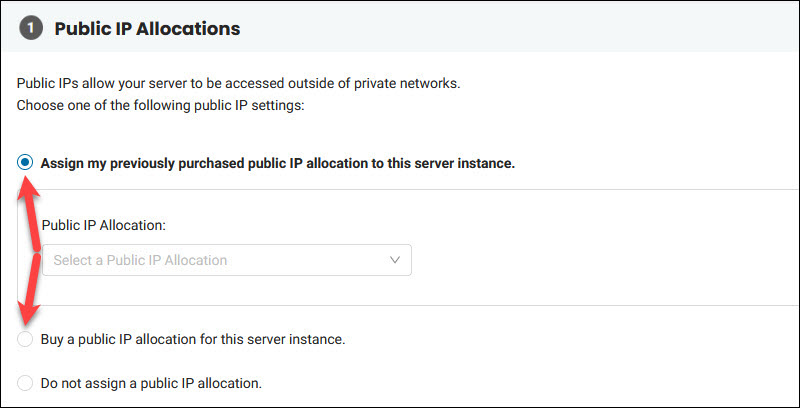
If you choose Do not assign a public IP allocation, you must add the server to a public network and assign a public IP in the next step.
12. The step to add a server to a public network is mandatory if you didn’t assign or buy a public IP allocation in the previous step. In that case, click + Add To Network, select a previously created public network, and specify a CIDR and IP address.
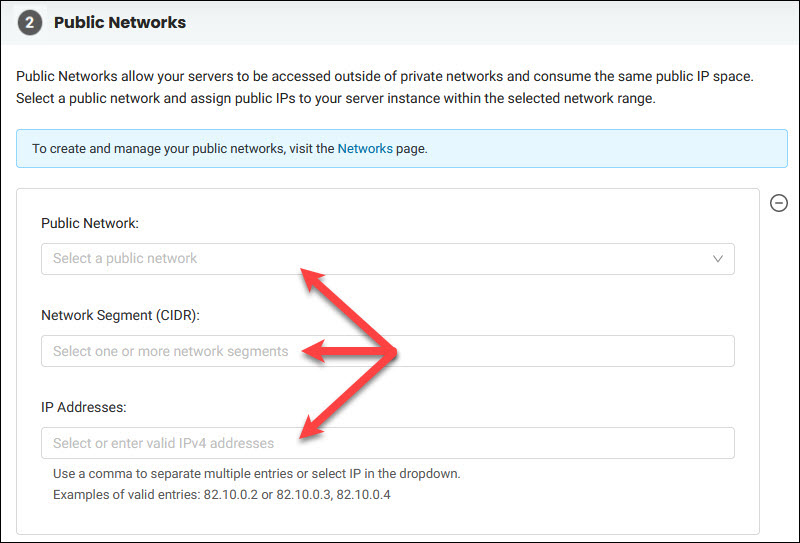
The SoftGate server automatically gets a private IP address within the default private network for your account. Optionally, specify the default gateway.
13. Click the Deploy New Server button to provision the SoftGate BMC server.
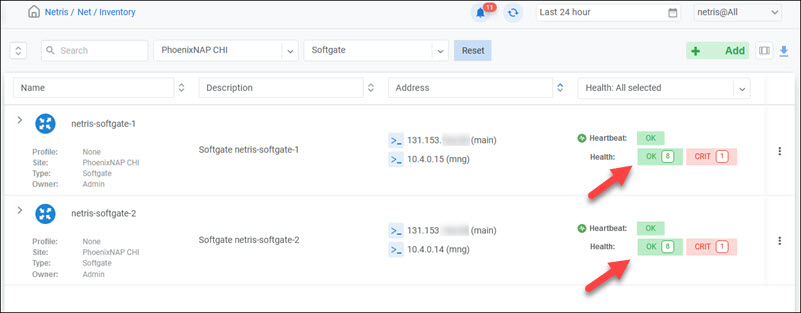
Repeat the same steps for the second SoftGate node. Both servers for the location should now be visible in the Netris Controller console under the Net -> Inventory section. The heartbeat changes from critical to healthy when the controller detects the SoftGate nodes within a minute or two.
Netris Network Configuration
The instructions in the previous sections showed how to set up the Netrix environment and spin up the controller and SoftGate nodes.
For advanced networking configuration, refer to the Netris documentation for the phoenixNAP BMC integration:
- IPAM Setup for Services
- Using NAT services in phoenixNAP BMC
- Using on-demand (elastic) L4 Load Balancer service in phoenixNAP BMC
- Using V-Net (isolated virtual network) services in phoenixNAP BMC
Conclusion
The instructions in this article showed you how to successfully deploy a Netris Controller and SoftGate servers using the phoenixNAP BMC portal. Additionally, you learned what Netris does, what the main components are, and what services this solution offers.
For more information on how to use our portal, refer to the Bare Metal Cloud Portal Quick Start Guide.
