Bare Metal Cloud (BMC) servers provide access to dedicated resources in a single-tenant environment. With quick deployment, seamless resource scaling, and no virtualization overhead, BMC is an excellent choice for any type of environment.
Deploying a BMC server is an easy process, and it takes a few minutes. The guide will show you how to deploy a Bare Metal Cloud server via the phoenixNAP BMC portal.
Prerequisites
- BMC portal credentials. If you are a new client, create an account for Bare Metal Cloud.
Deploy New Server
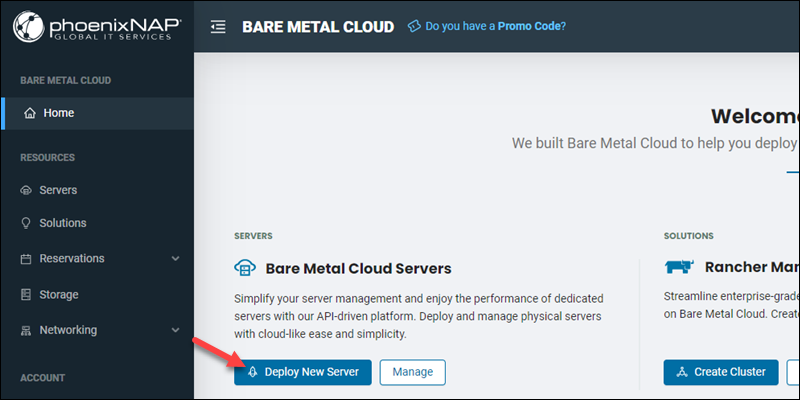
To create a new BMC server via the GUI, log in to the BMC portal. The landing page is the Home tab, where you can create servers and access different BMC features.
Note: If you prefer using an API or CLI to create and manage BMC servers, refer to our APIs on Developer Portal.
To deploy a BMC server, select the Deploy New Server button on the Home or Servers page.
There are three screens with multiple steps in the process, the number depending on the selected OS.
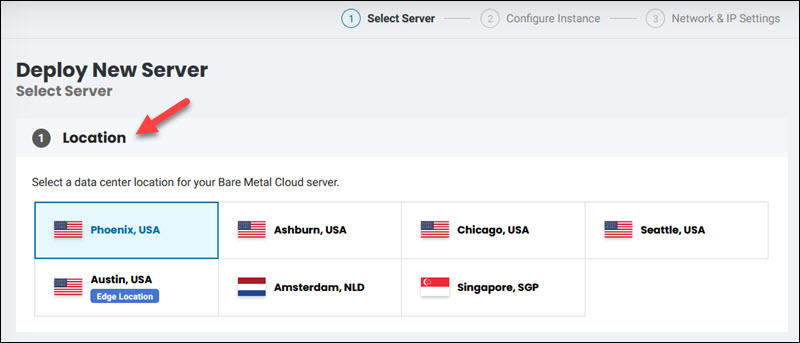
Step 1: Select Location
Select a physical data center location for the BMC server. The pricing is the same for all locations, so you can choose any data center.
There are seven available locations where you can deploy a BMC server:
- Phoenix, USA
- Ashburn, USA
- Chicago, USA
- Seattle, USA
- Austin, USA
- Amsterdam, NLD
- Singapore, SGP
Step 2: Billing Selection
The billing section allows you to select the desired billing model. The available options are:
- Hourly billing. Deploy a server and pay by the hour with no contractual obligations. You will be charged a full hour even if you decommission a server before 60 minutes expire.
- Reservations. Choose a period to reserve hardware resources. 12-month and longer reservations require you to agree to the terms and conditions. One-month reservations have auto-renewal enabled automatically.

Note: To learn more about billing options and choose which is right for you, refer to our Bare Metal Cloud Billing Models guide.
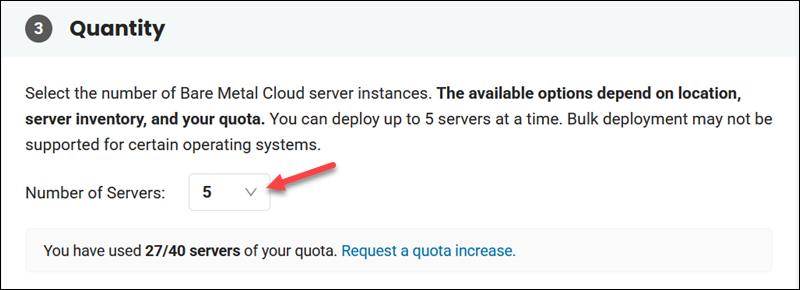
Step 3: Server Quantity
This section enables you to bulk deploy up to five Bare Metal Cloud server instances at once. The server availability depends on the location, quota, and current inventory state.
Bulk deployment is available for the following OSes:
- Ubuntu.
- CentOS.
- AlmaLinux.
- Rocky Linux.
- Debian.
- Virtuozzo.
- Netris Softgate.
- Oracle Linux.
To increase the quota, request a quota increase for the number of servers per account.
Step 4: Server Configuration
This section offers multiple BMC server instances to choose from. Use the Show only immediately available instances toggle to hide unavailable servers and click Select. If the server configuration is unavailable in any data center, click Contact Sales to be informed about availability. Alternatively, select another server.
The Available Locations button appears when a server is available in a location different from the selected data center.
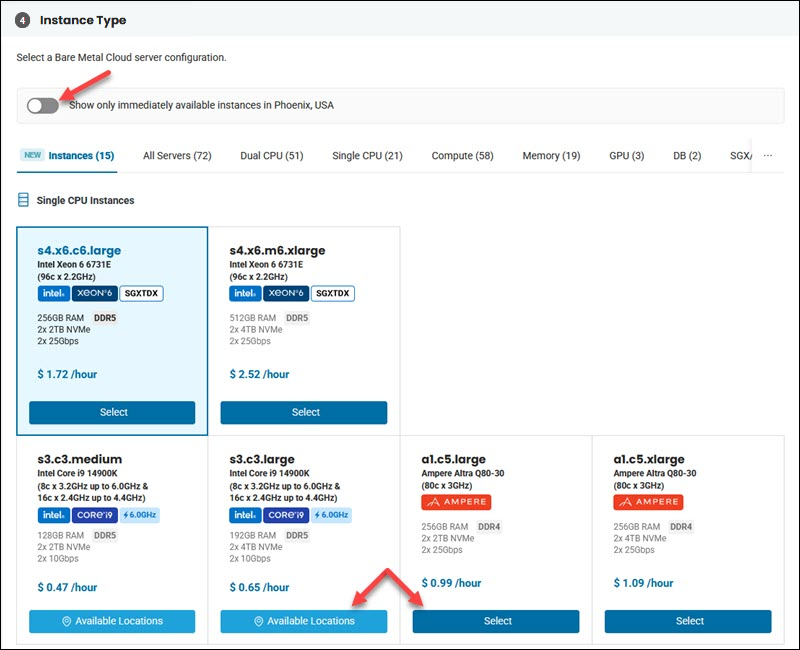
Click the Available Locations button to choose an alternative location for the selected configuration.
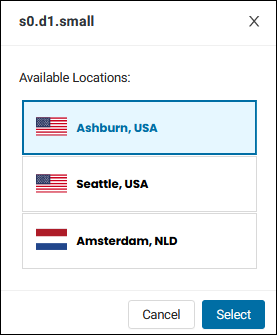
Pick a location and click Select to confirm the choice.
Step 5: Choose Operating System
Select the OS and the version you want to be installed on the server during deployment.
Most operating systems incur no additional cost, while Windows Server OS and Netris Softgate require a fee. The deployment time and price are visible in the operating system cards.
Use the Change Version dropdown menu to select the OS version.
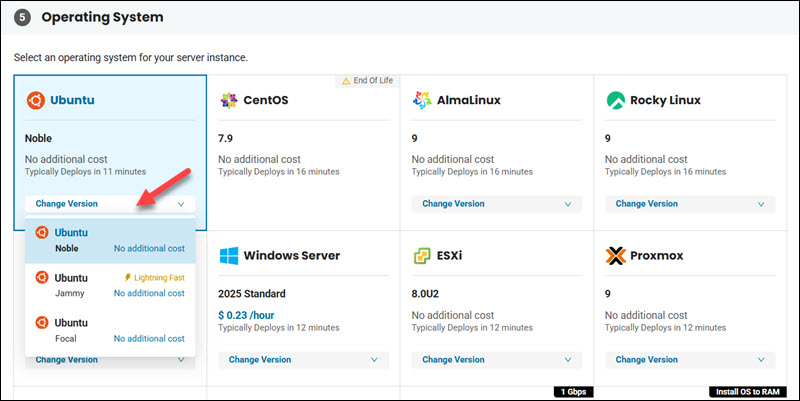
If you select Ubuntu Jammy, the server will be ready in three minutes. Different locations offer quick deployment of different Ubuntu versions.
Click Next to continue to the Configure Instance screen.
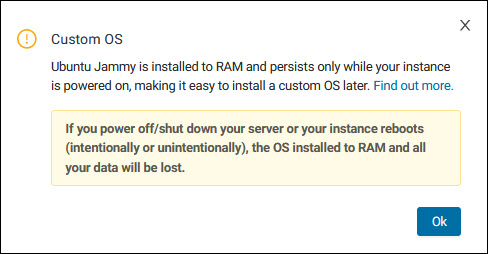
Custom OS
Select the Custom OS tile to provision a server with a fully functional OS located entirely in the system memory (RAM). The BMC Portal currently supports Ubuntu Jammy.

Warning: Since RAM is volatile, if a Custom OS server is powered off or restarted, the OS files and all other data in the RAM is lost.
Read the warning message carefully and click OK to continue.
The operating system installed to RAM is the same as the regular installation on a disk. The only difference is that the disks remain empty since the OS files occupy the RAM space.
When you finish setting up and the Custom OS server boots up, you can use the lsblk tool to check and verify disk space:
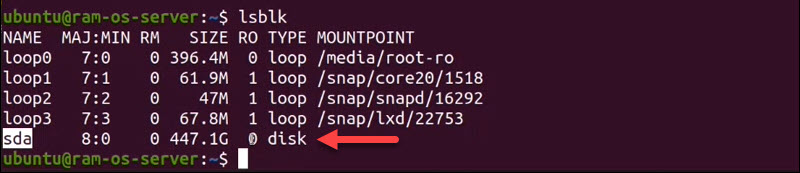
The output shows disks as empty. Every other action or process is the same as with any standard server provision.
Note: Check out our guide on installing Custom OS on BMC.
Netris Controller and Netris Softgate
Netris provides an all-in-one network management solution. Select the corresponding tile to deploy Netris Controller or Netris Softgate as an Ubuntu Jammy server. Follow the steps in the article linked below for each selection.
- Netris Controller. This selection installs the Netris Controller software on your server. This server is responsible for managing the whole Netris solution. Only one controller is required regardless of the number of SoftGate nodes.
- Netris Softgate. This tile deploys SoftGate nodes and offers three licenses: 1 Gbps, 10 Gbps, and 25 Gbps. These nodes provide all the networking features that Netris offers. It is recommended to install at least 2 SoftGate nodes to achieve sufficient redundancy.

GPU Servers
Choosing a GPU server limits the OS choice to three options:
- Ubuntu Jammy. The server requires additional setup to utilize the two Intel MAX 1100 GPU cards. Install the Intel oneAPI Base Toolkit and set up a machine learning environment after provisioning.
- PyTorch. An out-of-the-box AI server with the Intel oneAPI Base Toolkit set up. It comes with the latest available PyTorch Docker image on Ubuntu Jammy.
- Custom OS. The server requires manually setting up a custom OS, GPU driver, and machine learning environment.
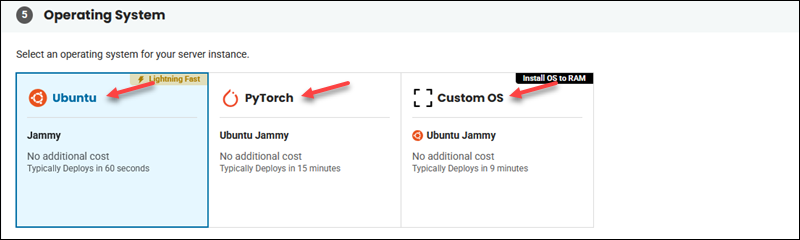
The GPU driver is preinstalled on both OS types. For more information about the post-provisioning steps, see our guide on how to set up ML environments on BMC.
Step 6: Specify Hostname
In the Configure Instance screen, enter a unique server name in the Hostname field. Optionally, add a server description to identify your servers better if the list gets extensive.
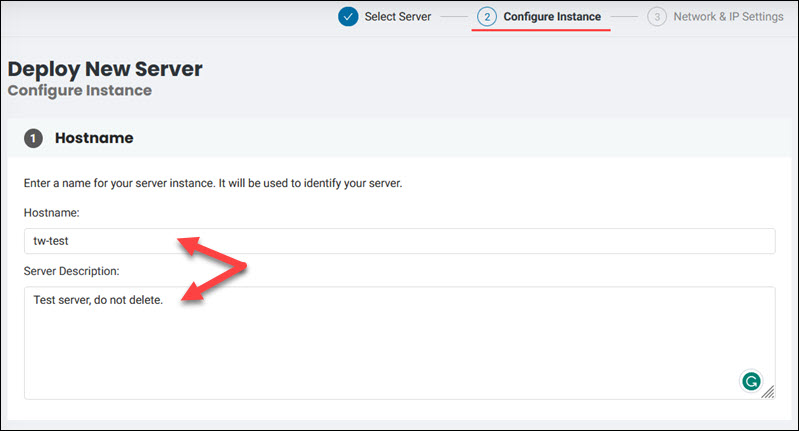
Once the server is deployed, the server description appears at the bottom of the Instance Details page.

(Optional) Software RAID and Root Partition
The Software RAID step appears when the supported instance type and OS are selected. You must select a BMC server with two drives and an Ubuntu or Virtuozo OS. Select between NO RAID, RAID 0, and RAID 1 from the dropdown list.

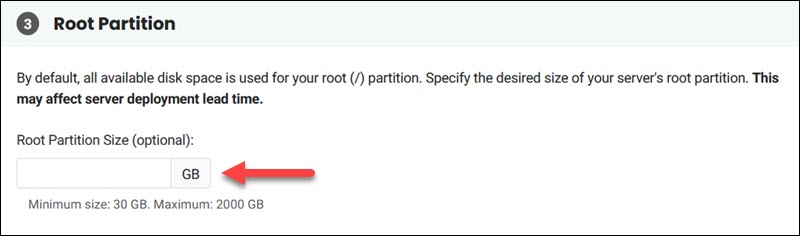
The Root Partition option lets you customize the server's root partition size. If you want to change the size, enter a value between 30 GB and the maximum size of your disks. Leaving the field blank uses all the available disk space for the root partition.
Step 7: Remote Access
The steps for Windows, ESXi, and Proxmox remote access appear only when one of those OSes is selected. For Linux servers, skip to the next step.
To access a BMC server, you can use SSH, BMC Remote Console, or RDP if you choose a Windows server.
Windows - RDP
When deploying a Windows server, an additional Remote Desktop step appears in the Configure Instance screen. This step is optional, and you can only use SSH to access your server.
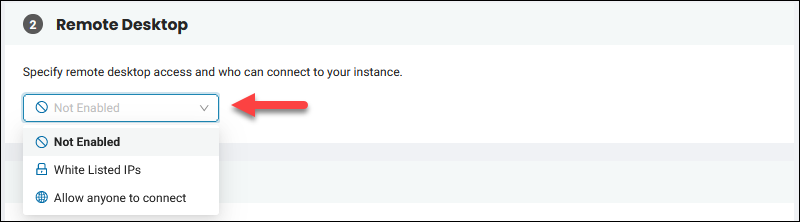
To specify who can access the server using RDP, select White Listed IPs and add the IPs.
Choose Allow anyone to connect if you do not want to restrict RDP access.
To learn more, read our How to Access BMC Windows Server guide.
ESXi Access
When deploying an ESXi hypervisor, an additional step for ESXi access appears.
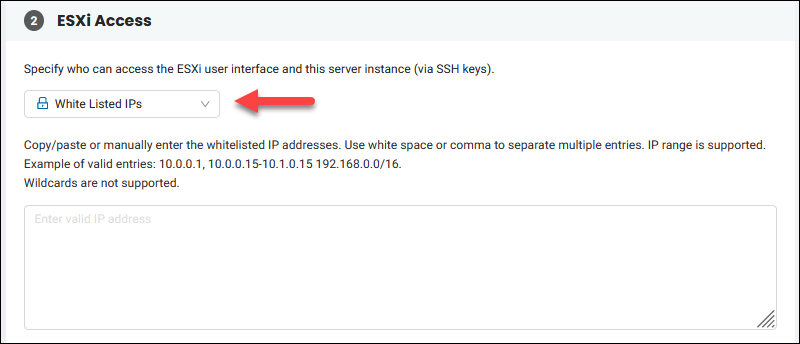
To specify who can access the server and UI via SSH, select White Listed IPs from the dropdown menu. Next, add the IPs or IP ranges.
Choose Allow anyone to connect from the dropdown list if you do not want to restrict ESXi access.
Note: By default, SSH is not enabled on ESXi. If you need assistance, refer to our article to enable SSH on ESXi.
Proxmox Access
The Proxmox remote access step is the same as when deploying an ESXi server. Choose who can connect to the Proxmox server interface.
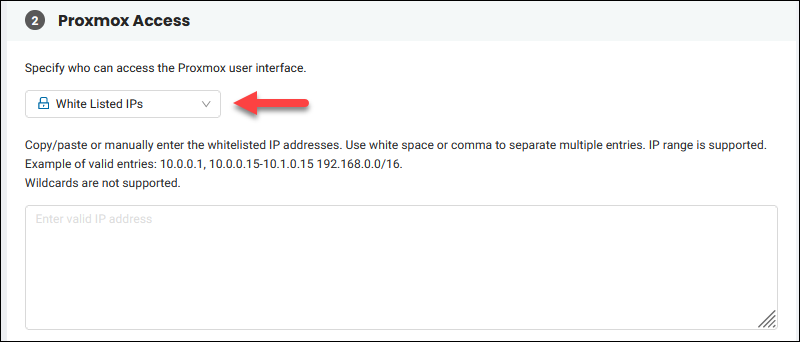
Select White Listed IPs from the dropdown menu and add the IPs or IP ranges to limit access. If you do not want any restrictions, select the Allow anyone to connect option.
If you choose to have public access, the public interface is a part of the bridge interface, and the configuration is matched with the Proxmox default installation.
Note: Refer to How to Connect to a Server Using the BMC Remote Console Feature to learn more about remotely accessing your servers.
Netris - Softgate Configuration
This step appears on the Configure Instance screen when you select to deploy a Netris SoftGate node. Follow the steps from our Netris Deployment guide to connect your SoftGate nodes to the Netris Controller.
Step 8: Add Public SSH Key
The Public SSH Key section shows the default user account information depending on the selected OS. Click the first field to choose a saved public SSH key from the list if you have added it previously in the SSH Keys Management section of the BMC portal.
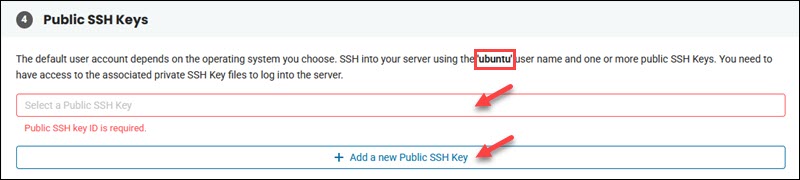
To assign a new public SSH key to the server you are deploying, select the + button and paste the key in the field. Select the same button again to add multiple public SSH keys.
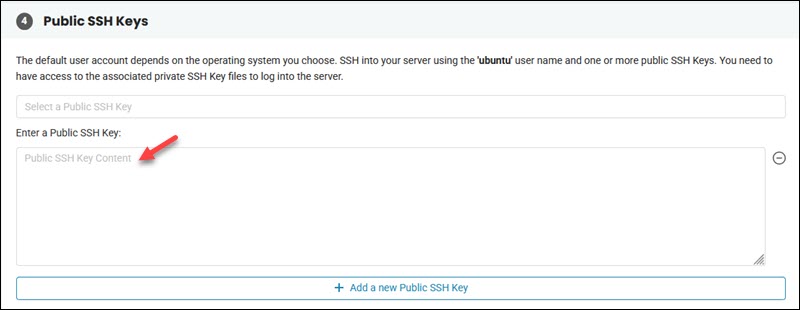
When your server boots up, SSH will be set up and ready to use, except for ESXi servers.
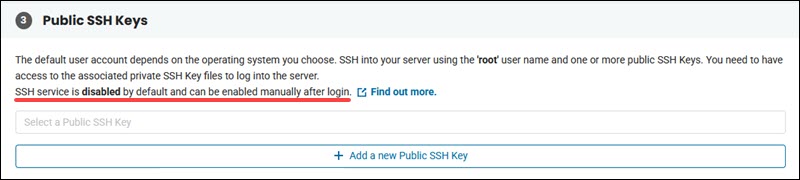
The user root is disabled by default for Linux systems.
Step 9: Cloud Init (Linux only)
When you choose a Linux-based server, the Cloud Init step is visible on the Configure Instance screen.
Select the checkbox to add a custom script to the cloud-init configuration if desired.
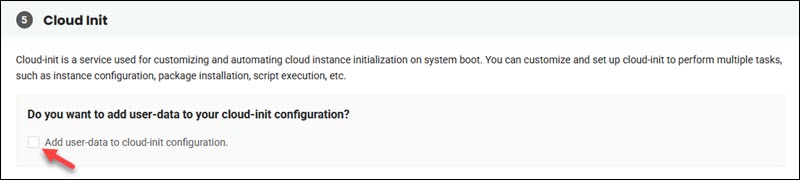
Paste the user-data content in the text field to apply the configuration on the first system reboot. Refer to the Cloud-init article for more information.
Click Next to proceed to the Network & IP Settings screen.
Step 10: Network & IP Settings
The Network & IP Settings screen is the final section in the BMC server provisioning process. Configure public IP allocations and network settings by following the instructions below.
Public IP Allocations
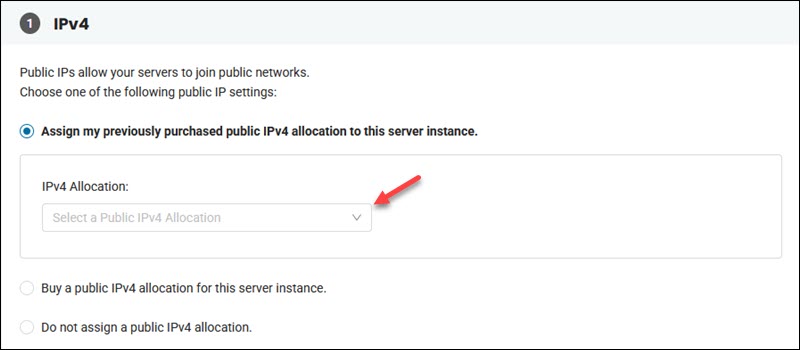
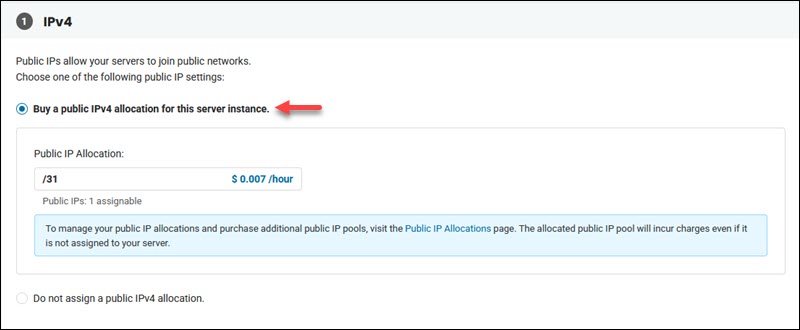
To allow access to your server directly from the Internet, you must assign a public IP allocation. There are three options:
1. Assign a previously purchased public IP allocation. Click the dropdown menu and select a preowned public IP allocation from the same location as the server.
2. Buy a public IP allocation for the server you are deploying. Once you finish deploying the BMC server, the public IP allocation will be assigned.
3. Do not assign a public IP allocation and create a private-only server. The instance will not be accessible from the Internet, only by private networks. In this case, deploy a server with public access to reach the private one or use the remote console feature.

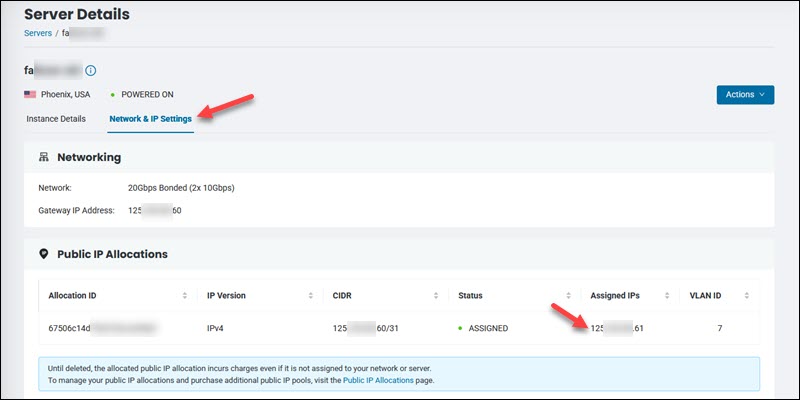
To view the assigned IP addresses after the server is deployed, go to the Servers page. Click the name of the server you created to view the details and select the Network & IP Settings tab.
Note: Read our in-depth guide about BMC public IP management.
Networks and Default Gateway (Optional)
Assign the BMC server to public and private networks. If you assign a server to a private network only, it will not be accessible over public networks.
To assign a server to a public network:
1. Click + Add To Network to reveal the configuration fields in the Public Networks section.
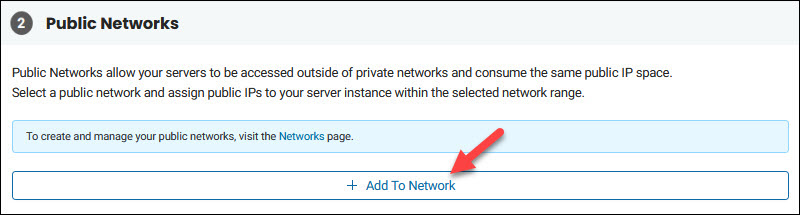
2. Select a previously created public network from the list. The list shows only the networks in the same data center location as the server you are deploying.
3. Specify one or more CIDRs for the selected network.
4. Select the available public IP addresses from the dropdown menu or type in the entries.
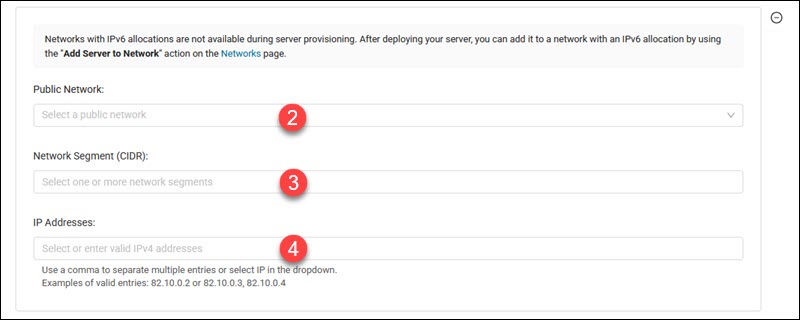
Click the + button again to add the server to another public network.
To add the server to a private network:
1. Click + Add To Network to reveal the configuration fields in the Private Networks section.
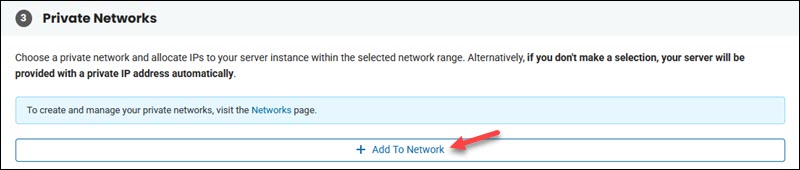
2. Choose a previously created private network in the dropdown list. The menu shows only the private networks in the same data center location as the server you are deploying.
If the selected network is a NO-CIDR network, skip the following IP address selection step. In that case, the network requires configuring IP addresses manually. If the network is a storage network (NFS), the storage IPs show alongside the private IP range.
3. Select private IP addresses from the dropdown menu or type in the valid IPv4 entries. The field is grayed out if you check the box to use your own DHCP server. DHCP is not available if your server has a public IP or if you added it to a public network.

Click the + button again to add the server to another private network.
The default gateway step only appears if you add a server to a public or private network. In that case, enter a valid address from the CIDR you assigned to the server. Leave the field empty to use the Bare Metal Cloud default gateway IP.

Review Configuration and Create BMC Server
The top-right side of the Deploy New Server screen shows the order summary and other BMC server details:
- Server configuration.
- Cost per hour or month without tax.
- The OS and license fee without tax.
- IP allocation reminder.
- Public bandwidth overage fee per GB.
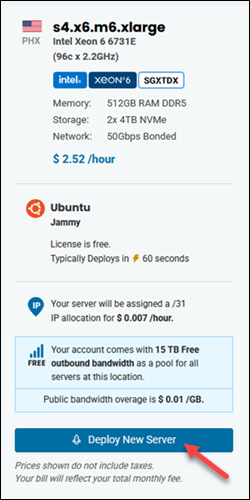
When ready, select the Deploy New Server button to start the process. Depending on the OS you selected, server deployment takes from three to fifteen minutes.
Proxmox, ESXi, RDP, and Netris Controller Credentials
If you choose an ESXi/Proxmox server, Netris Controller, or Windows with Remote Desktop access, a pop-up box with the root/admin password appears as soon as you deploy the server.
Click the checkbox and copy the credentials. We advise you to change this temporary password upon initial login.
For example, this is the ESXi pop-up box:
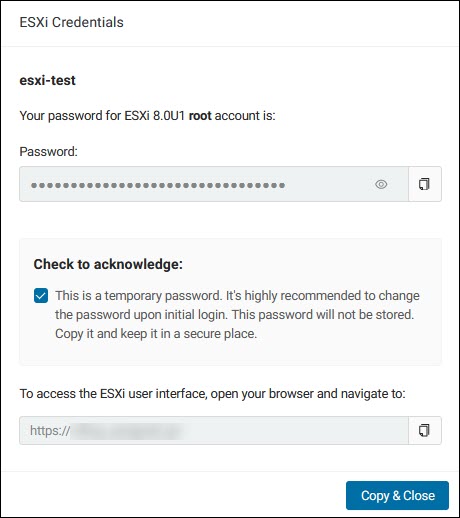
To log into your ESXi or Proxmox server, browse to the indicated IP address (or use the DHCP-assigned IP) and enter the provided credentials.
View BMC Server Status
Once you finish creating a BMC server, you are redirected to the Servers page.
The servers list contains columns with basic information for your Bare Metal Cloud instances. One of them is the Status column with the "Creating Server" message while the deployment is in progress.
Once your server is ready and powered on, the information is refreshed automatically, and the column reflects the status:

When the server is powered on, you can access it and install apps and services.
Note: The default maximum number of server instances in use for new BMC accounts is five. To send a quota increase request, open the profile menu in the top-right corner and click Request Quota Increase.
Conclusion
The BMC portal is a quick and easy way to spin up a new BMC instance when you need it. You can also use an existing reservation to deploy a server. Flexible billing models allow you to use one server for one hour or up to three years. With no noisy neighbors, productivity stays at the highest level.
Make sure to refer to our BMC Portal Quick Start Guide to learn more about the portal's features.