Cloud-init is a tool that automates the configuration of cloud instances during system initialization. For users where default cloud OS templates are not sufficient, phoenixNAP BMC instances come with cloud-init ready to use via the portal or API.
Follow this guide to learn how to utilize cloud-init via Bare Metal Cloud Portal and API to customize task execution, package installation, and other supported tasks.
Prerequisites
- Bare Metal Cloud portal account. Fill out the form to create an account if you are a new user.
- User data for cloud-init to execute.
Cloud-init on Bare Metal Cloud
Bare Metal Cloud instances are deployed with the network configured and ready to go. To customize the system using a cloud-init script, you can provide user data via the BMC portal or API during system provisioning.
Some examples of the cloud-init capabilities on BMC are user creation, setting up SSH keys, installation of specific software packages, etc. You can perform more advanced tasks, such as making an Apache server from a BMC server on the first boot and syncing files to a remote directory.
Supported Formats
The supported datasource for cloud-init configuration data is NoCloud, while the supported user data formats are standard types for cloud-init:
- Cloud-config data. The syntax starts with
#cloud-configor for MIME archivesContent-Type: text/cloud-config. - User-data script. Suitable when you want to execute a shell script. The syntax starts with
#!orContent-Type: text/x-shellscriptfor MIME archives.
When specifying user data via BMC API, use Base64 encoding.
Run cloud-init Script via BMC Portal
When deploying a BMC server via the portal, you can add a cloud-init script (user-data) to run when the server initializes.
To deploy a BMC server and customize the cloud-init configuration with user-data:
1. Log into the BMC portal.
2. Select the Deploy New Server button on the Servers page.
3. Choose the location, billing model, server quantity, and BMC server type.
4. Select a Linux-based OS and click Next.
Note: The server-ready times specified in the portal may differ when running cloud-init scripts.
5. Specify a hostname. Other fields, such as Software RAID, SSH keys, etc., are optional as you can define them using cloud-init.
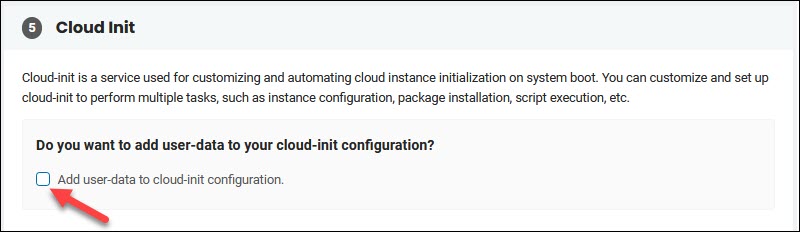
6. Tick the Add user-data to cloud-init configuration box to show the text field.
7. Add the content of your script that begins with #cloud-config or #!. The supported formats are standard cloud-init formats. Refer to the official cloud-init documentation for cloud config examples.
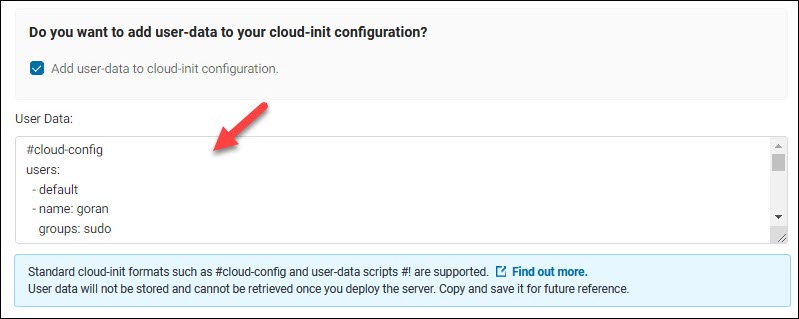
The user-data is then encoded in Base64 and sent to the backend. The data is not visible later as it may contain sensitive information.
8. Click Next and finish configuring the server as needed.
9. Select Deploy New Server when you are ready.
The configuration is saved on a floppy image and mounted whenever user-data is provided in the field above. The server then needs to reboot to apply the cloud-init configuration from the floppy. The script executes on every reboot but only applies the per-boot configuration.
Run cloud-init Script via BMC API
The BMC API lets you provision servers with the cloud-init configuration specified in the Base64 encoding. Add the custom script using the userData property under the osConfiguration -> cloudInit object.
Note: Due to security concerns, userData provided in the API request will NOT be returned in the response.
Use the POST method and the following HTTP request:
https://api.phoenixnap.com/bmc/v1/servers For example, the request body to create an Ubuntu Bionic server with a cloud-init script looks like this:
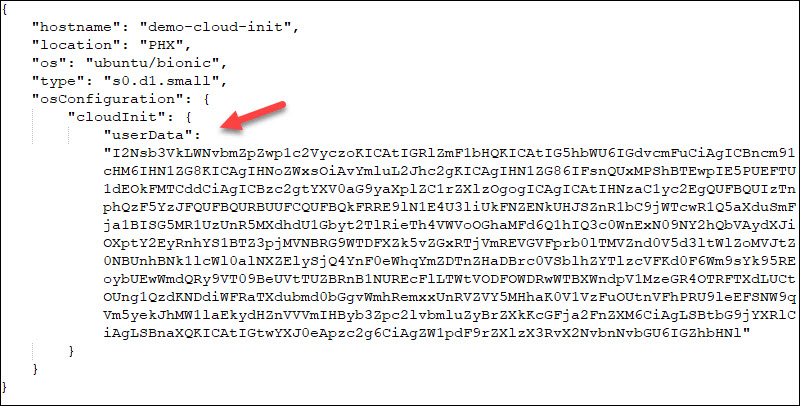
When decoded, the userData shows the following actions:
#cloud-config
users:
  - default
  - name: goran
    groups: sudo
    shell: /bin/bash
    sudo: ['ALL=(ALL) NOPASSWD:ALL']
    ssh-authorized-keys:
      - ssh-rsa AAAAB3NzaC1yc2EAAAADAQABAAABAQCSq9DkAH9Joi+8mx0wtYEtC+6lIvtfSaKFUI2xwYj9lwbpOXYQSmEpO/9QsxLcIlY5j+Xg/7ssrgyYeUkUL/Lc1JUSuiPf2Hzsciu1HwvP5P+DldlWq8Ig6ORX8W6bq9xX/c7UmRrdoY9ynJ1LciAzYckx8KI9eeRDep00obl2xifE8PBJ8Ufyb1wPnxrkVomnAOnFGrV8hXrBBQsZRjNvQ/wposrcib9OJw/WtiVKgru1codcDDOck9SEVKxtNg7k5om2J5IHljYaTVu+HAuP0IxVNe6s4Oc4ZWJ675TphA180HzHdVXAoiZzzvYMQxi1xXFFrLQlZLAf2HEhjt5P rsa-key-20221020
packages:
  - mlocate
  - git
  - kpartx
ssh:
  emit_keys_to_console: false
To verify the cloud-init configuration worked properly, run this command in the terminal when the server boots up:
cloud-init query -aThe output shows all metadata consumed: complete network configuration, issued commands, and everything you used in the script.
Conclusion
The guide showed you how to add user-data to customize cloud-init configuration via the BMC portal and API.
Make sure to enter the data correctly to ensure the script executes properly.