The Bare Metal Cloud APIs provide additional flexibility when working with phoenixNAP BMC products. With the APIs herein, you can create and manage servers, organize resources by using tags, monitor system logs and API activities for your BMC account, create and manage networks for your BMC instances, etc.
In this article, you will learn how to use different Bare Metal Cloud APIs.
BMC Server API
The Bare Metal Cloud Servers API allows you to perform essential server management tasks such as creating, deprovisioning, powering off, powering on, rebooting, and shutting down your server. Additionally, you can manage SSH keys, allocate public IPs, assign servers to networks, and more.
All URLs are relative to:
https://api.phoenixnap.com/bmc/v1/serversThe supported methods are:
- POST. Create a new server.
- GET. Show all servers for the account.
To work with a specific server, provide the server ID in the URL:
https://api.phoenixnap.com/bmc/v1/servers/{serverId}The following methods are supported:
- GET. Fetch details for the specified server.
- PATCH. Update the hostname and description of the specified server.
Note: Refer to the Bare Metal Cloud API page on our developer portal for the complete list of APIs for managing individual servers.
Create Server
Request a new BMC server using the POST method and the /servers endpoint. The request body must contain the following fields:
- hostname. The name of the server without spaces.
- os. The operating system to install on the server.
- type. The type of server to provision.
- location. The data center location of the server.
The complete list of fields and supported values for a detailed server configuration during provisioning is listed on the POST /servers page.
For example, create an Ubuntu Bionic s1.c1.small BMC server located at Phoenix with:
{
  "hostname": "my-server-1",
  "os": "ubuntu/bionic",
  "type": "s1.c1.small",
  "location": "PHX"
}Note: You can check for product availability using the Billing API. Send a GET request to /billing/v1/product-availability and provide the product code (e.g., "s1.c1.small") to see the resource's availability.
When the server is created with the minimum parameters, the system sets pricingModel to hourly billing and configures networkType. The default behavior for network configuration on server provision is:
- The system assigns the server to the default private network. If one does not exist, a new private network is created.
- A new minimum-size IP block for the OS is purchased and assigned to the server.
- The server DNS is configured with Google's public DNS (8.8.8.8).
force Query Parameter
The BMC Server API supports the force query parameter so power users can perform advanced server and network configuration by bypassing specific validation checks. The default setting is false.
Warning: The parameter controls advanced features. It should be used with caution because it can lead to nonfunctional setups.
Setting the force query parameter to true with the BMC Server APIs allows you to:
- Provision a server assigned to a public and/or private network but without consuming any IPs. This action is also possible post-provision when adding a server to a public or private network.
- Provision a server with private or public IP addresses already in use by another resource in the network. This action is also possible post-provision when adding a server to a public or private network.
- Provision a server and select a gateway address that does not point to any resource.
Note: When adding a server to a network or adding an IP block after a server is provisioned, phoenixNAP handles the switches’ side while you must complete the whole network setup on the actual server.
Provision New Server or Add an Existing Server to a Network with no IPs Defined
Define the network configuration for your server using the privateNetworkConfiguration and publicNetworkConfiguration objects.
For example, use the /servers endpoint to create a BMC server with the custom private network and an empty list in the ips field:
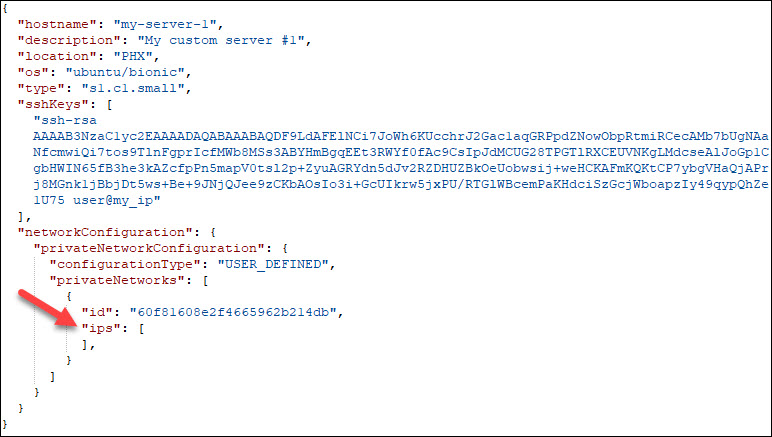
When the force query parameter is false, and DHCP is also set to false, you get the validation error: “No IP addresses to set up is only supported in case of DHCP enabled or when the force flag is set". Setting force to true in combination with an empty ips array allows the request to pass, and the server is created with a network without any IP addresses. Omitting the ips field is not supported.
The force query parameter functions the same when adding an existing server to a private or public network using these endpoints:
/servers/{serverId}/network-configuration/private-network-configuration/private-networksand
/servers/{serverId}/network-configuration/public-network-configuration/public-networksNote: Defining a public network without IPs is only possible when you are not defining a gateway IP.
Provision New Server or Add an Existing Server to a Network with an IP Address Already in Use
The BMC Servers API with the force query parameter set to true lets you reuse an already assigned IP address. By default, the system does not allow using the occupied IPs to avoid IP conflicts within the network.
For example, if you have server A with IP 10.0.0.20 in your private network and you want to add server B to the same network using the same IP, you will get this validation error:
“Error on field ‘privateIpAddresses’: private IP 10.0.0.20 is already in use”
The same error occurs with public networks and when creating a new server with an IP that is already in use in that network. Therefore, if you want a custom public or private network where two servers advertise the same IP, you can bypass the validation with the force flag.
Similarly, during server deprovisioning, the assigned IPs cannot be reused instantly. You must wait while background processes free the resources which could take up to 20 minutes, even though the system does not show the original IP as occupied. However, you can reuse the IPs immediately and add a server to a private or public network with the force flag set to true and these endpoints:
/servers/{serverId}/network-configuration/private-network-configuration/private-networksand
/servers/{serverId}/network-configuration/public-network-configuration/public-networksUpdate Network Configuration on Server
The force flag lets you reuse the already assigned IPs when updating the network configuration of a public or private network on a server. For example, if you deprovision a server and you want to reuse its IPs for another provisioned server assigned to the same network without waiting for the resources to be freed, use the PATCH method, and set the force flag to true.
The endpoint to update a server’s public network configuration is:
patch /servers/{serverId}/network-configuration/public-network-configuration/public-networks/{publicNetworkId}To update a server’s private network configuration, use
patch /servers/{serverId}/network-configuration/private-network-configuration/private-networks/{privateNetworkId}The PATCH method also supports setting the force parameter to true in combination with an empty ips array. This allows the request to pass and updates the server's network configuration.
Provision a Server with the Gateway Address without Preassigned Resources
If you define a gateway address with no resources assigned and try to create a server with force set to false, you will get an error. For private networks, the error is:
“The provided gateway address 10.0.0.1 did not match an owned resource’s Private IP.”
Setting the force query parameter to true lets you skip gateway validation. The system then does not check if a resource is assigned to the specified gateway address and completes the request.
Server Tag Manager API
The Tag Manager API lets users create tags to organize and group servers. You can also filter the resources by tag names or a tag name and value. Hence, tags are key-value pairs that simplify the Bare Metal Cloud server management.
The Tag Manager API uses this HTTP request:
https://api.phoenixnap.com/tag-manager/v1/tagsand the following methods:
- POST. Create a new tag in the tag inventory.
- GET. Retrieve information for your tags and the tag inventory.
- PATCH.Modify/update a tag from the inventory.
- DELETE. Delete a tag from the inventory.
Note: Refer to the Tags API page for in-depth details.
Create Tag
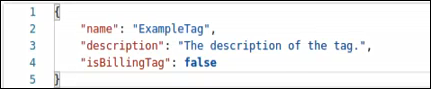
To add a tag using the POST request requires the tag body to contain a tag name and the value for the isBillingTag property (true or false). This property instructs whether the invoice should use the tag to display the servers with recurring costs. The tag description property is optional.
Note: A tag name is case sensitive, must be unique, and 100 characters maximum. It is not possible to create two tags with the same name even if you specify different values for other properties.
For instance, to create ExampleTag, use the /tags endpoint and:
Once you create a tag, it gets a unique ID. You can use the tag name or ID for API requests.
View Tags and Tag Inventory
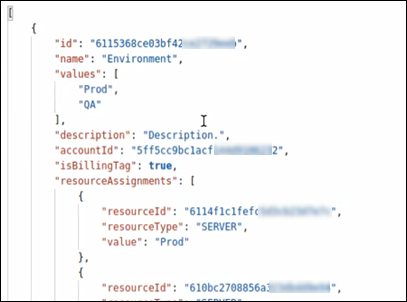
Use the GET request and the /tags endpoint to view all tags that belong to your BMC account. In our case, we have the tag Environment and the ExampleTag we created above.
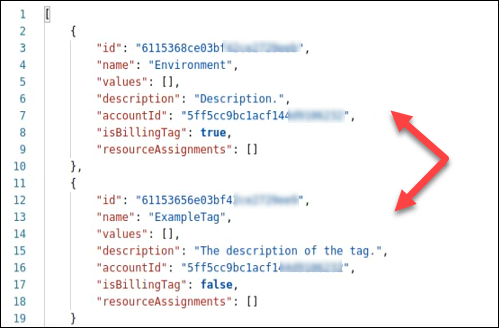
The output lists all tags in the inventory with all properties and their current values.
To view a specific tag and its properties, use the /tags/{tagId} endpoint.
Modify a Tag
Use the PATCH method with the /tags/{tagId} endpoint to update a tag's values. For example, change the isBillingTag from false to true.
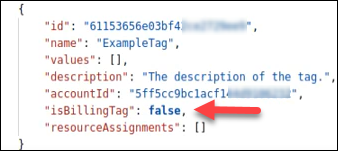
If you patch the isBillingTag property, the tag changes on all assigned resources.
Delete a Tag
To completely remove a tag from your BMC account, use the DELETE method with the /tags/{tagId} endpoint.
Note: A tag is automatically removed from any assigned resources upon deletion.
Assign Tag to Server Resources
Use the PUT method and the /servers/{serverId}/tags to assign a tag to a BMC server. The tag body must contain a tag name, while the value property can be left empty. However, if this property is populated, you can have multiple servers using the same tag with a different value.
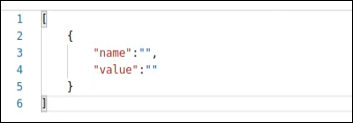
For instance, set the environment tag with the value prod to one BMC server and use the same tag name for another server but with the value QA. Therefore, you can assign one tag to multiple servers but use a different value.
Note: The maximum number of tags per BMC server is 20.
When you request tag details, the body of the tag shows the fields gathered from the server it is assigned to. When the same tag is assigned to multiple BMC servers with different values, then the tag shows that information as well.
If you remove a tag assignment from a resource, the system updates the tag details automatically.
Having tags assigned to servers facilitates resource usage organization when different teams work on multiple projects. Additionally, businesses get a clear breakdown in the invoices for the server usage for their BMC account.
Filter Servers by Using Tags
You can filter BMC servers by using a tag name and tag value if a server has any tags assigned.
Use the GET method in this format to filter server resources:
/servers/?tag=tagName.tagValueUse multiple query parameters to refine the filtering:
/servers/?tag=tagName.tagValue&tagName2.tagValue2Specifying the tag value is optional, so use the tag name to filter the server resources only.
/servers/?tag=tagNameFor example:
/servers/?tag=EnvironmentNote: Tag names are case-sensitive. If you make a mistake in a tag name you will not get any results, even if the tag value is correct. Therefore, you must specify a tag name and a tag value verbatim.
The query result shows all servers that match the filtering parameters.
Audit Log API
The BMC Audit Log API allows you to monitor API calls and activities on your Bare Metal Cloud account. The system records user actions by creating event logs for each API action automatically.
With this API, you can read the audit log entries and maintain the required security level. The Audit Log API provides business owners the transparency they need to maintain operational best practices.
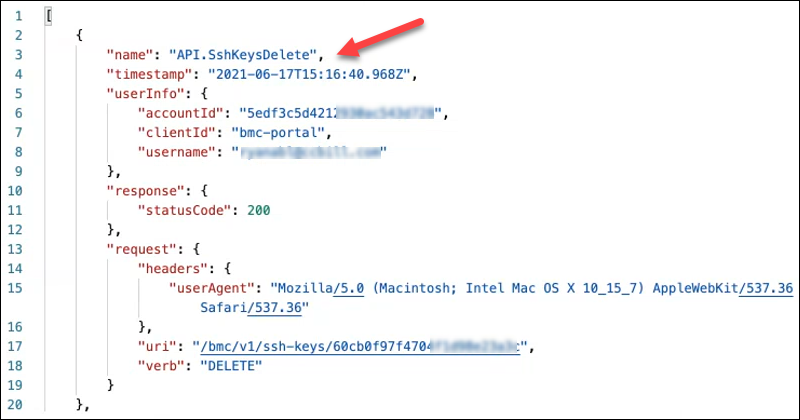
For example, the system logs when there is an error message or action such as powering off a server, restarting, billing changes, deleting an SSH key, and similar.
Users can see audit logs for their own accounts only.
Retrieve Event Logs
To retrieve API event logs, use the GET method and this request:
https://api.phoenixnap.com/audit/v1/eventsNote: Date and time are represented in the UTC time zone.
Use different query parameters to customize the filter result:
- Limit. Instructs the API to limit the response output to a specified number of events. The endpoint is
/events?limit=value. - Verb. Shows the results for the specified verb events. For example, to see the POST events, use the
/events?verb=POSTendpoint. - Username. Displays the API event log for the specified username. The endpoint is
/events?username=value. - Order. Set the sorting order of the event audit log according to the time stamp in ascending (ASC) or descending (DESC) order. The default is DESC if no value is specified. The endpoint is
/events?order=ASC_or_DESC. - Date. Filters by the specified date range using from and to. The endpoint is
/events?from=data&to=date.
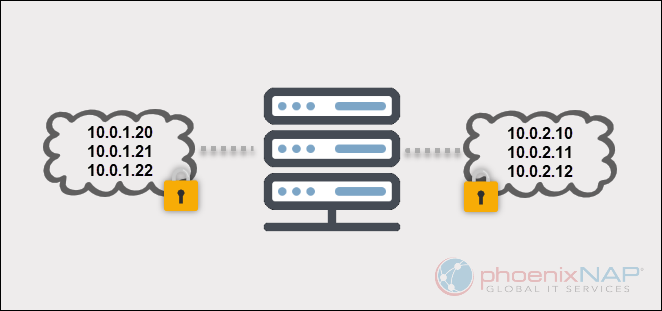
Multi-Private Backend Network API
The multi-private backend feature provides added control and flexibility when using private networks with BMC servers. With the multi-private backend networking APIs, users can now customize private IP space when provisioning a server.
The HTTP Request URL is:
https://api.phoenixnap.com/networks/v1/private-networksThe Network API has the following properties:
| Property | Input | Description |
|---|---|---|
| ID | system | Unique network identifier assigned by the system. |
| Name | required | The network name must be unique for all networks for an account. (case insensitive) |
| Description | optional | Network description, if not defined it will be nulled. |
| Type | system | A field returned for backend networks, in this case PRIVATE. |
| Location | required | Network location. |
| Location Default | required | Boolean representing the default network for an account in a location. |
| CIDR | required | Network subnet from which users can assign IP addresses. |
| VLAN ID | system | VLAN ID used for issue reporting in case of network problems. |
| Servers | system | List of servers assigned to the network in question. |
With the BMC Server API, users can:
- Provision a server and assign it to a specific private network. If no network details are specified, then the system adds a server to the default network for the location and automatically assigns the first available IP. For example, provision a server within multiple private networks and specify network settings for each. One server can be assigned up to 10 private IP addresses. It is not possible to combine different networks, and only one gateway is supported.
- Add an existing server to another private network. This can be any network for that location. You can also assign multiple networks in the same manner as when you provision a server.
- Remove an existing server from a private network. You can remove a server from any private network, even when that is the only network the server is connected to. When you deprovision a server, the server is removed from any associated private networks, and the IP allocation is freed up.
Below is the table of the default private networks for all locations:
| Location | CIDR |
|---|---|
| Phoenix (PHX) | 10.0.0.0/24 |
| Ashburn (ASH) | 10.1.0.0/24 |
| Singapore (SGP) | 10.2.0.0/24 |
| Netherlands (NLD) | 10.3.0.0/24 |
| Chicago (CHI) | 10.4.0.0/24 |
| Seattle (SEA) | 10.5.0.0/24 |
| Austin (USA) | 10.6.0.0/24 |
Create Private Network API
Use the POST method and the /private-networks endpoint to create a private network.
Note: The first created network is the default network. The maximum number of networks (public and private combined) per account is 15.
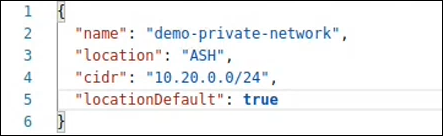
The request contains the following fields:
- name
- location
- locationDefault
- cidr: Supported ranges are:
- 10.0.0.0 – 10.255.255.255
- 172.16.0.0 – 172.31.255.255
- 192.168.0.0. – 192.168.255.255
- description (optional)
For example:
However, the cidr field is optional when you set the force flag to true, and you can skip assigning the IP range. This is an expert feature and must be used with caution.
When linking a server to a network without a CIDR:
- You must define the
ipsfield as an empty list. When the CIDR is not defined for a network, any IP you enter is not part of the CIDR’s subnet, and the request fails. - If an IP address in the server network is null, the request fails since the system cannot compute the next IP.
- If you do not define a custom network, the default network is used. In case the default network is the one without a CIDR, the request fails.
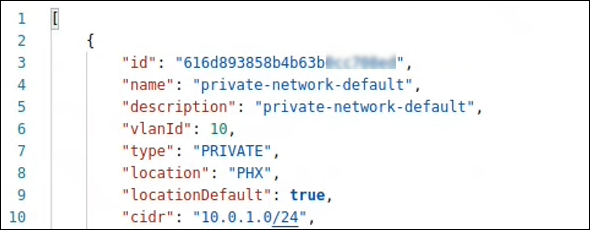
Retrieve Private Network Details
Use the GET method and the /private-networks endpoint to retrieve the list of all private networks for all locations owned by the account.
To get the details of a specific private network, use the /private-networks/{network_id} endpoint.
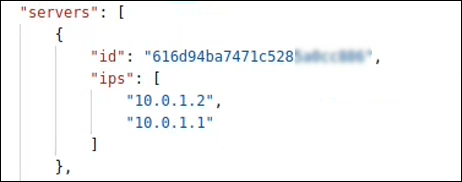
The result also shows the servers assigned to a private network with server IDs and IPs.
Optionally, filter the results by the location with this endpoint:
/private-networks?location=PHXReplace PHX with the desired location.
Modify Private Network
Use the PUT method and the /private-networks/{network_id} endpoint to update a private network's details.
The fields you can modify are:
- name - either leave the same name or specify a new unique name.
- locationDefault - for example, if a network is not default, set the value to true to make that network default. Only one network can be default per location.
- description - optional field.
Delete Private Network
To remove a known private network, use the DELETE method and the /private-networks/{network_id} endpoint.
Note: If a network is assigned to a BMC server, you cannot delete it. Additionally, it is not possible to delete a default network as this would leave that location without a default network. If the default network is the only network, then you can remove it from the location.
Once you delete a network, you cannot retrieve any previous information on it.
Public Network API
The public network API lets you create and manage public networks. A public network allows numerous servers to be connected to the same network and have internet access, as opposed to private networks. BMC servers can have multiple public networks with multiple public IP blocks the user purchased.
The HTTP Request URL for the Public Network API is:
https://api.phoenixnap.com/networks/v1/public-networksCreate Public Network
Use the POST method and the /public-networks endpoint to create a public network. The maximum number of networks per account is 15.
The body can contain the following fields:
- name (required) - must be unique.
- location (required) - available locations are: PHX, ASH, SGP, NLD, CHI, SEA, and, AUS.
- description (optional)
- ipBlocks (optional) - specify up to ten IDs of the IP blocks you purchased previously.
For example, to create a public network with two previously purchased IP blocks, use:
{
  "name": "BMC public network",
  "location": "PHX",
  "description": "My first public network test",
  "ipBlocks": [
    {
      "id": "60473a6115e34466c9g8f083"
    },
    {
      "id": "613b51c01f4b04615da1d3be"
    }
  ]
}
Note: There is no default network when creating public networks.
Retrieve Public Network Details
Use the GET method and the /public-networks endpoint to retrieve the details of all public networks for all locations owned by the account. The response lists the information available for all public networks.
To filter the results by the location, use this endpoint:
https://api.phoenixnap.com/networks/v1/public-networks?location=PHXTo view the details of a single public network, use the /public-networks/{publicNetworkId} endpoint.
For example:
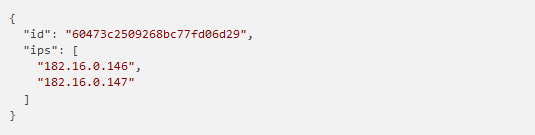
https://api.phoenixnap.com/networks/v1/public-networks/603f3b2cfcaf050643b89afdIf BMC servers are part of the network, the response shows their IDs, type, and IPs added to the server:

Modify Public Network
Use the PATCH method and the /public-networks/{publicNetworkId} endpoint to update a public network's details.
The fields you can update are:
- name - specify a new unique name for the public network or leave it unchanged.
- description - update the public network description.
For example:
{
  "name": "New public network",
  "description": "The updated description of my public network"
}
Delete Public Network
To remove a public network, use the DELETE method and the /public-networks/{publicNetworkId} endpoint.
Note: The request is completed if no resources are attached to the public network you want to delete. All IP blocks associated with the network will be in the unassigned state and stay in the account's ownership for future use.
Add IP Block to Public Network
To add an IP block to a public network, use the POST method and this HTTP request URL:
https://api.phoenixnap.com/networks/v1/public-networks/{publicNetworkId}/ip-blocksThere are a few requirements when adding an IP block to a public network:
- An IP block must not be assigned to a network or server.
- An IP block must be in the same location as the public network.
- The minimum CIDR block size for IPv4 is /29, and the maximum is /22. On IPv6, there is only one CIDR block size available, which is /64.
- A public network can have a maximum of 10 assigned IPv4 and 1 IPv6 block.
- The total quota per account is 80 public IPv4 and one public IPv6 block.
Specify the IP block ID in the body of the request to add it to the public network.
For example:
{
  "id": "60473a6115e34466c9f8f083"
}
Delete IP Block from Public Network
To remove an IP block from a public network, use the DELETE method and this HTTP request URL:
https://api.phoenixnap.com/networks/v1/public-networks/{publicNetworkId}/ip-blocks/{ipBlockId}For example:
https://api.phoenixnap.com/networks/v1/public-networks/603f3b2cfcaf050643b12a4b/ip-blocks/6047127fed34ecc3ba8401c1If a resource within the network has IPs assigned from the IP block you want to remove, the request fails.
However, setting the force query parameter to true allows you to remove an IP block even if a resource is using it. The switches are configured immediately after the request is sent and the communication with the server stops after a few moments. This is an expert feature, and users take full responsibility for this action.
Note: If you readd the same public IP block to the server, the IP configuration will not be reset in our database. The server connection will work properly, but our system will not be aware of any IPs you set
Add Server to Private or Public Network (Server API)
Use the POST method with the servers endpoint to add a server to an existing private or public network. The server must be in the same location as the network and can be powered on, powered off, or rebooting when you make the API call.
The HTTP request URL for adding a server to a private network is:
https://api.phoenixnap.com/bmc/v1/servers/{serverId}/network-configuration/private-network-configuration/private-networksThe HTTP request URL for adding a server to a public network is:
https://api.phoenixnap.com/bmc/v1/servers/{serverId}/network-configuration/public-network-configuration/public-networksThe body of the request must contain the public network ID and the IPs you want to add to the server. The IPs need to be in the CIDR range of any IP block assigned to the public network in question.
The usable IPs in a subnet are:
- IPv4 private block. The first 10 and last addresses are reserved.
- IPv4 public block. The first two and the last IP addresses are reserved, if the block size allows it.
- IPv6 public block. The first 10 addresses are reserved.
Note: Adding a server to the network does not automatically perform the OS-level configuration. BMC configures the networking devices in the data center infrastructure only, and manual network configuration changes in the server’s OS are required from your side.
For IPv4 public or private networks, use the force query parameter and change it to true to allow an empty ips list. The server requires manual configuration after in this case.
For IPv6 public networks, set the computeSlaacIp parameter to true to automatically generate an IPv6 address. The ips list can be empty in this case. The generated address is visible in the response, and it is based on the server's primary MAC address. No additional configuration is required after.
Note: The computeSlaacIp parameter is controlled by the raEnabled parameter in the /public-networks API. It is automatically set to true when a public network with an IPv6 block is created or when an IPv6 block is added to public network. To change the value, use the PATCH /public-networks/{publicNetworkId} endpoint.
Remove Server from Private or Public Network (Server API)
Use the DELETE method with the bmc servers endpoint to remove a server from a network. When deleting a network, manual OS-level network configuration is required.
Note: This action makes a server inaccessible over that network. Verify the server is accessible using the remote console feature via the BMC portal to avoid issues in case of misconfiguration.
The HTTP request for private networks is:
https://api.phoenixnap.com/bmc/v1/servers/{serverId}/network-configuration/private-network-configuration/private-networks/{privateNetworkId} The HTTP request for public networks is:
https://api.phoenixnap.com/bmc/v1/servers/{serverId}/network-configuration/public-network-configuration/public-networks/{publicNetworkId}Conclusion
The guide provided an overview of the Tag Manager API, Audit Log API, and the Network APIs.
To get more details on the response types, errors, and other details for our APIs, visit the Developers Portal.