The BMC portal allows you to add Bare Metal Cloud servers to multiple existing private and public networks. The portal lets you choose the IP addresses from the available range.
Even though you can add servers to different networks, you need to perform manual network configuration on your server after completing those steps.
Follow the instructions in this guide to learn how to configure your Bare Metal Cloud instance after you add it to a public or private network.
Prerequisites
- Access to the BMC portal.
- Access to the server/BMC Remote Console.
How to Add Server to Network via BMC Portal
Follow the steps below to add a server to an existing public or private network via the portal:
1. Log in to the Bare Metal Cloud portal.
2. Navigate to the Networking -> Networks page.
3. Choose the Public or Private tab.
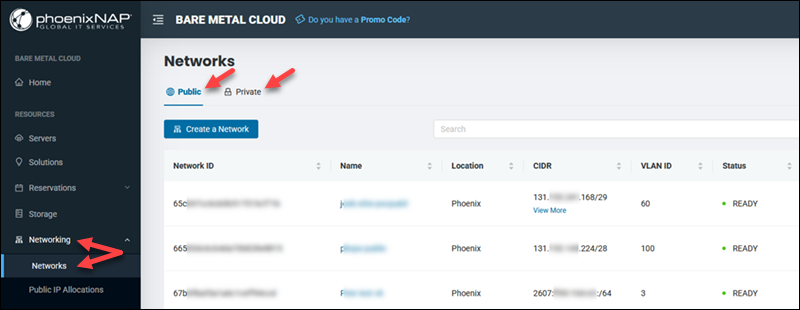
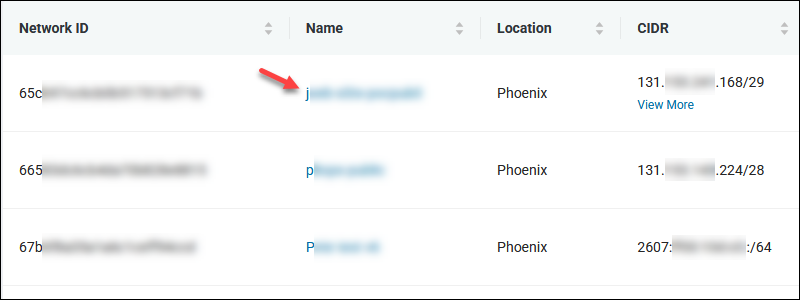
4. Click the network name to which you want to add your server.
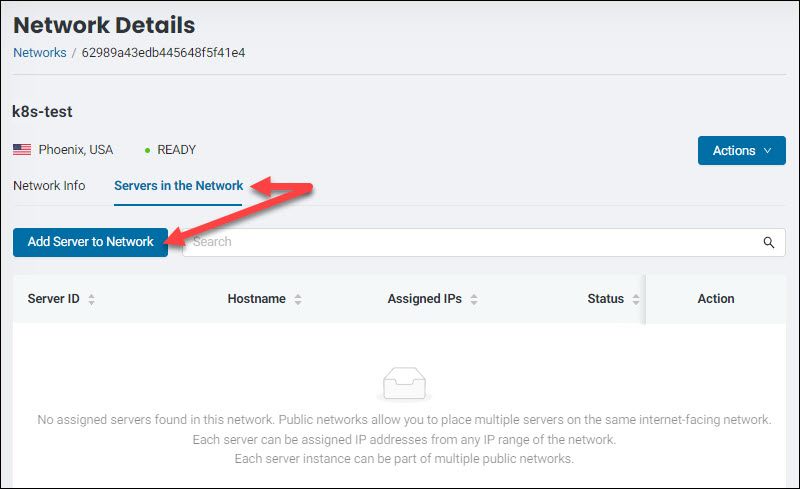
5. Select the Servers in the Network tab.
6. Click the Add Server to Network button.
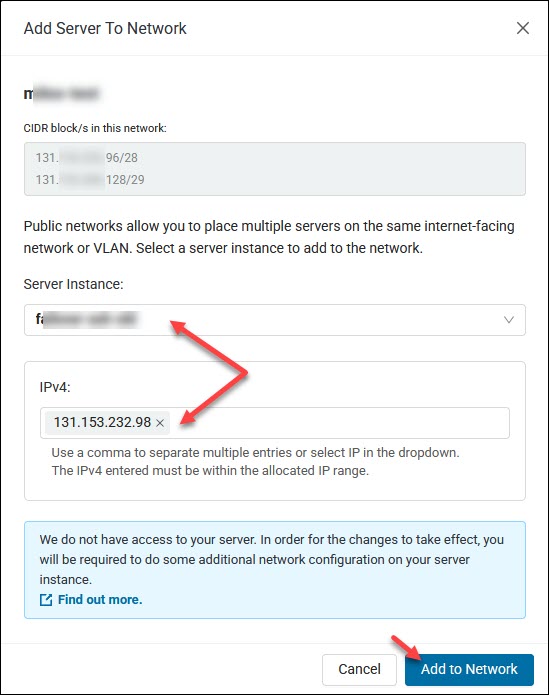
7. Select a server from the list and choose one or more IP addresses. For private networks, leave the field blank to assign the first available IP address within the network automatically.
8. Click Add to Network. Depending on the IP stack associated with the network you will be prompted to assign an address:
- IPv4 only:
- IPv6 only:
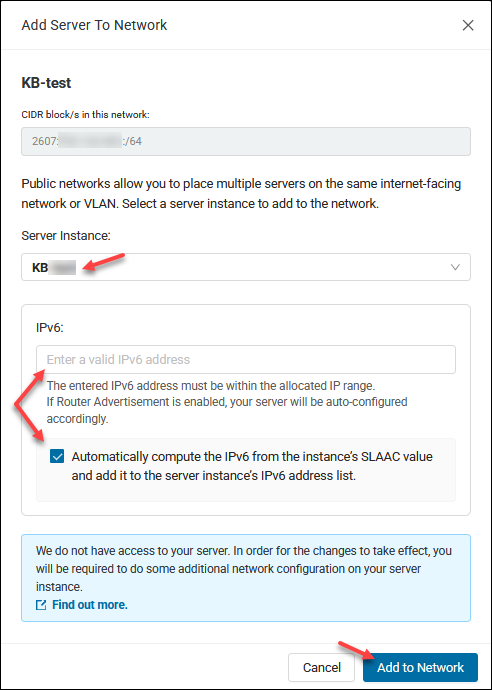
- Dual stack (assigning both an IPv4 and IPv6 in a dual-stack network is not mandatory):
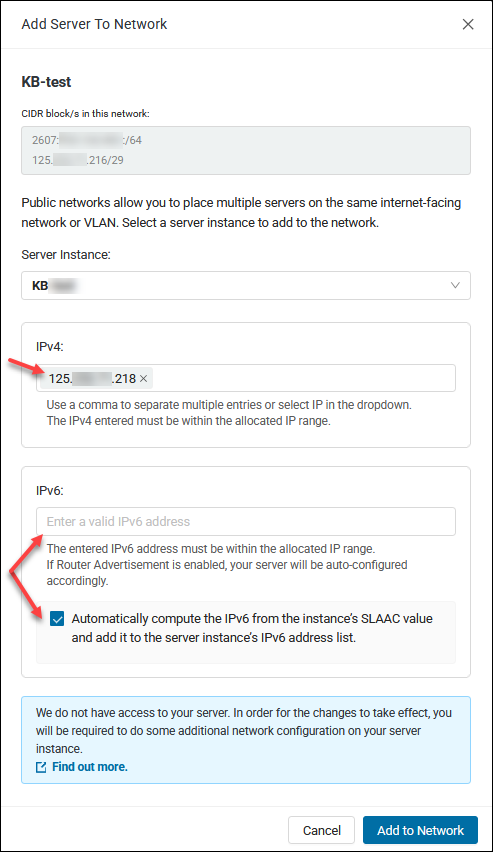
The message Server successfully added to network appears. Proceed with the manual network configuration on your BMC server.
Note: Make sure you have access to your server using the BMC Remote Console functionality. This is a fail-safe system if an issue occurs after making network configuration changes.
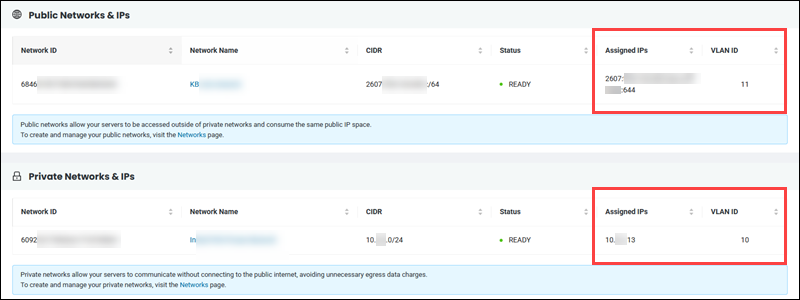
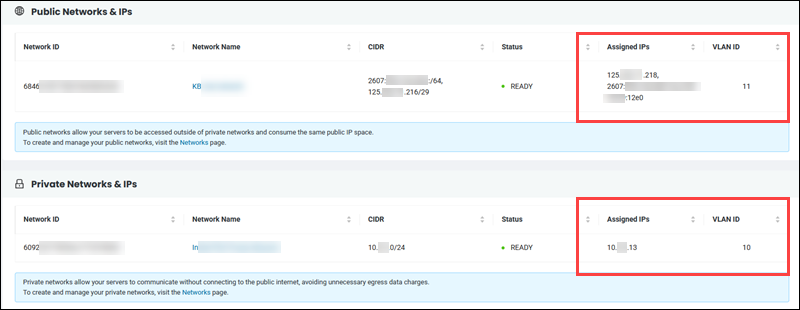
Note Network Details
The network configuration on the BMC server must match the network configuration in the portal. Note the details of the private or public network to which you added your server to properly edit the server-side network configuration.
To find the network information for your server:
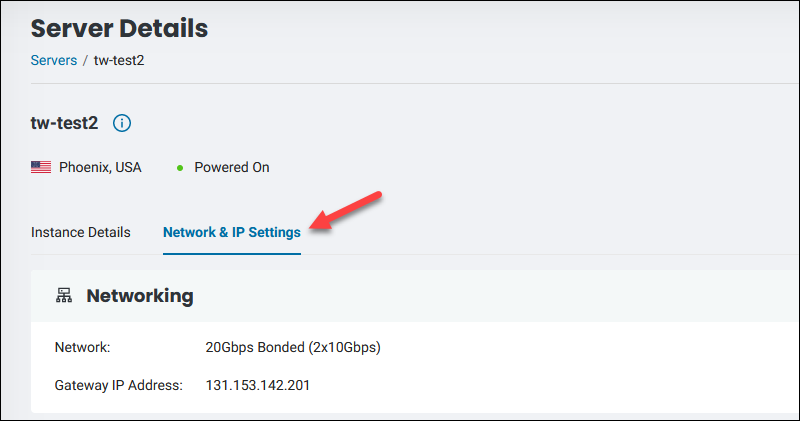
1. Navigate to the Servers page and locate the server you added to a network.
2. Click the server name or select Actions -> View Details.
3. Choose the Network & IP Settings tab. The page contains all the relevant network information to use for manual configuration.
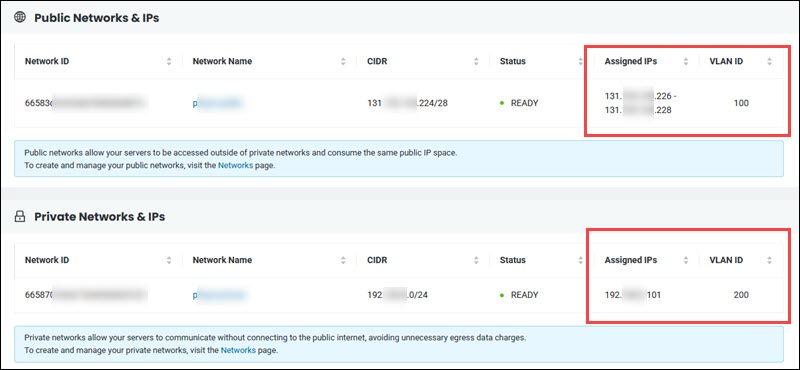
4. Scroll down and note the VLAN ID and the assigned IPs for the public or private network to which you added the BMC server. Public networks can have one of the following configurations:
- IPv4:
- IPv6:
- Dual stack:
Use the information above and the steps in the following sections to configure the network on your BMC server.
Configure Server After Adding it to a Network
For changes to take effect after adding a BMC server to a network, you must complete the network configuration on the server.
For any networks enabled with IPv6 and router-advertisements set to enable, most operating systems will automatically self-assign an IPv6 address through the IPv6 stateless-auto-configuration (SLAAC) mechanism.
If this behavior is undesired and static IPv6 assignment is preferred, edit the network to disable IPv6 router advertisements. Navigate to the Networks page -> Edit and switch the Enable Router Advertisement option to Off:

PhoenixNAP does not have access to your server. Therefore, manual configuration is necessary, and the steps are different depending on the OS in question.
Linux Server Setup
To configure a BMC server with a Linux-based OS:
1. Connect to the server via SSH or the Remote Console in the BMC portal.
2. Launch a command-line window and switch to the root user.
sudo su -3. Open the network interface configuration file using a text editor:
vi /etc/cloud/cloud.cfg.d/50-curtin-networking.cfg4. Locate the vlans section in the config file and add network information from the portal at the bottom of the file.
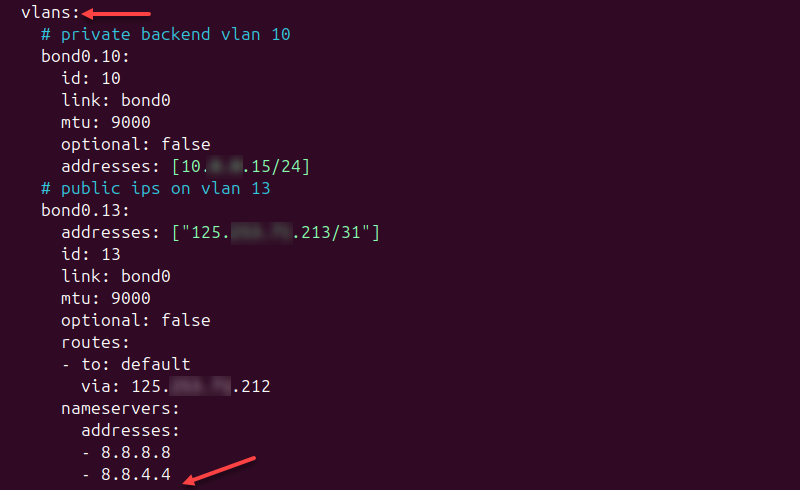
For example, we added the server to the public network with the assigned IPv6 and the VLAN ID 16. The bond0.x is the VLAN ID, in our case, bond0.16.
Therefore, the edited file on our instance looks like this:
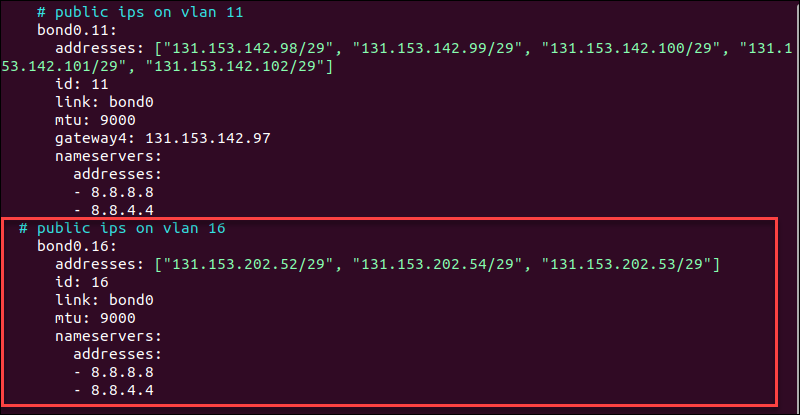
Follow the same steps when working with IPv6 or private networks. For a dual stack network, see the following example configuration:
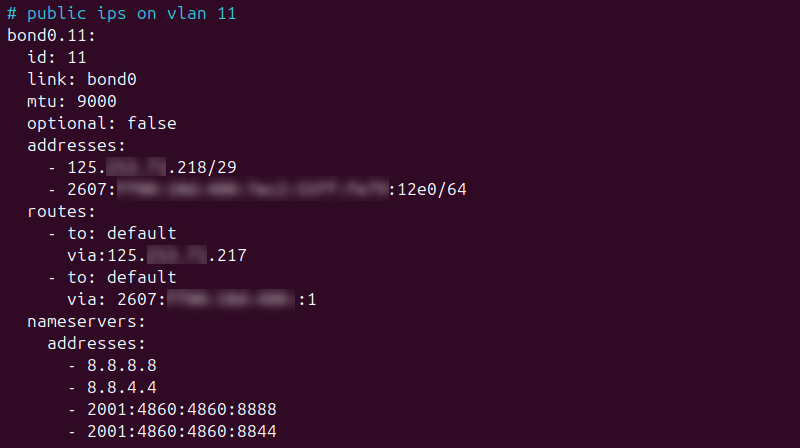
Warning: Do not copy the IPs from this guide. Use the IPs and the VLAN ID from your BMC portal account.
5. Save the changes and reboot the server.
The server is now configured to work with the new network.
Windows Server Setup
Follow the steps below to configure the BMC server with Windows Server OS after you assign the instance to a private or public network:
1. Connect to the server via the Remote Console or an RDP client. It is highly recommended to change the default Windows password the first time you log in.
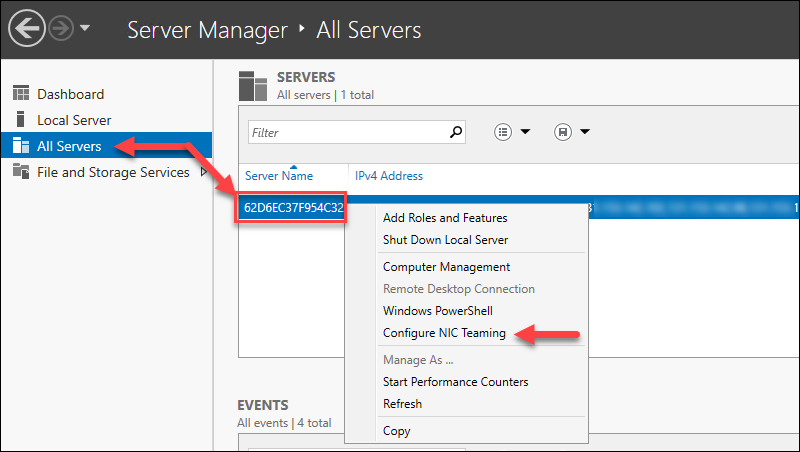
2. Open the Server Manager application if it does not open automatically.
3. Select All Servers and right-click the server name.
4. Click Configure NIC Teaming.
5. In the TEAMS section, click the team name to highlight it. In our case, bond_bond0.
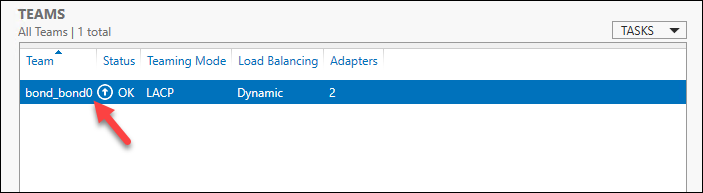
6. Select Team Interfaces in the ADAPTERS AND INTERFACES section on the right side.
7. Click TASKS and select Add Interface.
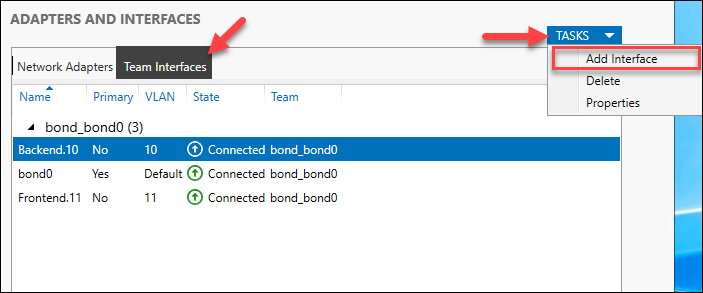
8. Enter the network name. For example, for public networks, use Frontend.vlanid. In our case, Frontend.16 for VLAN 16. For private networks, use Backend.vlanid.
9. Enter the VLAN you noted earlier from the portal.
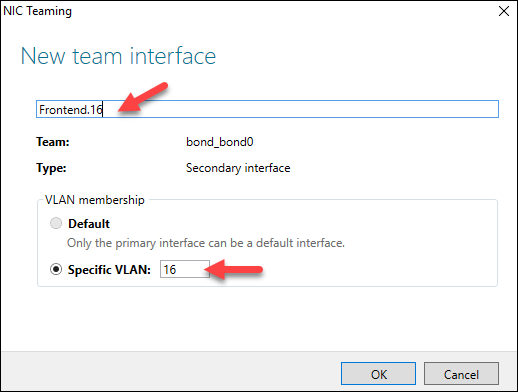
10. Click OK, and the new interface appears in the list. Close all windows.
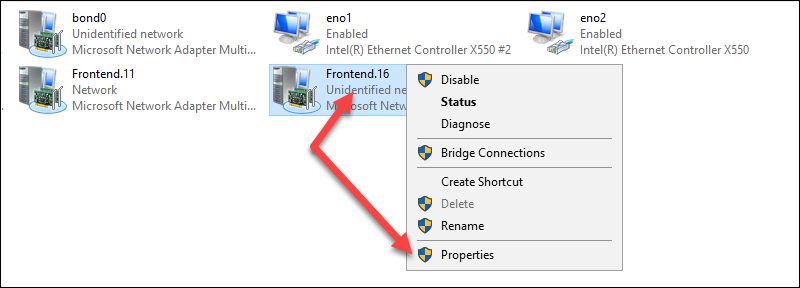
11. Go to Control Panel > Network and Internet > Network and Sharing Center > Change adapter settings.
12. Right-click the interface you just added and select Properties. In our example, Frontend.16.
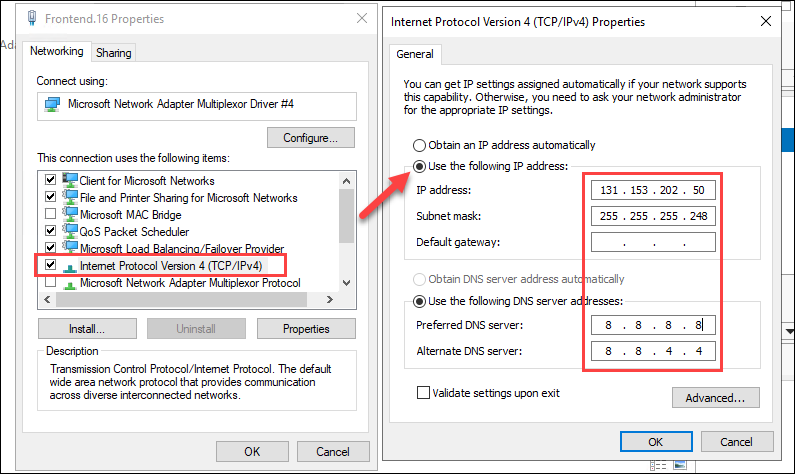
13. Select the Internet Protocol Version 4 or Internet Protocol Version 6 item in the menu and click Properties.
14. Click the Use the following IP address option. Enter the network IP address from the portal with the corresponding subnet mask for the CIDR. For example, use 255.255.255.248 for /29. Leave the default gateway field empty, specify DNS servers, and click OK.
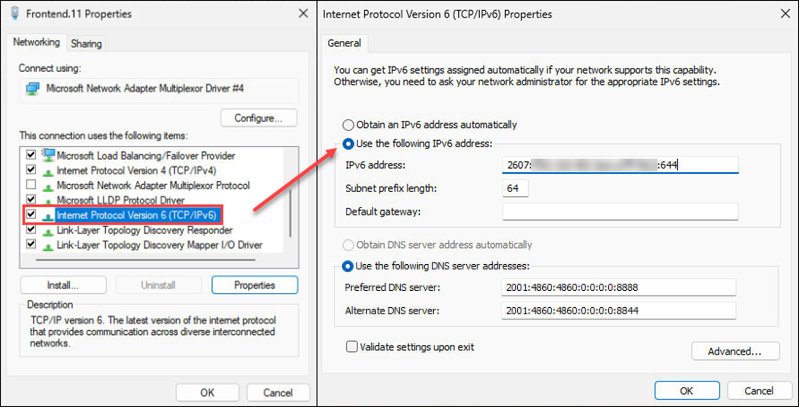
For IPv6, provide the address and the subnet prefix length:
If you want to add multiple entries, select the Advanced… button.
15. Restart the server to complete the configuration.
Proxmox Server Setup
Follow the steps below to configure a Proxmox BMC server after adding it to another network. Make sure to change the default Proxmox password for security reasons.
1. Log in to the Proxmox BMC instance via a browser. Use the server’s public IP address with port 8006.
2. Use the root account and the password you received when you deployed the server if you have not changed the password already.
3. Select the server’s name in the Proxmox UI and then choose Network.
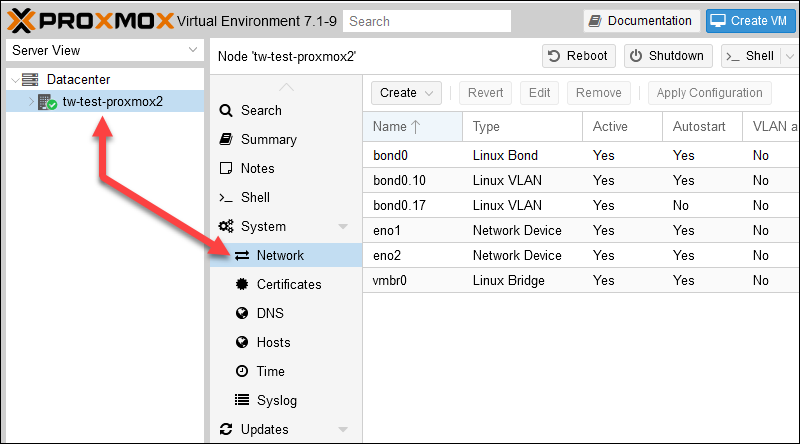
4. Click Create and choose Linux VLAN.
5. Enter bond0.vlanid in the Name field and click Create. The fields Vlan raw device and VLAN Tag populate automatically. For example, use bond0.16 if the network is on VLAN 16.

6. Click Create again and now choose Linux Bridge.
7. Add the network IP address from your BMC portal account with the corresponding CIDR. For example, 131.153.142.122/29. You can add only one IP here. Other IPs are added to VMs.
8. Add the bond name in the Bridge ports field. Use the bond name you created previously.
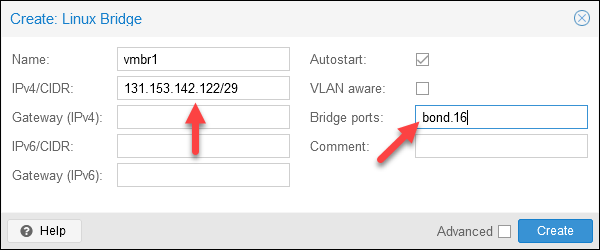
9. Click Create.
10. Select the Apply Configuration button to activate the changes.
Note:If you use SSH or Remote Console, edit the interfaces file located at /etc/network/interfaces
ESXi Server Setup
Follow the steps below to configure an ESXi BMC server after adding it to a new network. Make sure to change the default ESXi password if you have not already.
1. Log in to the ESXi host via a browser using the server’s IP address.
2. Use root and the password you received when you deployed the server if you have not changed the password already.
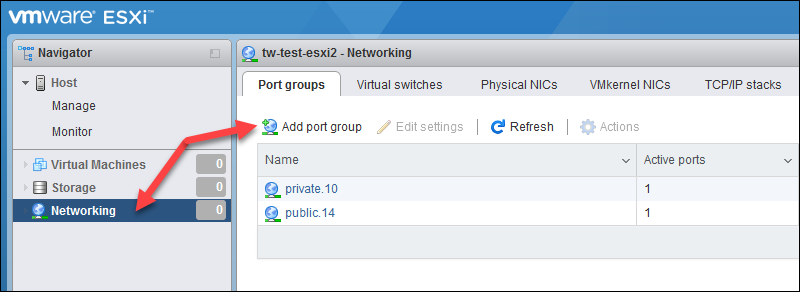
3. Select Networking on the left side of the screen and then click Add port group.
4. Enter the group name and use the VLAN ID of the network to which you added the BMC ESXi server in the portal. Our public network is on VLAN 16.
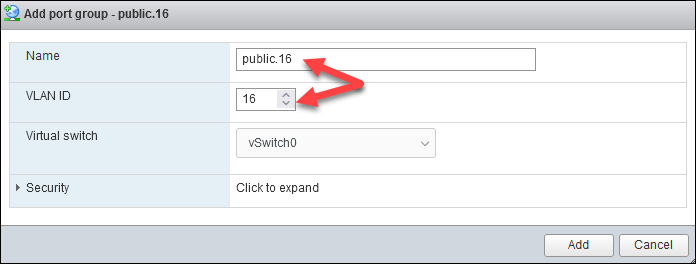
5. Click Add.
You can now start adding virtual machines using the new network on your ESXi host. Use the network information from the portal with the corresponding subnet mask and gateway to configure each virtual machine.
The new network name is assigned automatically during the VM creation wizard:

Conclusion
The steps in this guide showed you how to complete the network configuration on your BMC server after adding it to a network via the portal.
Make sure you change the default admin or root username for your BMC server before you start using it.