MySQL offers several different ways to analyze and repair databases. Errors and anomalies appear for numerous reasons, some of which include:
- A MySQL update or downgrade.
- Rapid changes in indexes or data.
- Table inconsistencies.
When checking for corrupted data and repairing tables, the steps to fix errors depend on how you connect to the database, the database server state, the type of error, and the database engine.
This article shows you multiple ways to troubleshoot and repair a MySQL database.
Prerequisites
- Terminal or command line with root privileges.
- MySQL version 8.0 installed and configured.
- A corrupt database or database table.
How to Check MySQL Table for Errors
Running diagnostics is the first step to troubleshooting issues. There are two ways to check a MySQL table for errors:
- Through a MySQL
CHECK TABLEquery. - Using the terminal program
mysqlcheck.
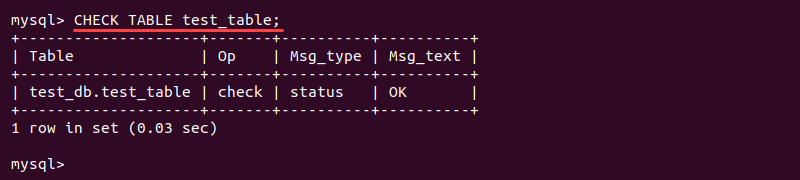
Check a Table with CHECK TABLE
The CHECK TABLE query works in MySQL while the service is running. The general use is:
CHECK TABLE <table name> [, table name, table name] [option] [option];The simplest use is one table without any options:
CHECK TABLE <table name>;The output of the CHECK TABLE query shows an informative table about the check results:
The available options when checking tables are:
FOR UPGRADE- discovers version inconsistencies. For example, MySQL 8.0 does not support two-digit years, so a table containing such values is marked for upgrade.QUICK- does not check rows for incorrect linking. This is helpful in avoiding timeouts.FAST- performs a check on tables that are not closed properly.CHANGED- only checks tables with changes since the last check or that have not closed properly.MEDIUM- checks table rows to verify the validity of deleted links and performs a checksum for the rows.EXTENDED- does a check for complete consistency.
Without any options, CHECK TABLE performs a MEDIUM check on MyISAM tables and views. The FOR UPGRADE and QUICK perform checks on InnoDB engine tables and views while other options are ignored.
You can also combine the options for a more detailed check. For example, to do a quick check to find out whether a table closed adequately, run:
CHECK TABLE <table name> FAST QUICK;Any options that do not apply to the tables are ignored.
Check a Table With mysqlcheck
The mysqlcheck command is the command-line version of CHECK TABLE. The program runs in the terminal while the MySQL service is operating. To perform the check:
1. As the root user, navigate to the directory where the databases are stored:
sudo su
cd /var/lib/mysql
2. Check the whole database with:
mysqlcheck <database name>
Alternatively, check a specific table within the database by providing the table name as well:
mysqlcheck <database name> <table name>
How to Repair MySQL Database
There are several methods for repairing a MySQL database. However, keep in mind that these methods are not a quick fix and can result in data loss. If the database tables are often corrupt, identify the cause.
Before making any changes and starting repairs, create a copy of the directory:
cp -rfv /var/lib/mysql /var/lib/mysql_copyAlternatively, make a backup of the database before trying any repair solutions. Follow our guide: How to Back Up & Restore a MySQL Database.
Below you will find three options for repairing a MySQL database.
Repairing MySQL Database with REPAIR TABLE Query
After scanning and locating the database and the tables with problems, the quickest way to fix the issue is with the REPAIR TABLE query:

If the server shuts down during the repair, rerun the REPAIR TABLE operation when the server starts again. Make sure to do this before performing any other operations on the same table. In normal conditions, a MyISAM table will not experience data loss when using this method.
Repairing MySQL Database with mysqlcheck
The mysqlcheck command is an alternative to repairing database tables in the terminal.
1. First, navigate to the MySQL database folder as the root user:
cd /var/lib/mysql2. Add the -r option to the mysqlcheck command to repair the database table:
mysqlcheck -r <database> <table name>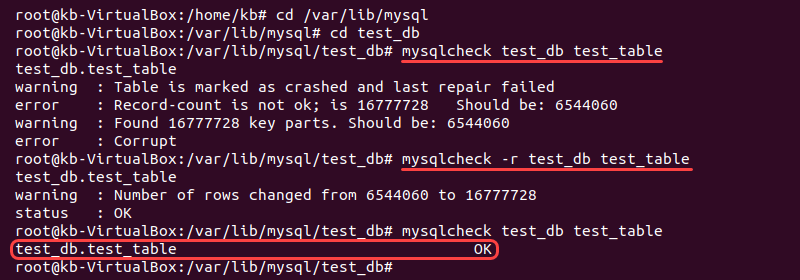
The mysqlcheck -r command is the terminal version of the REPAIR TABLE query.
Repairing MySQL Database with ALTER TABLE
Use the ALTER TABLE query to rebuild the table using the same storage engine. For example, if you have an InnoDB table, run:
ALTER TABLE <table name> ENGINE = InnoDB;To rebuild a MyISAM table, use:
ALTER TABLE <table name> ENGINE = MyISAM;If you are unsure which storage engine the table uses, run the following query to find out:
SHOW CREATE TABLE <table name>;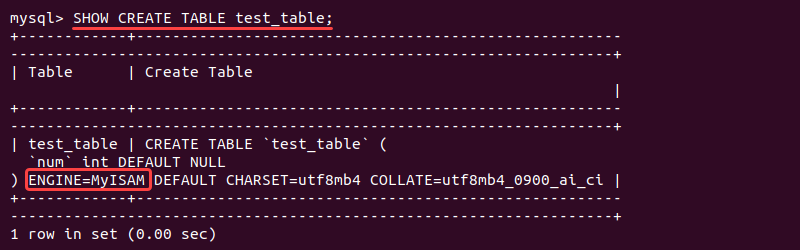
Running Engine-Specific Diagnostics and Repairs to MySQL Database
Depending on the database engine used, MySQL provides engine-specific approaches for analyzing and repairing a database table.
MyISAM tables are prone to corruption. However, most errors are easy to fix.
In InnoDB databases, corruption occurs when checksum values don't match. Errors typically occur due to a power outage or another hardware issue.
Checking and Repairing MyISAM Tables with myisamchk
MySQL provides a specific checker for MyISAM tables.
1. Shut down the MySQL server. Open the terminal and run:
systemctl mysql stop2. As the root user, navigate to the location of the database:
cd /var/lib/mysql/<database name>3. To check a specific table, run:
myisamchk <table name>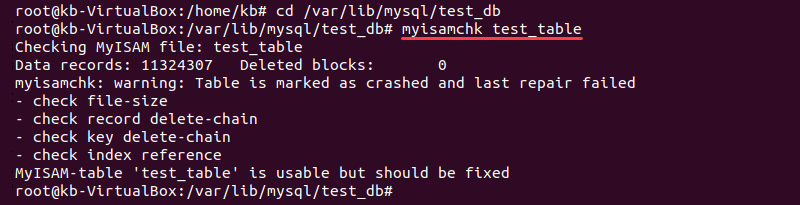
4. Repair a table by running:
myisamchk --recover <table name>5. Restart the MySQL server:
systemctl restart mysql6. Lastly, check the table in MySQL after recovery:
sudo mysql -u <user> -p <password>
USE <database name>;
SELECT * FROM <table name> LIMIT 4;
Running the InnoDB Recovery Process
MySQL documentation suggests running the InnoDB recovery process for InnoDB databases.
1. Locate and open the global configuration file using your favorite text editor. For Ubuntu and Debian systems, the location is:
cd /etc/mysql/my.cnfNote: For CentOS and Fedora, the location is:
cd /etc/my.cnf2. Add the following option to the my.cnf file:
[mysqld]
innodb_force_recovery=4
By default, the forced recovery option is set to 0 (off) and goes up to 6. Every new level includes the recovery features of the lower numbers.
3. Save and close the file.
4. Restart the MySQL server to ensure the new configuration file applies:
systemctl restart mysql5. In the home folder, export all the databases to a backup file with the mysqldump command:
sudo mysqldump --all-databases --add-drop-database --add-drop-table --routines > <file name>.sql6. Start the MySQL client and drop all the affected database tables. To drop a database table, try:
DROP TABLE IF EXISTS <table name>;If the table does not drop, try removing the database table manually. Log in as the root user and navigate to the directory where the databases are:
sudo sucd /var/lib/mysql/<database name>Remove the database table:
rm -r <table name>7. Stop the MySQL server:
systemctl stop mysql8. In the my.cnf file, comment out the innodb_force_recovery option added in step 2 to disable the recovery mode. Then, save the file and close.
9. Start the MySQL server up again:
systemctl start mysql10. Restore the database from the backup .sql file in the MySQL shell. Log in to the MySQL client:
sudo mysql -u <username> -p <password>11. Run the following query to import the databases:
USE <database name>;
# Turning off auto commit is optional and speeds things up for larger databases
SET autocommit=0;
SOURCE <file name>.sql;
12. Lastly, test the database to confirm everything works correctly. If not, restore the database from backup and try an alternate method.
Conclusion
This tutorial outlines several methods for repairing a MySQL database. Since database corruption is bound to happen, MySQL provides multiple ways to detect and fix errors in a database, some of which are outlined in this article.
However, since recovery can sometimes result in data loss, the best way to protect your information is to create regular backups and follow best database security practices.