Veeam Cloud Connect allows you to back up and restore your virtual machines quickly and securely. Using phoenixNAP’s cloud infrastructure, you can seamlessly migrate from any cloud provider.
This guide will show you how to create a recovery media and perform a restore operation on your virtual machines.
Prerequisites
- Access to a remote machine you want to backup.
- Credentials for vCloud Director
Create Recovery Media ISO
To create a recovery media, you need to launch the wizard from the source machine.
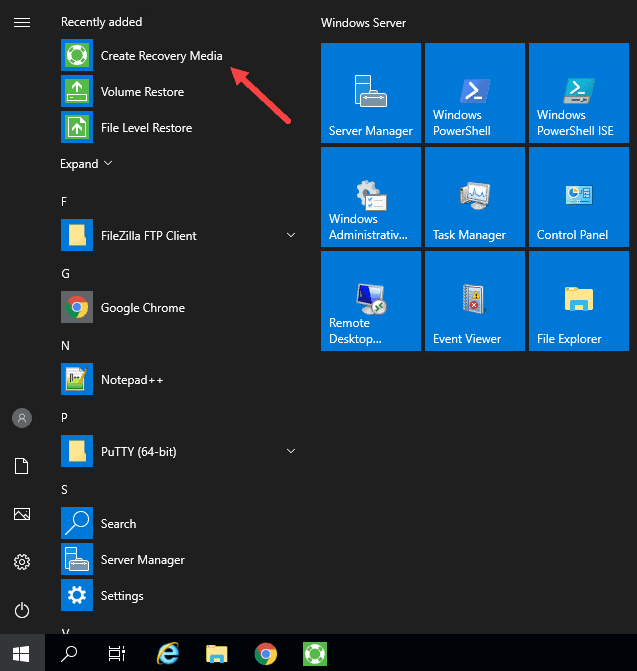
In the start menu, find the Create Recovery Media shortcut. The icon should be at the top if you have completed the installation recently. If not, start typing “create”, and the Create Recovery Media icon appears.
STEP 1 – Select Recovery Media
In the Recovery Media screen:
1. Select an ISO image file from the bootable media types list. You may have more options on the Recovery Media list, but make sure to select ISO.
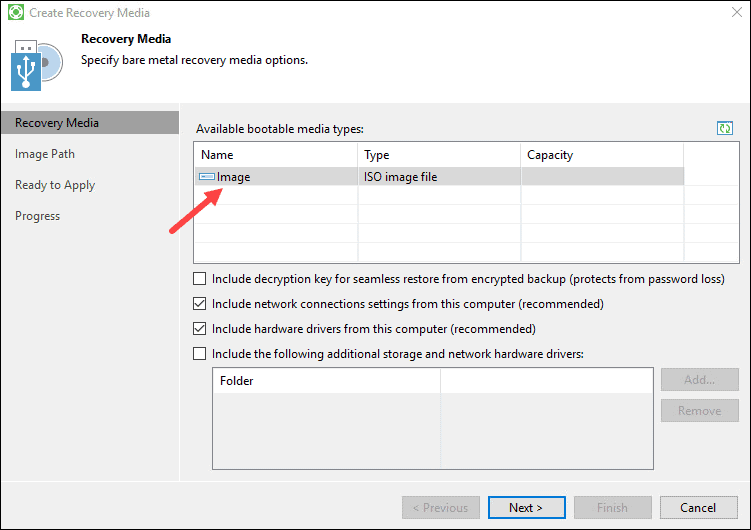
2. You can leave the default settings and click Next.
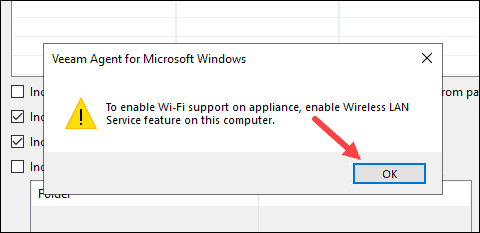
3. Click OK when the Wireless LAN warning appears. The message is relevant only when restoring to a new target using a wireless network.
STEP 2 – Specify Image Path
In the Image Path step:
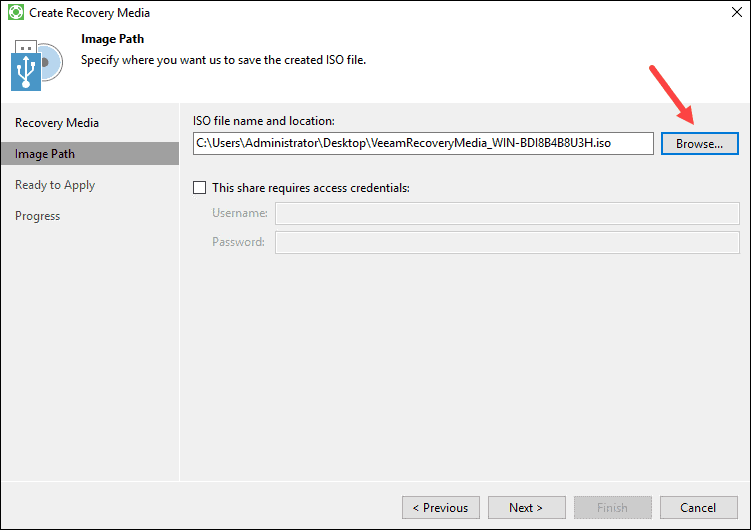
1. Click Browse to select the desired location to save the ISO image.
2. Select a path easy to remember, such as Desktop or Documents, and click Save. Optionally, edit the default name of the ISO file. We recommend a shorter name to avoid character limitation during the upload.
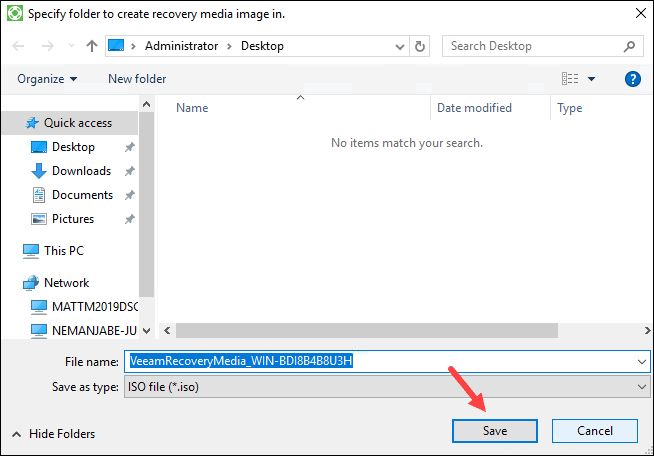
In the steps further below, we will upload the image to the vCloud Director media library.
3. Click Next
STEP 3 – Review the Settings
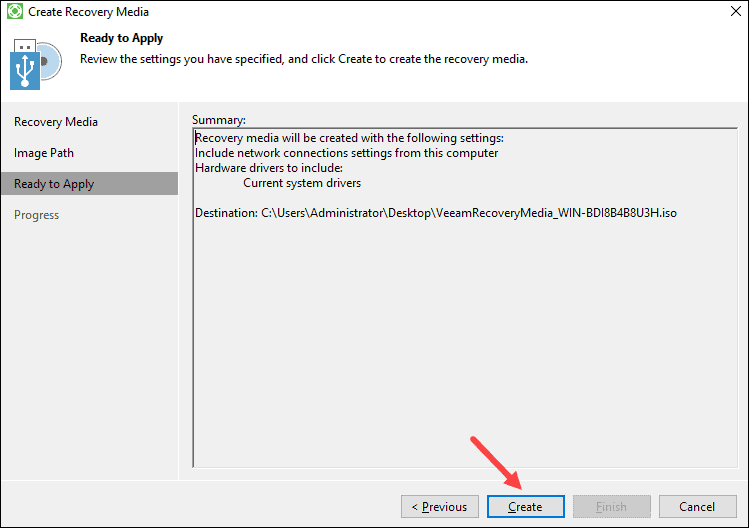
In the Ready to Apply screen, read through the summary of the settings for your ISO recovery image before you proceed.
When you confirm the settings are correct, click Create to start the process.
STEP 4 – Progress Log
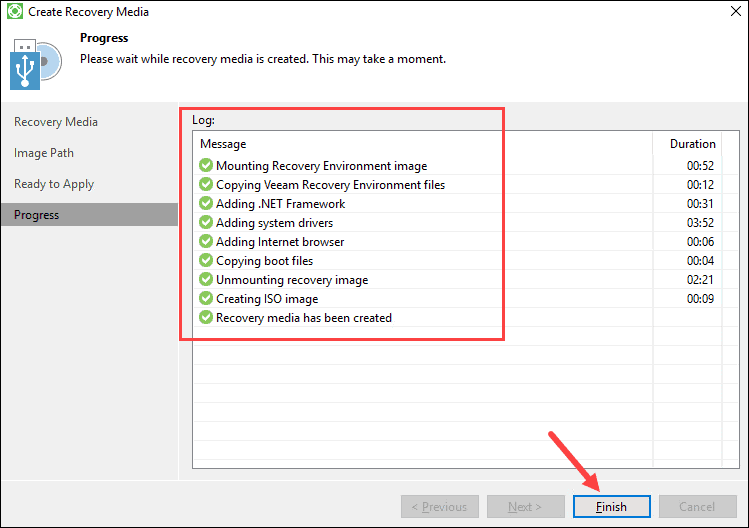
In the Progress screen, the log shows the status of every step for the recovery media creation process. This step may take from five to ten minutes, so let the wizard complete the process.
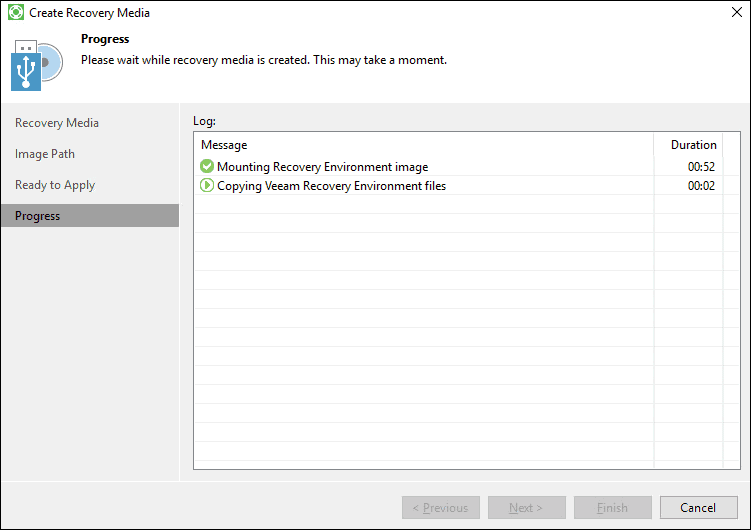
If you need to stop the process for whatever reason, click Cancel.
When all the steps are done, click Finish to exit the wizard.
Upload Recovery Media Using vCloud Director
To upload the recovery ISO to the Veeam Cloud Connect repository:
1. Log in to vCloud Director on the source machine where you created the ISO image.
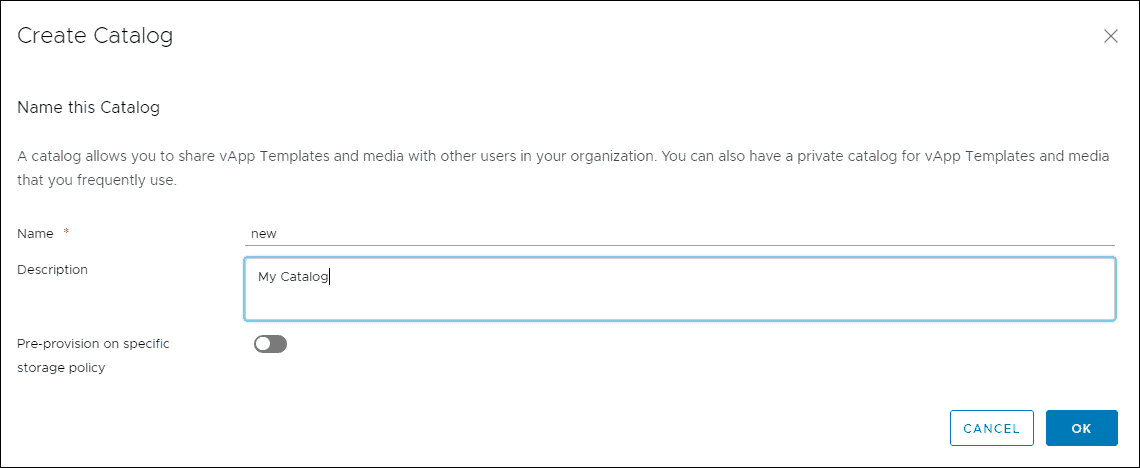
2. Create a media catalog in the Catalogs section if you do not have a non-public one.
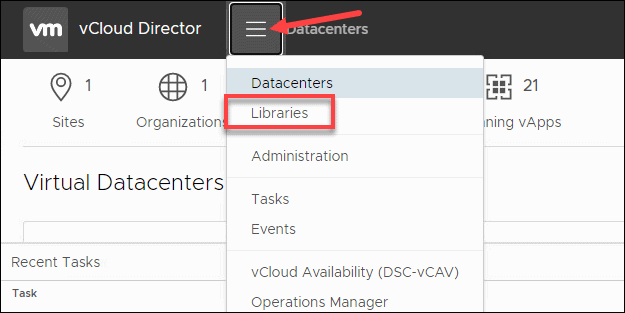
3. Choose Libraries from the menu.
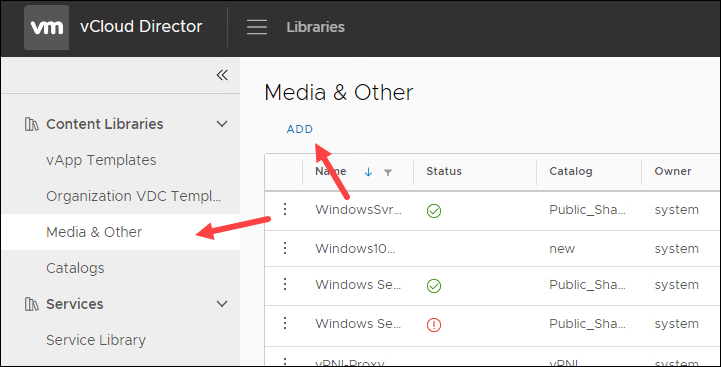
4. Select Media & Other on left side of the screen.
5. Click + ADD to upload your ISO file.
6. Select a non-public catalog from the drop-down list.
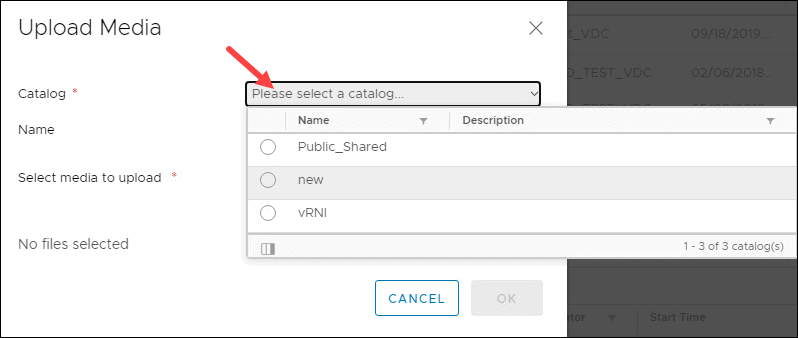
7. Click the upload arrow to browse and open the ISO file you created previously.
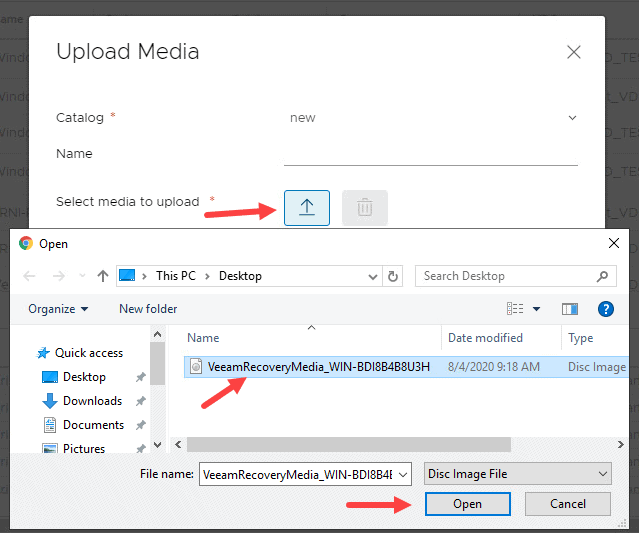
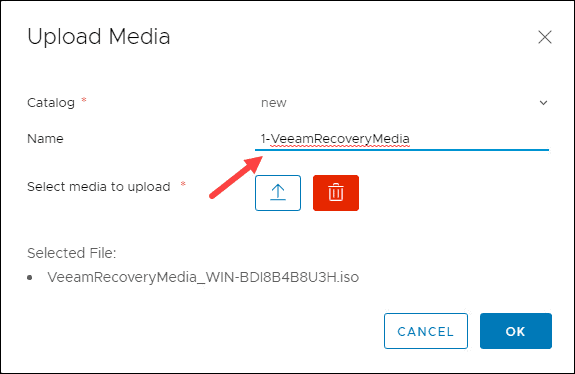
8. Shorten the name of the file if you get an error and click OK.
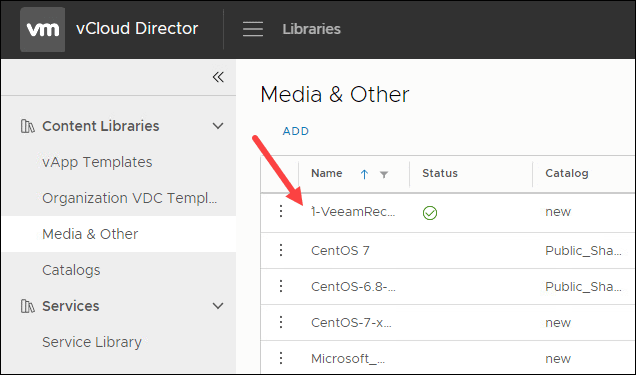
Wait until the upload completes. You can find the ISO file in the Media & Other section.
Build Target VM – Notes
Next, you need to build the target VM in the target environment. With vCloud Director, you can choose an existing vApp or create a new vApp.
When building a target VM, there are a few things to keep in mind:
- An E1000 network adapter is required for your VM. The Veeam Bare Metal Restore ISO may not have VMXNET3 adapter drivers. Make sure your machine uses a VMXNET3 adapter before going into production.
- You need to select a routable network for the NIC to enable internet access. Adjust firewall rules on Edge as needed.
- Ensure the hard drive layout matches the existing hard drive layout. Use Disk Management to identify source sizes.
- After building a VM in vCloud Director, use vCenter to add a USB 2.0 controller to enable mouse support. Do not use VMware Tools.
- Insert the ISO CD/DVD, select the media you uploaded previously.
Perform a Backup of the Source Machine
Before we continue with the section on restore procedures, make sure you performed the final backup of your machine.
You can start a backup job on the source machine using the Veeam Backup Agent.
1. Right-click the Veeam Agent icon in the system tray.
2. Select Control Panel.
3. Click Backup Now to start the process.
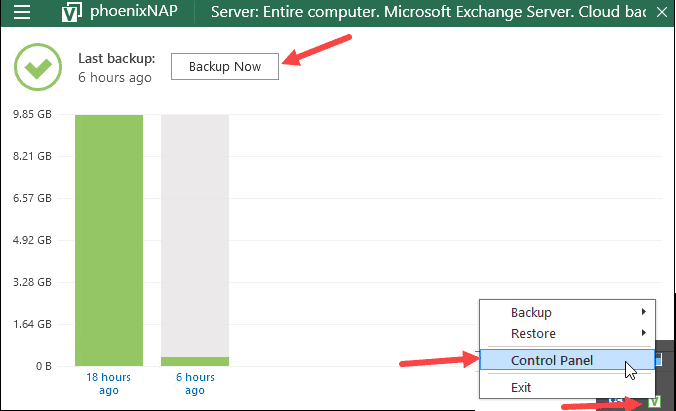
The window shows the progress of your backup job.
Another option to start (and configure) a backup job is to use Veeam Availability Console (VAC).
Perform Bare Metal Restore
To start a restore procedure, insert the recovery media in the target VM and power it on. Make sure your VM is set to boot from a drive or use the ESC button at the splash screen to access the boot list.
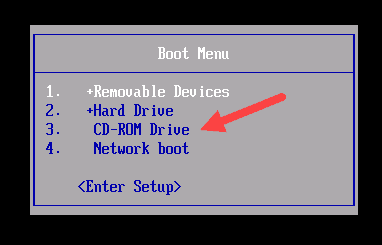
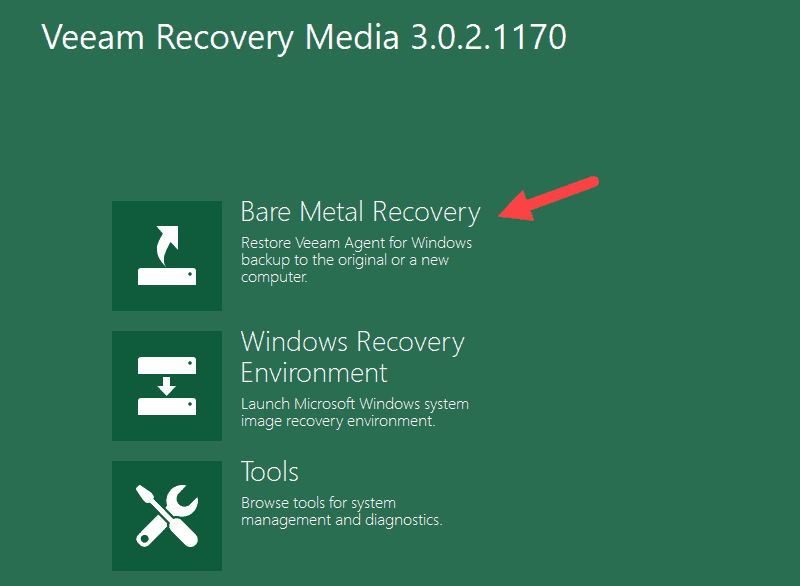
Press any key to boot from the media. After a minute or two, the Veeam Recovery Media menu appears.
Select Bare Metal Recovery to start the Volume Level Restore wizard.
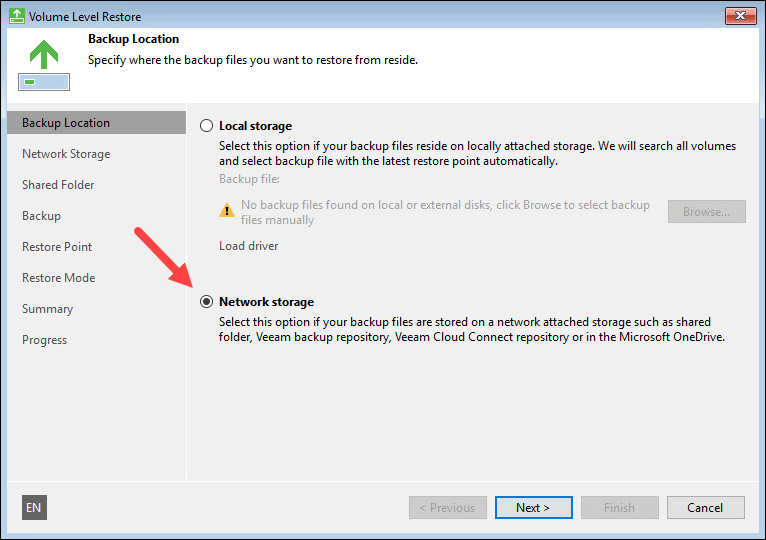
STEP 1 – Select Backup Location
Choose the location of the backup ISO file. In this case, the ISO is located on a phoenixNAP VCC repository.
Select Network storage and click Next.
STEP 2 – Select Network Storage Type and Configure Network Settings
If the wizard does not detect an active network adapter, you need to install drivers before you continue.
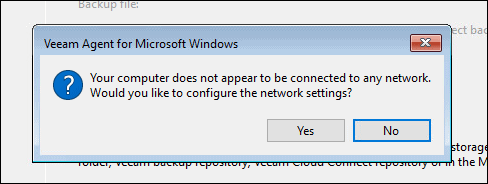
To do so:
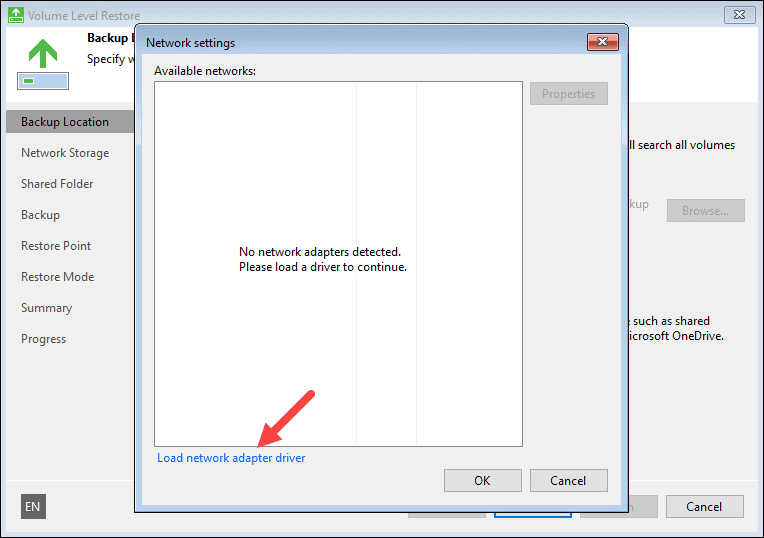
1. Click Load network adapter driver.
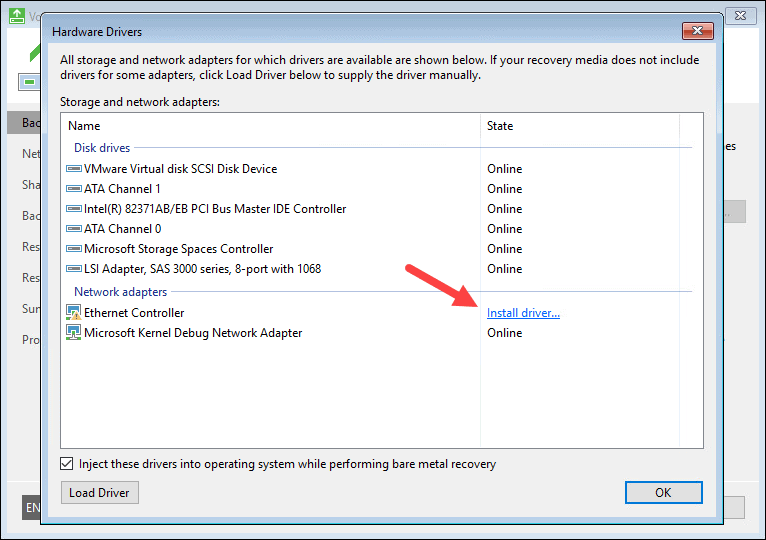
2. Select an ethernet adapter from the list and click Install driver…
Once the installation completes, a confirmation popup appears.
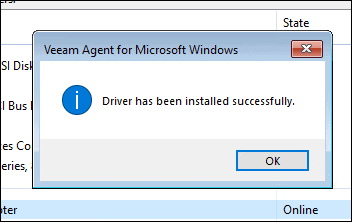
3. Click OK on both windows to close the pages.
When you finish installing the drivers, a network adapter appears on the list. Now you can configure network settings.
Choose Ethernet0 on the list and select Properties.
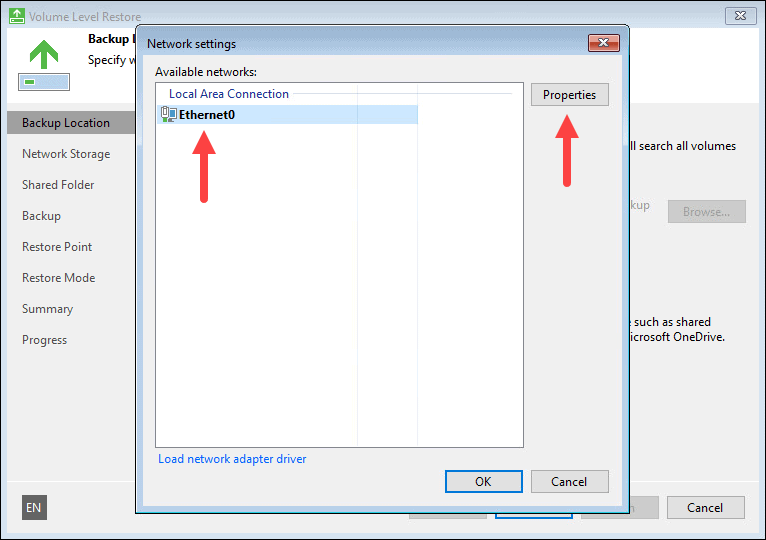
Select Use the following IP address and add an available IP address in the target subnet that has internet access along with appropriate gateway and DNS settings. You can use Google’s server as an alternate DNS.
For example:

Click OK for both windows to return to the wizard. If internet access is not available, you may need to adjust the firewall rules.
Choose Veeam Cloud Connect repository. You can also access the above network settings by clicking the Configure network settings link in the lower right corner.
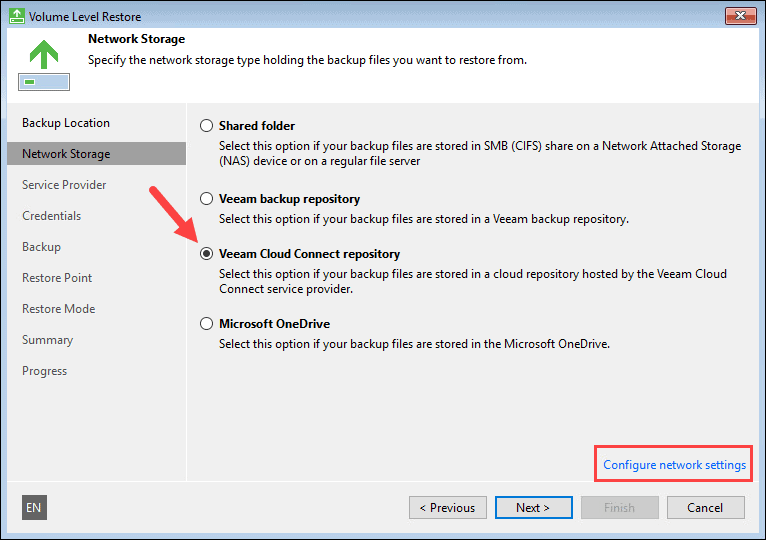
Click Next to continue.
STEP 3 – Specify Service Provider
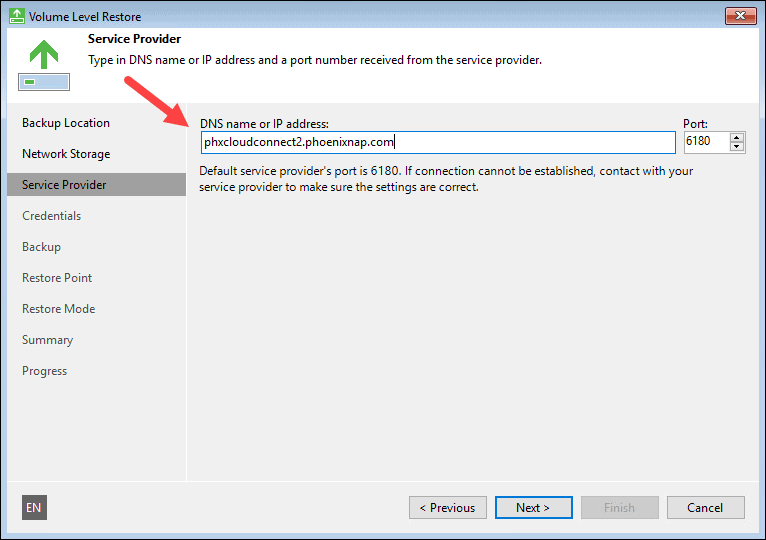
Add the URL of the phoenixNAP location where your backup is located.
The possible FQDNs are:
- For Phoenix: phxcloudconnect.phoenixnap.com or phxcloudconnect2.phoenixnap.com
- For Ashburn: ashcloudconnect.phoenixnap.com
- For the Netherlands: nldcloudconnect.phoenixnap.com
- For Atlanta: atlcloudconnect.phoenixnap.com
- For Singapore: sincloudconnect.phoenixnap.com
Leave the port at 6180 and click Next.
STEP 4 – Validate Certificate and Enter Credentials
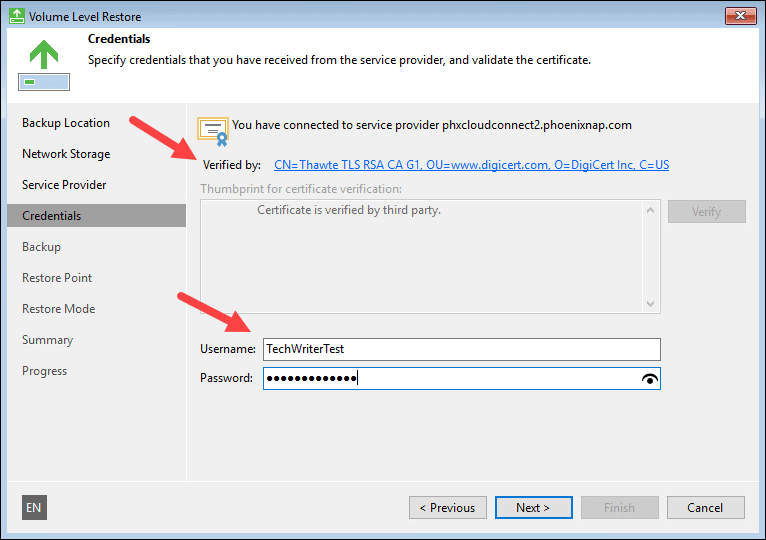
If your network connection is working, you will get certificate details.
Enter your username and password. Do not specify the company.
Click Next.
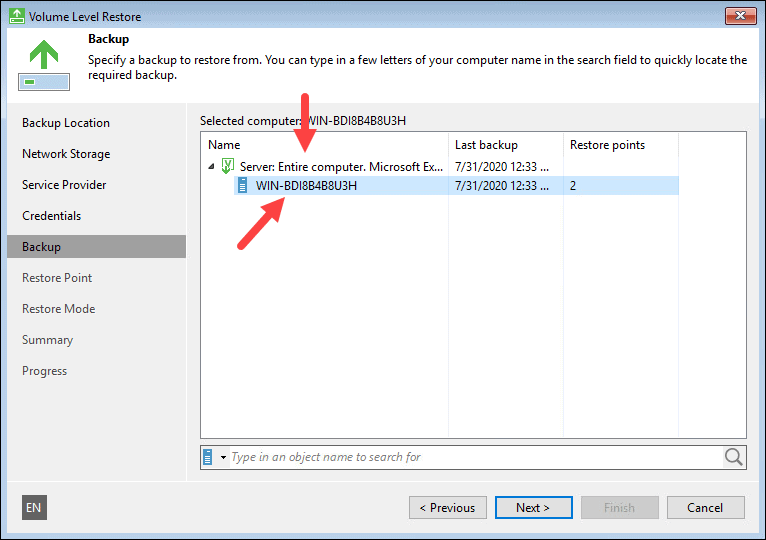
STEP 5 – Select Available Backup
When the wizard connects to phoenixNAP’s server, you will get a list of backups.
Expand a backup job and choose a computer.
Click Next to continue.
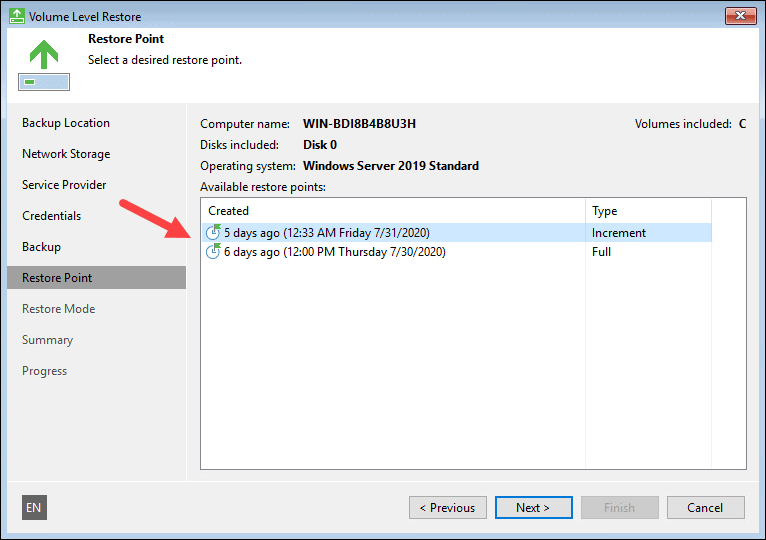
STEP 6 – Select Restore Point
Select a restore point from the list. If there are multiple points, use the date stamp to choose the one you want and click Next.
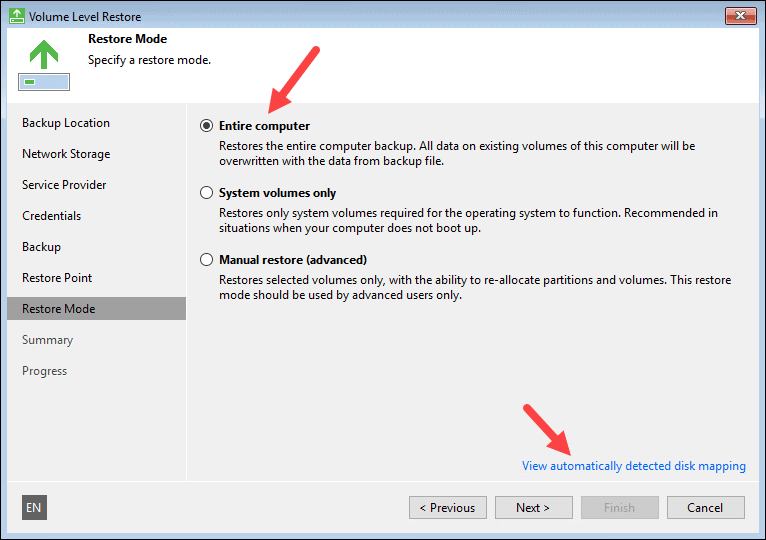
STEP 7 – Choose Restore Mode
For a full VM restore, select Entire computer.
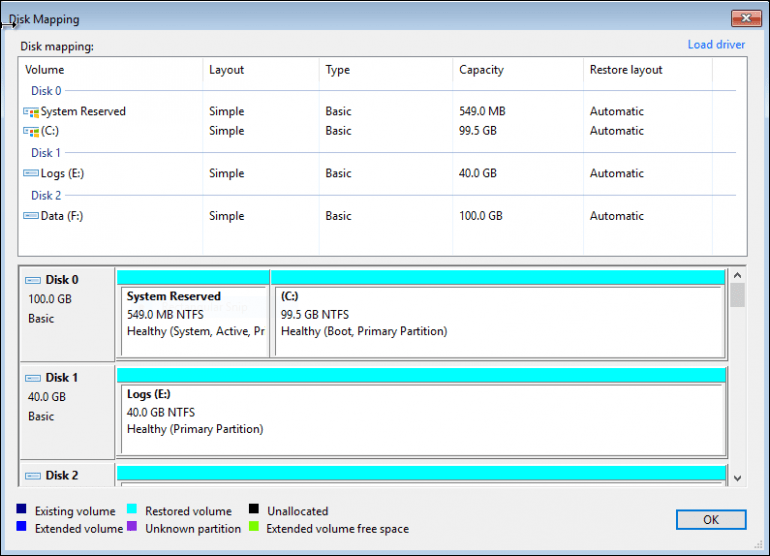
To verify the disk mapping is correct, click View automatically detected disk mapping.
Scroll through the list of drives to verify the size and drive location are in order.
Click OK if everything looks good.
Click Next to continue
Note: If the drives are not mapped correctly, choose Manual Restore (advanced) to map the drives manually.
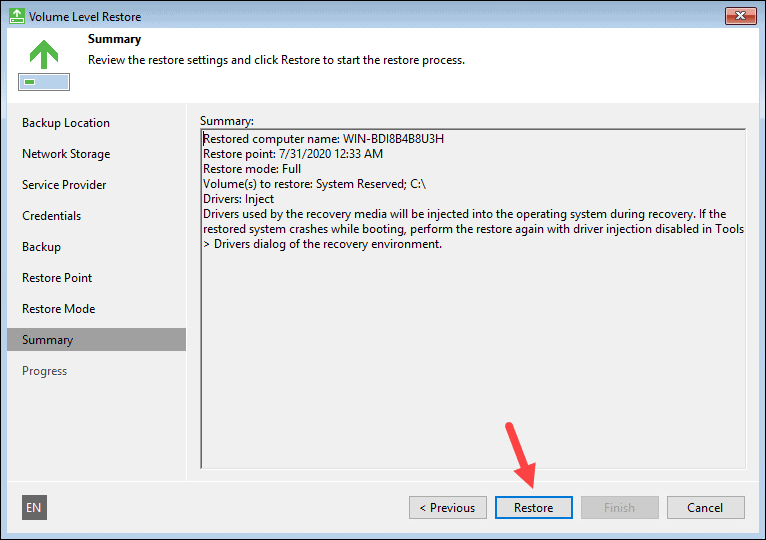
STEP 8 – Review Restore Settings
Review the restore configuration before you start the process.
When you are ready, click Restore. Make sure to let the process complete without any interruptions to avoid potential issues with your VM.
STEP 9 – Restore Progress and Finalization
You can watch the progress of the restore steps in this section.
Ignore any restore log warnings. These errors do not have any effect on the restore process.
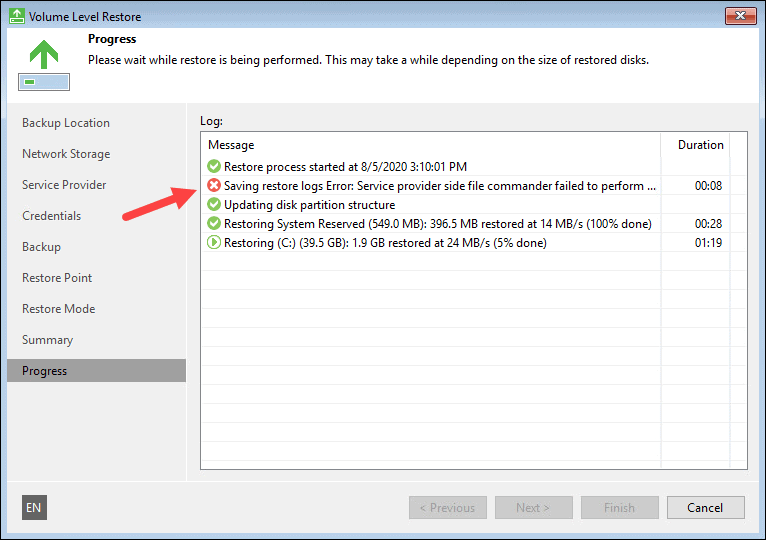
Click Finish when the steps complete.
Finally, select Yes when the popup appears to reboot the machine.
Final Steps
Once your machine has booted up and you completed the restore process successfully, there are a few tasks you can do using vCloud Director:
- Configure necessary settings for your VM.
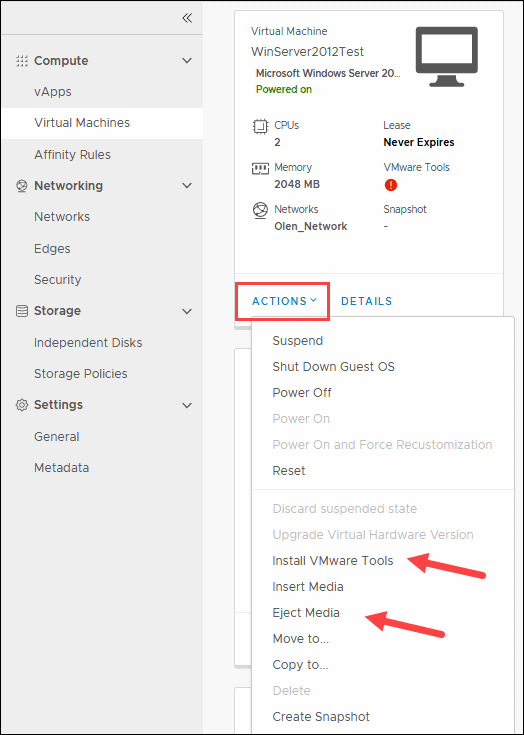
- Eject Veeam Recovery Media ISO for the VM in question.
- Install VMware Tools on the machine
Conclusion
The steps in this guide helped you create an ISO backup image using the Create Recovery Media wizard, as well as to perform Bare Metal Restore.
If you need more information on other vCloud Director options, refer to our VMware vCloud Director quick start guide.
