All phoenixNAP Data Security Cloud users are granted access to the Veeam Self-Service Backup Portal, a web tool based on Veeam Enterprise Manager. The portal allows you to perform backup and restore operations, as well as view backup statistics.
The main benefit of using the self-service portal is that there is no need to install the Veeam Backup & Replication console on a local machine. You can complete the necessary tasks by using the web UI.
This guide will show you how to navigate the Self-Service Backup Portal and use its features.
Prerequisites
- Internet access and a web browser.
- Self-Service Portal URL provided by phoenixNAP.
- Login credentials to access your VMware Cloud Director organization. If you did not receive the email with credentials, please check the spam folder or contact us for assistance.
How to Access the Veeam Self-Service Backup Portal
To log into the Self-Service Backup Portal, you need the portal URL phoenixNAP provided. Please use Chrome or Firefox to access the portal, as there are compatibility issues with Internet Explorer. The portal does not allow Security Assertion Markup Language (SAML) authentication.
The login URL should follow this format:
- Phoenix: https://dsc-vem.phoenixnap.com/vCloud/YourOrgName/
- Ashburn: https://dsc-ash-vem.phoenixnap.com/vCloud/YourOrgName/
The name of your organization should be at the end of the URL.
Note: VPDC Clients can follow the same steps outlined in this article using the portal VPDC URLs:
- Phoenix: https://phxveeambackups.phoenixnap.com/vCloud/YourOrgName
- Ashburn: https://ashveeambackups.phoenixnap.com/vCloud/YourOrgName
- Open the portal URL. The Welcome page loads.
- Enter your Username and Password. Find the credentials in a separate email from phoenixNAP. Check the Remember me box to save your credentials for future use.
- Click Login. The portal takes you to the Dashboard.
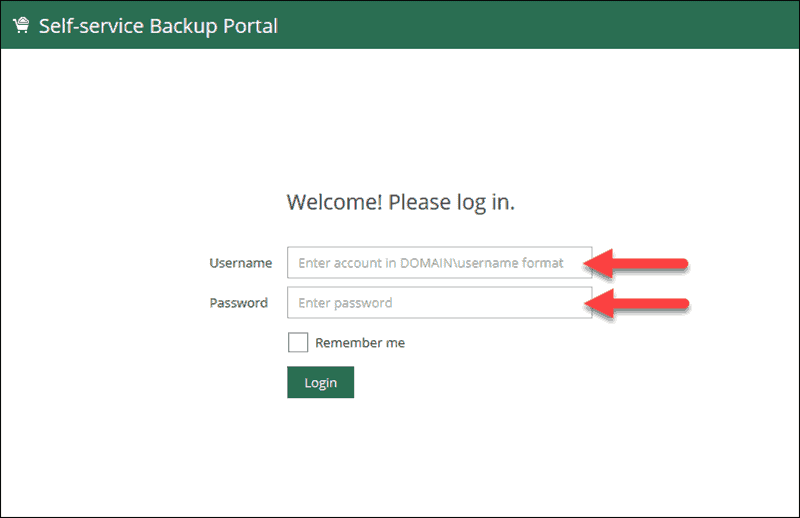
Note: Enter the username and password exactly as you received them in the email.
Do NOT prefix the domain name as the login page informs you.
Dashboard
The Dashboard is the portal's landing page. The page shows the statistics of your backups. You can view data from the last 24 hours or 7 days. This section is divided into four blocks and a graph.
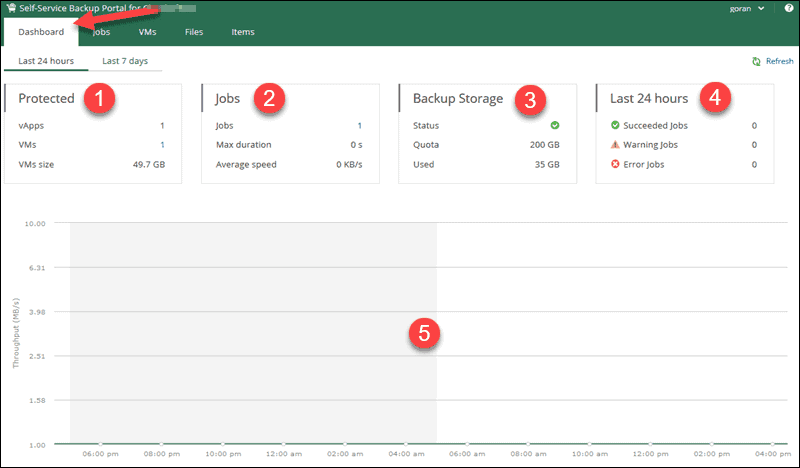
Block 1: Protected
The Protected block shows the following information:
- vApps. The total number of vApps that have successful restore points created.
- VMs. The total number of virtual machines that have successful restore points created. Clicking the number takes you to the VM screen.
- VMs size. The size of all successfully processed source virtual machines.
Block 2: Jobs
The Jobs block shows the following information:
- Jobs. The total number of backup jobs. Clicking the number takes you to the Jobs screen.
- Max duration. The maximum amount of time it took a job to complete.
- Average speed. The average transfer speed for all jobs.
Block 3: Backup Storage
Backup Storage shows the following information:
- Status. Displays the status of your backup storage quota. Green informs you there is more than 10% free space, yellow warns you there is less than 10% available, while red notifies that you do not have any backup storage space left.
- Quota. The total storage quota you have available.
- Used. The amount of storage you used so far.
Block 4: Job Session Results for 24 Hours or Last 7 Days
- Succeeded Jobs. The number of successful jobs for the period you selected.
- Warning Jobs. The number of job sessions with a warning.
- Error Jobs. The number of job sessions that contain an error.
Graph
The graph displays information about ongoing jobs. There are two curves that show different data. The horizontal curve shows the time and date when the jobs were executed. The vertical curve shows the backup job speed in MB/s.
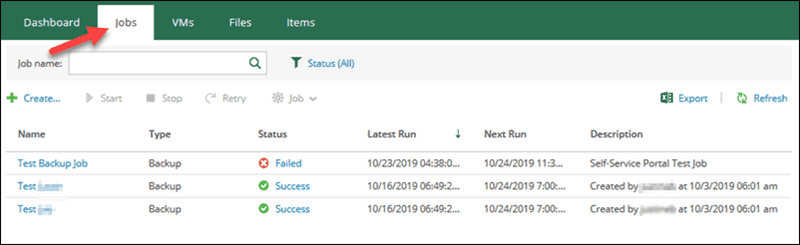
How to create Backup Jobs using Veeam Self-Service Backup Portal
The jobs section of the Self-Service Backup Portal allows you to manage your backup jobs. These are the tasks you can perform:
- Create a backup job.
- Start, stop, or retry a backup job.
- Disable, enable, delete, or edit job settings.
- Search for a backup job (filters are available).
- View job statistics.
- Export job statistics data.
Create Backup Job
Start the Create Backup Job wizard by clicking the +Create… button in the Jobs tab. Follow the steps for each section.
Configure Job Settings
At the Job Settings step:
1. Enter a Job name. If you intend to create multiple jobs, it is recommended to use a meaningful name.
2. Add a Description for the backup job. By default, this will be the user who created the job and the timestamp when the job was created.
3. Specify the Retention policy. Set the latest backups to keep. Choose how many restore points or days to keep in the backup repository. When you reach the defined number, the earliest point will be deleted.
4. Click Next to proceed.

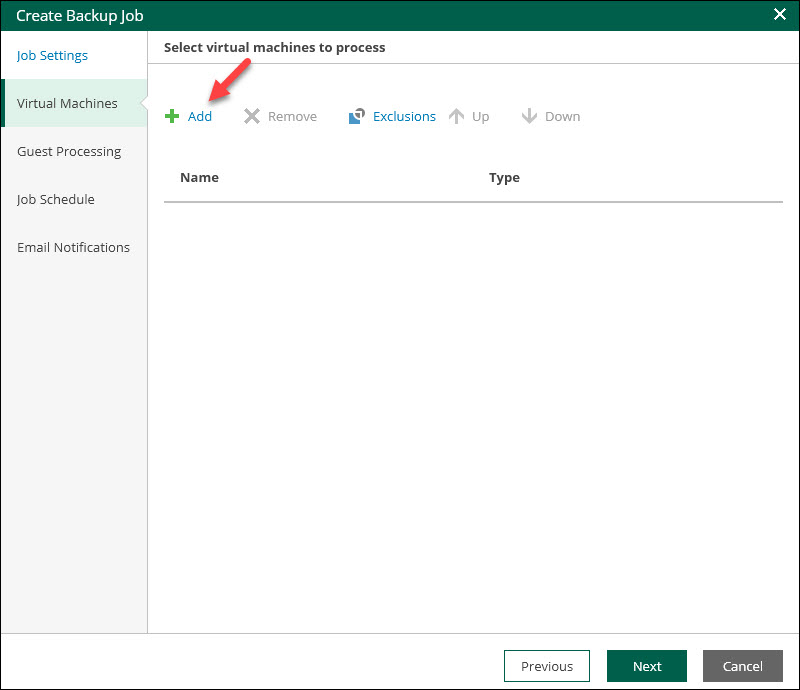
Add Virtual Machines
At this step, add a VM or a vApp to the backup job:
1. Click +Add.
The Add Objects window loads.
2. Select an object in the infrastructure tree. You can also search for an object using the search bar at the top.
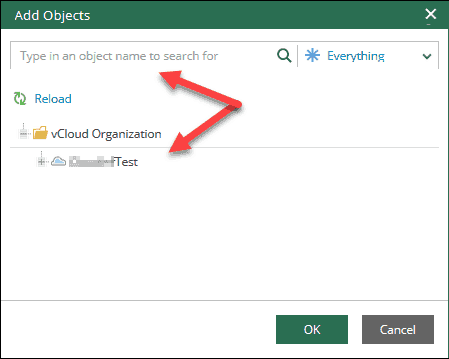
3. Click OK to add the selected object.
4. Click Next to continue.
You can add multiple objects to the list. Use the up and down arrows to change the machine processing order. If you want a machine to be processed first, select it and move it up or down on the list.
If you change your mind, select an object from the list and click Remove to delete it.
Optionally, you can select Exclusions if yoclude a specific VM from machine containers.
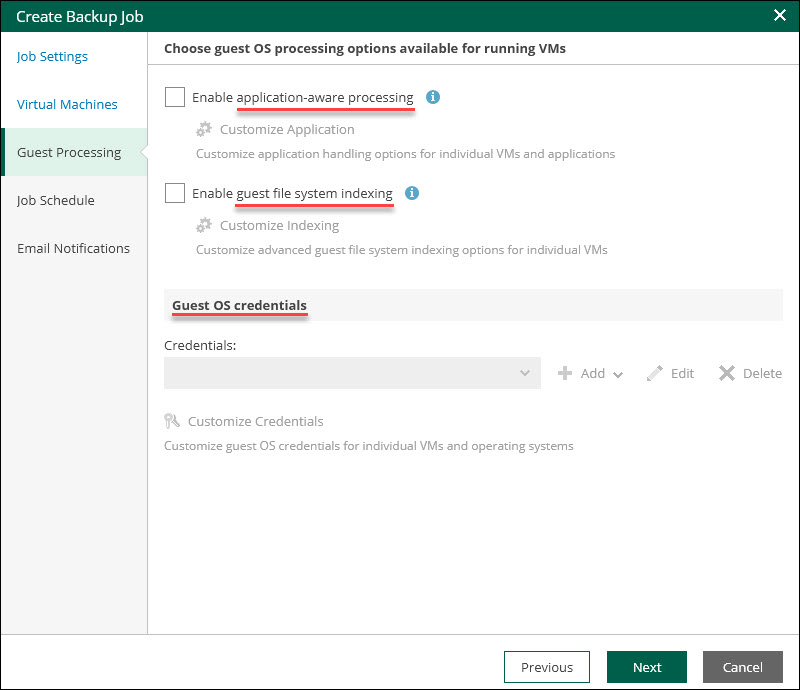
Guest Processing Settings
This step of the wizard is optional. You cClick to skip the step and continue creating the backup job. Otherwise, use the Guest Processing step to configure:
- Application-aware Image Processing. Enables the creation of transactionally consistent backups.
- Guest file system indexing. Allows advanced guest OS file search functions.
- Guest OS credentials. Add Linux or Windows credentials for the account with proper privileges to add executable files to the guest OS.
Customize Job Scheduling
The Job Schedule section lets you schedule the job to run automatically and define the timeframe.
To configure the job scheduling:
1. Ensure the Run the job automatically box is selected. If you want to run the job manually, unselect the box.
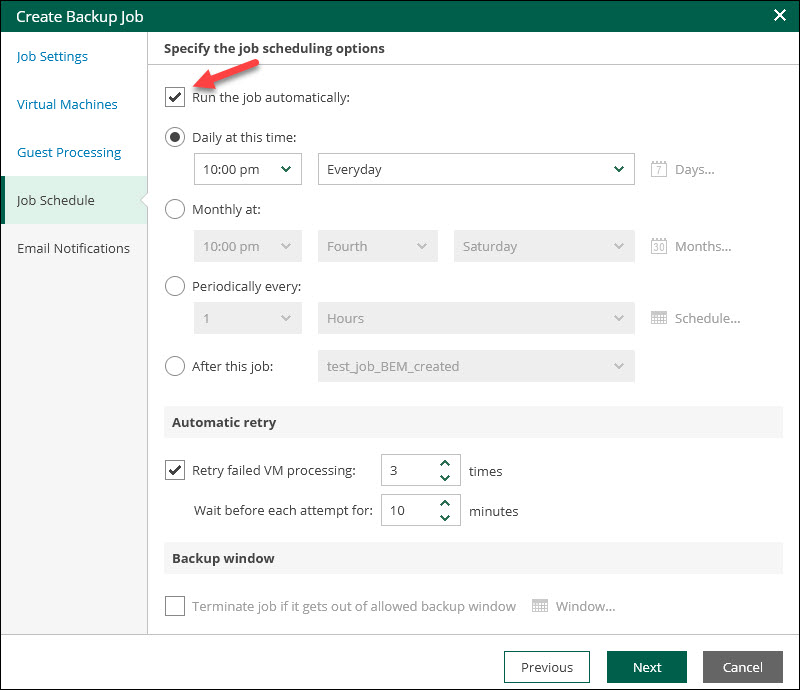
2. Choose whether to run the job daily, monthly, periodically, or after a selected job. Define the desired timeframes.
3. Choose if you want Veeam Backup & Replication to retry failed backup jobs. Select the number of retry times and the interval between each attempt. Only failed machines will be processed.
4. Optionally, select the Terminate job if it gets out of allowed backup window box to set up a backup window for the job. Specify the allowed and prohibited hours.
5. Select Next when ready.
Set Email Notifications
This step lets you enable backup job email notifications. To configure status emails:
1. Select the Enable email notifications checkbox.
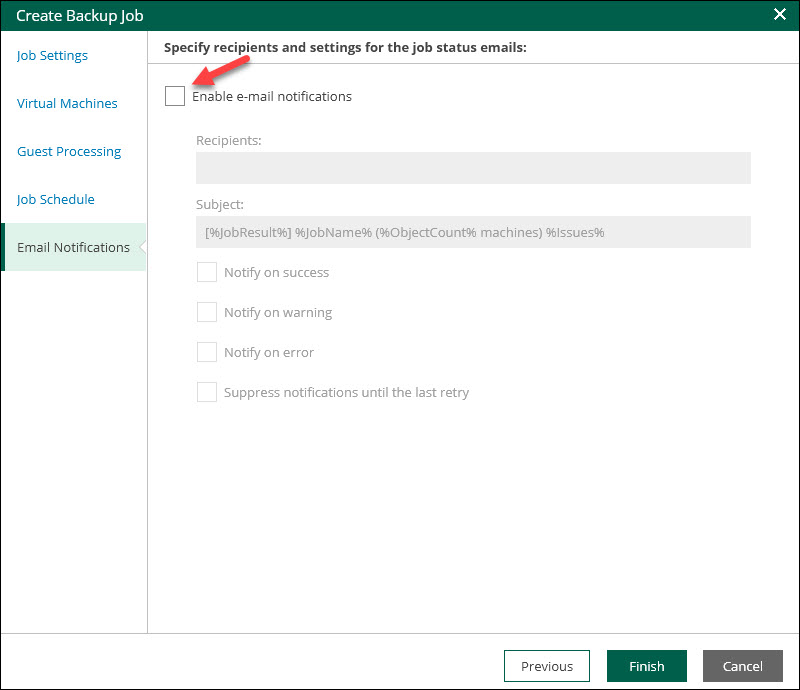
2. Add Recipients. Use a comma between entries.
3. Customize the Subject for email notifications.
4. Select the type of notifications you want to receive.
5. Click Finish to complete adding the backup job.
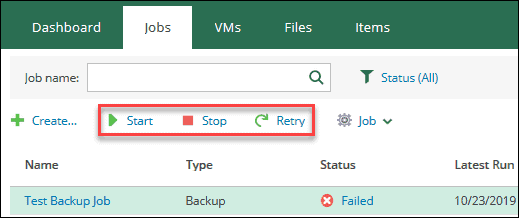
Start, Stop, or Retry Backup Job
After you create a backup job, you need to start it for the first time. Select the job on the list and click the Start button to run it.
To stop the job, select it, and click the Stop button. If the job fails, you can click Retry to try to rerun it.
Disable, Enable, Delete, or Edit Job Settings
The Self-Service Backup Portal allows you to disable a backup job, enable it, delete, or edit its settings. You can find these actions under the Job drop-down menu.
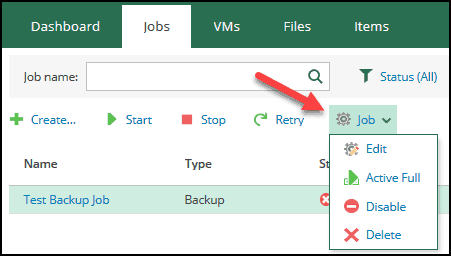
To complete any of these actions, select a job from the list and click the desired action. Note that when you disable a backup job, no restore points will be copied to the target backup location, and source backup repositories will not be monitored.
To edit a job’s settings, follow the same steps as when adding a new job.
Search for Backup Job
To search for a specific job, use the search bar at the top of the Jobs menu. You can filter the search results by job status. This feature is especially useful if you have numerous jobs on your list.
To locate a job, start typing the name, and the list instantly filters the results.

View Job Statistics
The Jobs menu contains a list of all existing jobs for your organization. The list shows basic information such as name, the type of job, status, description, and the date/time when a job ran and its next scheduled run.
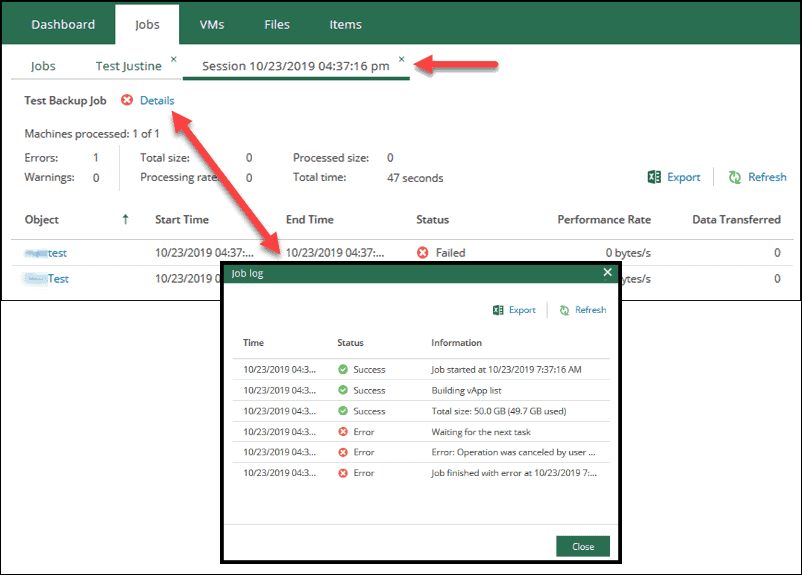
To view all previous sessions for a job, click the name of a job on the list. The details open in a new tab.
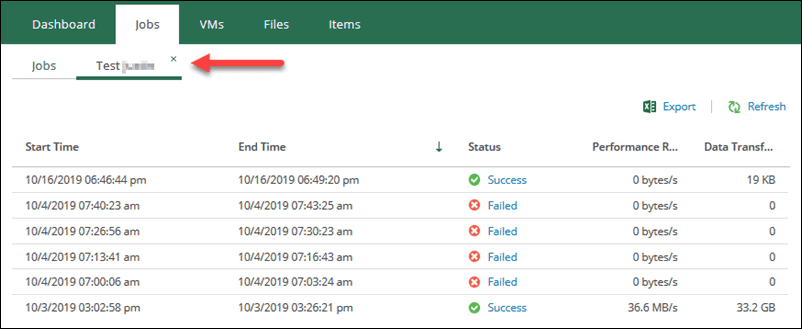
To view the details of a session, click the status description link. The details open in a new tab.
Here you can also see the in-depth logs and backup process steps. Click the Details link to view the Job log.
Export Job Statistics Data
Every report in the Jobs section has an export function. To save the report to your local machine, open a job, a job session, or a job log, and click the Export button. Choose a location for the Excel file when the pop-up appears.
The Excel sheet contains all the information you see in the report you are viewing in the portal at that time.
Restore Virtual Machines, vApps, or Virtual Disks
The VMs tab of the Self-Service Backup Portal lets you view details and information for your VMs and vApps. You can restore a VM/vApp, delete it, restore individual virtual disks, or view the restore history.

View or Search for VM
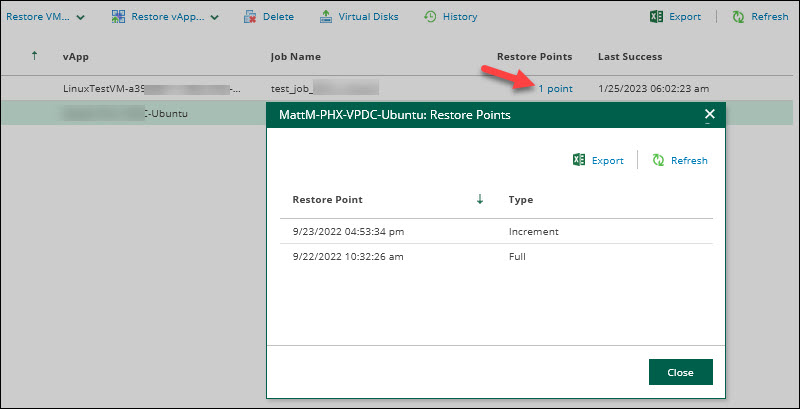
The landing page of the VMs section shows all available VM backups. You can select a VM from the list to view the details or use the search bar to locate a VM. Furthermore, you can click the History button to view the complete VMs restore history.
On the list, click the Restore points link to view the type and timestamps of restore points for a machine.
Restore VM or vApp
Restoring a VM or a vApp is a simple process:
1. Select a VM or a vApp from the list in the VMs section of the portal.
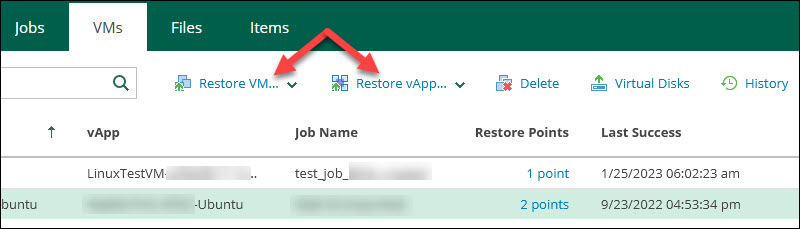
2. Click Restore VM… or Restore vApp.
3. Choose Overwrite or Keep. If you select Overwrite, you will shut down and replace the original VM or vApp in production with the one from the backup. If you choose Keep, a VM or vApp will be restored next to the corresponding VM or vApp in production. The restored VM or vApp will have "_restored" appended to the original name. For example, "testVM_restored" or "testvApp_restored."
4. Select a restore point from the list. Optionally, you can choose the Quick rollback option or Power on VM after restoring.
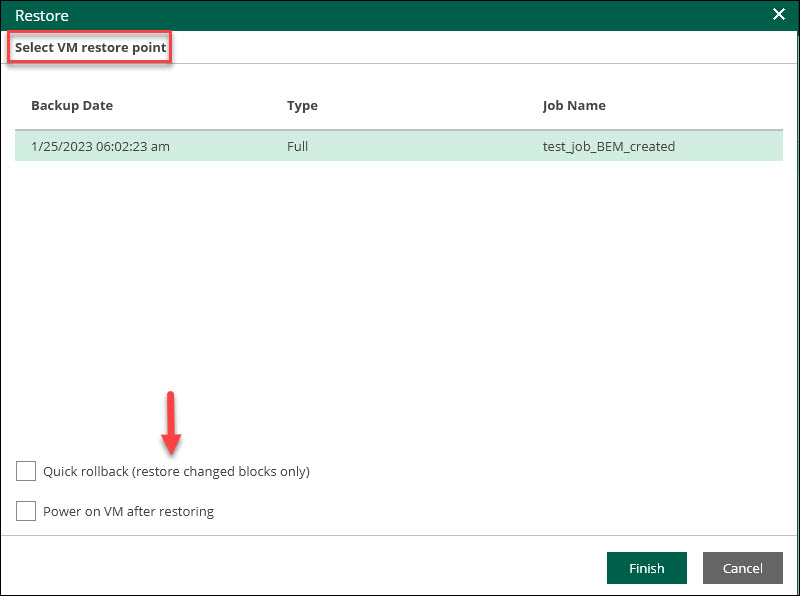
5. Select Finish to proceed with the restore operation. To follow the progress, click History in the toolbar on the VMs landing page.
Delete VM or vApp from Backup
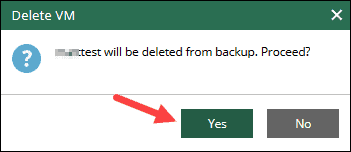
To delete a virtual machine or a vApp from a backup:
1. Select a VM or vApp from the list in the VMs section of the portal.
2. Click Delete on the toolbar.
3. Select Yes to confirm you want to delete the selected VM or vApp.
The object may remain on the list after you delete it. The list will update once the VM or vApp records are removed from the main backup database.
Note: Deleting a vApp removes all VMs in the backup. When you delete the last VM in a vApp, both the VM and the vApp are removed from the backup. Similarly, when you delete the last vApp in the backup, the whole backup is removed.
Restore Virtual Disk
Restoring a virtual disk is a valuable feature when a VM disk becomes corrupted. You can restore a virtual disk and attach it again to the source VM to replace the old disk or attach the disk to a new VM.
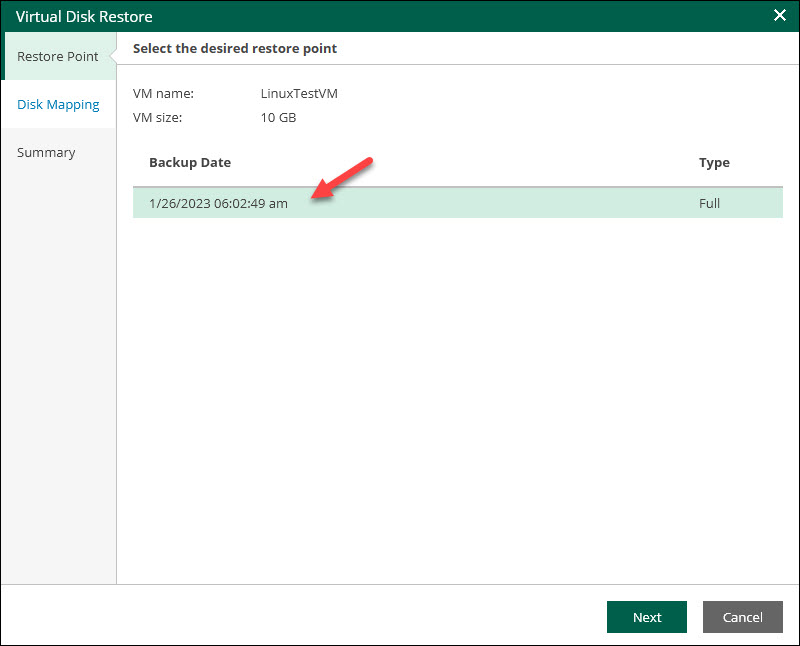
To restore a virtual disk:
1. Click Virtual Disks in the VMs section of the portal to launch the restore wizard. For some operations, the wizard has the Secure Restore step.
2. Select the desired restore point in the Backup Date section and click Next.
3. Specify disk restore settings in the Disk Mapping section. The original VM is selected by default. Click Choose to select a different VM. Select the boxes next to the virtual disks you want to restore. If you want to change the original disk properties, click the Change disk mapping link.
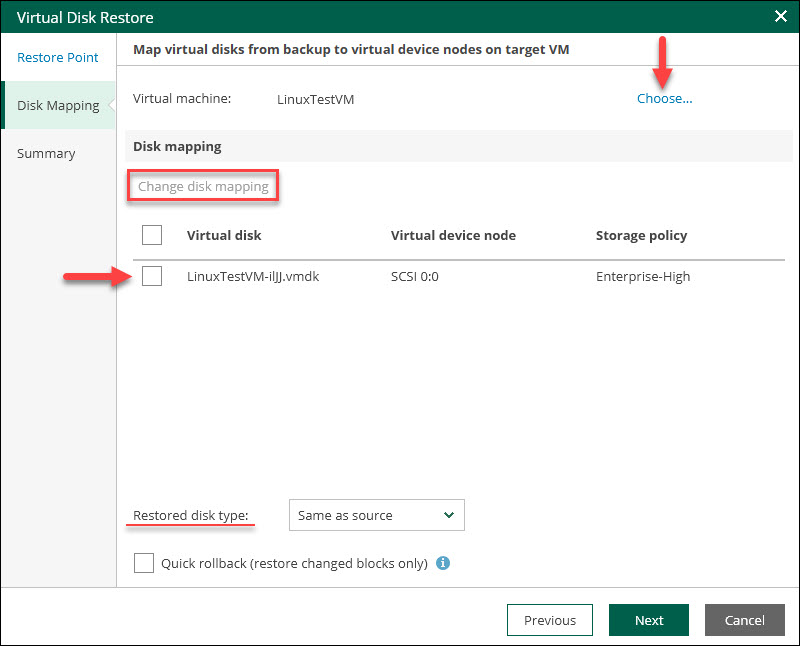
Optionally, change the Restored disk type. When you finish the setup, click Next to proceed.
4. Review the configuration at the Summary step. Enable the Power on target VM after disk is restored to start the VM when the restore completes.
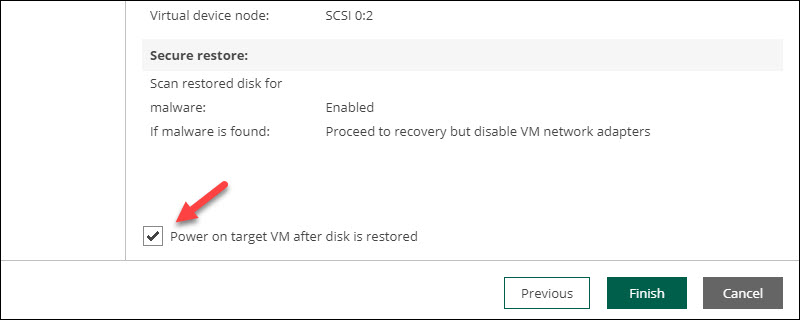
5. Click Finish to complete the virtual disk restore process.
Restore Files
In the Files section of the portal, you can search and restore guest OS files from the guest OS file system in a VM backup. This section lets you search only the backups you made with the guest files indexing option.
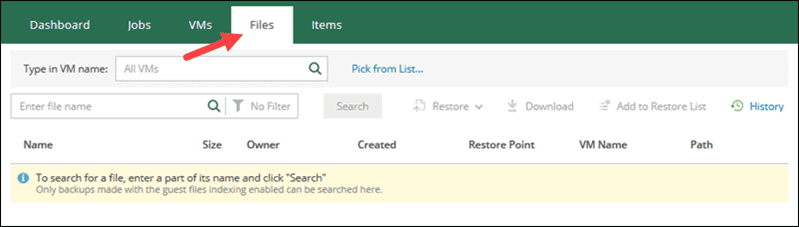
Please refer to Veeam’s file restore guide for in-depth information on this feature.
Restore Items
The Items section of the portal lets you complete item-level recovery from your backups. The recovery includes restoring application items from:
- Microsoft SQL Server databases. To restore an SQL server item, please follow the SQL restore procedure.
- Oracle databases. To restore an Oracle database item, please follow the Oracle restore procedure.
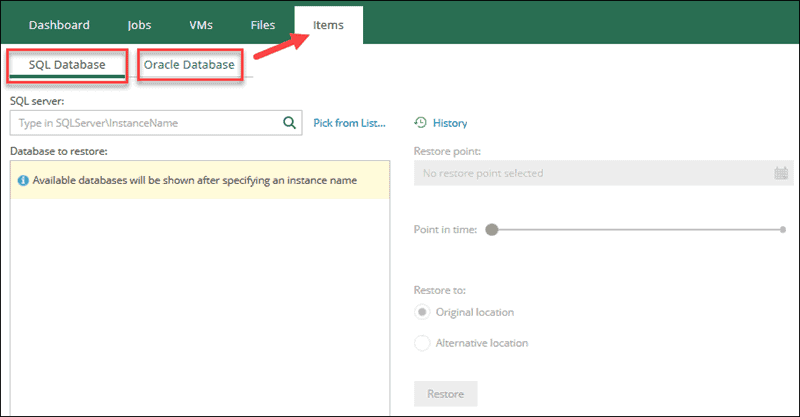
For the item-level recovery to work, you have to configure backup jobs with application-aware processing.
Conclusion
By following the instructions in this guide, you can successfully navigate through the Self-Service Backup Portal for your VMware Cloud Director organization. Create new jobs, restore VMs or vApps, and manage your backups using the intuitive web interface powered by Veeam.