Managed Backup for Microsoft Office 365 powered by Veeam is completely independent of Microsoft’s infrastructure.
In the case of a major outage on Microsoft’s part, you would still have all your emails and be able to view them within the Veeam Explorer for Microsoft Exchange. You can recover items from any point in time using the interface with a traditional mailbox look.
In this guide, you will learn how to add phoenixNAP as a service provider and how to perform Microsoft Exchange restore operations within the Veeam console.

Note: Veeam Backup and Replication and Veeam Explorer for Microsoft Exchange need to be installed on your machine prior to using this guide.
Why Do I Need Managed Backup for Microsoft Office 365?
There is a widespread misunderstanding from the users’ perspective that office 365 provides a full backup solution, which is not the case. While Microsoft keeps your data for a certain amount of time, you can find yourself in a situation that your emails are gone for good. If you need an email that you deleted a year ago, or you may want to access a mailbox from a deleted account, it will not be possible without this backup solution.
There are many use cases where Managed Backup for Microsoft Office 365 can save your business from a major disaster.
- Malicious attacks and other threats. Different viruses, malware or ransomware can infect your organization. This can cause irreparable damage to your Office 365 data if you do not have a valid backup outside Microsoft. The situation gets worse when an account with root access is compromised. In this case, only a full backup can restore your organization’s operation to its original state.
- Insider concerns. It is not uncommon that ex-employees keep access to email for some time after they leave a company. Then, they can log in, permanently delete all emails and cause substantial damage to your organization. With backups safely stored on our cloud repositories, you can always find the emails you need.
- Unintentional actions and email deletion. Accidental deletion of emails or whole folders is virtually unavoidable in any organization. The situation is even more serious when someone moves items around by mistake and you can no longer determine what has been deleted and where the emails belong. Using a simple Veeam interface, you can restore your mailbox to the desired point in time.
Add phoenixNAP as a Service Provider
Before you can start viewing and restoring the mailboxes we backed up for you, you need to add phoenixNAP as a service provider within the Veeam Backup and Replication console. In order to do so, open the console and perform the steps as shown below:
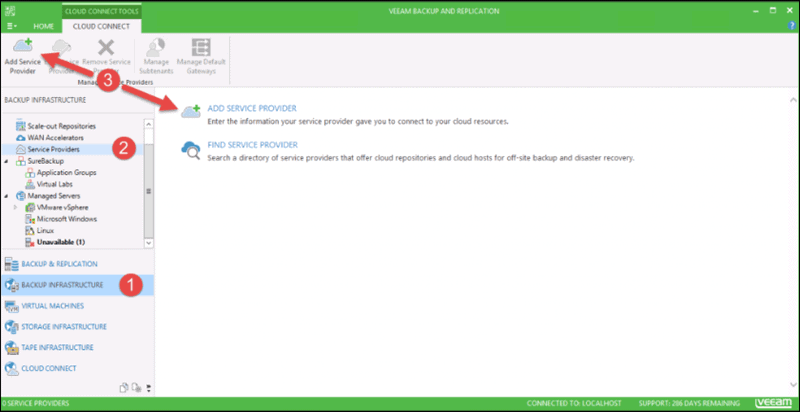
- Navigate to the Backup Infrastructure
- Select Service Providers.
- Click on one of the Add Service Provider buttons to start the wizard.
- Enter the URL for your Office 365 backup repository. You should have receive the URL and other necessary information from phoenixNAP directly.
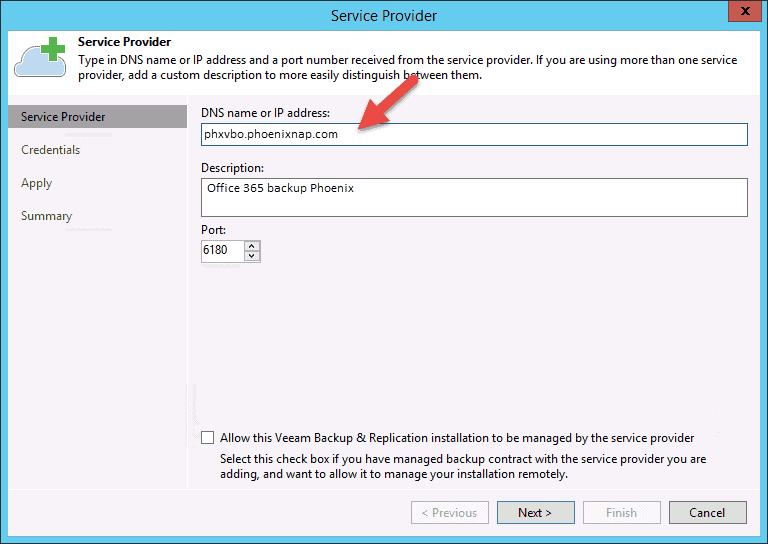
- Change the description of the service provider if you want to. You can leave the default value as well.
- Do not change the port value; it must always be 6180.
- Click Next to proceed. Wait until you get the SSL certificate information.
- Click Add… next to the Credentials field.

- Enter the provided Username and Password as well as the Description for the user and click OK.
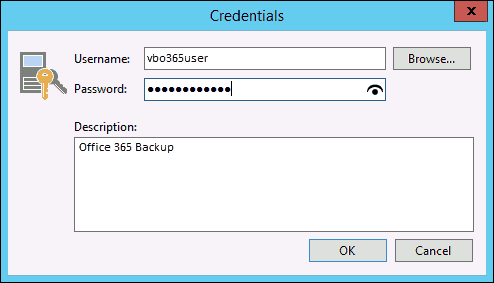
- Click Apply and wait for the authorization of your credentials to complete. You will see the details of your repository. You can then proceed to the next screen.
- The wizard starts the connection setup to your repository.
- Click Finish once the setup completes. You will then be able to see the service provider on the list.
Load Backup Database for Microsoft Exchange
To view and restore your mailboxes or emails, you need to establish a connection with the repository for the service provider you added previously. To do so:
- Launch Veeam Explorer for Microsoft Exchange from your desktop or the Start menu. The explorer window shows up.
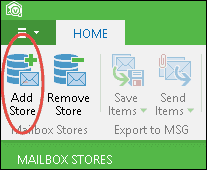
- Click Add Store and select Veeam Backup for Microsoft Office 365 Service Provider. It should be the option at the bottom of the list.
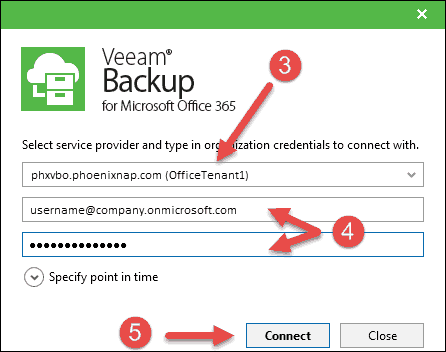
- In the pop-up window, select an available tenant from the drop-down list. The list will contain the tenants that phoenixNAP set up for you.
- Insert the Microsoft Office 365 username and password for your organization. Optionally, you can select a specific point in time you want to load the files from. Simply click on Specify point in time and choose one of the options. You can decide if you want to show deleted items or all items that the user has modified.
- Click Connect.
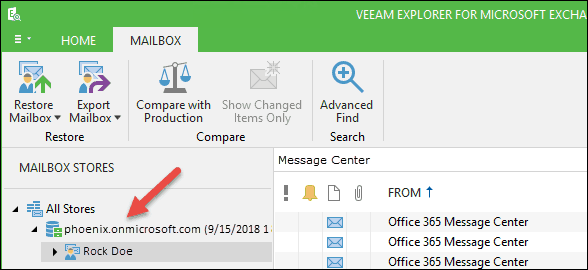
When the connection is established, the explorer shows your organization and user under the All Stores menu.
View Items from Microsoft Exchange Backup
To view all your folders and objects for your Microsoft Exchange account inside a backup file, click on a username to expand all folders. Depending on the number of folders, this action may take a few seconds. Click on any item from the list on the left side in the navigation pane to show its content in the preview pane on the right side of the screen.
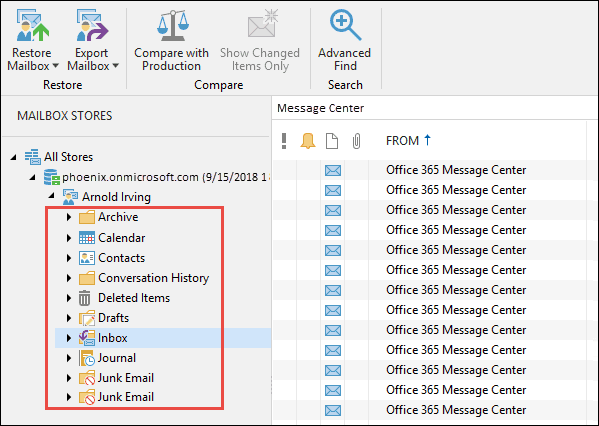
To open a specific message, right-click on it and select Open. A pop-up window appears with the message contents. To locate a specific message, you can use the search bar at the top of the preview pane or Advanced Find.
Note: Did you know that as of November 2019, Veeam Backup for Office 365 offers an increased ability to offload backup data to cloud providers with the introduction of Object Storage? Check out our guide on How to Leverage Object Storage with Veeam Backup Office 365.
Restore Microsoft Exchange Mailbox Data
Veeam Explorer for Microsoft Exchange provides multiple locations and options for restoring your mailbox data. You can choose between restoring single items, folders or whole mailboxes. Every restore procedure is quick and simple to carry out.
Restore Whole Mailbox Store Data
Use this option when you have multiple mailboxes under a certain mailbox store. To restore multiple mailboxes, follow these steps:
- Select a mailbox store in the navigation pane on the left.
- Click the Restore Mailboxes button in the Home tab at the top of the explorer window.

- Insert the credentials in the Restore Wizard window. There are two options:
- To restore to the on-premise Exchange server type in the credentials in this format: domain\username, e.g. PNAP\Admin365 or use the current account.
- To restore to the Exchange Online server, type in the credentials in the format you used to add a mailbox store, e.g. <username>@<orgname>.onmicrosoft.com.
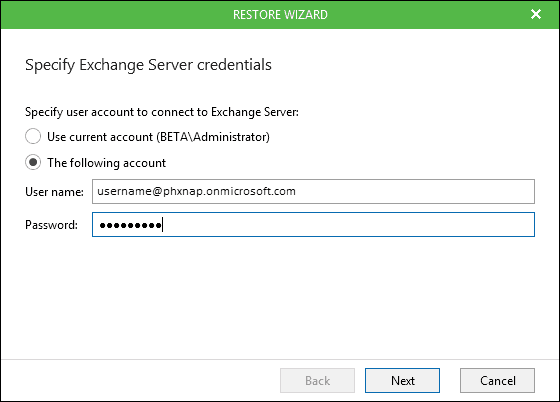
- Click Next.

- Select the mailboxes you want to restore and click Next.
- Type in the mailbox server path and choose a folder where to recover the files and click Next.

- Select the desired restore settings. You can exclude folders, changed or missing items, and mark all recovered items as unread. If you want to view the most recent items while the restore procedure is still in progress in the background, check off the box Finish the restoration of recent items before restoring the remaining items and select the desired number of days.
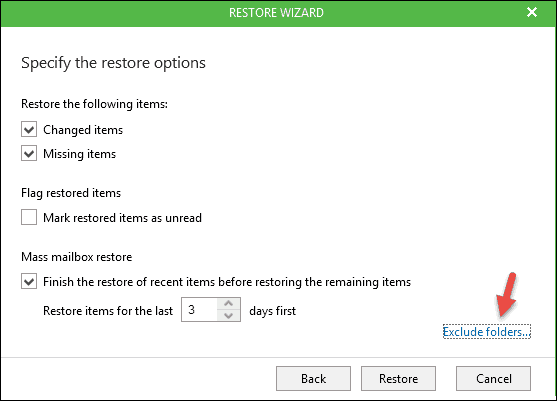
- Click Restore to start the job.
Restore Data for a Single Mailbox
The steps for restoring single mailboxes do not differ a lot from restoring multiple mailboxes or individual folders. To recover a single mailbox:
- Navigate to a mailbox in the navigation pane on the left.
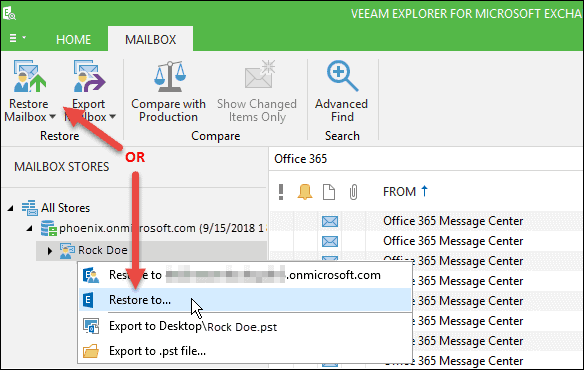
- Click the Restore Mailbox button in the Home tab at the top explorer window and select Restore to… You can also find this option by right-clicking a mailbox in the navigation pane.
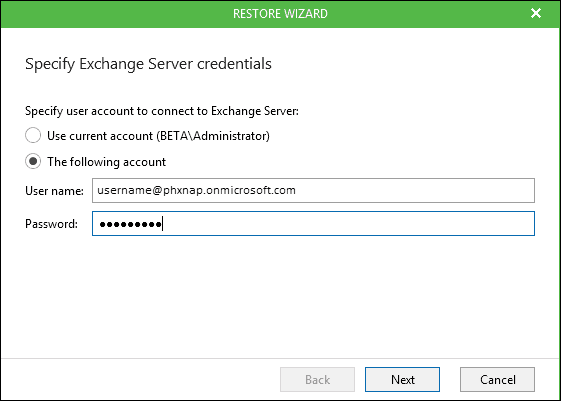
- Insert the credentials in the Restore Wizard window. There are two options:
- To restore to the on-premise Exchange server type in the credentials in this format: domainusername, e.g. PNAPAdmin365 or use the current account.
- To restore to the Exchange Online server, type in the credentials in the format you used to add a mailbox store, e.g. @.onmicrosoft.com.
- Click Next.
- Type in the mailbox server path and choose a folder where to restore the files and click Next.

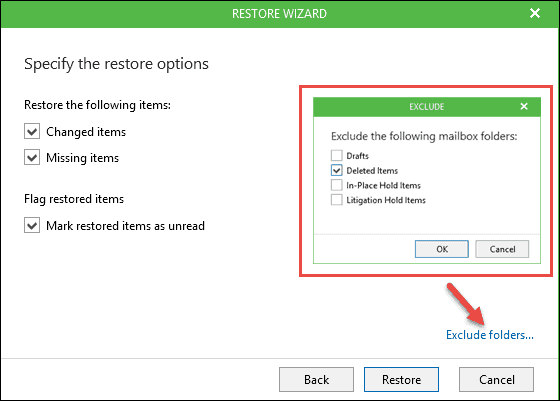
- Select the desired restore settings. You can exclude changed or missing items, and mark all recovered items as unread. If you want to exclude certain folders, you can do that here as well.
- Click Restore to start the job.
Restore Single Items from a Mailbox
With Veeam Explorer for Microsoft Exchange, you can restore, save, or export a single message from a desired mailbox. To do so:
- Navigate to a mailbox and a folder where the email you are looking for is located.
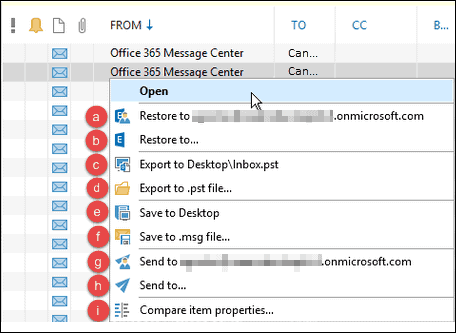
- Right-click the message to get the list of available options:
- Restore the message to the current Microsoft Office 365 account.
- Restore the message to an account you specify.
- Export the message in the .pst format to your Desktop.
- Export the message in the .pst format to a folder on your machine.
- Save the message in the .msg format to your Desktop.
- Save the message in the .pst format to a folder on your machine.
- Send the message to the current Microsoft Office 365 account.
- Send the message to an email account you specify.
- View details on what exactly has changed for the file since the last backup.
PhoenixNAP’s Managed Backup for Microsoft Office 365 offering allows you to back up your Microsoft Exchange data and store it on our cloud repositories.
Our NOC engineers will manage the backups for you so you can focus on your business. Your data will be available 24/7 with a retention policy customized to your needs. You can restore deleted emails or whole mailboxes without any limitations.
