A Job is a Kubernetes object type whose purpose is to allow administrators to perform finite tasks inside a cluster. Unlike other Kubernetes objects, which ensure the desired number of pods are always running, Jobs terminate pods once the operation finishes.
Regular Kubernetes Jobs can run multiple times if the number of completions declared in the YAML file is larger than one. However, each job instance runs either simultaneously with others or immediately after the previous one completes. To schedule job instances for a later time, use the CronJob controller.
This tutorial will teach you how to deploy and use Kubernetes CronJobs.
Prerequisites
What is Kubernetes CronJob?
The CronJob is a Kubernetes controller that creates Jobs on a repeating schedule. It utilizes the Cron scheduling format used in Linux for script and command scheduling.
CronJobs are used for regularly repeating cluster actions, such as report generation and backups. Furthermore, they allow administrators to schedule an individual task for a later time, such as a period of low activity in the cluster.
How to Create Kubernetes CronJob
Creating a CronJob is similar to creating a regular Job. The YAML manifest file defines:
- Name of the job.
- Containers to run in the pod.
- Commands to execute.
Follow the steps below to create a CronJob on your cluster.
1. Create a YAML file in a text editor.
nano [filename].yaml2. Configure the CronJob in the file. The spec.schedule field provides the frequency of the job's repetition.
apiVersion: batch/v1beta1
kind: CronJob
metadata:
  name: test-cron-job
spec:
  schedule: "*/1 * * * *"
  jobTemplate:
    metadata:
      name: test-job
    spec:
      template:
        spec:
          containers:
          - name: test
            image: alpine:latest
            command:
            - "bin/sh"
            - "-c"
            - "for i in 1 2 3 4 5 6 7 8 9 ; do echo $i ; done"
          restartPolicy: Never
The example above creates a job that executes every minute. The job creates a pod running the alpine:latest image and then runs commands to print numbers from one to nine in the shell.
Save the file and exit.
3. Apply the configuration with kubectl apply.
kubectl apply -f [filename].yamlThe output confirms the CronJob creation.

4. Use kubectl get with the --watch option to monitor the task execution in real time.
kubectl get cronjob --watchThe output shows that the job is executed approximately every minute.
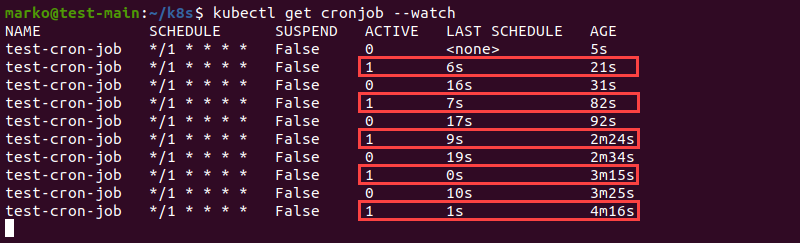
Note: One of the CronJob limitations is that it does not always precisely follow the schedule configured in the manifest. While these occurrences are rare, it is possible that at the time of the scheduled execution, no jobs will start or two jobs will be created.
How to Configure CronJob
The cron syntax in the spec.schedule field is five characters long, and each character represents one division of time. The table below shows the numbers that can populate each field.
* | * | * | * | * |
| Minutes (0-59) | Hours (0-23) | Days in a month (1-31) | Months (1-12) | Weekdays (0-6) (Sunday to Saturday) |
Note: Some systems accept numbers from one to seven in the weekdays field. In those systems, both zero and seven stand for Sunday.
An asterisk symbol in an expression signifies the unrestricted value. The example below schedules a job for 10 PM every Friday, regardless of the date:
0 22 * * 5The next example schedules the job for August 28 at 9:15 AM.
15 9 28 8 *You can also schedule tasks to be performed at a time interval. For example, to schedule a task every hour, type:
* */1 * * *How to Delete CronJob
Use kubectl delete to remove the CronJob and related pods from the cluster.
kubectl delete cronjob [cronjob-name]The output confirms the successful deletion.

You can also delete the CronJob by referring to its YAML file:
kubectl delete -f [filename].yamlNote: With solutions such as Rancher cluster integration and fast and reliable servers, phoenixNAP's Bare Metal Cloud is a great place to host your cluster.
Conclusion
After reading this article, you should be able to create and configure CronJobs on your Kubernetes Cluster. The tutorial included creation of a YAML manifest file, configuration options, and the ways to remove the CronJob from your cluster.
Next, learn how to set up a cron job on Mac.