A Kubernetes cluster consists of multiple node machines that host pods, the smallest units of Kubernetes architecture. A cluster administrator defines the desired state with the necessary number of pod replicas. Accordingly, Kubernetes makes sure that the requested number of pods is always up and running.
However, when managing a Kubernetes cluster, certain tasks require pods to terminate after completion. To perform those tasks, administrators use specific workload resources called jobs.
This tutorial will show you how to create, manage, and delete Kubernetes jobs.
Prerequisites
What is Kubernetes Job?
A Kubernetes job is a workload controller object that performs one or more finite tasks in a cluster. The finite nature of jobs differentiates them from most controller objects, such as deployments, replica sets, stateful sets, and daemon sets.
While these objects permanently maintain the desired state and number of pods in the cluster, jobs run until they complete the task and then terminate the associated pods.
Kubernetes Job Use Cases
Kubernetes jobs can perform many important tasks in a cluster, including:
- Maintenance tasks (such as performing backups).
- Large calculations.
- Batch tasks (such as sending emails).
- Monitoring node behaviors.
- Managing work queues.
- Some Helm charts use jobs to install apps.
How to Create Kubernetes Job
A job in Kubernetes is created using a YAML file. Follow the steps below to deploy a Kubernetes job.
1. Create a YAML file using a text editor.
nano [filename].yamlThe file provides the necessary configuration for the job.
2. The example below creates a test-job file. This job runs a pod with a container based on the alpine:latest Docker image. Inside the container, the job prints the numbers from one to nine and then terminates the container.
apiVersion: batch/v1
kind: Job
metadata:
  name: test-job
spec:
  template:
    metadata:
      name: test-job
    spec:
      containers:
      - name: test
        image: alpine:latest
        command:
        - "bin/sh"
        - "-c"
        - "for i in 1 2 3 4 5 6 7 8 9 ; do echo $i ; done"
      restartPolicy: Never
Save and exit the file.
3. Apply the YAML file using kubectl:
kubectl apply -f [filename].yamlThe output confirms the successful job creation.

4. Confirm the job execution by checking the state of the pods in the cluster:
kubectl get podThe READY column shows the pod is not running anymore and the pod's status is Completed.

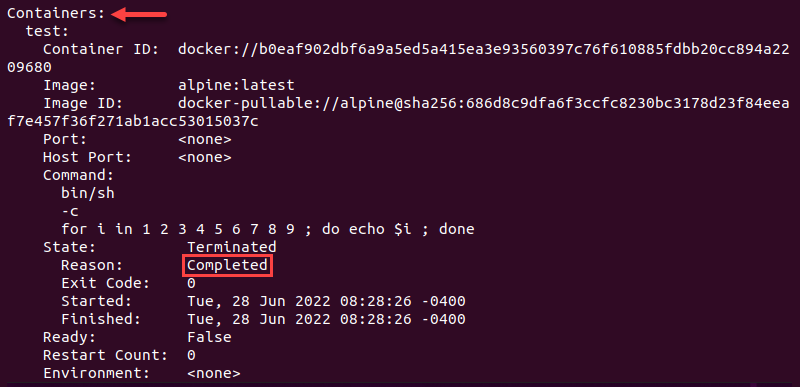
Use kubectl describe to see pod details:
kubectl describe pod [pod-name]The output shows the pod's status as Succeeded.
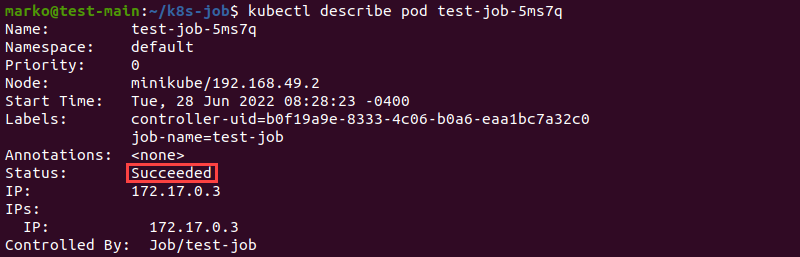
The Containers section of the output lists the container state as Terminated. The reason for termination is the completion of the operation.
You can also check the job itself by typing the following command:
kubectl get jobThe COMPLETIONS column shows the job completed successfully.

Note: You can run Kubernetes anywhere - on dedicated servers, in the cloud, or using IaaS solutions such as phoenixNAP's Bare Metal Cloud.
Managing Kubernetes Job
You can configure a Kubernetes job to execute once or multiple times. Multiple instances of a single job can run successively or simultaneously.
Execute Job More Than Once
To configure a job to perform the same task more than once, add the completions field in the spec section of the YAML manifest.
apiVersion: batch/v1
kind: Job
metadata:
name: test-job
spec:
completions: 10
template:
metadata:
name: test-job
spec:
containers:
- name: test
image: alpine:latest
command:
- "bin/sh"
- "-c"
- "for i in 1 2 3 4 5 6 7 8 9 ; do echo $i ; done"
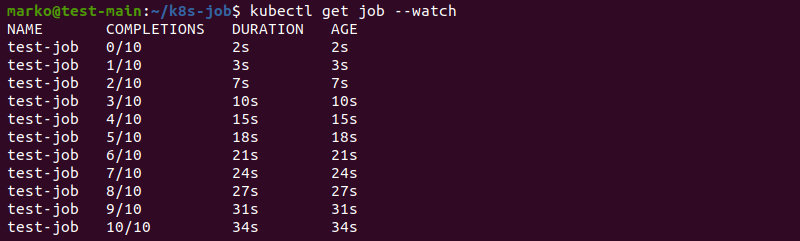
restartPolicy: NeverAfter applying the YAML above, use the --watch flag with kubectl get to monitor the job completion in real-time.
kubectl get job --watchWhen configured this way, the job completes a single task instance and starts another until it reaches the number of completions provided in the YAML file.
Execute Parallel Job Instances
Kubernetes can execute more than one task instance at the same time. With sufficient resources, this action improves the speed of job completion.
To use this feature, state the number of tasks you want the system to run simultaneously in the spec.parallelism field of the YAML file.
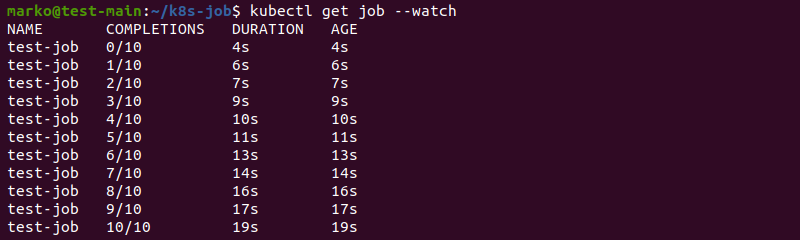
The example below defines a job that runs ten times, with five instances running simultaneously.
apiVersion: batch/v1
kind: Job
metadata:
  name: test-job
spec:
  completions: 10
  parallelism: 5
  template:
    metadata:
      name: test-job
    spec:
      containers:
      - name: test
        image: alpine:latest
        command:
        - "bin/sh"
        - "-c"
        - "for i in 1 2 3 4 5 6 7 8 9 ; do echo $i ; done"
      restartPolicy: Never
After you apply the YAML file, check the progress of the job:
kubectl get job --watchThe output shows that the task performed much faster with the parallelism option included:
Limit Time for Job Completion
Include the spec.activeDeadlineSeconds field in the job's YAML manifest to limit the duration of the job. The number value corresponds to the number of seconds after which the job terminates, regardless of whether it was fully performed.
The example below shows a job that will repeat ten times, unless it exceeds the limit of ten seconds:
apiVersion: batch/v1
kind: Job
metadata:
  name: test-job
spec:
  completions: 10
  activeDeadlineSeconds: 10
  template:
    metadata:
      name: test-job
    spec:
      containers:
      - name: test
        image: alpine:latest
        command:
        - "bin/sh"
        - "-c"
        - "for i in 1 2 3 4 5 6 7 8 9 ; do echo $i ; done"
      restartPolicy: Never
Save and apply the file. After some time, check the status of the pods:
kubectl get podThe output shows only three pods completed.

Check the job status:
kubectl get job --watchThe output shows the last job instance completed at the ten-second mark.

To see why the job stopped executing, view the job's details by typing:
kubectl describe job [job-name]The reason provided in the command output is DeadlineExceeded.

Schedule Job
Use CronJobs to create repeating tasks or schedule jobs to be performed at a later time. CronJobs utilize the Cron scheduling format used in Linux for scheduling commands and scripts.
For more information about CronJobs, read our Kubernetes CronJob Guide.
How to Delete Kubernetes Job
Delete a job in Kubernetes using the following command:
kubectl delete job [job-name]Alternatively, delete the job using its YAML file:
kubectl delete -f [filename].yamlThe output confirms the successful deletion of the job.

Note: When you delete a job, all associated pods are removed, too.
Conclusion
After reading this tutorial, you should know how to deploy and configure Kubernetes jobs to suit the needs of your cluster.
To continue learning about Kubernetes objects, read How to Create and Use ConfigMap.