Node Version Manager (NVM) is an essential tool for managing multiple Node.js versions on your system. Different projects often require different Node.js versions, and using a single globally installed version can cause compatibility problems between projects.
However, NVM allows you to install and manage multiple Node.js versions, making it easy to switch between them. This is useful for developers who use Ubuntu or other Linux systems.
This tutorial will explain how to install NVM on Ubuntu.
Prerequisites
- Ubuntu installed.
- Access to the terminal.
- sudo or root privileges.
Installing NVM on Ubuntu
Node.js is a JavaScript runtime environment that enables developers to build fast and scalable network applications. However, different projects often require different versions. NVM simplifies managing these versions by allowing you to install, use, and switch between them.
To install NVM on Ubuntu, take the following steps:
1. Update the repositories to ensure you get the latest NVM version:
sudo apt update
2. Download and install the NVM installation script with curl:
curl -o- https://raw.githubusercontent.com/nvm-sh/nvm/v0.40.0/install.sh | bash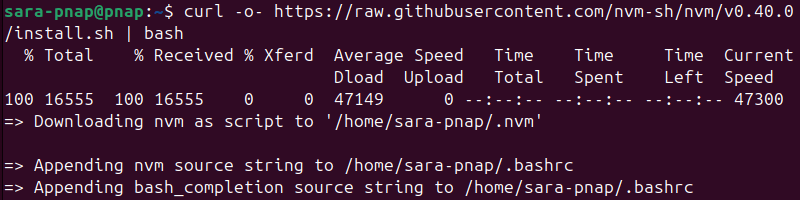
Note: If curl is not installed on your system, get it with: sudo apt install curl.
3. After the installation script runs, activate NVM by reloading the shell configuration file. If you're using the bash shell, run the source command to reload the .bashrc file:
source ~/.bashrcThe command has no output, but this process sets up the necessary environment variables for NVM to work correctly in your shell.
4. Check the NVM version to verify the installation:
nvm --version
Using NVM on Ubuntu
Once NVM is installed and running on your Ubuntu system, you can manage multiple Node.js versions. NVM makes it easy to install new versions, switch between them, and set project-wide defaults.
The following sections explain different ways to install, use, and manage Node.js versions with NVM on Ubuntu.
Install a Node.js Version
NVM provides a way to install either the latest stable release, the Long-Term Support (LTS) version, or a specific version required for your project.
To install the latest stable Node.js version, run:
nvm install node
This command downloads and installs the most recent stable release, which in this case is v23.11.0. However, current releases often include the newest features, which are sometimes not production-ready. For more stable environments, use a Long-Term Support (LTS) version.
To install the latest LTS version, enter:
nvm install --lts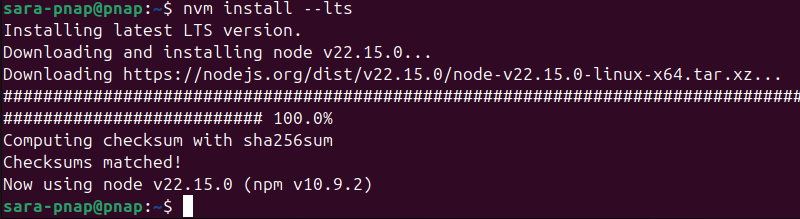
LTS versions receive critical updates and security patches for a longer period, making them suitable for most applications. In this case, the latest LTS version is v22.15.0.
In some cases, the project requires a specific version of Node.js. To find all available versions, including older and pre-release builds, run:
nvm ls-remote
The output displays all available releases, including LTS and the latest versions. These are highlighted in color (green for LTS, blue for the latest).
After identifying the required version, install it using:
nvm install [version]Replace [version] with the exact number. For example, one version is v18.17.1. Install it with:
nvm install v18.17.1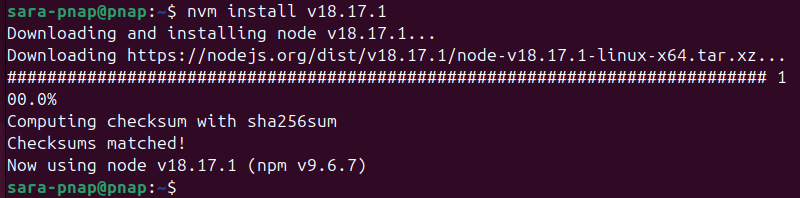
Switch Between Node.js Versions
After installing a new version, NVM automatically switches to it for the current shell session. This lets you start using it immediately without any extra steps. However, when multiple versions are present, switching manually is often necessary.
To activate a different installed version, use:
nvm use [version]For example, to switch to v18.17.1, run:
nvm use v18.17.1
To switch to the most recent installed LTS release, run:
nvm use --lts
The active version applies only to the current terminal session. To set a version across sessions, you can set a default alias after verifying the installed versions.
List and Verify Installed Versions
Once multiple Node.js versions are installed, check which ones are available and which version is currently active in your terminal session. To list all Node.js versions installed via NVM, use nvm with the ls command:
nvm ls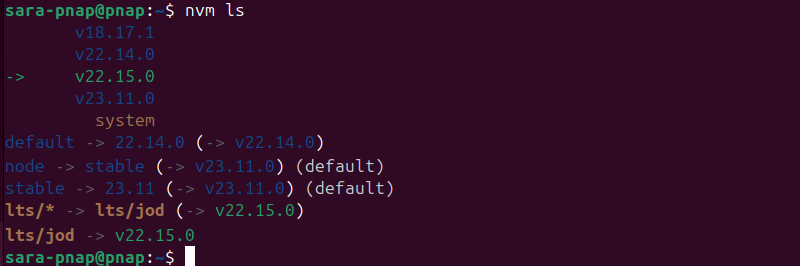
This command displays a list of all versions installed on your system. It also shows any defined aliases and highlights the active version with an arrow.
To confirm which version of Node.js is currently in use, run:
nvm current
This command returns only the version number currently active in your session. It is helpful when switching between versions to ensure the correct one is in use.
Create and Manage Aliases
NVM allows you to create aliases for installed Node.js versions. Aliases make it easier to reference specific versions by custom names or to set a default version for new terminal sessions.
This is especially useful when managing multiple projects that use different Node.js versions.
To set a default version for all new terminal sessions, use nvm with the alias command:
nvm alias default [version]This assigns the specified version as the default. NVM loads it automatically whenever a terminal session starts without explicitly selecting a version.
For example, to set version 22.15.0 as the default, run:
nvm alias default 22.15.0
After setting this alias, every new terminal session uses version 22.15.0 by default unless another version is selected. To verify the default version is active in a new shell session, open a new terminal and run:
node -v
Another option is to create custom aliases for specific versions using:
nvm alias [alias-name] [version]For example, to create an alias named dev for version 18.17.1, run:
nvm alias dev 18.17.1
To switch to this alias, use:
nvm use dev
To list all your aliases and their corresponding versions, run:
nvm alias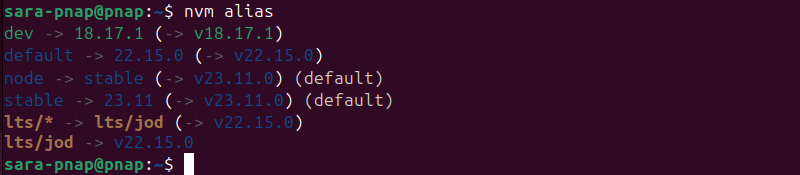
If you want to remove an alias, use:
nvm unalias [alias-name]For example, to remove the dev alias, run:
nvm unalias dev
Uninstall Node.js Versions
Use NVM to remove Node.js versions that are no longer needed. This keeps your environment clean and reduces potential version conflicts.
Before uninstalling, switch to a different version. NVM does not allow removing the currently in-use version. To switch versions, use:
nvm use [version]For example, if you want to uninstall version 18.17.1, first switch to 22.15.0 with:
nvm use 22.15.0
Once you've switched, run the following command to uninstall a specific version:
nvm uninstall [version]In this case, remove version 18.17.1 with:
nvm uninstall 18.17.1
Uninstalling NVM
If you no longer need NVM or want to revert to the system's default Node.js version, uninstall NVM.
To do that, take the following steps:
1. Deactivate NVM using the following command:
nvm deactivate
The process clears any path variables and ensures no conflicts occur when removing versions of Node.js.
2. Remove NVM from your system with:
nvm unloadThe command produces no output but removes NVM-related environment variables and cleans up the current session. The process ensures NVM is no longer active in your terminal session.
3. Access the .bashrc file using a text editor of choice. To access it using Nano, run:
sudo nano .bashrc4. Remove the following lines:
export NVM_DIR="$HOME/.nvm"
[ -s "$NVM_DIR/nvm.sh" ] && . "$NVM_DIR/nvm.sh" # This loads nvm
[ -s "$NVM_DIR/bash_completion" ] && . "$NVM_DIR/bash_completion" # This loads nvm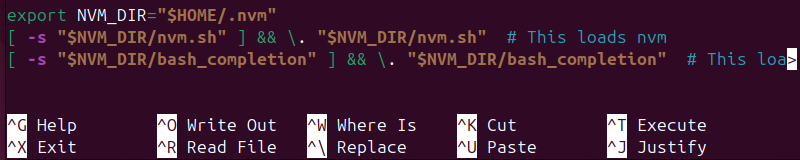
These lines are added during NVM installation and must be deleted to prevent NVM from loading in future terminal sessions. After deleting them, save the changes and exit the file.
5. Remove the NVM directory:
rm -rf ~/.nvmThis command has no output, but it deletes the directory and all its contents, fully removing NVM from your system.
6. To apply the changes, run the following command:
source ~/.bashrcThe command has no output. However, NVM is no longer available in any new terminal sessions.
Conclusion
This tutorial explained how to install NVM on an Ubuntu system. It also explained various NVM uses for managing Node.js, such as installing different versions and switching between them. The text also showed how to remove NVM from your system.
Next, learn how to install Node.js on Ubuntu.