MongoDB is a document-based NoSQL database application. Unlike MySQL, it allows each document to have a unique data structure thanks to its flexible schema. MongoDB is ideal for applications that have changing data models.
MongoDB does not come pre-installed on CentOS or Rocky Linux.
In this tutorial, learn how to install MongoDB on CentOS or Rocky Linux.
Prerequisites
- A system running 64-bit CentOS or Rocky Linux.
- User account with sudo or root privileges.
- Access to a terminal window/command line.
Installing MongoDB on CentOS or Rocky Linux
The sections below outline the steps for installing MongoDB on CentOS or Rocky Linux. Follow the instructions and use the commands to install MongoDB on your system.
Step 1: Add the MongoDB Software Repository
By default, MongoDB is not available in the official repositories. To add the MongoDB repositories, open a terminal window and do the following:
1. Create a MongoDB repository configuration file:
sudo nano /etc/yum.repos.d/mongodb-org-8.0.repo2. In the newly created repo configuration file, enter the following lines:
[mongodb-org-8.0]
name=MongoDB Repository
baseurl=https://repo.mongodb.org/yum/redhat/$releasever/mongodb-org/8.0/x86_64/
gpgcheck=1
enabled=1
gpgkey=https://pgp.mongodb.com/server-8.0.asc
3. Save the file (Ctrl+o) and exit (Ctrl+x).
Note: At the time this article was written, MongoDB 8.0 was the latest version. Please check the MongoDB developer page for the latest version.
Step 2: Install MongoDB Software on CentOS or Rocky Linux
Install MongoDB on CentOS or Rocky Linux with the following command:
sudo yum install -y mongodb-org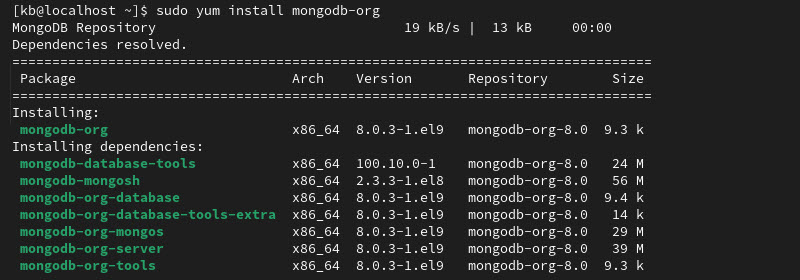
When prompted, press y to download the suggested packages.
Step 3: Start the MongoDB Service
MongoDB acts as a Linux service. To control the service, use the following commands:
1. Start the MongoDB service by entering the following command:
sudo systemctl start mongodIf you receive an error that the unit is not found, run the following command, then try the previous command again:
sudo systemctl daemon-reload2. If using MongoDB as a permanent feature, set it to run at boot:
sudo systemctl enable mongodThe service persists after restart.
3. To check whether the MongoDB service is running, use the following command:
sudo systemctl status mongod
The service shows as active (running).
Set up and Configure MongoDB on CentOS or Rocky Linux
After installing MongoDB, set up and configure the database. The steps below show how to set up a database user and configure authentication.
Create MongoDB Admin User
To create a MongoDB admin user, do the following:
1. Open the Mongo shell for use. Enter the following command in the terminal:
mongoshThe prompt changes to the MongoDB shell running the test database (test>).
2. Switch to the admin database:
use admin
3. Create an administrator user account for the Mongo database:
db.createUser(
{
user: "mdbadmin",
pwd: "password",
roles: [ { role: "userAdminAnyDatabase", db: "admin" } ]
}
)
Note: Replace mdbadmin with an actual administrator username you want to use. Also, replace password with a unique strong, and secure password.
4. List all users:
show users
The system displays details about the username just created. The alphanumeric user ID will be different from this example.
5. Exit the Mongo shell with:
quitThe prompt returns to the terminal shell.
Configure MongoDB Authentication
By default, any user can perform any function in MongoDB. This requires users to have proper credentials to perform actions.
Step 1: Turn on Authentication
To turn on authentication:
1. Edit the following file:
sudo nano /lib/systemd/system/mongod.service2. Find the following line:
Environment="OPTIONS=--f /etc/mongod.conf"3. Add the --auth option to the line:
Environment="OPTIONS= --auth -f /etc/mongod.conf"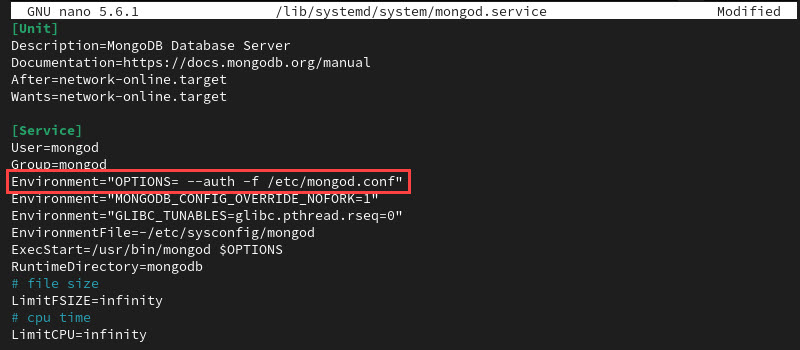
The option requires authentication to run database commands.
4. Save the file (Ctrl+o) and exit (Ctrl+x).
Step 2: Reload the Services to Apply Changes
To apply the changes:
1. Reload the services:
sudo systemctl --system daemon-reload2. Restart the mongod service with:
sudo systemctl restart mongodThe commands do not show any message. If there is an error, re-check the configuration file for syntax errors.
Step 3: Test Mongo User Authentication
To test the user authentication, do the following:
1. Switch to the Mongo shell:
mongosh2. Use the admin database:
use admin3. Show all users:
show users
An error message shows that the command requires authentication.
4. Use the following command to authenticate with the credentials created in the previous section:
db.auth('mdbadmin', 'password')
Replace mdbadmin and password with the actual username and password you created. The system responds with { ok: 1 }.
5. Retry the show users command:
show usersThe system shows the same user information as before.
Conclusion
This guide showed how to install MongoDB on CentOS or Rocky Linux. It also included the steps to secure the administrator account and prevent unauthorized access.
Next, learn how to create a database in MongoDB.
