MongoDB is a versatile NoSQL database for dynamic workload management. Its flexible data structure and scalability make it an ideal choice for distributed environments like Docker containers.
This tutorial will show you how to deploy a MongoDB instance on a Docker container.
Prerequisites
- Docker installed (read instructions for Ubuntu and CentOS/Rocky Linux).
- Command-line access.
- A user with sudo privileges.
- Docker Compose installed (optional).
Can MongoDB Run in Docker Container?
Running MongoDB instances in Docker containers is a common and efficient deployment method. Docker allows MongoDB users to create isolated database environments, ensuring consistency and portability across different systems.
MongoDB maintains an official Docker image, which is available for download on Docker Hub.
How to Deploy MongoDB in Docker Container
Deploying MongoDB with Docker involves downloading the image and starting a container using the docker run command. Follow the steps below to create a MongoDB container deployment.
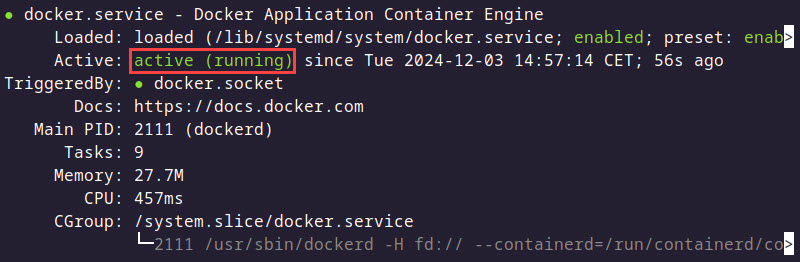
Step 1: Check Docker Status
Check the current status of the Docker service by entering the following command in a terminal:
sudo service docker statusEnsure the output shows the Docker service as active and running.
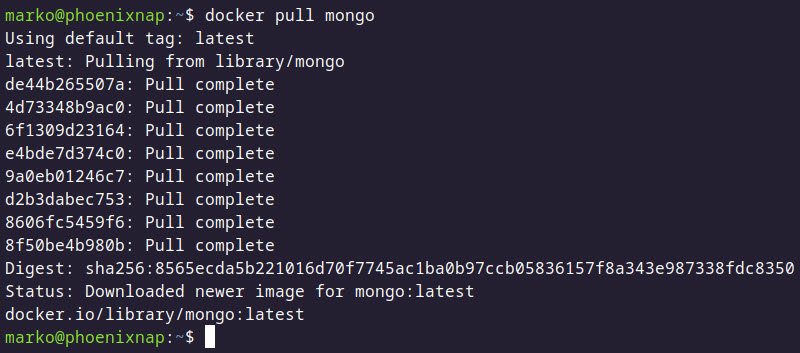
Step 2: Download MongoDB Image for Docker
Use the command below to download the latest official Docker image for MongoDB:
docker pull mongoWait for Docker to complete the image download:
To download a specific version of MongoDB, use the same command but append the version tag. For example:
docker pull mongo:4.2.2View locally available images by entering the following command:
docker imagesThe output shows the MongoDB image is now available on the host system.

Step 3: Create Storage Directory on Host
By default, MongoDB stores data in the /data/db directory located within its Docker container. Given the transient nature of containers, this storage method is highly unreliable, as all the data is erased whenever the container instance fails.
To resolve this issue, create a directory on the host system to store data persistently across container restarts:
mkdir mongodataIn the next step, the directory is used as a mount point for the container's /data/db directory.
Step 4: Deploy MongoDB Container
Use the following docker run command to create and start a MongoDB Docker container:
docker run -it -v mongodata:/data/db --name mongodb -d mongoThe command has the following arguments:
-itcreates an interactive shell session in the Docker container.-vallows specifying a host directory on which to mount a container directory.--namegives the container a name.-dstarts the container as a background process.

Once the MongoDB container starts, check its status by typing:
docker psThe output shows the container and provides basic information, such as the port number (27017 by default).

Optionally, explicitly specify the MongoDB port by adding the -p option:
docker run -it -v mongodata:/data/db -p 27017:27017 --name mongodb -d mongoHow to Run MongoDB Using Docker Compose
Another way to deploy MongoDB instances is to use Docker Compose, a tool that simplifies the deployment of multi-container applications. Follow the steps below to create a MongoDB container with Docker Compose:
1. Create a compose.yml file in a text editor, such as Nano:
nano compose.yml2. Paste the following code:
version: '3.7'

services:
  mongodb:
    image: mongo:4.2.2
    container_name: mongodb
    ports:
      - 27017:27017
    volumes:
      - ./mongodata:/data/db
    environment:
      MONGO_INITDB_ROOT_USERNAME: [username]
      MONGO_INITDB_ROOT_PASSWORD: [password]
    restart: always
The code above contains instructions for deploying a single MongoDB container. To use the same file to deploy more apps simultaneously, provide specifications in the services field. For example:
version: '3.7'
services:
  mongodb:
    [MongoDB_configuration]
  [app1]:
    [app1_configuration]
  [app2]:
    [app2_configuration]
  [...]
3. Save the file and exit.
4. Run the container(s) by issuing the following command:
docker compose upNote: On older versions of Docker Compose, the command to run the containers is docker-compose up.
How to Use MongoDB with Docker
To use the containerized instance of MongoDB, connect to the container and start the MongoDB shell from there. The following sections explain how to manage MongoDB instances in Docker.
Connect to MongoDB Deployment
Follow the steps below to connect to a MongoDB instance:
1. Connect to the container using the docker exec command:
sudo docker exec -it mongodb bashThe container's Bash shell prompt appears.

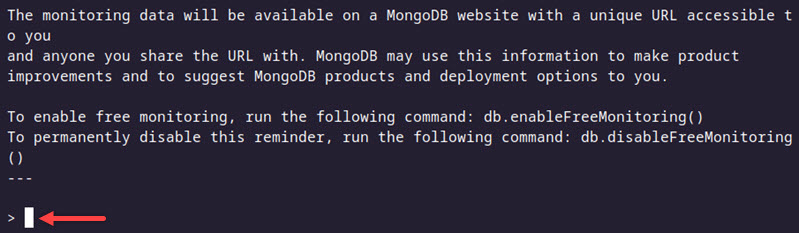
2. Start the MongoDB shell (mongosh) by typing mongo in the interactive terminal:
mongoThe MongoDB shell launches, and the prompt is ready to accept commands.
To define a specific host and port to connect to, type the following:
mongo -host [hostname] -port [port]Replace [hostname] and [port] with relevant values.
Connecting to MongoDB from Different Container
Containerized applications that need to communicate with a MongoDB database container can connect directly using a Docker network. Proceed with the steps below to create a network and register the MongoDB instance:
1. Use the following command to create a Docker network:
docker network create mongo-network2. Add the --network option when using docker run to start a container:
docker run -d --name mongodb --network mongo-network -p 27017:27017 mongo3. Use the same network name when starting an application container:
docker run -it --network mongo-network --rm my-app4. Inside the app container, use the MongoDB driver to connect to the database instance:
mongodb://mongodb:27017Note: mongodb is the name of the MongoDB service, as defined in the Docker network.
How to Exit MongoDB and Interactive Shell
To exit the mongosh shell and return to the host system prompt, type exit to leave MongoDB and then exit again to leave the container shell. Alternatively, you can type quit() to exit MongoDB and use Ctrl-C to leave the container.
Stopping and Restarting MongoDB Database
Stop a running Docker container instance with the docker stop command:
docker stop mongodbThe container is now listed as stopped. To restart the container, use the docker start command:
docker start mongodbConclusion
After reading this article, you can install MongoDB on a Docker container and use the instance to access the MongoDB shell. The tutorial also showed how to use Docker Compose to deploy multiple container instances quickly.
If you are a Docker beginner, learn about best practices for managing Docker containers.