The DNS_PROBE_FINISHED_NXDOMAIN is an error that shows up in a web browser and prevents access to a web page. The error indicates a DNS issue, and there are many potential causes. Fortunately, there are also several ways to resolve the issue.
This article shows ten ways to attempt to resolve the DNS_PROBE_FINISHED_NXDOMAIN error.
Prerequisites
- A stable internet connection.
- Access to the command line/terminal.
- Access to an administrator account on the system.
What is the DNS_PROBE_FINISHED_NXDOMAIN Error?
The DNS_PROBE_FINISHED_NXDOMAIN error means a domain does not exist. The error shows up because the DNS cannot resolve a provided URL into an IP address. The problem requires troubleshooting DNS issues to discover and resolve the matter.
What Causes the DNS_PROBE_FINISHED_NXDOMAIN Error?
The DNS_PROBE_FINISHED_NXDOMAIN error occurs for several reasons. Some causes include:
- A mistyped website address.
- A misconfigured DNS server.
- Internet connection errors.
- Firewall or antivirus.
- An expired or unregistered domain name.
- A VPN or antivirus issue.
Pinpointing the exact problem is difficult. However, there are several ways to start troubleshooting the problem to attempt to resolve the difficulty.
How to fix "DNS_PROBE_FINISHED_NXDOMAIN" error?
There are different steps to take to attempt to resolve the DNS_PROBE_FINISHED_NXDOMAIN error. Below are detailed steps for different operating systems.
1. Restart Router
The quickest way to try and resolve DNS errors is by resetting the internet connection.
To properly reset a router, turn off or unplug the device and leave it off for a minute. Plug in or turn on the device again and wait for the internet connection to establish.
Once the connection is up again, attempt to access the same web page to see if the error disappeared.
2. Release and Renew IP Address
Release and renew an IP address to change the DHCP-provided address. The steps to renew an IP address differ based on the operating system.
Follow the appropriate guideline below for Linux, Windows, or macOS.
Linux
To force renewal on Linux:
1. Open the terminal (Ctrl+Alt+T).
2. Run the following command to release the current IP:
sudo dhclient -rThe output prints the old client process has terminated.
3. Renew the IP with:
sudo dhclient
4. Check the connection to the web page to see if the error disappeared.
Windows
To release and renew an IP address on Windows, do the following:
1. Open Command Prompt.
2. Enter the following command to release the current IP address:
IPCONFIG /RELEASE3. The following command renews the IP address:
IPCONFIG /RENEW4. Confirm the new information with the following command:
IPCONFIG /ALL5. Recheck the connection to the web page to see if the error persists.
macOS
To renew an IP address on a macOS:
1. Go to Apple menu->System Settings.
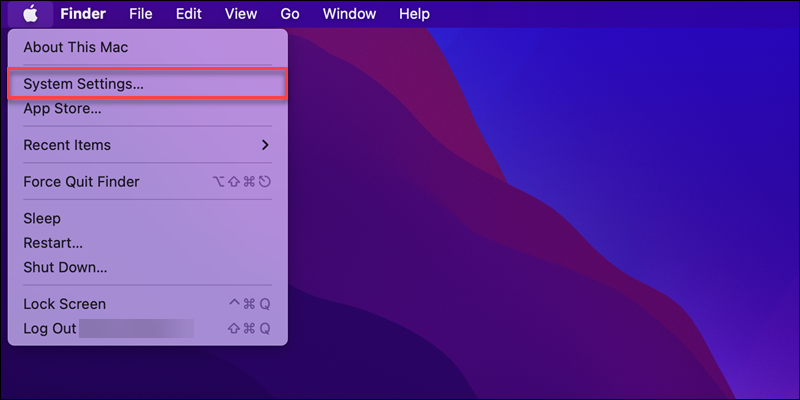
2. Select Network in the sidebar.
3. In the left menu, choose the network you wish to reset.
4. In the TCP/IP menu, click Renew DHCP Lease.
5. Click OK to confirm the changes.
6. Recheck the webpage connection to see if the error is gone.
3. Change DNS Settings
An incorrectly set up DNS server leads to DNS issues. Changing the DNS configuration to a new DNS server helps resolve the problem.
The steps to configure DNS settings and change the resolver are different for every operating system. Check out our detailed guide to configure DNS for Windows, Linux, and macOS.
4. Disable Firewall
Firewalls block access to malicious websites. An incorrectly set up firewall option can conflict with network settings and cause the DNS_PROBE_FINISHED_NXDOMAIN error.
The easiest way to check if the firewall is blocking website access is to disable it temporarily. The steps below show how to disable a firewall on Linux, Windows, and macOS.
Linux
The firewall software varies between Linux distributions. The most common firewalls on Linux are IP tables, UFW firewall, and Firewalld.
Below are several guides for several types of firewalls and Linux distributions:
Windows
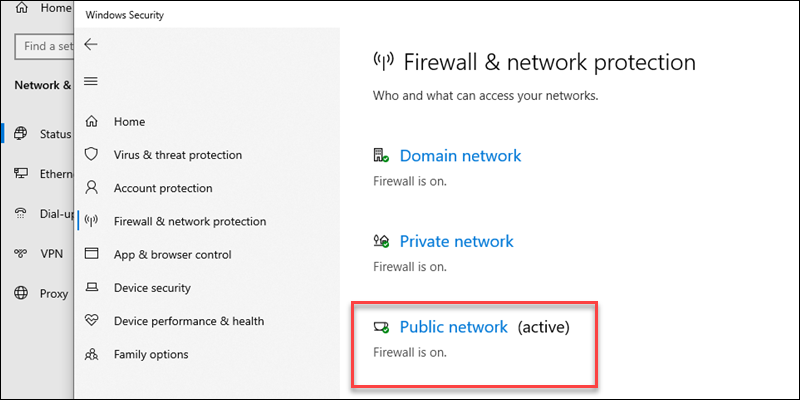
To temporarily disable the firewall on Windows, do the following:
1. Open the Start menu.
2. Type "Windows security" and press Enter.
3. In the right pane, open the Firewall & network protection menu.
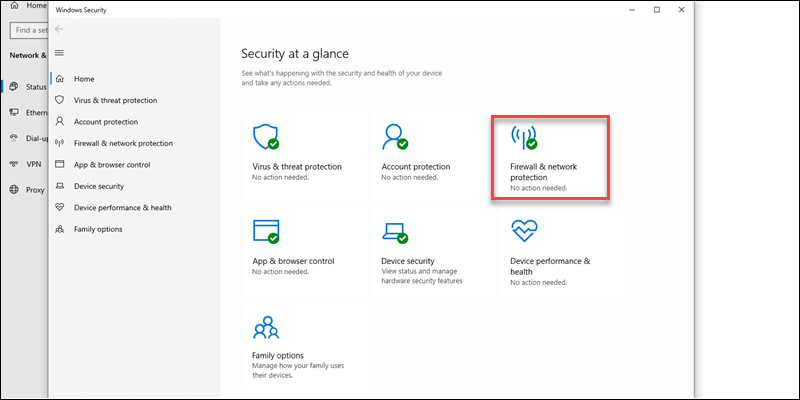
4. Select the active network profile from the list.
5. Turn the Microsoft Defender Firewall off.
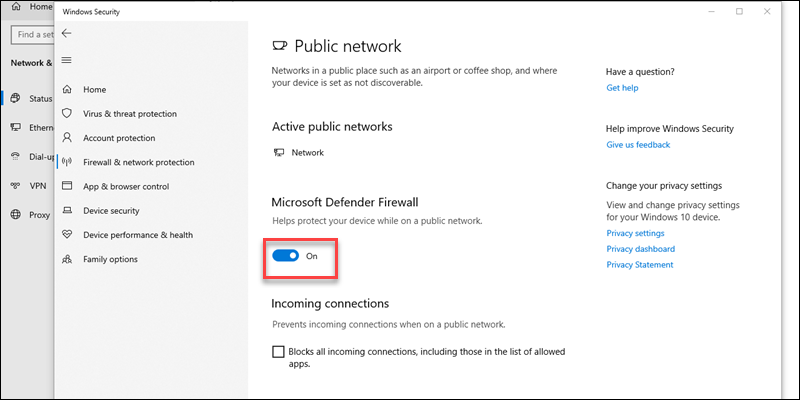
6. Restart the browser and recheck access to the webpage which gave the error. If the error disappears, check if any specific firewall settings are blocking access to the website.
macOS
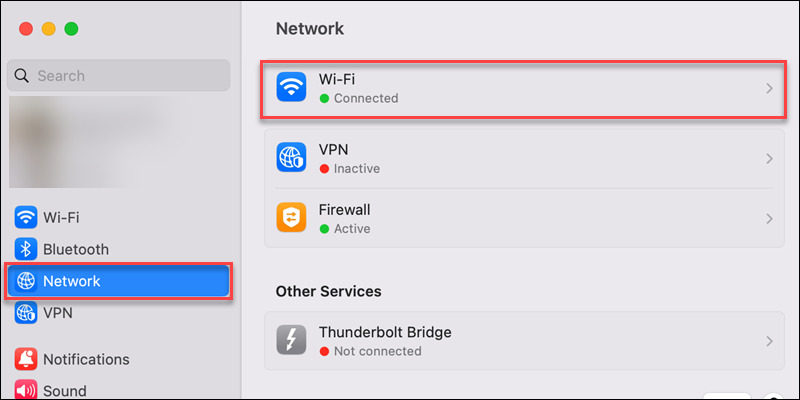
To temporarily turn off the firewall on macOS, do the following:
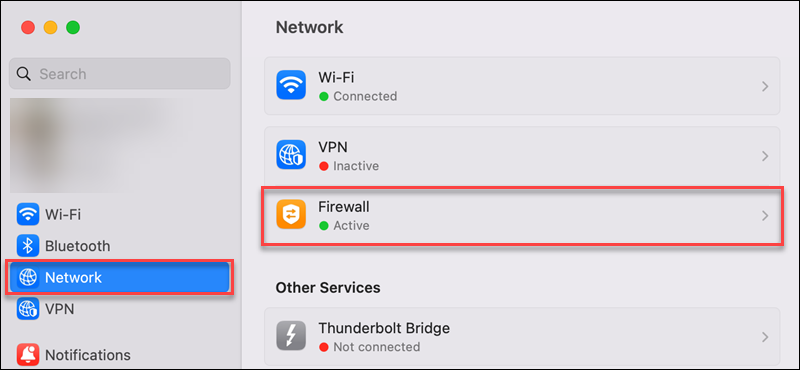
1. Open Apple menu->System settings.
2. In the left sidebar, choose Network.
3. Select the Firewall in the right pane.
4. Switch the firewall off.
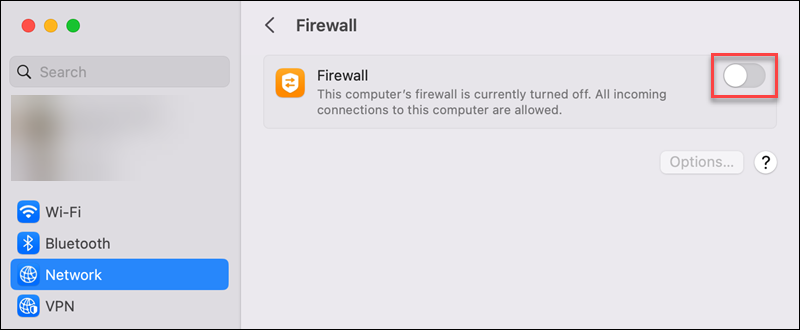
5. Check if the error persists on the website. If the error is gone, double-check the firewall settings and blocked websites.
5. Flush the DNS Cache
DNS caches information to reduce lookup times for individual website names. A corrupted cache often leads to DNS errors, and it's good practice to clear the DNS cache. The information automatically updates the next time a webpage opens.
Follow our detailed guide to flush the DNS cache on macOS, Windows, or Linux. After completing the steps, attempt to connect to the webpage again to see if the error disappeared.
6. Check Hosts File
The hosts file is a plain text file that overrides default DNS mapping. Malware can target the file and reroute traffic to a different address.
Check the contents of the hosts file and remove any unknown entries. The location of the file is different between operating systems.
Linux
To check the hosts file in Linux, do the following:
1. Open the terminal.
2. Move into the /etc directory:
cd /etc3. Open the hosts file in a text editor:
sudo nano hosts4. Locate the website entry from the list and remove the whole line.
5. Save the file and close nano.
6. Restart the machine and attempt to connect to the website to see if the error persists.
Windows
To edit the hosts file on Windows, follow the steps below:
1. Open File Explorer.
2. Navigate to the following location:
C:\Windows\System32\drivers\etc3. Right-click the hosts file and open it as an administrator using a text editor.
4. Locate the website entry and remove it from the list.
5. Save and close the file.
6. Restart the system and try to access the webpage again.
macOS
To check and edit the hosts file on macOS, do the following:
1. Open the terminal.
2. Use cd to move into the /private/etc directory:
cd /private/etc3. Run the following command to open the hosts file in the nano text editor:
sudo nano hosts4. Locate the website from the list and remove the entry.
5. Save the file and close the text editor.
6. Restart the system and attempt to connect to the website again.
7. Disable VPN and Antivirus
A misconfigured VPN or antivirus program can cause DNS issues. If you are using an in-browser VPN, turn off the add-on and check if the problem persists. Alternatively, shut down the VPN and try accessing the web page again.
If you use an antivirus, pause or quit the program and double-check if there is a blocked website list that is causing the DNS issue.
8. Reset Chrome Flags
Google Chrome flags control experimental browser features. An incorrectly set up flag can cause the DNS_PROBE_FINISHED_NXDOMAIN error and block access to a website.
To reset the flags, do the following:
1. Open a new tab and go to the following page:
chrome://flagsThe page shows individual Chrome flags and their status.
2. Click the Reset all button to reset the flags to default settings.
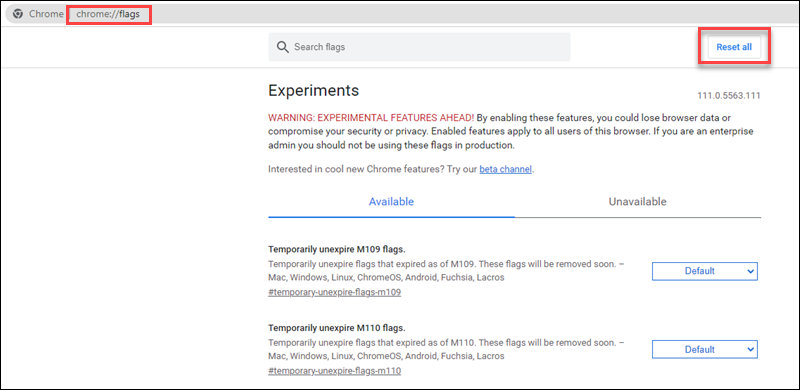
Alternatively, check the individual flags and change their status.
3. Restart Chrome and attempt to access the website to see if the issue persists.
9. Clear Browser DNS Cache
Browsers cache DNS data to improve website access speeds. Clearing a browser's DNS cache is a quick way to attempt to resolve DNS errors. Below are steps for Chrome, Firefox, and Safari.
Chrome
The steps below show how to clear the DNS cache in Chrome:
1. Open the following page in Chrome:
chrome://net-internals/#dns2. Click the Clear host cache button.
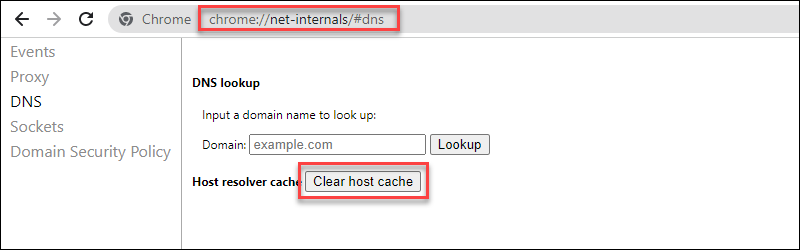
3. Restart the browser to apply the changes.
4. Attempt to access the webpage that gave the error to see if the issue persists.
Firefox
To clear the DNS cache in Firefox:
1. Navigate to the following page:
about:networking#dns2. Click the Clear DNS Cache button near the bottom of the page.
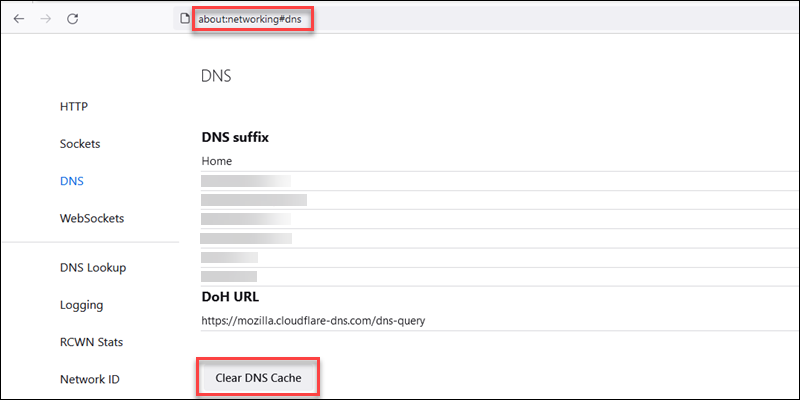
3. Restart the browser to apply the changes.
4. Check if the error disappeared from the webpage.
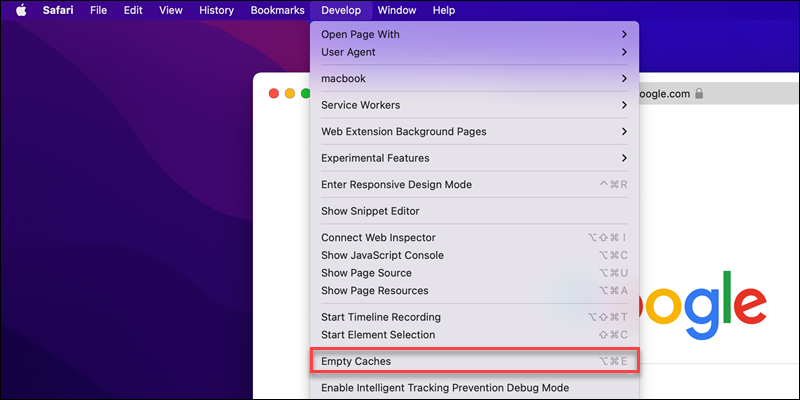
Safari
If you use Safari, follow the steps below to enable the Develop menu and clear the DNS cache:
1. Open Safari->Settings.
2. In the Advanced tab, check the Show Develop menu in menu bar.
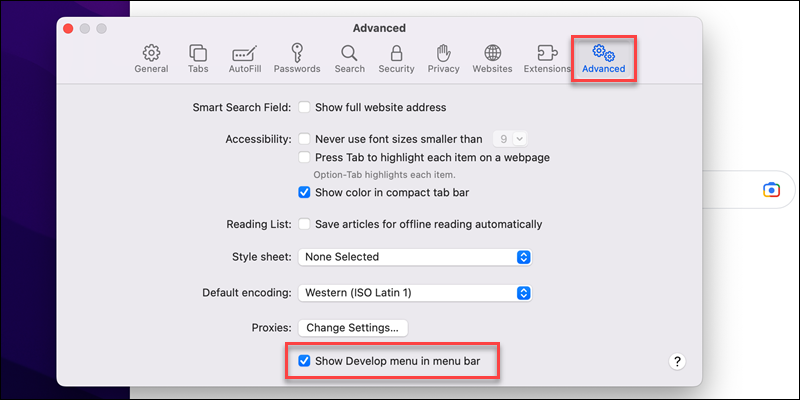
The new option appears in the Safari menu bar.
3. Expand the Develop menu and select Empty Caches from the list.
4. Restart the browser and reconnect to the webpage to see if the error persists.
10. Check Domain Registration
If you are a website owner or administrator, the DNS_PROBE_FINISHED_NXDOMAIN error appears due to misconfigured DNS records.
Check if the domain name has expired and if the DNS records point to the correct server. If the website is new or recently migrated, DNS changes may take 24 hours to apply.
Conclusion
After reading this guide, you know what the DNS_PROBE_FINISHED_NXDOMAIN error is and the different ways to fix it.
Next, learn about DNS security best practices.