A web browser displays the DNS_PROBE_FINISHED_BAD_CONFIG error if it cannot connect to a web server. The error shows a vague indication of DNS configuration issues. Understanding what causes the error is the first step to resolving it.
This article explains how to fix the DNS_PROBE_FINISHED_BAD_CONFIG error.
Prerequisites
- A stable connection to the internet.
- Command line/terminal access.
- Access to a user account with administrator/sudo privileges.
What is the DNS_PROBE_FINISHED_BAD_CONFIG Error?
The DNS_PROBE_FINISHED_BAD_CONFIG error appears when a browser cannot connect to a website due to a DNS misconfiguration.
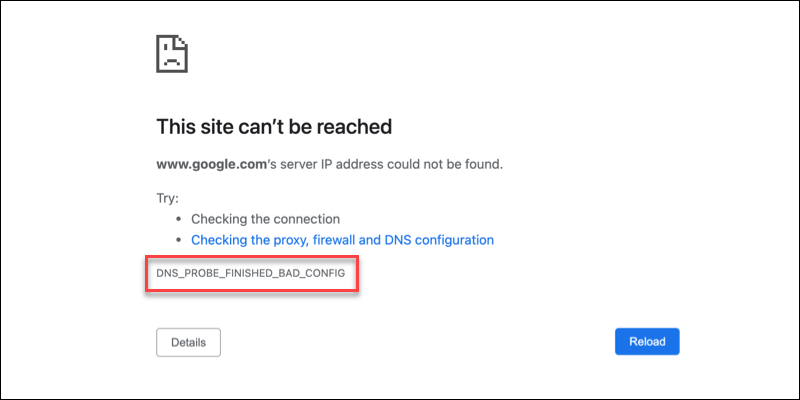
A DNS configuration error means the browser can't resolve the domain name into an IP address. The problem can occur in any browser and operating system.
What Causes the DNS_PROBE_FINISHED_BAD_CONFIG Error?
The DNS_PROBE_FINISHED_BAD_CONFIG error happens for several reasons. The source of the error is one of the following:
- User configuration - A misconfigured DNS on a user's device.
- Network - Network connectivity issues or network misconfigurations.
- Web server - A website's DNS misconfiguration.
How to Fix the DNS_PROBE_FINISHED_BAD_CONFIG Error?
There are several reasons the DNS error appears, and it is difficult to pinpoint the source of the issue. The best approach is to troubleshoot DNS issues to fix a DNS_PROBE_FINISHED_BAD_CONFIG error.
Below are several different methods to approach resolving the DNS error.
1. Restart Router
A fast way to check and resolve connectivity issues is through a router reset. Turn the router off for a minute and turn it back on again.
Wait for the router to reboot and connect fully. Once connected to the internet, check if the problem persists on the website.
2. Clear Browser DNS Cache
Browsers cache DNS records to enable faster response times. If the cache corrupts over time, it may cause the DNS_PROBE_FINISHED_BAD_CONFIG error. Clear the browser's DNS cache to attempt resolving the error.
The steps to clear the DNS browser cache differ based on the browser. Follow the steps below for the specific browser you're using.
Chrome
To clear DNS cache in Chrome:
1. Open a new tab in Chrome.
2. Enter the following address into the address bar:
chrome://net-internals/#dnsThe page shows a DNS lookup section and a button for the Host Resolver Cache.
3. Click the Clear Host Cache button.

4. To apply the changes, restart the browser and check if the problem is gone.
Firefox
To clear DNS cache in Firefox, do the following:
1. Open a new tab in Firefox.
2. Go to the following page:
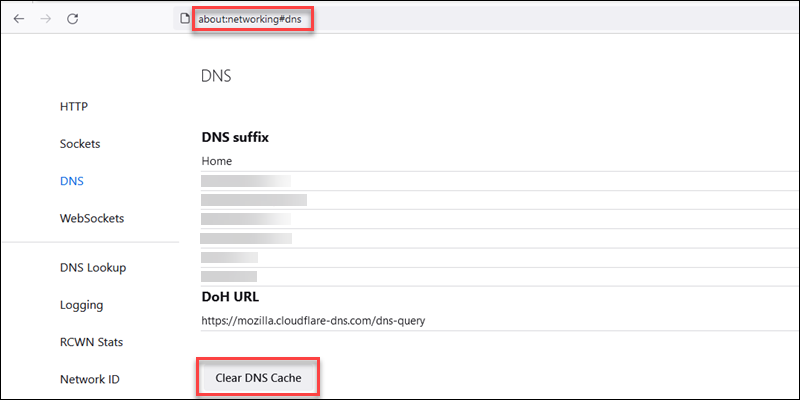
about:networking#dnsThe page shows DNS networking options.
3. Click the Clear DNS Cache button near the bottom of the page.
4. Restart the browser and check if the problem persists.
Safari
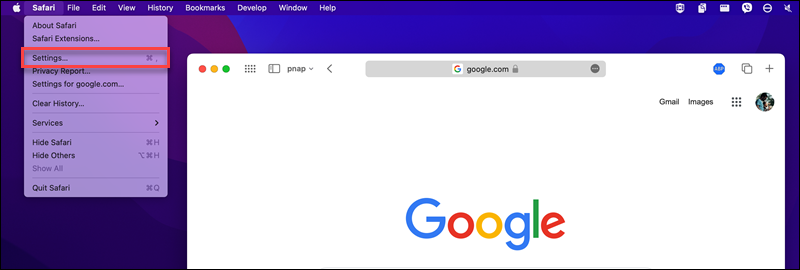
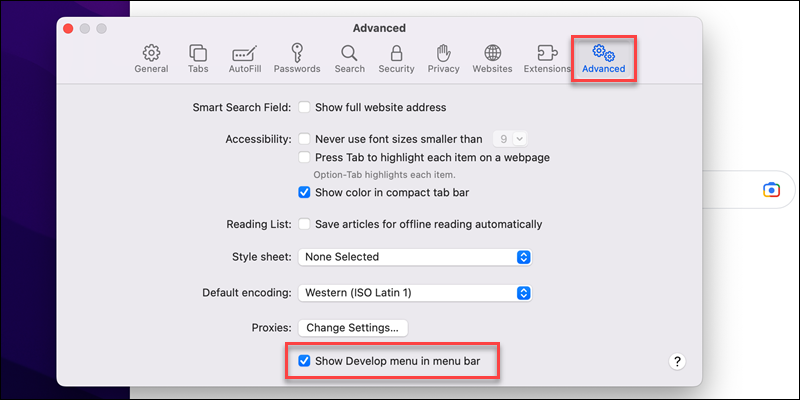
If using Safari, enable the Develop menu to clear DNS cache. Follow the steps below:
1. Open the Safari menu and choose Settings.
2. Select the Advanced tab and check Show Develop menu in menu bar. The new option appears in the menu bar.
3. Open the Develop menu and choose Empty Caches from the list to clear the browser's cache.
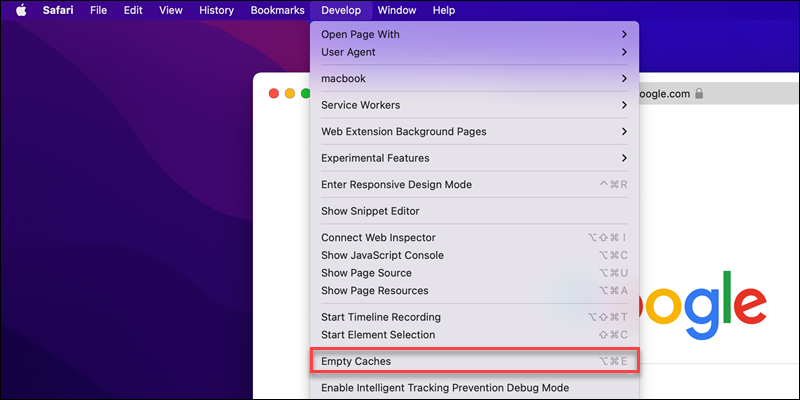
4. Restart the browser to apply the changes and see if the problem persists.
3. Flush System DNS Cache
DNS cache stores DNS lookup information. If the cache is corrupted, the best course of action is to clear the cache. The next time the computer sends a request, the lookup information automatically updates.
Follow our guide to flush DNS cache in macOS, Windows, or Linux. The commands differ between operating systems and their specific versions. After clearing the cache, attempt to connect to the same webpage again to see if the error persists.
4. Manually Configure DNS
Change the DNS configuration manually on your system to try and reset the DNS settings. Below are steps for different operating systems.
Windows
To manually configure DNS on a Windows machine, do the following:
1. Open the Start menu.
2. Search for Network Status and press Enter.
3. Under Advanced network settings, choose Change Adapter Options.
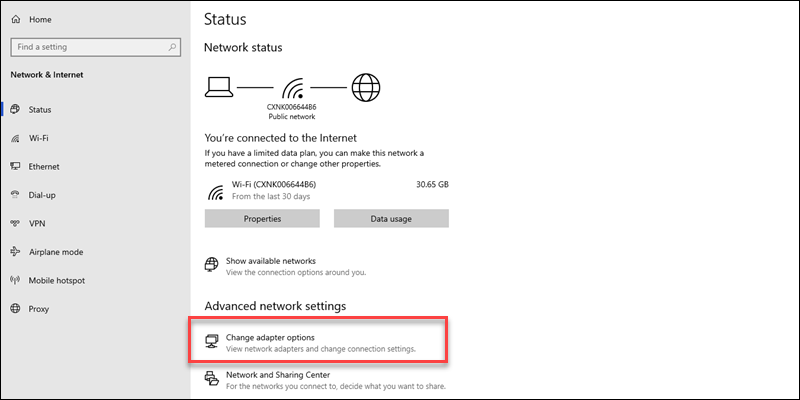
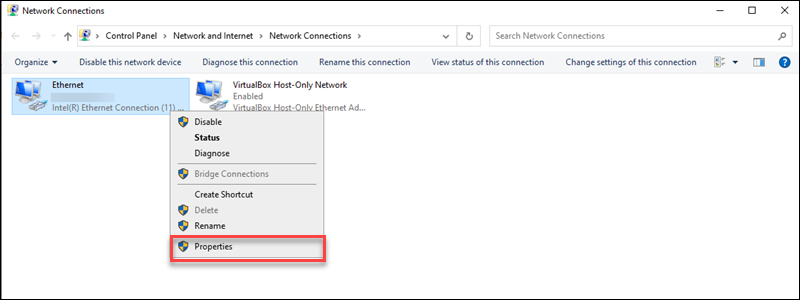
4. Right-click the network connection you wish to change and select Properties.
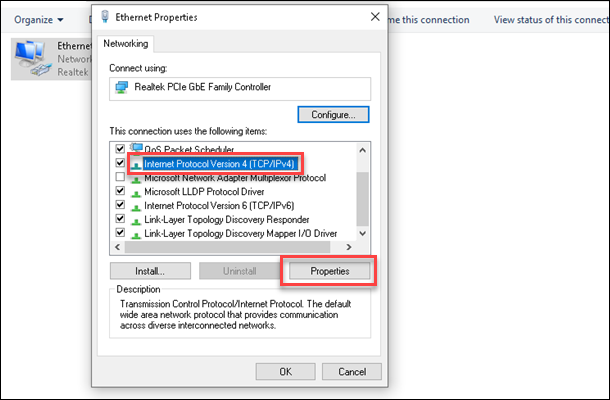
5. Find Internet Protocol Version 4 (TCP/IPv4) on the list and select the option.
6. Click the Properties button.
7. Select the Use the following DNS server addresses option.
8. Fill in the preferred and alternate addresses. For example, use Google's 8.8.8.8 as preferred and 8.8.4.4 as an alternate.
9. Click Ok to save the changes.
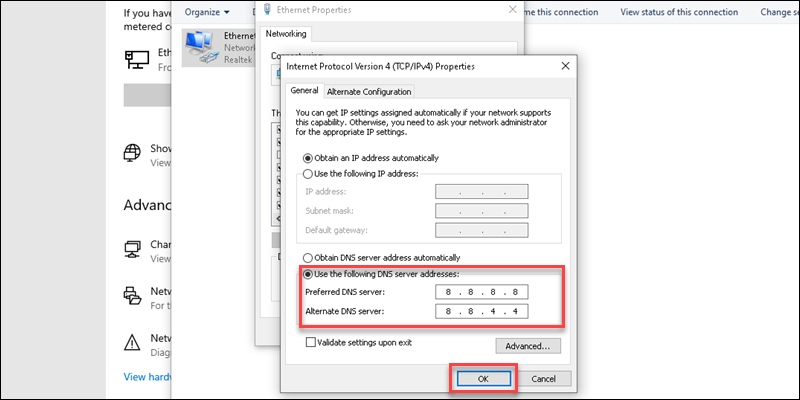
10. Restart the browser and test the connection to see if the DNS_PROBE_FINISHED_BAD_CONFIG error is resolved.
macOS
To manually change the DNS configuration on macOS, follow the steps below:
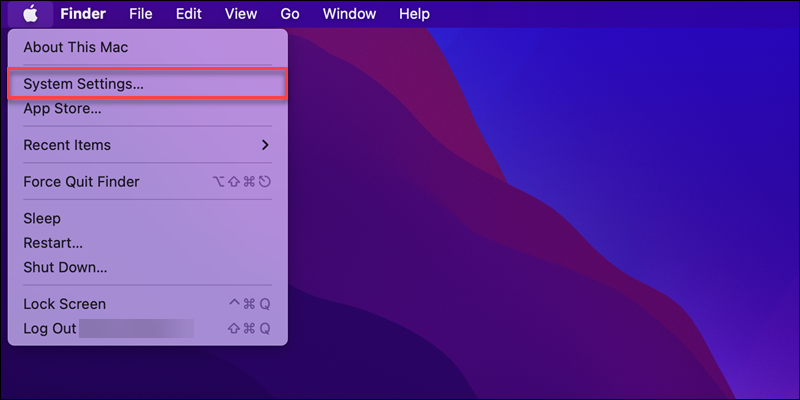
1. Open the Apple menu.
2. Select System Settings.
3. In the left pane, choose Network.
4. Select the connection you wish to configure from the list.
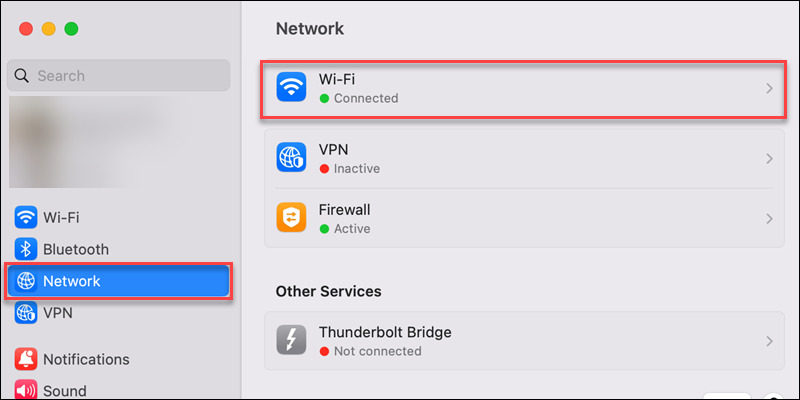
5. Open the Details page for the connection.
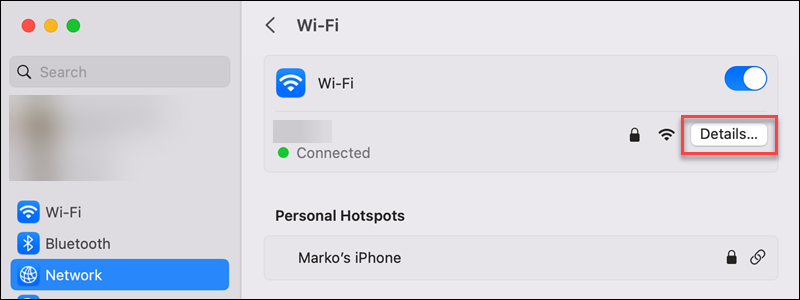
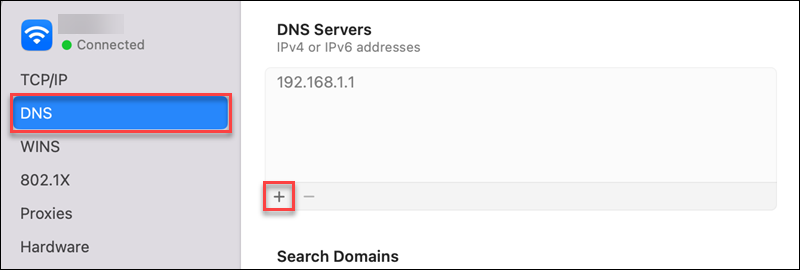
6. Switch to the DNS tab to see the DNS settings.
7. At the bottom of the left pane, click the plus (+) icon to add a new address.
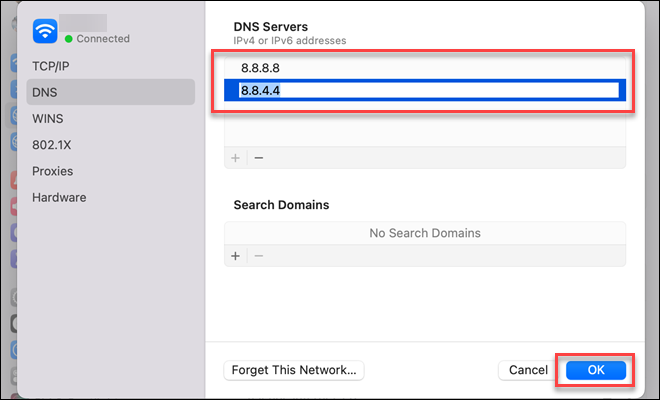
8. Add a primary and secondary address. For example, to use Google's DNS, set the primary as 8.8.8.8 and the secondary as 8.8.4.4.
9. Click OK to save the changes.
Test the webpage connection again to see if the configuration error persists.
Linux
Linux allows manually changing DNS settings via GUI or through the terminal. Follow our detailed guide to set up a DNS nameserver on Ubuntu.
Note: Check out our detailed guide to learn more about what the Domain Name System (DNS) is and how does it work.
5. Remove Temporary Files
Every browser stores temporary data. Temporary files can conflict with DNS information and cause errors. To clear temporary browsing files from the system, follow the OS-specific steps below.
Windows
To manually remove temporary files in Windows, type %tmp% into the Windows search bar and press Enter.
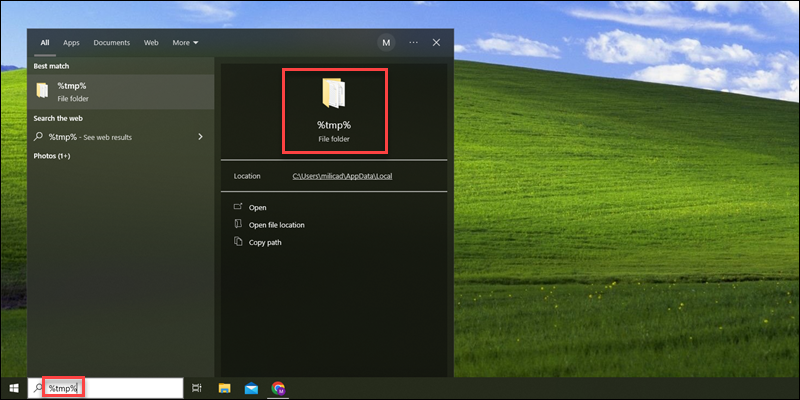
Windows Explorer opens the temp folder, which contains the temporary files. Delete all the files from the directory and recheck the connection.
macOS
To remove temporary files on macOS, open the finder and press CMD+Shift+G to open a search bar. Search for /Library/Caches and press Enter.
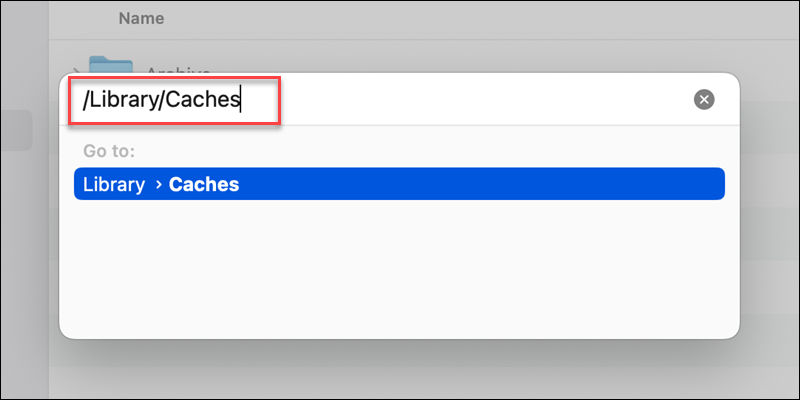
The result shows all relevant temporary cached folders to delete.
Linux
Temporary files reside in the /tmp directory on Linux systems, such as Ubuntu. The contents are automatically deleted upon system reboot. Use the command line to reboot a Linux system and reset the /tmp directory.
6. Check Firewall Settings
A firewall can block access to websites and cause conflicts with network settings. The easiest way to check if a firewall is the causing DNS issues is to disable firewall settings and try connecting to the webpage again. If the error disappears, the problem is due to the firewall's settings.
Below are instructions to access firewall options on different OSes.
Windows
Check the firewall settings on Windows by following the steps below:
1. Press the Start button.
2. Search for "Windows Security" and press Enter.
3. Open Firewall & network protection.
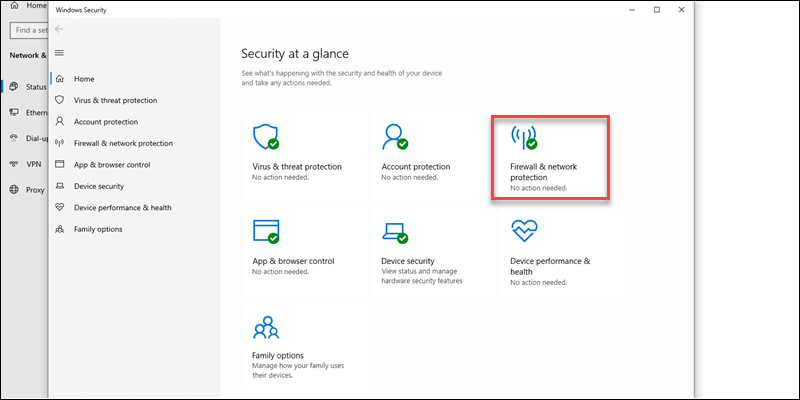
4. Choose the active network profile (Domain network, Private network, or Public network).
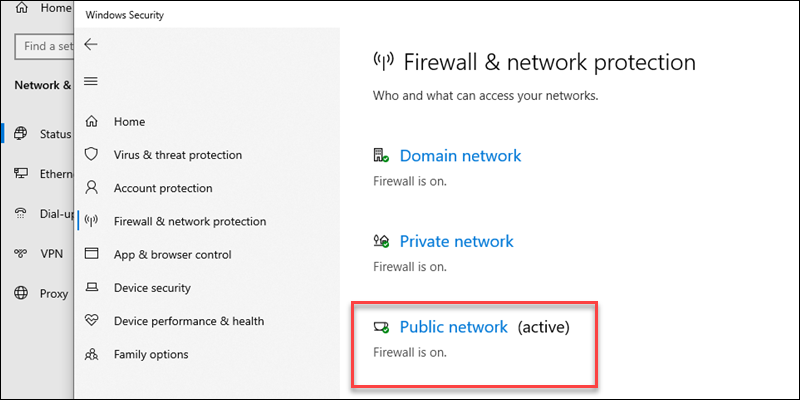
5. Switch the Microsoft Defender Firewall off and check if the problem persists.
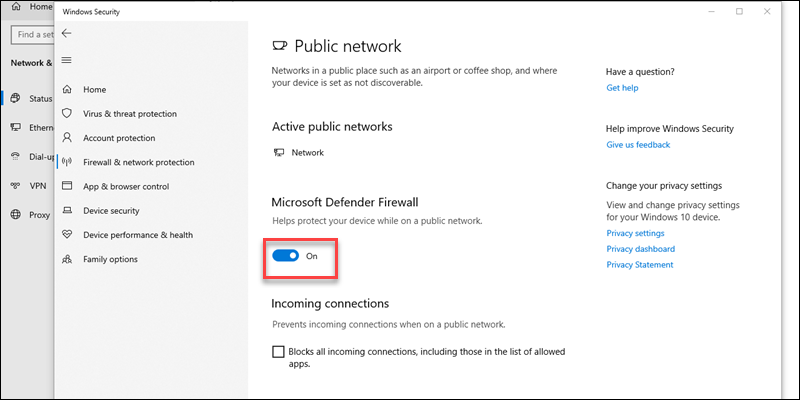
If the DNS problem disappears, double-check if the firewall settings block all traffic or access to specific websites.
Note: The steps to configure Windows Server firewall settings differ from the regular desktop version.
macOS
To check the firewall settings on macOS, do the following:
1. Open the Apple menu.
2. Choose System Settings.
3. In the sidebar, select Network.
4. In the right pane, choose Firewall.
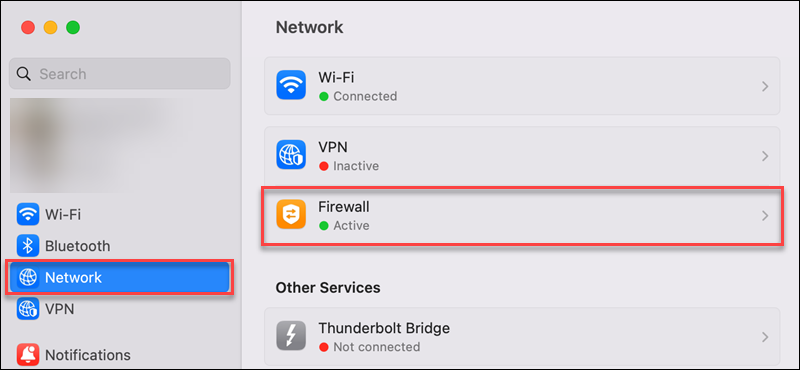
5. Turn off the firewall and see if the error persists.
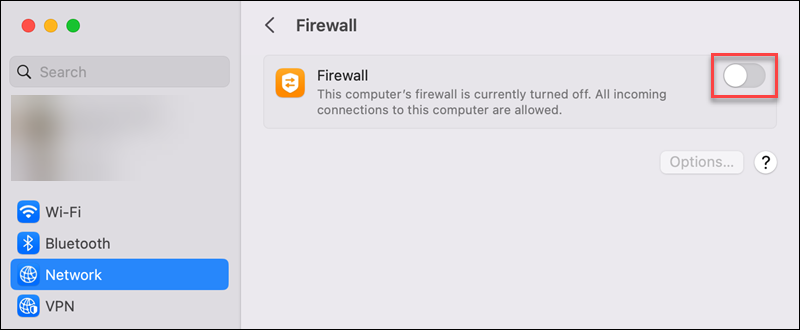
If the website is available after turning off the firewall, check the firewall options and whether any blocked websites cause the error.
Linux
Linux systems offer different firewalls depending on the distribution. Below are some useful guides for different firewalls and distributions:
- Enable/disable UFW on Ubuntu.
- Disable Firewalld on CentOS.
- Configuring Iptables (Ubuntu and CentOS).
Note: Check out our guide on the types of firewalls to learn more about them and how do they work.
7. Update Network Drivers
Outdated or corrupt network drivers cause various network issues, including DNS problems. Check if the system or its drivers require updating.
Follow the steps below for different operating systems.
Windows
System updates automatically handle network drivers. Windows also allows to manually check for newer versions of specific drivers. Follow the steps below to update a network driver:
1. Open the Start menu.
2. Type "Device Manager" and press Enter.
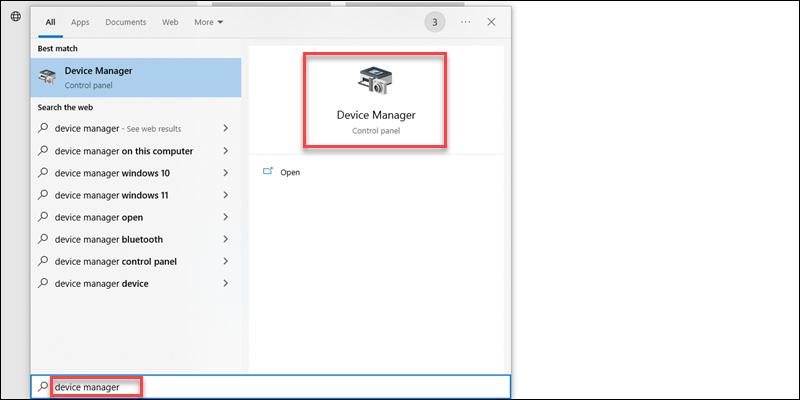
3. Expand the Network adapters field.
4. Right-click the network adapter and choose Update driver.
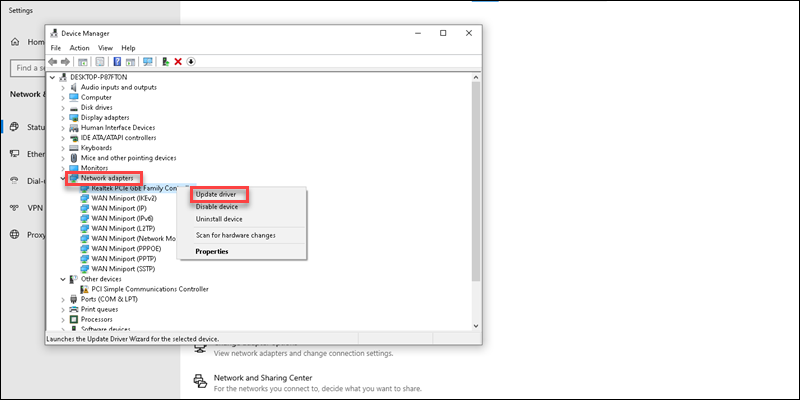
5. Restart the machine and try reopening the website.
macOS
To check for the latest updates on macOS, do the following:
1. Open the Apple menu.
2. Select About This Mac.
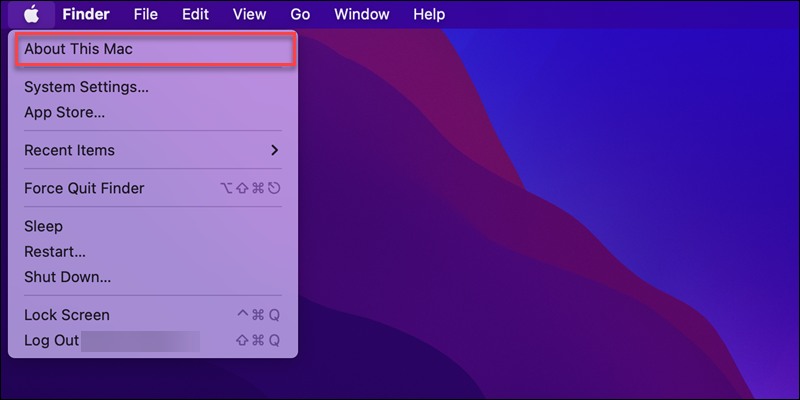
3. Click the More Info button.
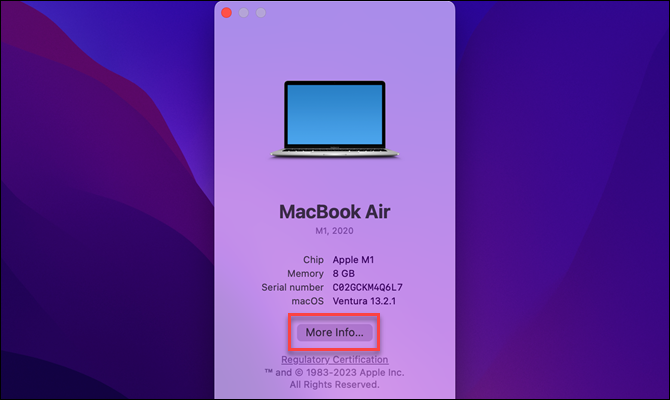
4. Check if the system is already at the newest version. If the system version is visible in the macOS section, the system is up to date.
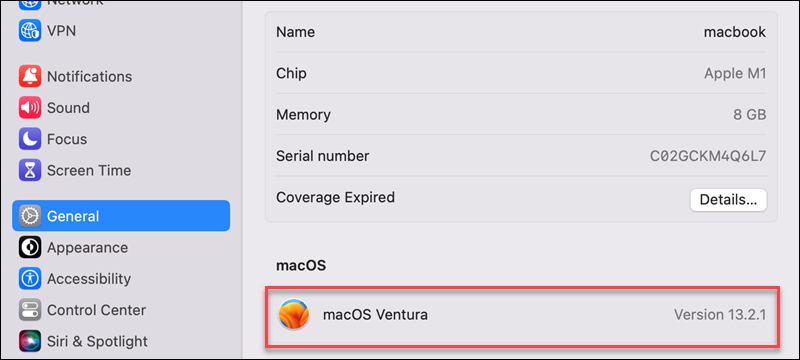
If the Update button displays, update the system to the newest version. Check if the DNS_PROBE_FINISHED_BAD_CONFIG error is gone.
Linux
To check for network driver updates in Linux, run the following commands in the terminal (CTRL+Alt+T):
1. Run the lshw command to list network hardware information:
sudo lshw -class network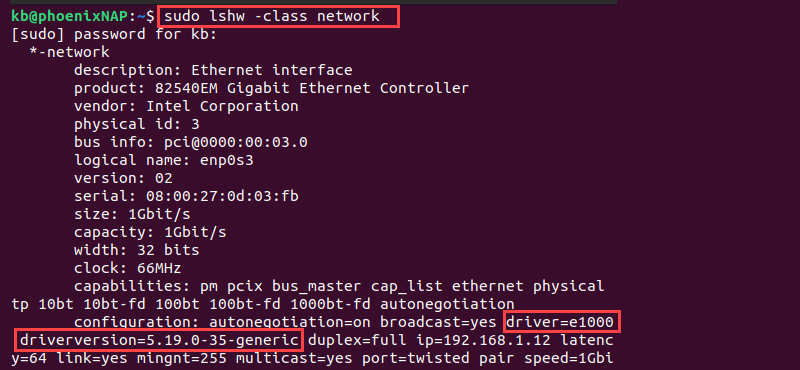
The output shows the driver's name and version.
2. Search the apt library for the driver using the driver name:
apt search <driver name>
Compare the version from the outputs of the two commands.
3. If the driver is not the newest version, update it with:
sudo apt install <package name>Wait for the installation to finish and recheck the connection.
8. Check Browser Add-ons
Some add-ons block websites or cause connectivity issues. Try turning off browser add-ons to pinpoint the one causing DNS issues.
If the connection issues disappear, check the specific add-on's settings to see if there are configurations that block connections to a webpage. Alternatively, try reinstalling or removing the add-on.
9. Scan the Computer for Malware
Malware, viruses, and other threats can tamper with cached DNS records. Scan the device for malware if you suspect malicious software or files are on the machine.
DNS is frequently targeted by attackers as that gives them an opportunity to redirect users to fake websites. Follow DNS security best practices to fortify the infrastructure and ensure protection from cyber attacks.
Conclusion
After going through this troubleshooting guide, you know the possible causes and resolutions to the DNS_PROBE_FINISHED_BAD_CONFIG error in a browser.
DNS errors are common, and learning how to resolve different DNS errors is a crucial skill for any network administrator. Learn how to troubleshoot and fix other common DNS errors, such as DNS_PROBE_FINISHED_NXDOMAIN and "DNS server not responding".

