Computers rely on DNS servers to resolve domain names into IP addresses. Users with administrative privileges can modify the Windows hosts file to override this process and map hostnames to specific IPs.
Find out how to edit the hosts file in Windows and control domain name resolution on your local machine.
What Is Windows Hosts File?
The hosts file is a plain-text file that contains domain name to IP mappings. Windows checks the file for existing entries before reaching out to the DNS resolver.
The system uses the IP address listed in the hosts file to access an online resource. The default path to the Windows hosts file is:
C:\Windows\System32\drivers\etc\hostsAny user can view the hosts file, but only users with administrative privileges can modify its contents.
Why Would You Edit the Windows Hosts File?
Editing the hosts file allows users to:
- Test new apps and website features without affecting the live site. Web developers frequently map development server IP addresses in the hosts file. This allows them to redirect traffic from a local machine to a dev server, adjust website design, or try new features and functionalities in a realistic testing environment.
- Access development servers faster. You can edit domain names in the hosts file and create shortcuts for frequently visited resources. Short domain names that are easy to remember can speed up access to development servers and improve workflow efficiency.
- Redirect traffic during website maintenance or migrations. System administrators can temporarily map domain names to valid and working IPs to ensure local systems have access to a resource during website migrations or maintenance.
- Block access to unwanted websites. Mapping a domain name to a non-routable IP address, like localhost, blocks access to that website. Editing the hosts file is used as a security feature for blocking potentially harmful websites or for exercising parental control.
- Diagnose and fix potential network issues. Network administrators often edit the hosts file to confirm and resolve local DNS issues or test network configurations.
How to Edit the Windows Hosts File?
You need administrative privileges on the Windows system to edit the hosts file. Use a text editor, such as Notepad, to access the file.
Step 1: Open Notepad as Administrator
To run Notepad as an administrator:
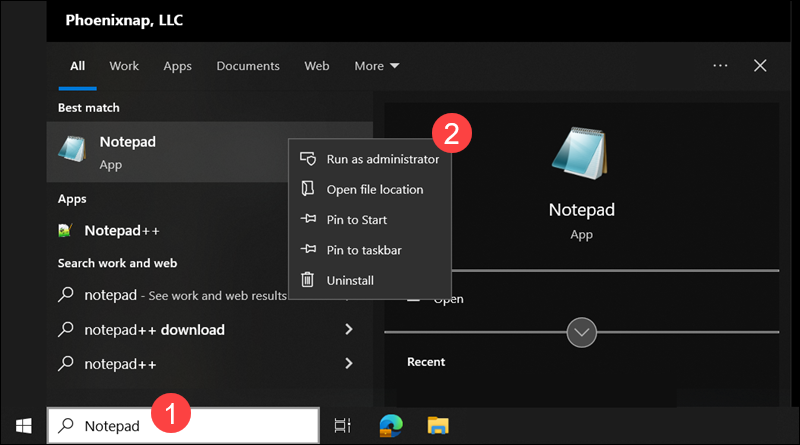
1. Type Notepad in the Windows search field.
2. Right-click Notepad in the search results and select Run as administrator.
Step 2: Access hosts File
To open the hosts file using Notepad:
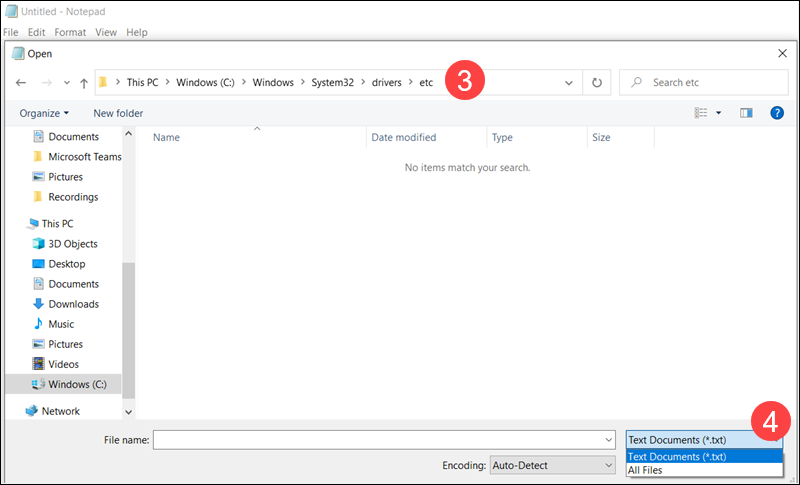
1. Click File.
2. Select Open.

3. The hosts file is located in the etc folder. Access the folder using the following path:
C:\Windows\System32\drivers\etc4. The host's file is not visible as a .txt file. Change the file type dropdown to All Files.
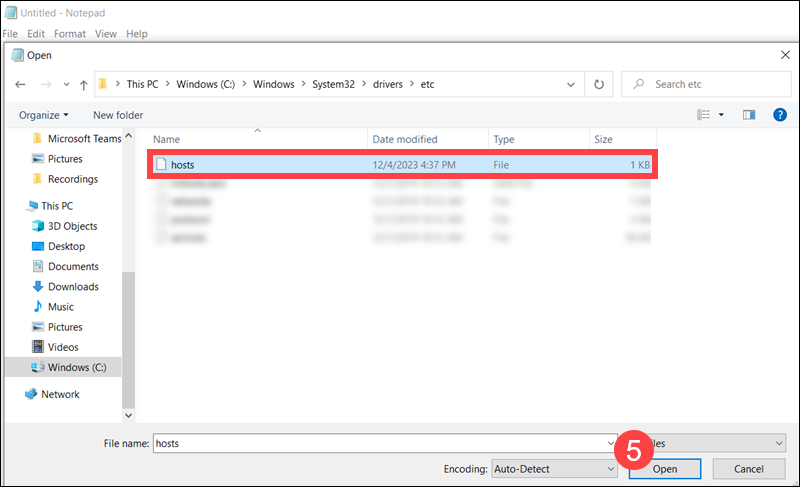
5. Select the hosts file and click Open.
Step 3: Edit hosts File
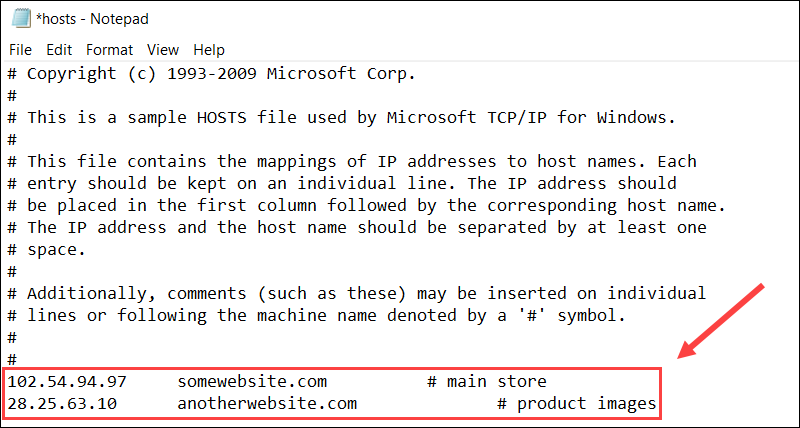
Edit the hosts file by adding a new IP to the domain name mapping section at the bottom of the file. Separate the IP and domain by at least one space.
Use the following syntax:
[ip-address] [hostname-or-domain-name]Each line should contain a single entry, and you can use the # symbol to include comments for additional clarity.
Press Ctrl+S to save the changes and close the file.
Conclusion
You have successfully edited the hosts file in Windows. The local system will prioritize this file when resolving domain names.
Use the file to test apps and website features or troubleshoot DNS issues, all within your local network.
