Users encounter the 403 Forbidden error in a web browser when a web server denies access to a webpage.
This guide explains why the 403 error occurs and how to fix it, whether you are a webmaster or a site visitor.
What Is 403 Forbidden Error
The 403 Forbidden error is an HTTP status code a web server issues to inform users that the content cannot be accessed. The most common cause is incorrect access permissions for a file or directory the browser is trying to access.
Web admins can customize how the 403 error is displayed, and its appearance may vary depending on the web server. This is why 403 error pages look different across various websites.
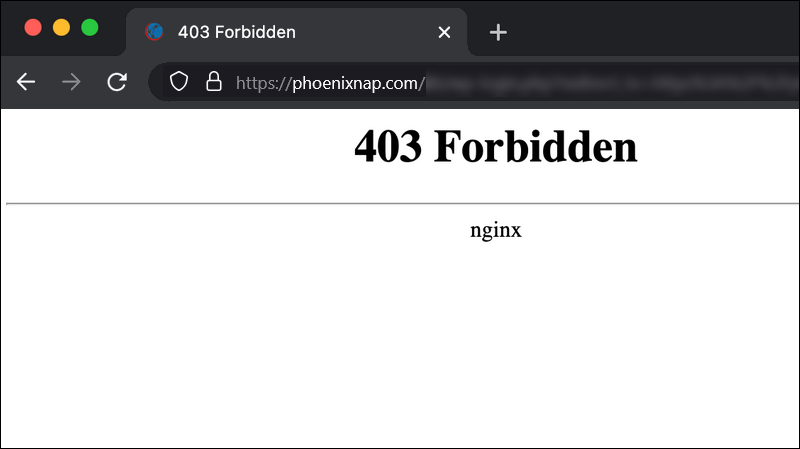
Common 403 error messages include:
- 403 Forbidden
- HTTP 403
- Forbidden
- HTTP Error 403 – Forbidden
- HTTP Error 403.14 – Forbidden
- Error 403
- Forbidden: You don't have permission to access [directory] on this server
- Error 403 – Forbidden
- 403 Forbidden Error
- 403 Error
The following sections explain the causes of the error and how to resolve the issue.
What Causes the 403 Error Code
Common causes of the 403 Forbidden error include:
- An empty website directory. The website's root directory is empty, and the server cannot find the requested content at the specified URL.
- Missing index page. Web servers are usually configured to look for specific homepage files in the root directory, such as index.html or index.php. A 403 error may occur if these files are missing or incorrectly named.
- Permission and ownership errors. Incorrect file and directory permissions or ownership settings may prevent the web server from reading or executing the requested files.
- Incorrect .htaccess settings. A misconfigured .htaccess file can block access to resources. Common issues include Deny from all rules that restrict access to all users or AllowOverride directives that prevent other configurations from functioning.
- Malware. Undetected malware can lead to persistent 403 errors, even after attempting to fix the issue. For example, removing an infected .htaccess file and replacing it with a fresh version does not solve the problem. If the malware is still present, it may reinfect the new file.
- Outdated cached webpage. If a webpage link has been updated but the cached version points to a restricted location, users may encounter a 403 error until the server or browser cache is cleared.
- Faulty plugins. Outdated or misconfigured plugins in content management systems (CMS), like WordPress, can interfere with website functionality and trigger 403 errors.
- Server configuration issues. Settings in Apache or Nginx configuration files can restrict user access and block directory browsing, leading to the 403 error.
Note: If your website is hosted on an Apache web server, read our detailed tutorial on how to fix the 403 Forbidden error in Apache.
How to Fix 403 Forbidden Error as a Webmaster
Steps to resolve the 403 Forbidden error vary depending on whether you are a website visitor or a webmaster. The following section is intended for webmasters.
Check Website Directory
An empty website directory can cause a 403 Forbidden error. To check the website root directory:
1. Use a hosting panel like cPanel or an FTP client such as FileZilla to access your server.
2. If using cPanel, open the File Manager and confirm the website's content is in the root directory.
Apache default root directory:
/home/username/public_html/Nginx default root directory:
/var/www/vhosts/domain.com/httpdocs/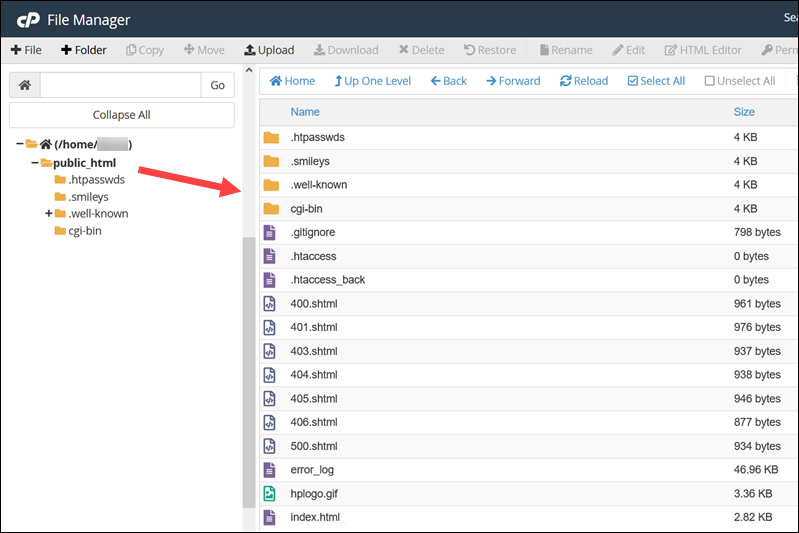
3. If the root directory does not exist, create it and upload all website files, including a valid index.html or index.php file.
4. Ensure the directory has the correct permissions, typically 755, so the server can access it.

Open your preferred browser and navigate to the website to verify the 403 error is resolved and the site loads correctly.
Add Index Page
Website builder tools and CMSs, like WordPress or Joomla, generate default homepage files such as index.html or index.php and store them in a local project folder.
Servers are often configured to look for these files in the website's root directory. If the files are missing or renamed, visitors may encounter a 403 Error.
To add an index page:
1. Log into your hosting account via cPanel or an FTP client.
2. Navigate to the public_html or httpdocs directory.
3. Upload your website's index.html or index.php file from your local project folder.
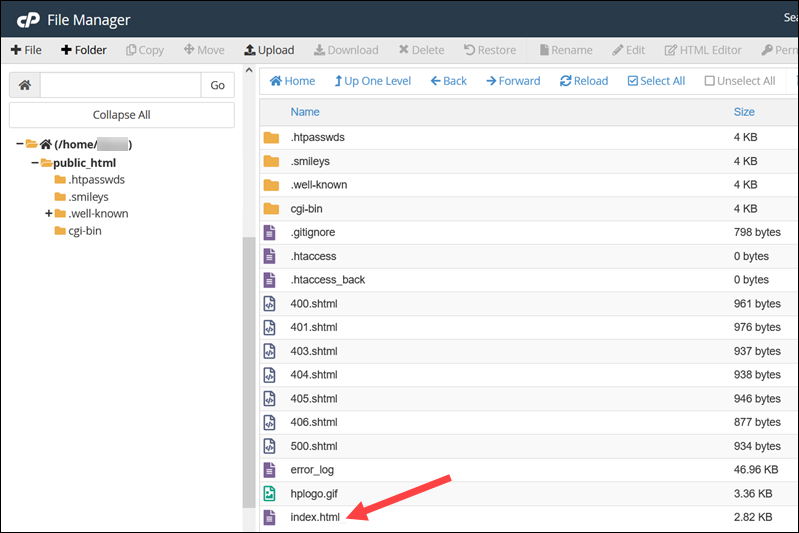
Access the website to confirm the error has been resolved.
Check File and Directory Permissions
Files and directories have permissions that control who can read, write, or execute them. Incorrect or overly restrictive permissions can cause 403 errors.
Different types of content usually require different permissions:
- 755. This is a standard permission for website directories. It grants full access (read, write, execute) for the owner and read/execute permissions to others.
- 644. Read/write access for the owner, and read-only access for others. These permissions are used for static content like HTML or CSS files.
- 700. Full access for the owner only. It's mainly used to restrict access to sensitive data and dynamic content like PHP scripts.
Note: Linux file permissions can include numbers, letters, or words, as well as an entry stating to whom the file has been assigned (Owner, Group, or Both).
To change file or directory permissions:
1. Access the website root directory using an FTP client or hosting panel.
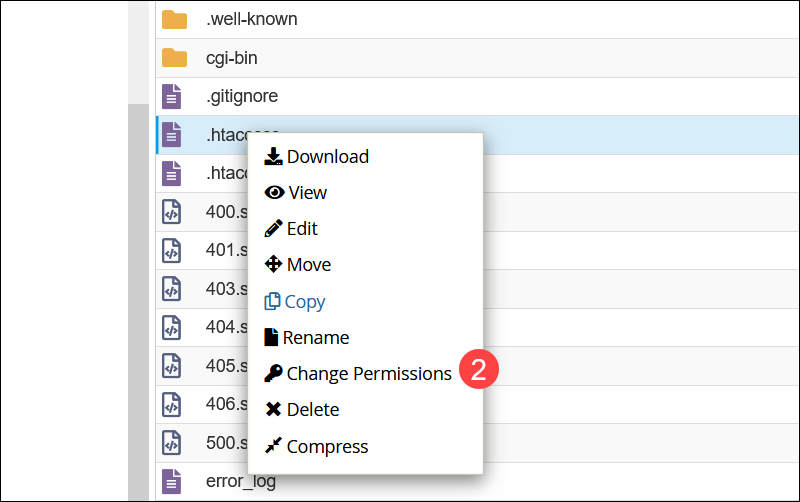
2. Right-click the directory or file and select Change Permissions.
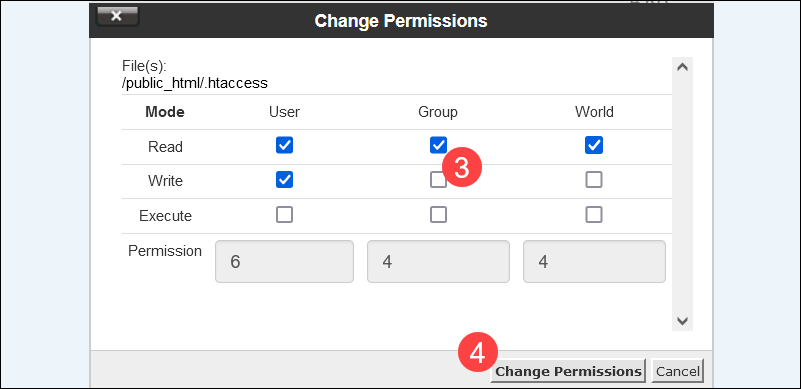
3. Check the Read, Write, and Execute boxes, and the permission values will change accordingly.
4. Click Change Permissions to save the changes.
Note: Avoid using overly permissive settings, like 777, for website content, scripts, or sensitive data, as they may pose significant security risks.
Create New .htaccess File
The .htaccess file controls the high-level website configuration, including redirects, security, and caching rules. Due to frequent updates and changes to server settings, the file can get altered or corrupted.
To check if the .htaccess file is the cause of the 403 error:
1. Use your file management software or an FTP client to access the website's root directory.
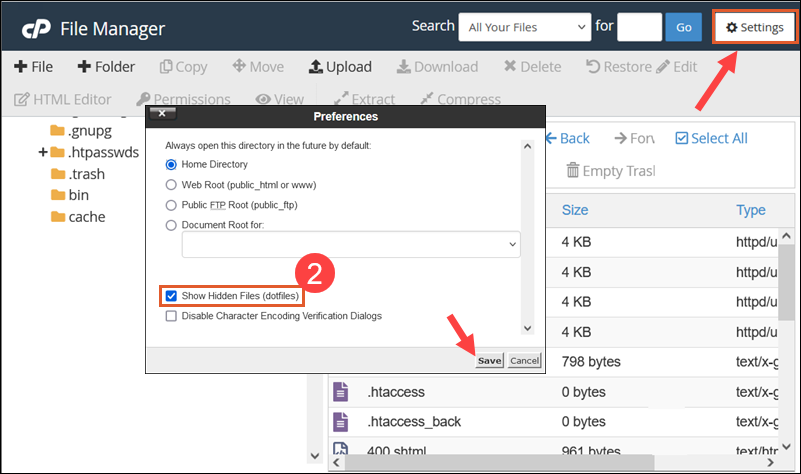
2. The .htaccess file is usually located in the root directory but may also be hidden by default. If using cPanel, click Settings in the File Manager panel and enable the Show Hidden Files option to display the file.
3. Right-click the .htaccess file and select Download to create a local backup.
Note: Always back up the .htaccess file before modifying or deleting it, especially if it contains custom rules for redirects, caching, or security.
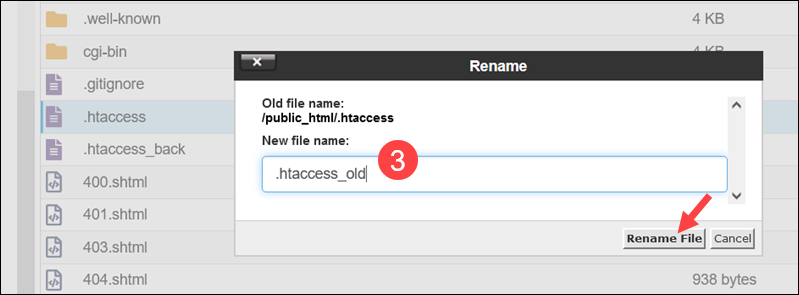
4. Right-click the file again and select Rename. Rename the .htaccess file to .htaccess_old. This temporarily disables the file without deleting it.
5. Refresh your website. If the error resolves, the .htaccess file may have been the cause.
6. If using WordPress, log into the dashboard to create a new .htaccess file.
7. Select Settings and then Permalinks.
8. Click Save Changes.
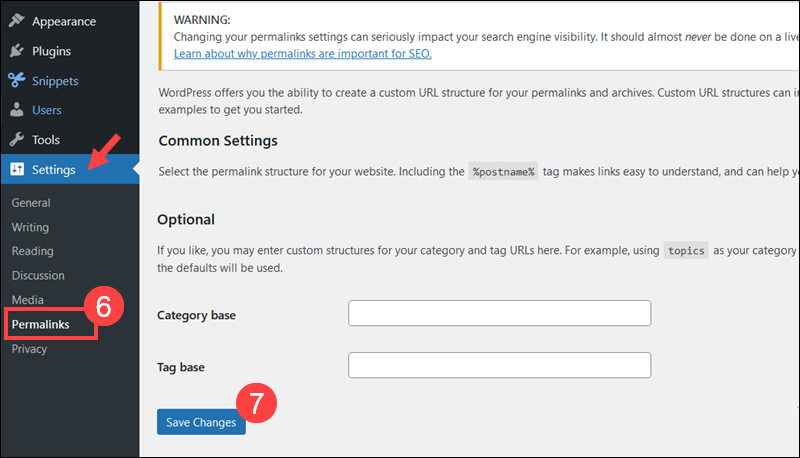
9. WordPress automatically generates a new .htaccess file in the public_html folder. Confirm the new .htaccess file permissions are set to 644.
Clear your cache and reload the website to verify it functions properly with the new .htaccess file.
Disable WordPress Plugins
A faulty or incompatible plugin can cause a 403 Forbidden error. To identify the plugin and fix the error in WordPress, you need to disable all plugins and test them individually.
Note: Some plugins may lose settings when deactivated. Consider backing up your site or noting down important settings beforehand.
Follow the steps below to disable all plugins:
1. Log into the WP Admin and access Installed Plugins in the Plugins menu.
2. Select all plugins by checking the checkbox at the top of the list.
3. Choose Deactivate from the Bulk Actions dropdown menu.
4. Click Apply to deactivate all plugins.
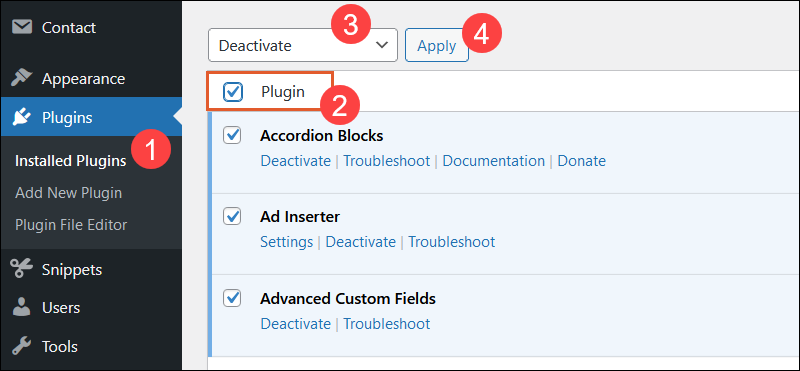
5. If you can access the website, it suggests that one of the plugins was causing the 403 error.
6. Access the WordPress admin and open the Plugins tab. Reactivate each plugin one by one, testing the website after each activation. When the 403 error reappears, the most recently activated plugin is the likely cause.
7. Update the problematic plugin to the latest version if available. If updating doesn’t work, consider uninstalling the plugin and searching for an alternative.
Remember to refresh your page after every change you make.
Check the A Record
If you recently migrated your website to a new server, an outdated A record in your Domain Name System (DNS) settings may still point to the old server's IP address. This can cause the 403 Forbidden error, especially if the access permissions to the old server are no longer valid.
Note: Keep in mind that DNS changes may take a few minutes to propagate, though in some cases, it could take up to 24-48 hours.
To check if the domain A record points to the correct IP address:
1. Log in to cPanel and open the Zone Editor in the Domains section.
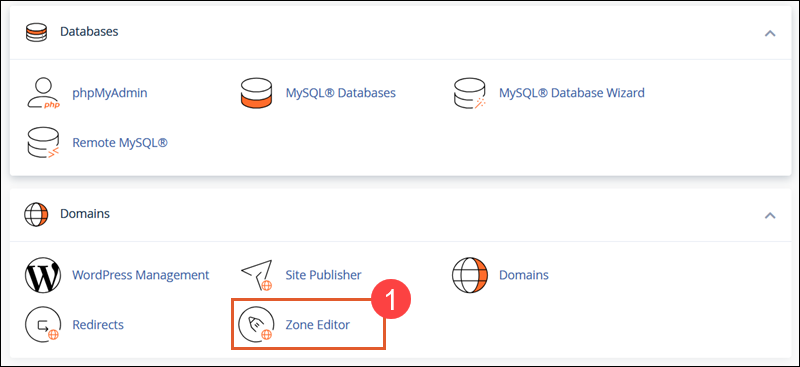
2. In the list of DNS records, check if the A record IP address in the Record column is correct.
3. If incorrect, click Edit and enter the current IP for your new server.
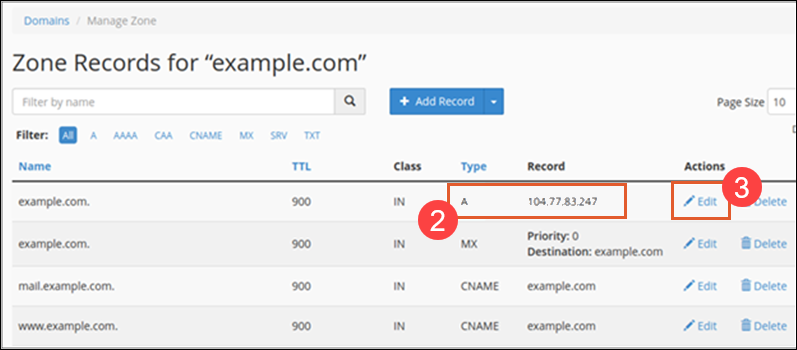
4. Click Update to save the changes.
Revisit the website to see if the issue has been resolved. If the 403 error is resolved but you are still experiencing DNS-related issues, refer to our comprehensive DNS troubleshooting guide.
Scan for Malware
Malware can inject unwanted lines into the .htaccess file even if you generate a new .htaccess file.
To counteract potential malware:
1. Install a security plugin to scan your web server for malware. Popular options for WordPress include Sucuri, Wordfence, and Defender.
2. Perform a full scan of your website using the plugin. The tool also identifies infected files.
3. Depending on the plugin, you can Delete the infected file or Restore it from a clean backup.
4. Once the malware is removed, check your .htaccess file to ensure no unwanted lines remain.
Visit your website to confirm the 403 error is resolved.
Clear Browsing Data
Caching stores static website elements to improve browser rendering speeds. However, if the content on a website changes, the cached version may not reflect the updated URL structure and result in a 403 Forbidden error.
Clear both the server-side cache and your browser cache to fix this issue.
Clear Server-side Cache
Server-side caching stores frequently accessed website data. This allows the server to retrieve the requested data much faster without accessing the slower underlying storage layer.
If you have made changes to your website, the caching system might not register those changes immediately. The discrepancy between the updated website and the old, cached version prevents the website from working correctly.
Clear the server-side cache after:
- Migrating to a new web host.
- Updating or installing plugins and themes.
- Making changes to website design or content.
The easiest way to clear the server-side cache is by using a caching plugin or your hosting provider's caching tools.
How to Clear Cache in Chrome
To clear the cache in Chrome:
1. Open the browser and press Ctrl+Shift+Del.
2. Set the Time range in the dropdown.
3. Check the Cached images and files box.
4. Click Delete data and reload the website.
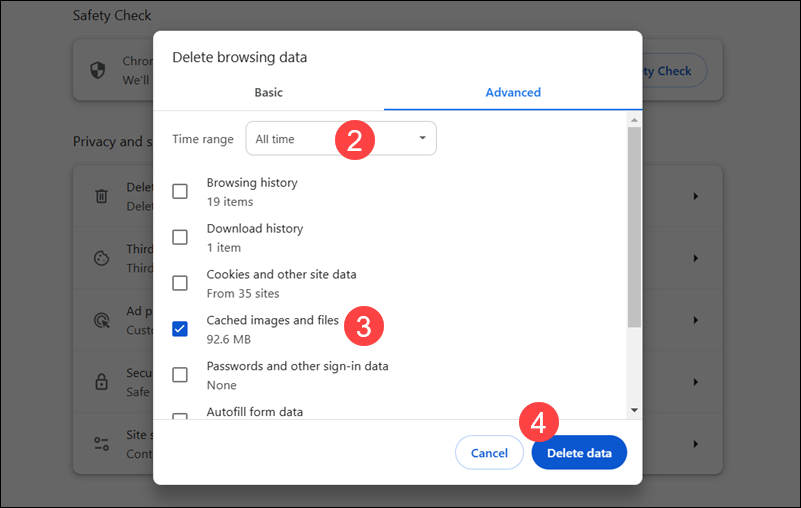
Note: If the issue persists, repeat the process and check the Cookies and other site data box to clear potential permissions-related issues.
How to Clear Cache in Mozilla
To clear the cache in Firefox:
1. While the browser is open, press Ctrl+Shift+Del.
2. Use the When dropdown to set the time range.
3. Check the Temporary cached files and pages box.
4. (Optional) To clear potential permissions-related issues, check Cookies and other site data.
5. Click Clear.
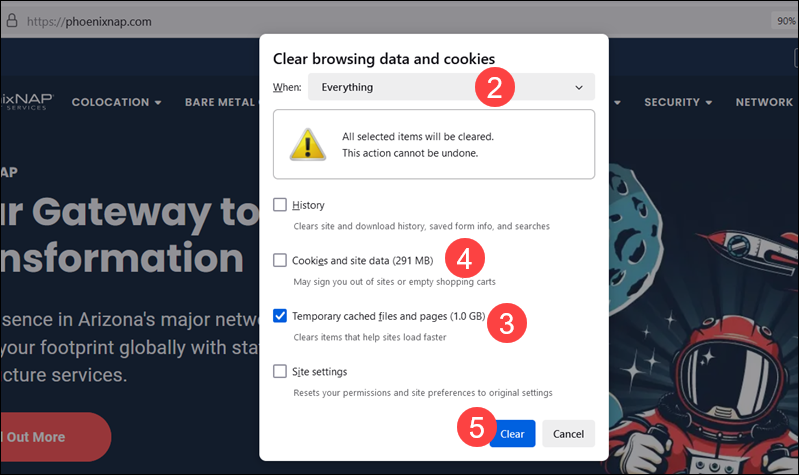
Reload the website to confirm the 403 Forbidden error is resolved.
How to Clear Cache in Safari
To clear the cache in Safari, press Cmd+Alt+E and reload the page.
Contact the Hosting Company
Hosting companies may occasionally experience technical problems that lead to a 403 Forbidden error. While web hosts prioritize resolving connectivity-related issues, there are a few actions you can take to expedite troubleshooting:
- Check the provider's status page to see if there are ongoing server problems or maintenance.
- Contact support via live chat or phone, as these methods are usually faster than email or a ticket system.
- Prepare 403 Forbidden error details in advance, such as the affected URL(s), troubleshooting steps you've already taken, and screenshots of the error.
How to Troubleshoot 403 Forbidden Error as a Visitor
As a website visitor, there are a few quick steps you can take to resolve the 403 error:
- Reload the page. Click the Reload button in your browser or press Ctrl+F5 (Windows and Linux) or Cmd+Shift+R (Mac) to force a refresh.
- Switch browsers or devices. Try accessing the website using a different browser or device to rule out local issues.
- Check URL. An incorrect or mistyped URL is a common cause of the 403 Forbidden error. Ensure you are trying to access a valid webpage and not a restricted directory.
- Clear history/cache. Browsers store cached webpages to speed up loading times. If the website link changes, the cached version may no longer match and cause the 403 error. Refer to the Clear Browsing Data section above for instructions on clearing the browser cache.
- Flush DNS cache. Clear your local DNS cache to ensure the browser connects to the correct server.
- Log in. A 403 Forbidden error code may occur if you need to log in to access a specific webpage. Enter your credentials to gain access to the content.
- Disable browser extensions. Some browser extensions may interfere with website access. Disable them and try reloading the page.
- Try later. If other users are experiencing similar issues, the problem is usually with the host. Revisit the site later to see if the error has been resolved.
- Contact your ISP. If none of the suggestions above worked and other users can access the website, contact your Internet Service Provider (ISP) to check for potential connectivity issues.
Conclusion
This article explained the causes of the 403 Forbidden error and how to resolve its underlying issues.
Web admins regularly encounter a broad spectrum of HTTP status codes. Read our comprehensive guides on troubleshooting the 401 Error, 503 Service Unavailable, 523: Origin is unreachable, and ERR_TOO_MANY_REDIRECTS errors.
