The dd command is a classic Linux utility that has stood the test of time. Even though modern alternatives such as ddrescue and dcfldd are often used for data recovery and forensics, dd remains the go-to tool for cloning drives byte for byte, testing disk I/O performance, and writing bootable ISOs.
Find out how the dd command works through a set of practical examples.
Prerequisites
- Command-line access.
- Sudo or root privileges.
- Linux system.
Note: dd is a standard utility that should work across all Linux distributions. This guide demonstrates the commands and examples using Ubuntu 24.04.
Linux dd Command Syntax
The dd command syntax is not as intuitive or flexible as some modern alternatives. It does not provide confirmation or warning before overwriting files or devices. Users must be careful, as a single typo leads to irreversible data loss.
In its simplest form, dd uses the following syntax:
dd if=[input_source_path] of=[output_destination_path] [options]if=specifies the source to read from: a file, raw device, or disk partition.of=specifies the destination to write the data, which can also be a file, disk image, or USB drive.
Warning: The output file or device will be overwritten without warning. Verify the path before running the command to avoid overwriting important drives or partitions.
[options]specify how data is read, written, and processed. They give users low-level control over tasks like cloning or erasing disks and creating compressed disk images.
For instance, the following command copies the first partition from an internal SSD to a backup image on an external USB drive:
dd if=/dev/nvme0n1p1 of=/media/usb/backup_partition.img bs=1M status=progressThe 1-megabyte block size (bs) is applied for better speed and control, while the status=progress option displays real-time transfer progress in the terminal.
Linux dd Command Options
The following table lists the most common dd options and their functions:
| Option | Description |
|---|---|
bs= | The default block size for reading and writing in the dd command is 512 bytes. Use the bs= option to increase the block size (e.g., 4M) for large operations. Keep in mind that large values may consume too much memory and impact system performance. |
count= | By default, dd copies all data from the input source. The count value is used to limit the number of blocks to copy. The size of each block is defined in the bs= option, the default is 512 bytes if bs= is not specified. |
status= | This option controls how much information is displayed during a dd operation. The progress value shows real-time progress updates, noxfer suppresses the final stats summary, and none suppresses all output. |
skip= | Skips a specified number of blocks from the input before starting to copy. |
seek= | Skips a specified number of blocks on the output before starting to write. |
conv= | Used to apply data conversions during the copy process. Values include sync to pad incomplete blocks with zeroes, fdatasync to flush data to disk after writing, and noerror to copy and ignore read errors. |
iflag= | Set input flags to define how dd reads from the input. Values include fullblock to ensure entire blocks are read, nonblock to perform non-blocking reads, and direct to bypass the cache for direct I/O. |
oflag= | Set output flags to control how dd writes to the output. Values include direct to bypass the cache for direct I/O, append to add data to the destination instead of overwriting it, and sync to flush data to the disk immediately. |
Linux dd Command Examples
The following dd command examples show how to back up and restore disks, test disk performance, and perform other essential system administration tasks. Modify the parameters to meet your specific task requirements.
1. Create Bootable USB
One of the common uses of the dd command is to create a bootable USB drive. The following command writes an ISO image of an operating system to an external USB device:
sudo dd if=linux.iso of=/dev/sdX bs=4M status=progressThe bs=4M option speeds up the process by reading and writing data in 4 MB chunks. The status=progress option displays the progress in real time with transfer speed and statistics.
Note: /dev/sdX is a placeholder, and using it directly in a command will result in an error. Before running the dd command, confirm the path of your USB drive to avoid overwriting critical drives.
2. Clone Disk
Use the following command to create an exact copy of the primary disk:
sudo dd if=/dev/sda of=/dev/sdb bs=64K conv=noerror,sync status=progressThe conv=noerror argument prevents minor read errors from interrupting the copying process. sync fills unreadable blocks with zeroes to maintain the alignment between the two disks.
3. Create Full Disk Backup
Enter the following command to create a full disk backup of an NVMe SSD as an image file:
sudo dd if=/dev/nvme0n1 of=backup.img bs=4M status=progressThe block size value is increased to 4M to speed up the process. The full backup will include partition tables, boot sectors, and data.
4. Restore Disk Image
After creating a full disk backup, you can restore the original disk from the disk image:
sudo dd if=backup.img of=/dev/nvme0n1 bs=4M status=progressAlternatively, use direct I/O to restore a backup image more efficiently:
sudo dd if=backup.img of=/dev/sdX bs=4M status=progress iflag=directThe iflag=direct option bypasses the system's cache to improve performance during large data transfers.
5. Create Swap File
Use the following command to create a 2GB swap file to be used as additional virtual memory:
sudo dd if=/dev/zero of=/swapfile bs=1M count=2048The bs and count options define the file's size (1MB x 2048 = 2GB).

Ensure that only the root user can read or write to the swap file:
sudo chmod 600 /swapfileActivate the swap file so the system can use it:
sudo mkswap /swapfile && sudo swapon /swapfile
You can make the swap file persistent across reboots by adding it to the /etc/fstab file.
6. Wipe Disk
The following command removes all data from a disk and replaces it with zeroes:
sudo dd if=/dev/zero of=/dev/sdX bs=1M status=progressThe disk is wiped clean and reset to a zeroed-out state. To add another security layer, you can write random data instead of zeroes using the following command:
sudo dd if=/dev/urandom of=/dev/sdX bs=1M status=progress Random data makes it harder for unauthorized individuals to recover previously stored information on the disk.
7. Test Disk Write Performance
Use the dd command to create a temporary file to measure a disk's write performance. In this example, the command writes 1GB of zeroes to the tempfile to assess writing speeds:
dd if=/dev/zero of=tempfile bs=1M count=1024 conv=fdatasync status=progress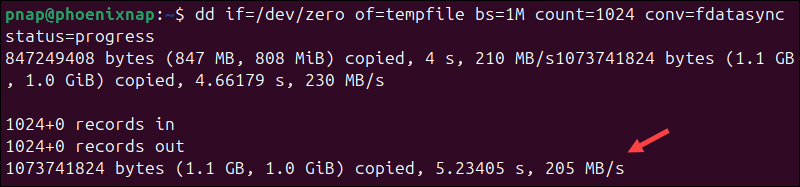
The conv=fdatasync option is used to flush all data to the disk and provide more accurate results.
8. Test Disk Read Performance
To measure a disk's read performance, you can read from the device and discard the data without writing it to a destination:
sudo dd if=/dev/sda of=/dev/null bs=1M status=progress
The status=progress option shows real-time progress and transfer speeds to help you analyze the disk's read performance.
9. Copy Specific Disk Range
Often, it is not necessary to copy an entire disk. You can copy a specific range of blocks using the skip and count options:
sudo dd if=/dev/sdX of=partition.img bs=4M skip=10 count=100In this example, the copy process initially skips 10 blocks (10 x 4MB=40MB) and then copies the following 100 blocks (100 x 4MB=400MB).
10. Define Start Point on Output Device
The seek option is ideal for defining where to start writing data on the destination device. The following command tells dd to start writing data from example_file.bin at the 50th MB of the output device:
sudo dd if=example_file.bin of=/dev/sdX seek=50 bs=1MThe block size is set to 1 MB and the seek value to 50 to target the 50th MB.
11. Create ISO Image From CD/DVD
You can back up data from a CD/DVD by copying its content to an ISO image on a local partition:
dd if=/dev/cdrom of=cd_backup.iso bs=2M
The ISO image preserves the original file structure and can later be mounted or burned to a new disc.
12. Remove Disk Partition Tables
Occasionally, you may need to wipe partition tables from a disk to create a new partition layout or resolve corrupted tables. The following command overwrites the first 4 MB of the disk, where the partition tables are stored, with zeroes:
sudo dd if=/dev/zero of=/dev/sdX bs=4M count=1Without a partition table, the operating system cannot detect the partitions and views the disk as uninitialized.
13. Create Zipped Disk Image
dd is commonly used with the gzip command to create a compressed disk image and conserve space. Use the following command to pipe the disk drive data into gzip and create a backup image:
sudo dd if=/dev/sdX | gzip > backup.img.gzTo restore the disk from the compressed image, use:
gzip -dc backup.img.gz | dd of=/dev/sdXThese commands reduce storage requirements and allow you to restore a backup with a single command.
14. Create Encrypted Disk Image
Use the dd command with openssl to create an encrypted disk image. The following command reads data from the specified disk and encrypts it using AES-256 encryption:
sudo dd if=/dev/sdX | openssl enc -aes-256-cbc -out backup.img.encThe disk image backup.img.enc is now encrypted and can be stored in a remote location, such as a public cloud.
15. Write Data to Specific Disk Location
You can combine the count and seek options to write data at a specific location on the output device. In the following example, the count=0 option ensures no data is copied from the input while seek=1 skips the first block (512 bytes) on the output device before writing:
sudo dd if=bootloader.bin of=/dev/sdX bs=512 seek=1 count=0This is useful for tasks such as installing a bootloader in a specific sector without overwriting other data.
16. Dump System Memory
When troubleshooting, it is sometimes necessary to analyze the system's memory. The following command places 100 megabytes of system memory into the memory_dump.bin file for easier manipulation and analysis:
sudo dd if=/proc/kcore of=/root/memory_dump.bin bs=1M count=100
This command requires root permissions. Be cautious, as it can expose passwords, encryption keys, or other sensitive user data that would otherwise be safely stored in memory.
17. Create and Restore MBR
The Master Boot Record (MBR) contains a disk's bootloader and partition table. If the MBR gets overwritten or corrupted, you can restore it from a backup. To create a backup of the MBR, type:
sudo dd if=/dev/sdX of=mbr_backup.bin bs=512 count=1This command copies the first 512 bytes of the disk, which contains the MBR. Use the following command to restore the MBR from the backup:
sudo dd if=mbr_backup.bin of=/dev/sdX bs=512 count=1The content from the backup file is written back to the /dev/sdX disk.
Conclusion
The article showed how the dd command works and how to use its options. Refer to the practical examples in this resource when using dd, as small syntax errors can result in critical data loss.
Consider using alternatives like the cp command or mv command, which carry less risk for more straightforward tasks.