Apache Maven is an open-source project management tool primarily used to develop Java applications. It uses a POM (Project Object Model) approach, storing project, configuration, and dependency information in an XML file.
This tutorial explains how to install Maven on Ubuntu using the official repository or the installation file on the Maven website.

Prerequisites
- A system running Ubuntu.
- Command-line access to the system.
- A user with administrative privileges.
Install Maven on Ubuntu with APT
The apt package manager is a straightforward way to install Maven on Ubuntu. However, the user is limited to the Maven version currently available in the repository.
Follow these steps to install Maven with APT:
1. Update the local package repository index:
sudo apt update2. Install Maven from the official Ubuntu repository:
sudo apt install maven -y3. Check the current Maven version to verify the installation:
mvn -versionIf successful, the output shows the program version.

Download and Install Maven's Recent Version on Ubuntu
Installing Maven by downloading the installation file from the official website is more complex than using the apt command, but it enables users to install the latest available version. Follow the steps below to manually install Maven.
Step 1: Install OpenJDK
OpenJDK is an open-source Java implementation that is a Maven dependency on Ubuntu. Proceed with the following steps to install OpenJDK on the system:
1. Update the system's package repository index:
sudo apt update2. Install the latest OpenJDK version by running:
sudo apt install default-jdk -y3. Verify the installation by checking the current OpenJDK version:
java -version
Step 2: Download and Install Maven
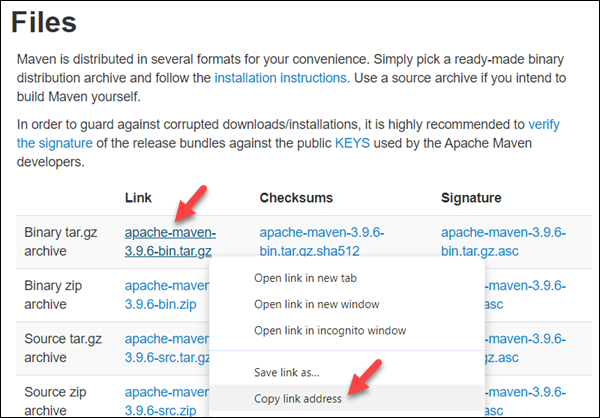
The latest Maven version is listed in the Files section of the official website. Earlier versions are available in the Previous Releases section. Follow the procedure below to download and install Maven on an Ubuntu system:
1. Visit the Maven download page.
2. Right-click the version of Maven you want to install and copy the link.

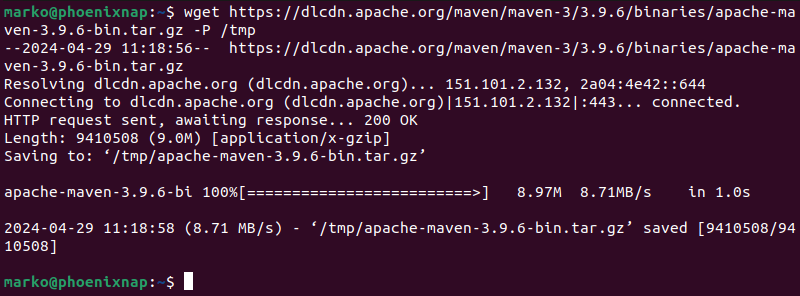
3. Download the Maven installation file to the /tmp directory using the wget command. The syntax is:
wget [link] -P /tmpReplace [link] with the link to the Maven version you copied in the previous step.

4. Once the download is complete, extract the installation file to the /opt directory:
sudo tar xf /tmp/apache-maven-*.tar.gz -C /opt5. Create a symbolic link leading to the Maven installation directory:
sudo ln -s /opt/apache-maven-[version] /opt/mavenReplace [version] with the Maven version you downloaded. For example:
sudo ln -s /opt/apache-maven-3.9.6 /opt/mavenStep 3: Set Up Environment Variables
1. Use a text editor like Nano to create and open the maven.sh script file in the /etc/profile.d/ directory:
sudo nano /etc/profile.d/maven.sh2. Add the following lines to the maven.sh file:
export JAVA_HOME=/usr/lib/jvm/default-java
export M2_HOME=/opt/maven
export MAVEN_HOME=/opt/maven
export PATH=${M2_HOME}/bin:${PATH}
Save the file and exit.
3. Use the chmod command to make the maven.sh file executable:
sudo chmod +x /etc/profile.d/maven.sh4. Execute the maven.sh script file with the source command to set up the new environment variables:
source /etc/profile.d/maven.shStep 4: Verify Maven Installation
Check the current version of Maven to verify the installation:
mvn -versionThe example output below shows the 3.9.6 version of Maven installed on the system.

Conclusion
After following this tutorial, you should have Maven installed and ready to use on your Ubuntu system. The article explained the steps for installing Maven via the official Ubuntu APT repository and the official website.
If you want to try Maven in a different environment, check out our guides for installing Maven on Debian and installing Maven on Windows.


