Behind the scenes, browsers and client-side scripts use the Document Object Model (DOM) to modify web pages in real time. The DOM treats an HTML document as a tree of objects that scripts can access and update through built-in DOM APIs.
In this article, find out how the DOM structures a web page and explore its most useful properties and methods.
What Is Document Object Model (DOM)?
The Document Object Model (DOM) is an in-memory tree representation of a structured HTML or XML document. Each element, attribute, and piece of text in the document becomes a node in the DOM tree. The nodes are exposed through a standardized interface to scripts running in the browser.
Browsers, through their JavaScript engines, can read, modify, add, or remove these nodes to update the document dynamically as the user interacts with the page.
How Does Document Object Model Work?
DOM acts like an in-memory link between the web page's code and what users see on their screens. The process runs through the following steps:
1. A developer creates an HTML or XML document that defines the page's structure using nested tags like <html>, <head>, and <body>. The document is then uploaded to the server hosting the website.
2. When a user visits a URL, the browser sends a request to the web server and retrieves the HTML document.
3. The browser reads the document and constructs the DOM tree in memory, turning each tag, attribute, and text into an object (node). The page becomes interactive once the main HTML elements have been parsed. Inline and external scripts can now read or modify elements using DOM APIs.
4. The user clicks a button, types in a form field, or triggers another event on the web page.

5. The browser's event system captures the action and checks if any script is listening for an event on that target element.
6. A function registered with addEventListener() or an inline event attribute is executed.
7. The function updates the DOM tree by adding or removing nodes, altering the text, or modifying CSS classes. The change is temporary and only exists in the browser's memory while the page is loaded.
8. The browser's rendering engine detects the changes in the DOM and updates the visible page without reloading it.
For the user, what they see in their browser now reflects the modified DOM, as changes to text, colors, or layout happen in real time. The original HTML document on the web server remains unaffected.
Why Is Document Object Model Important?
Browsing the web is a much smoother and more interactive experience than it was in the era of static HTML pages. Thanks to the DOM:
- Developers can build web pages that look and feel like full applications. Every user tap, scroll, or keystroke can trigger a visual response.
- JavaScript can manipulate the DOM in real time to provide instant feedback to users or display live content updates.
- Everything happens in the background, and users are often unaware that scripts are making subtle changes as they browse content.
- Modern development frameworks like React, Vue, and Angular are built on DOM principles. As a result, web development workflows are more structured, collaborative, and efficient than ever before.
- All major browsers implement the DOM according to W3C standards. This means that a script written for one browser almost always works for another.
The best way to understand how the DOM works is to look at how browsers structure a web page into a hierarchy of elements and nodes.
DOM Structure
Browsers use an HTML or XML document to build a hierarchical, in-memory model of the page. For example:
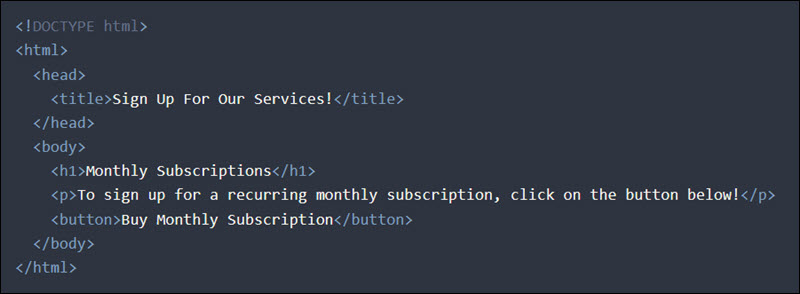
Each HTML element and piece of text becomes a node in the DOM:
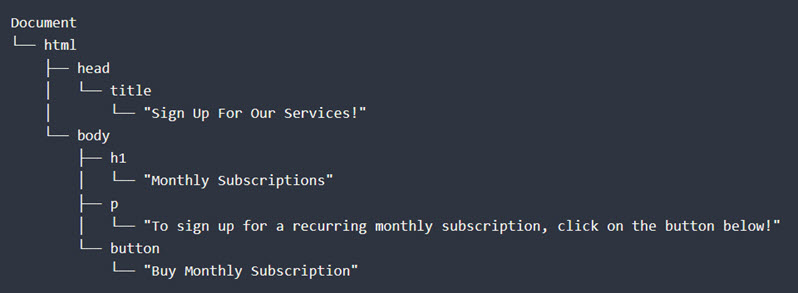
There are three primary types of nodes:
- Element Node. Represents an HTML tag, such as
<h1>,<p>,<div>, or<button>. They are the most commonly manipulated objects in the DOM. - Attribute Node. Represents HTML attributes like
id,class, orhref. These nodes store metadata that determines how elements behave or appear. - Text Node. Stores the actual content within an element, for example, the text Buy Monthly Subscription inside a
<button>tag.
Each node type represents a different kind of data or relationship within the DOM, and its position in the hierarchy determines how it can be accessed or modified. Based on their position in the DOM tree, nodes can be:
- Parent Node. A node that contains one or more child nodes. For example,
<body>is the parent of<p>. - Child Node. A node nested inside another node. It inherits the styling and structure from its parent.
- Sybling Node. Nodes that share the same parent node. For instance,
<h1>and<p>inside<body>are siblings. They enable horizontal navigation between related elements.
DOM Hierarchy
The Document Object Model (DOM) structure, often referred to as the DOM tree, defines how parent, child, and sibling nodes relate to one another, which enables JavaScript code to traverse or modify them.
The following table explains the DOM hierarchy based on the previous example:
| Term/Example | Description | Role in the DOM |
|---|---|---|
Document | The root object that represents the entire HTML or XML file. It is the entry point for accessing and modifying the content and page structure. | All other nodes are its descendants. |
<html> | The element that contains all other HTML content. | Child of the Document object and the parent of the <head> and <body> elements. |
<head> | A section that contains the page title, scripts, styles, and metadata. Document information that is not directly visible on the page. | It is the child of <html>, sibling of <body>, and parent of <title> and other metadata elements. |
<title> | Defines the page title and contains a text node with the title. | Child of the <head> node and parent of a text node. |
<body> | The section that contains visible page elements, such as elements that users can interact with. | Child of <html>, sibling of <head>, and parent of <header>, <main>, <footer>, etc. |
<header>, <main>, <footer> | Structural elements that define the main layout regions of the page and give semantic meaning to its structure. | Children of <body> and parents of content elements or text nodes. |
<h1>, <p>, <img>, <button> | Content elements are the readable or interactive parts of the page. | Children of <body> or structural elements and parents of text nodes. |
id, class, src, alt | Attributes provide additional information and configuration for an element, including resource links, styling hooks, and identifiers. | Associated with element nodes but not part of the child node hierarchy. |
Thanks to this structure, the DOM tree becomes a live, editable version of the HTML document that scripts and users interact with in real time.
DOM Properties and Methods
The DOM is all about interactivity. This is why it is structured as a collection of programmable objects that represent every part of a web document. The different types of actions users, scripts, and developers can perform on the DOM can be grouped into the following categories:
- Event. An event is a signal triggered by user actions, such as clicks, scrolling, or form input. They allow scripts to detect and respond to user interactions.
- Event Listener. A JavaScript function that waits for a specific event to occur and executes a defined block of code in response.
- Property. A data value that represents a node's current state or content and allows scripts to read or modify that state. Examples include
nameNode,textContent, orinnerHTML. - Method. A function that performs an action on a DOM object. Methods like
createElement()andappendChild()enable developers to directly manipulate the document's structure or content.
Some of the most common properties and methods are covered in the sections below.
innerHTML Property
The innerHTML property lets you read or update the HTML content inside a DOM element. It is one of the most commonly used DOM properties because it allows developers to dynamically update entire sections of a web page.
For example, the following code uses the getElementById() method to modify the content of the element with the ID message:
document.getElementById("message").innerHTML = "<strong>Thank You For Your Feedback!</strong>";If the page contains a paragraph element with the message ID:
<p id="message">Your opinion matters.</p>The browser removes any existing child nodes inside that element and replaces them with the new content:
<p id="message"><strong>Thank You For Your Feedback!</strong></p>In this example, once the user submits their feedback, the text Thank You For Your Feedback! appears, confirming that the message was received.
Note: Always validate or sanitize user-generated input before using innerHTML. Allowing users to add raw or untrusted content can expose your page to cross-site scripting (XSS) and other types of cyber attacks.
nodeName Property
The nodeName property returns the name of a DOM node as a string. It is a read-only property, which means you can use it to identify a node's type or tag name, but not to modify its content.
It can be used on any DOM node type, including HTML elements, text nodes, and comments. For element nodes, it returns the tag name in uppercase. For example, if the page includes an <h1> element, the script logs H1 in the console:
const node = document.querySelector("h1");
console.log(node.nodeName); // "H1"
Developers often use the nodeName property to filter out text nodes, traverse the DOM, or debug scripts that process a mixture of node types.
addEventListener() Method
The addEventListener() method attaches an event listener to a DOM element. When a specific user-driven event like a click or form submission occurs, the listener notifies the handler function, which executes the corresponding code.
Using this method, you can:
- Attach multiple event listeners to the same element without overwriting existing ones.
- Keep code modular and easy to maintain without mixing logic into inline event handlers.
- Remove event listeners using
removeEventListener()when they are no longer needed.
For example, if the page includes the following button element:
<button id="buyBtn">Add 10 Tokens</button>You can attach an event listener to display a confirmation message if the button is clicked:
const btn = document.querySelector("#buyBtn");
btn.addEventListener("click", () => {
  alert("10 tokens added to your account!");
});
When the user clicks the Add 10 Tokens button, the browser detects the event, triggers the listener, and runs the function that displays the 10 tokens added to your account! alert message.
The addEventListener() method can be used on any DOM element, as well as the document and window objects.
replaceChild() Method
The replaceChild() method replaces one child node with another within a parent element in the DOM tree. Developers use it to swap elements dynamically without recreating the entire container.
For example, you can update a specific part of a document, like replacing a list item, while leaving the rest of the content intact. If a page includes the following list:
<ul>
  <li>iPhone 16</li>
  <li>MacBook Pro</li>
</ul>
You can use this script to replace the first list item with a new one:
const newItem = document.createElement("li");
newItem.textContent = "iPhone 17";
const list = document.querySelector("ul");
list.replaceChild(newItem, list.children[0]);
After the script runs, the text node in the first <li> element is replaced, and the list reads:
- iPhone 17
- MacBook Pro
The replaceChild() method can be used on any HTML element that contains a child node.
appendChild() Method
The appendChild() method adds a node as the last child of a parent element. It is one of the most commonly used methods to modify the DOM tree.
This method is often combined with createElement() to add new elements to a page. For example, if the page includes the following list:
<ul>
  <li>iPhone 17</li>
  <li>MacBook Pro</li>
</ul>
You can append a new item to the end of the list using the following script:
const item = document.createElement("li");
item.textContent = "iPad Air";
document.querySelector("ul").appendChild(item);
After the script runs, the list includes an additional item:
- iPhone 17
- MacBook Pro
- iPad Air
The appendChild() method can only append one node at a time. If the node already exists in the DOM, it will be moved to a different parent rather than being duplicated.
setAttribute() Method
The setAttribute() method updates the value of an element's attribute. If the specified attribute does not exist, it is created automatically.
This method is ideal for changing an element's behavior or appearance, like toggling classes, updating image sources, or adding data attributes.
For example, if a page includes an image:
<img src="linux-commands-chear-sheet.png">Use the setAttribute() method to set its alternative text (alt attribute):
const img = document.querySelector("img");
img.setAttribute("alt", "Linux Commands Cheat Sheet");
After the script runs, the HTML becomes:
<img src="linux-commands-cheat-sheet.png" alt="Linux Commands Cheat Sheet">This method is often paired with getAttribute() to read the attribute's current value before changing it.
createElement() Method
The createElement() method creates a new element node in memory but does not automatically add it to the page. Developers use it to build new parts of the DOM and add interface elements such as buttons, cards, or list items.
After creating an element, you must append it to the page using methods like appendChild() or insertBefore():
const button = document.createElement("button");
button.textContent = "Buy Now Pay Later";
document.body.appendChild(button);
In this example:
const button = document.createElement("button")creates a new<button>node in memory.button.textContent = "Buy Now, Pay Later"adds text inside the element.document.body.appendChild(button)inserts the button into the page as the last child of the<body>element.
After the script runs, the page includes the <button>Buy Now, Pay Later</button> element.
You can combine createElement() with setAttribute() to configure the element before inserting it into the DOM.
getElementById() Method
The getElementById() method retrieves the element with the specified id attribute. Because ID values are unique, this method always returns a single element or null if the specified element does not exist.
Since browsers optimize for ID lookups, it is one of the fastest and most efficient ways to select DOM elements. Developers often use this method to access unique elements like headers, forms, or navigation containers.
For example, if a page includes a heading with the following ID:
<h1 id="mainHeader">Welcome</h1>You can select and modify it using:
const header = document.getElementById("mainHeader");
header.style.color = "darkblue";
After the script runs, the header text color changes to dark blue.
getElementsByTagName() Method
The getElementsByTagName() method returns a live HTMLCollection of all elements in the document with the given tag name. Because the collection is live, it automatically updates if matching elements are added or removed from the DOM.
Note: HTMLCollection is a live collection that contains both structural and content elements. It is typically returned by older DOM methods such as getElementsByTagName() and getElementsByClassName(). Developers today prefer modern alternatives like querySelectorAll().
This method is useful for performing bulk operations, iterating through multiple elements, or applying the same style or behavior to each one.
For example, if the page includes several paragraphs:
<p>Introduction</p>
<p>Plot</p>
<p>Conclusion</p>
You can increase the font size using:
const paragraphs = document.getElementsByTagName("p");
for (let p of paragraphs) {
  p.style.fontSize = "16px";
}
After the script runs, all <p> elements display text at a font size of 16px.
querySelectorAll() Method
The querySelectorAll() method returns a static NodeList containing all elements in the document that match a specified CSS selector.
Note: A NodeList is a static collection that can hold elements, text, or comment nodes depending on the method used. Unlike HTMLCollection, it does not update automatically when the DOM changes. The static nature makes it more predictable and the preferred choice in most modern JavaScript workflows.
This is a flexible way to target multiple elements at once. You can use any valid CSS selector, like classes, IDs, attributes, or tag names, to select group elements.
For example, if the page contains elements with the class highlight:
<p class="highlight">Important note</p>
<p>Regular text</p>
<p class="highlight">Read this carefully</p>
You can use the following script to apply a background color to all of them:
const highlights = document.querySelectorAll(".highlight");
highlights.forEach(el => el.style.backgroundColor = "yellow");
After the script runs, all elements with the .highlight class will have a yellow background.
DOM Properties and Methods Overview
The following table provides a quick overview of the listed methods and properties:
| Property | Description | When to Use |
|---|---|---|
| innerHTML | Reads or updates the HTML content inside a DOM element. | Replace the content of an element and remove its child nodes. |
| nodeName | Returns the name of a DOM node as a string. | Identify what node type you are working with when inspecting or debugging the DOM. |
| Method | Description | When to Use |
|---|---|---|
| addEventListener() | Attaches an event listener to an element. | Trigger scripts when a user clicks, presses a button, scrolls, or submits a form. |
| replaceChild() | Replaces one child node with another. | Update only part of a parent element without recreating the whole container. |
| appendChild() | Adds a new node as the last child of a parent element. | Insert a new list item, button, or other element at the end of a container. |
| setAttribute() | Sets or changes the value of an element's attribute. | Update or add attributes dynamically. |
| createElement() | Creates a new element in memory without adding it to the page. | Build new interface components before appending them to the DOM. |
| getElementById() | Retrieves an element with the specified ID. | The fastest way to find a single element when you know its ID. |
| getElementsByTagName() | Returns a live HTMLCollection of all elements with a specific tag. | Loop over or update all elements with the same tag name. |
| getElementsByClassName() | Returns a live HTMLCollection of all elements with a specific class name. | Update or style all elements that share the same class. |
| querySelector() | Returns the first element that matches the specified CSS selector. | Retrieve a single element using flexible CSS-style selectors. |
| querySelectorAll() | Returns a static NodeList of all elements that match a CSS selector. | Target multiple elements at once using CSS selectors. |
DOM Use Cases
The DOM enables organizations and individuals to introduce countless real-world features into their digital platforms.
Some of the practical uses of the DOM include:
- Real-time communication. Chat messages, notifications, and activity feeds all rely on DOM updates. It creates the impression of a constantly active, live environment that invites users to stay engaged.
- Navigating media and images. Users can flip through photo galleries, browse videos, or explore catalogues dynamically, instead of constantly reloading new pages.
- Dynamic payment forms. Customers can update payment methods, change currencies, or enter billing information without leaving the payment form. Totals are automatically recalculated, new fields appear, and promotional offers are adjusted based on input.
- Checkout page summaries. Users can add or remove items from their shopping cart in the same session, and prices and item lists will update instantly.
- Interactive dashboards. Moving sliders, filtering data, or using search fields triggers real-time updates of charts, KPIs, and data tables.
- Smart form validation. You can provide users with meaningful instructions and guide them through forms by highlighting missing or incorrect fields, showing tooltips, and confirming successful entries. A very effective method for reducing the number of form errors and abandonment rates.
- Interface personalization. Developers can tailor the interface to each user's behavior and preferences by allowing them to switch between light and dark themes, expand or collapse menus, and adjust layouts in real time.

DOM Advantages and Disadvantages
The DOM is the foundation of the modern web, but it also has certain drawbacks that developers need to be aware of.
Advantages
The key benefits of using the DOM include:
- Every part of an HTML or XML document can be accessed programmatically.
- The DOM tree structure is intuitive and human-readable, making it easier for developers to navigate and traverse.
- Modern JavaScript frameworks like React, Vue, and Angular are built on DOM principles.
- The DOM is standardized by the W3C, works seamlessly with JavaScript, and is supported by all major browsers.
- It integrates with web APIs such as Fetch, Local Storage, and Canvas to extend its functionality.

Disadvantages
The disadvantages of using the DOM include:
- Raw DOM manipulation requires many lines of code before the results are visible.
- Managing multiple event listeners and dynamic elements can be demanding as applications grow.
- Frequent DOM changes force browsers to recalculate layouts and redraw content, affecting website performance.
- The DOM exists only temporarily in the browser's memory and disappears when the page is closed or reloaded.
- Unsafe inputs can expose the page to cross-site scripting (XSS) and increase its attack surface.
- Removing DOM elements without detaching their event listeners can cause memory leaks because their references persist in memory.
Conclusion
This article helped you understand how the DOM works, its tree structure, properties, and methods. Building a responsive and engaging website is important, but performance matters just as much.
Explore 7 effective ways to reduce server response time and make your website load faster.