An IP address is a numerical label that identifies a device on a local or public network. Changing it alters how your device appears on the network or to external servers. This may help with connectivity issues, enhance security, and improve anonymity online.
This tutorial will explain how to change your IP address across major operating systems and platforms, whether you're troubleshooting a network issue, improving privacy, or accessing restricted content.
Changing IP Address - Benefits and Use Cases
An IP is a unique identifier. Your internet service provider (ISP) assigns an IP address for internet access and your router for local network communication. IPs determine your online location, affect content accessibility, and allow websites to track activity.
Most IP addresses are IPv4 (e.g., 192.168.0.1), but some networks begin to use IPv6. If your network uses both IPv4 and IPv6 (dual-stack), you'll need to configure IPv6 addresses separately. You can follow the same methods outlined for IPv4, but select the IPv6 tab in the network settings
Replacing an IP address helps improve privacy, resolve connectivity issues, and bypass content restrictions in specific use cases.
Some benefits and use cases of changing an IP address are:
- Protects privacy and security. A different IP address can help obscure your approximate location and reduce online tracking by websites and advertisers. However, your ISP can still see your traffic unless you use encryption tools like a virtual private network (VPN).
- Prevents DDoS attacks and doxxing. Gamers and streamers switch IP addresses to avoid attacks that disrupt gameplay or expose personal information.
- Fixes network issues. Network errors or misconfigurations often involve private IP addresses. Assigning a new one resolves conflicts and reconnects devices.
- Reduces targeted advertising. Advertisers track IP addresses to collect data and deliver ads. A different IP limits tracking and increases anonymity.
- Supports network reconfiguration. Installing a new router or building a custom network setup sometimes requires a fresh IP range. Switching IP addresses ensures compatibility.
How to Change Your IP Address on Different OSes
There are two types of IP addresses: public and private.
A public IP address identifies your network on the Internet and is assigned by your ISP. It stays the same across all local devices on the same connection. A private IP address identifies individual devices inside a local network, and your router assigns them to it.
You can't directly change your public IP address yourself. If your ISP assigns dynamic IPs, sometimes you can change them by resetting your modem or router.
The following text explains how to change private IP addresses on different devices and operating systems. A static IP address is a fixed, manually assigned IP that doesn't change over time, unlike a dynamic IP, which is automatically assigned by a dynamic host configuration protocol (DHCP) server.
Note: Most of these methods are temporary, and the IP address reverts to the previous state after reboot. To make the change permanent, set a static IP through the advanced network settings or configure it in your router. This ensures the IP settings persist across reboots.
Change IP Address on Windows
Changing your IP on Windows can help resolve network issues, improve privacy, and bypass restrictions. Since Windows is one of the most commonly used operating systems, knowing how to set your IP address is useful for troubleshooting or protecting your online presence.
There are several ways to change the IP address on Windows.
Change IP Address Using Windows GUI
The easiest way to update an IP address on Windows is via the Graphical User Interface (GUI). Take the following steps to assign a new IP address in Windows:
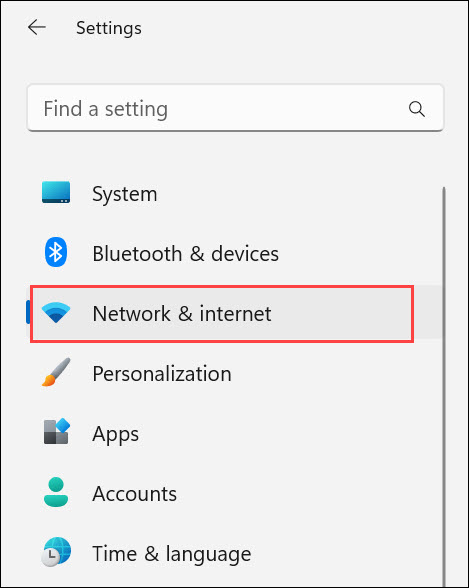
1. Press the Windows key, type Settings, and hit Enter to open Settings.
2. In Settings, select Network & internet from the sidebar to navigate to network settings.
3. Click either Wi-Fi or Ethernet, depending on the active connection.
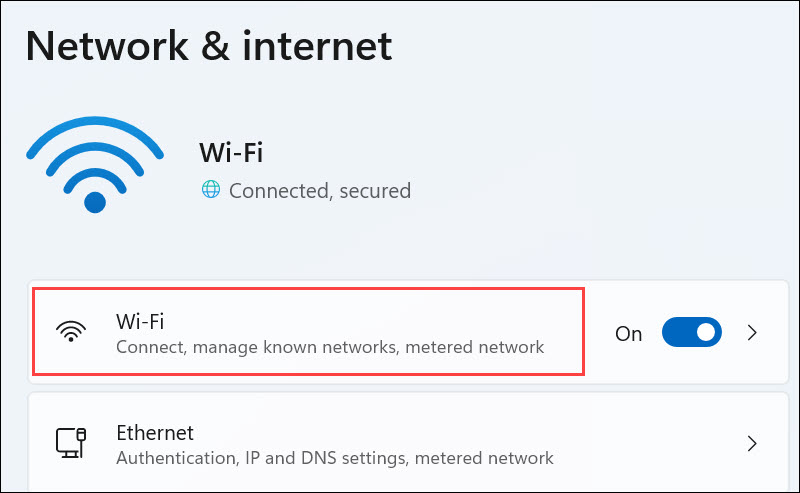
4. Select the name of the connection you're using
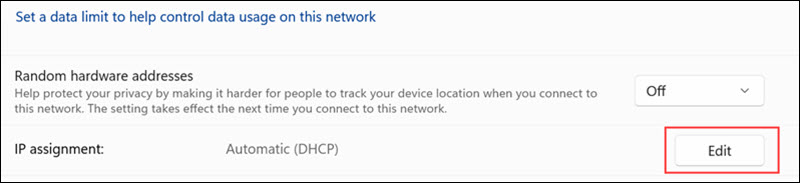
5. Scroll down and click Edit under the IP assignment section.
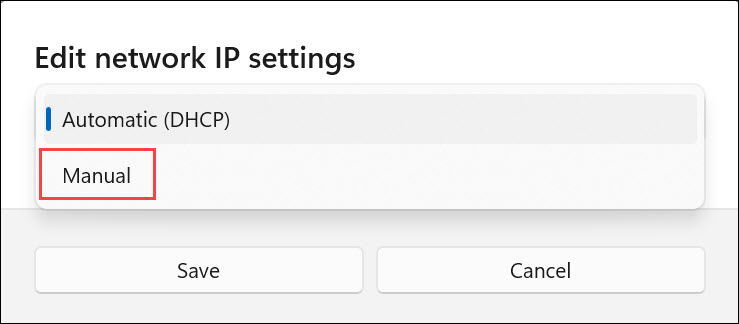
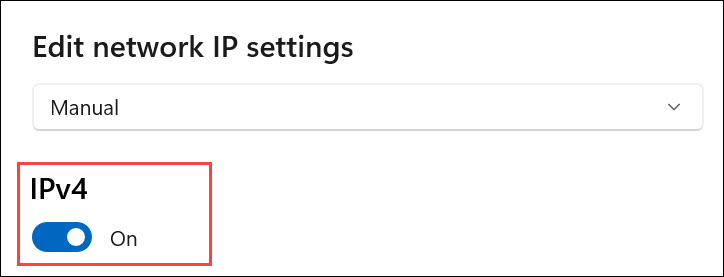
6. Toggle Manual to set a custom IP address.
7. Turn on IPv4 since it's the most commonly used protocol for home networks.
8. Enter the new IP address, subnet mask, default gateway, and preferred DNS server. In this example, they are:
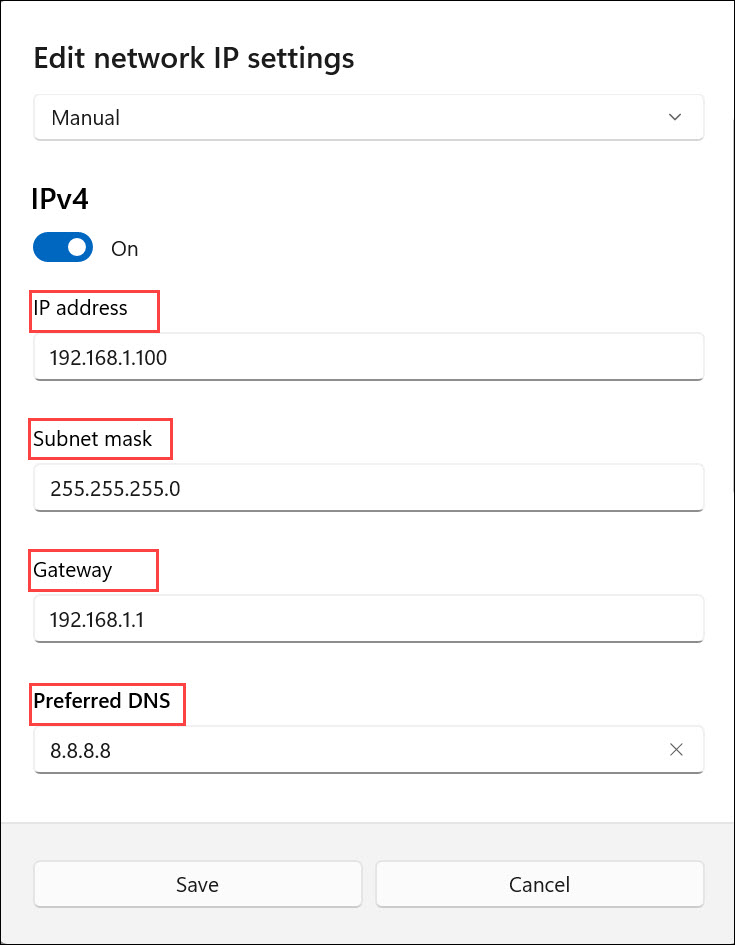
The settings in the example above show the following:
- 192.168.1.100. A unique address for your device within your local network. It should be within your router's IP range but not overlap with other devices.
- 255.255.255.0. The default subnet mask for most home networks, allowing for up to 254 devices on the same local network.
- 192.168.1.1. Usually the IP address of your router, which acts as the gateway between your local network and the internet.
- 8.8.8.8 (Google's DNS). Helps your device resolve domain names into IP addresses.
9. Click Save to apply changes.
Change IP Address with Windows Command Prompt
For a more tailored method, use Command Prompt to set your Windows IP address. Command Prompt uses the netsh command, which is older but still widely used for network configuration tasks.
Access the Command Prompt and take the following steps:
1. Show network interfaces with:
netsh interface ipv4 show config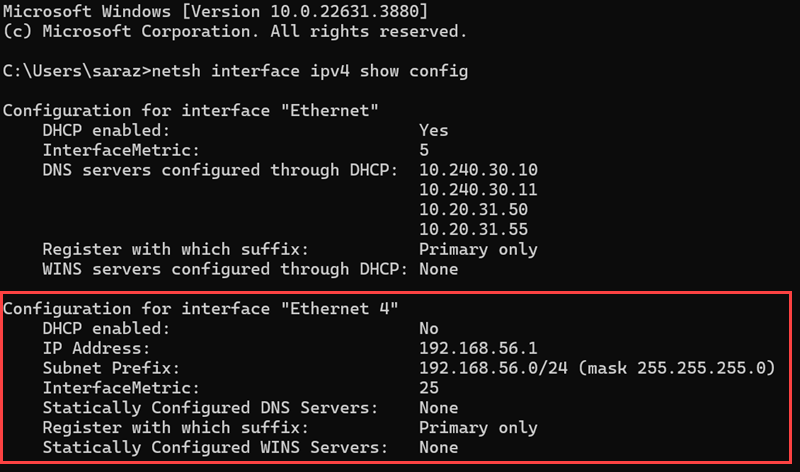
Look for the interface you want to modify (in this tutorial, we'll modify Ethernet 4).
2. Set a static IP address with:
netsh interface ipv4 set address name="Ethernet 4" static [IP address] [Subnet Mask] [Gateway]Replace values accordingly. For example:
netsh interface ipv4 set address name="Ethernet 4" static 192.168.56.10 255.255.255.0 192.168.56.1The command has no output.
3. Set DNS servers with:
netsh interface ipv4 set dns name="Ethernet 4" static [DNS IP]In this example, the command is:
netsh interface ipv4 set dns name="Ethernet 4" static 8.8.8.8The command has no output.
Use PowerShell to Change IP Address
PowerShell is a powerful command-line shell and scripting language for system administration and automation. It offers more control and flexibility than the traditional Command Prompt or GUI, making it ideal for managing complex or repetitive tasks efficiently.
PowerShell commands use the New-NetIPAddress cmdlet, which is more modern and built to manage network settings in a more structured way. This command sets a new IP address for the specified network interface on your system.
This tutorial uses PowerShell to configure the same Ethernet 4 interface.
Take the following steps.
1. Set a static IP with:
New-NetIPAddress -InterfaceAlias "Ethernet 4" -IPAddress [IP address] -PrefixLength [Subnet Length] -DefaultGateway [Gateway]In this example, the values are:
New-NetIPAddress -InterfaceAlias "Ethernet 4" -IPAddress 192.168.56.10 -PrefixLength 24 -DefaultGateway 192.168.56.1The command has no output.
2. Configure DNS servers with:
Set-DnsClientServerAddress -InterfaceAlias "Ethernet 4" -ServerAddresses "8.8.8.8","8.8.4.4"This sets the DNS servers (8.8.8.8 and 8.8.4.4) for the Ethernet 4 interface. The command does not produce any output.
Change IP Address on Linux
The process on Linux works either through a graphical interface (GUI) or the terminal.
This section covers both methods. The process differs in other distributions.
Note: Both methods are temporary, and the IP address reverts to the previous state after reboot. To make the change permanent, configure a static IP in the network settings or modify the /etc/network/interfaces or /etc/netplan/ configuration files, depending on your distribution.
Change IP Address via Linux GUI
The GUI method provides a user-friendly way to change the IP address, especially for those less familiar with command-line operations.
To reassign your Linux IP address via GUI, take the following steps:
1. Press the Show Apps key and type Settings.

2. In the left sidebar, select Network to access network settings.
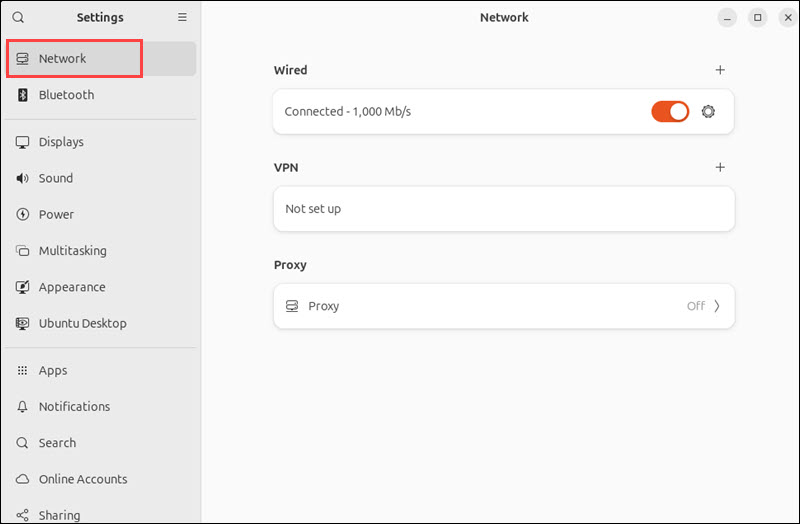
3. Select your network interface. Under Wired or Wi-Fi, click the gear icon.
4. Under the IPv4 tab, switch to Manual.
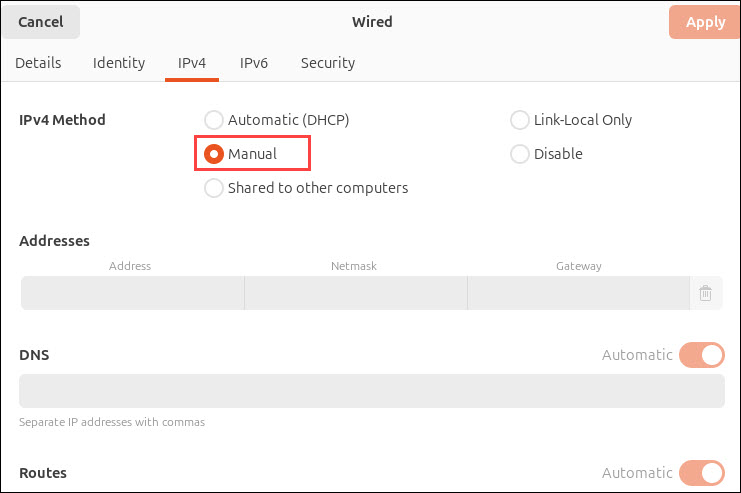
5. Enter your desired IP address, netmask, and gateway in the appropriate fields. For instance:

The settings in the example above show the following:
- 192.168.1.100. A unique address for your device within your local network.
- 255.255.255.0. The default subnet mask for most home networks, allowing for up to 254 devices on the same local network.
- 192.168.1.1. The IP address of your router, which acts as the gateway between your local network and the internet.
- 8.8.8.8 (Google's DNS). The factor that helps your device resolve domain names like google.com into IP addresses.
- Route. The element that determines how traffic is directed to different network destinations. It ensures your device knows where to send packets outside of your local network. It consists of the following:
- Address: 0.0.0.0. The destination for all traffic that doesn't match the local network.
- Network: 0.0.0.0. The netmask for the default route indicating any address outside the local network.
- Gateway: 192.168.1.1. Your router's IP address used for routing traffic to external networks.
- Metric: 100. Factor that determines the priority of the route. Lower values have higher priority.
6. Click Apply to save your changes.
Change IP Address via the Linux Terminal
The terminal method offers more control and flexibility, allowing advanced users to configure network settings quickly. It's especially useful for automation or when managing multiple systems remotely.
Take the following steps to find your Linux IP address via the command line:
1. Find your active network interfaces with :
ip addr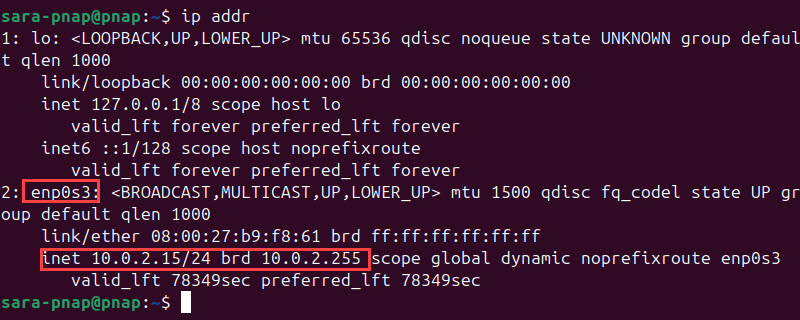
This shows all available network interfaces. Look for an interface with an inet line showing an assigned IP address and the UP status. In this case, enp0s3 is the active interface because it has the IP address 10.0.2.15/24 assigned to it.
2. To change your IP address, use the following command:
sudo ip addr add [new IP address] dev [interface]Replace [interface] with the name of your interface, and [new IP address] with the desired address:
For example:
sudo ip addr add 192.168.1.100/24 dev enp0s3The command has no output. The command also doesn't remove the old IP address, leaving the system with two IP addresses.
3. To remove the old IP and apply the changes, use:
sudo ip addr del [old IP address] dev [interface]In this example, the command is:
sudo ip addr del 10.0.2.15/24 dev enp0s3The commands provided no output.
Note: If you want to skip Step 4, use ip addr flush dev [interface] to remove all existing IPs before adding a new one, or use ip addr change instead to directly replace the current IP.
4. After applying the changes, check the new IP address by typing:
ip addr show [interface]In this case, the command is:
ip addr show enp0s3
5. To set the default gateway, use:
sudo ip route add default via [gateway IP]Replace [gateway-ip] with your actual gateway IP address. For example, use 192.168.1.1 :
sudo ip route add default via 192.168.1.1The command does not print output.
6. Check if systemd-resolved is managing DNS:
systemctl is-active systemd-resolved
The output confirms systemd-resolved is managing your DNS settings.
If the output doesn't confirm systemd-resolved is active, check whether NetworkManager is managing DNS with:
systemctl is-active NetworkManager
7. If DNS is managed by systemd-resolved, set your DNS servers by editing the /etc/systemd/resolved.conf file in a text editor of your choice. For example, in Nano, use:
sudo nano /etc/systemd/resolved.conf8. Locate the [Resolve] section and add or modify the DNS and FallbackDNS entries:
[Resolve]
DNS=1.1.1.1 8.8.8.8
FallbackDNS=9.9.9.9 8.8.4.4
Replace 1.1.1.1 and 8.8.8.8 with your preferred DNS servers. The FallbackDNS is optional but can be set as a backup if the primary DNS servers are unreachable or fail.
9. Save and exit the file to confirm changes.
10. If NetworkManager is active, modify the DNS settings for your connection with:
nmcli connection modify [connection-name] ipv4.dns "1.1.1.1 8.8.8.8"11. Apply the changes by bringing the connection up:
nmcli connection upChange IP Address on macOS
MacOS offers both a graphical interface and a terminal method for changing your IP address. The steps may vary in different versions.
Use GUI to Change IP Address on macOS
The GUI offers a simple way to modify your IP address on macOS. Take the following steps to accomplish that:
1. Click the Apple logo in the top-left corner and select System Settings.
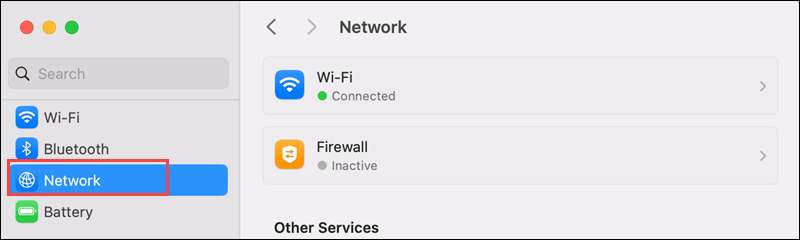
2. Select Network from the left sidebar.
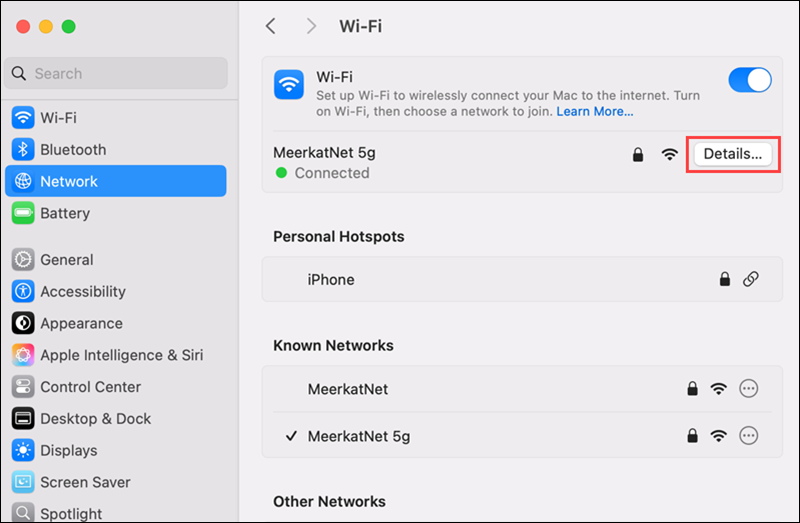
3. Choose your active connection and click Details (or Advanced, depending on your macOS version).
4. Go to the TCP/IP tab.
5. Click the dropdown next to Configure IPv4 and select Manually.
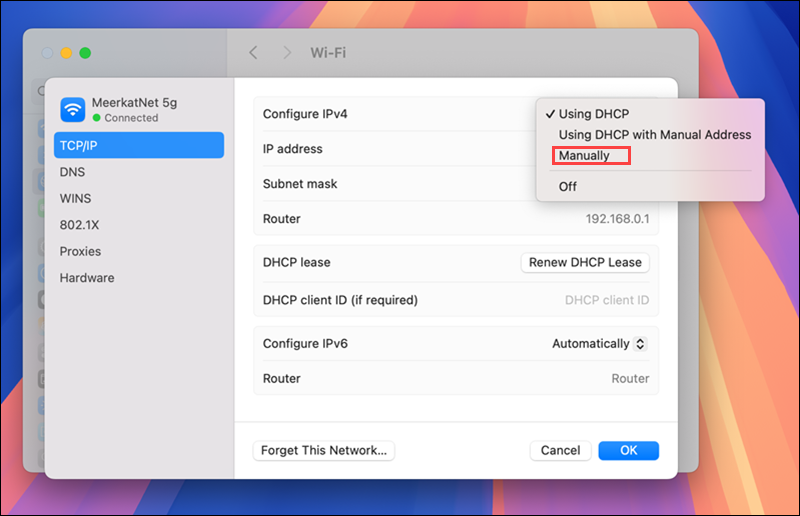
6. Enter the new IP address, subnet mask, and router IP.
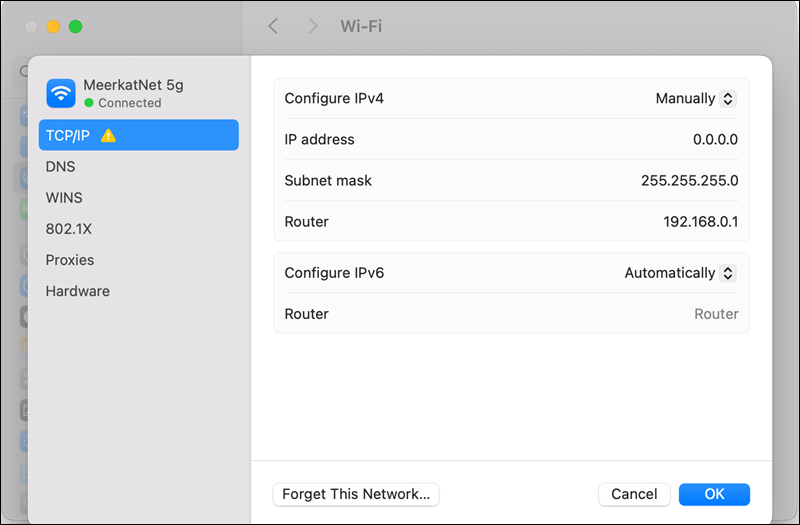
7. Click OK or Apply to save changes.
Change IP Address Using the Terminal on macOS
To update your IP address on macOS using the Terminal, take the following steps:
1. Find your network interface:
networksetup -listallnetworkservices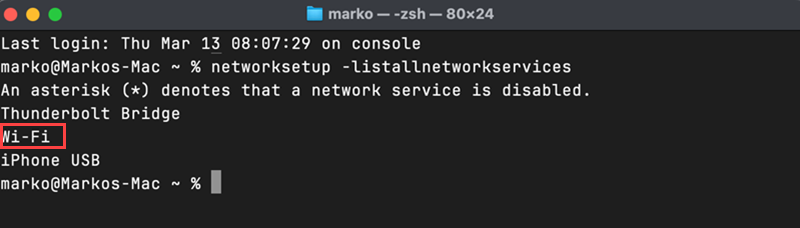
2. Identify the service name for Wi-Fi (usually Wi-Fi or en0).
3. Set a manual IP address with:
sudo networksetup -setmanual "Wi-Fi" 192.168.1.150 255.255.255.0 192.168.1.1Replace the IP address, subnet mask, and router IP with values that match your network.
The command has no output
4. Reset to automatic (DHCP) with:
sudo networksetup -setdhcp "Wi-Fi"This removes manual settings and requests a fresh IP from the router. The command does not print any output.
Change IP Address on Android OS
Changing your IP address on Android is a quick process. It helps you troubleshoot network issues, access region-restricted content, or improve privacy.
Note: You can only set a static IP for Wi-Fi connections. For mobile data, your carrier automatically assigns your IP.
Take the following steps to reset your IP address on your Android device:
1. Access the Settings app.
2. In the Settings menu, select Wi-Fi (or Connections and then tap Wi-Fi depending on the model.
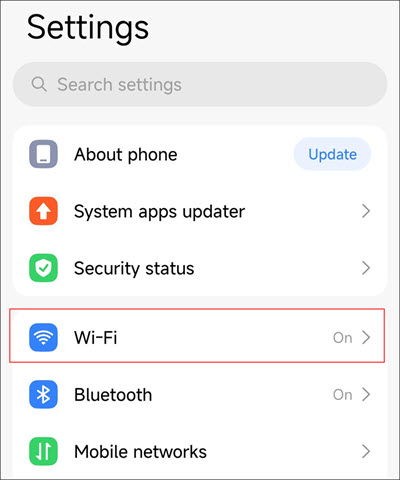
3. Find the Wi-Fi network you're currently connected to. Tap the gear icon or the greater-than sign> to access the settings next to it.
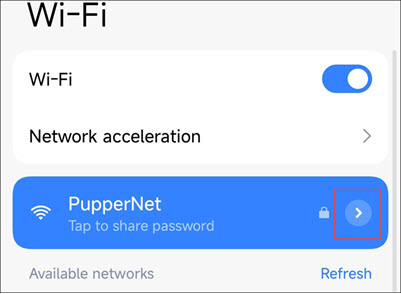
4. Under the network settings, tap IP settings.
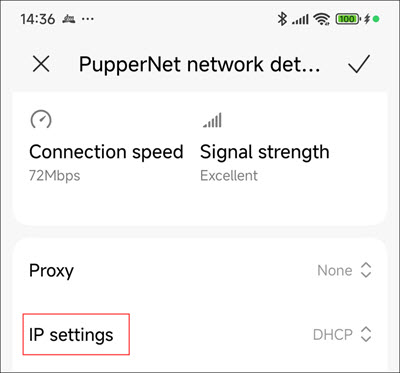
5. From the available options, switch from DHCP to Static.
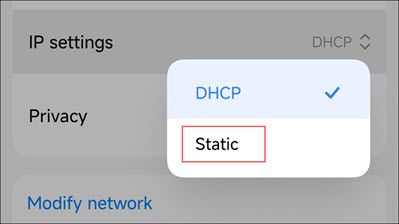
Note: When you disable DHCP, you're manually assigning an IP to your network interface. This means the system will not automatically request an IP address from a DHCP server, and you will need to configure all network settings (IP address, gateway, DNS) manually.
6. In the IP address field, input your new IP address.
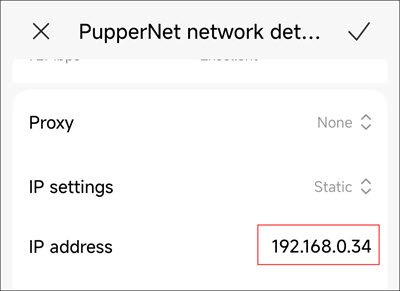
7. Save changes
Note: If you prefer automatically getting a new IP address, return to your Wi-Fi settings, tap on your connected network, and tap Forget. Reconnect to your Wi-Fi network, and your device receives a new dynamic IP address assigned by the router.
Change IP Address on iOS
iOS allows manual IP changes directly through system settings, with no need for third-party tools or advanced configuration.
To accomplish this, take the following steps:
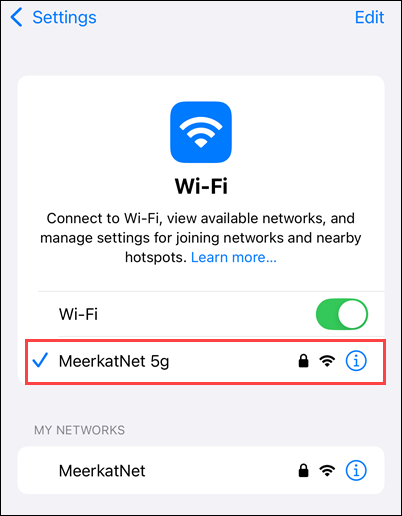
1. Open the Settings app.

2. Tap Wi-Fi and select your currently connected network.
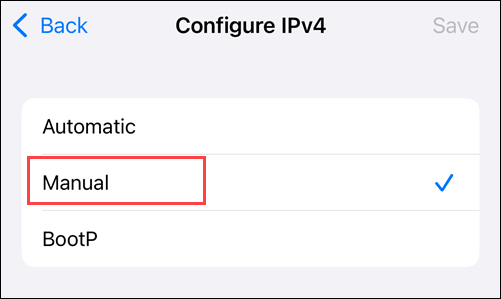
3. Scroll down to the IPv4 Address section and tap Configure IP.
4. Select Manual to assign a new IP address.
5. Enter the IP address, subnet mask, and router IP address.
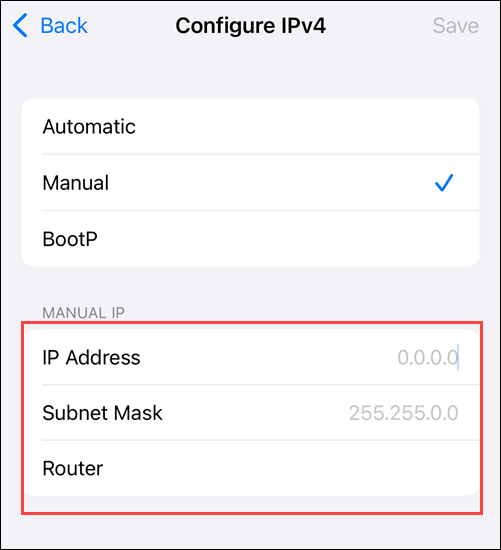
6. Tap Save to apply the changes.
How to Change IP Address by Resetting the Router
Restarting your router is one of the easiest ways to set your public IP address, but only if your ISP uses dynamic IP addresses. Most home users have dynamic IPs by default, which change periodically or when the network reconnects.
Here’s how to modify your IP address
1. Check your current IP address. Visit a site like whatismyipaddress.com or search What is my IP address on Google. Write it down to compare it after the reset.
2. Unplug your router and modem. Power both devices off and keep them unplugged for at least five to ten minutes. This gives your ISP time to drop your old IP address and assign a new one.
3. Plug your router and modem back in. Wait for all the lights to stabilize. This takes a few minutes, depending on your setup.
3. Reconnect your device to the network. Your device might reconnect automatically, but if it doesn't, select your network and rejoin it manually. Make sure you're connected before moving on.
4. Check your IP address again. Return to the same site or search What is my IP address again. If the number has changed, your public IP was successfully updated.
The effectiveness of this method depends on your ISP's DHCP lease policies. Some assign dynamic IPs that rotate frequently, while others tie an IP to your connection for long periods. If your IP doesn't change after a single reset, leave your devices unplugged for longer or repeat the process a few times.
Routers also assign private IP addresses to devices inside your local network. Resetting the router may also give your devices a new private IP if the old lease expires and a new one is issued. But this address is only visible within your home network.
If your public IP address never changes, no matter how long you unplug your equipment, your ISP is probably using a static IP setup. In that case, you won't be able to change it by resetting the router. You'll need to do one of the following:
- Manually change the IP settings in the router admin panel.
- Contact your ISP to request a new IP address.
- Use a VPN or proxy to mask your real IP.
Note: The method is temporary, and the public IP address may revert to the previous one after the router is restarted or after the ISP's dynamic IP lease expires. To make the change permanent, contact your ISP to request a static IP address or configure the router for a static IP.
How to Change IP Address Using a VPN
A VPN is a secure tunnel between your device and the internet. Instead of sending your internet traffic directly through your ISP, a VPN routes it through one of its own servers. This hides your real IP address and replaces it with the IP of the VPN server you connect to.
Besides changing your IP, a VPN encrypts your connection. This makes your data unreadable to anyone trying to intercept it. It's a useful tool for improving online privacy, avoiding censorship, and accessing region-locked content.
Note: A VPN changes your public-facing IP address and makes it visible to websites and external services, masking your location. However, it does not alter your internal, private IP address within your home or local network.
To modify your IP address using a VPN, follow these steps:
1. Choose a VPN provider. Pick a trustworthy VPN service that offers apps for your devices. Look for providers with strong encryption, no-logs policies, and various server locations.
2. Install the VPN app. Download the VPN client for your operating system or device. Follow the installation steps provided by the VPN provider.
3. Log into the VPN. Open the app and enter your account credentials. Some VPNs also ask for a security key or two-factor authentication (2FA) code.
4. Connect to a VPN server. Pick a server location from the list. Once connected, your IP address is replaced with the IP of that server.
5. Verify your new IP address. Visit whatismyipaddress.com or search What is my IP address to confirm the change. The IP now matches the VPN server location you selected.
Note: The method is temporary, and the IP address reverts to the original public IP once the VPN connection is disconnected or the device is rebooted. To keep your IP masked continuously, configure your VPN to launch at startup and use features like a kill switch and DNS leak protection.
How to Choose a VPN Provider?
Some VPNs prioritize strong encryption and transparent no-log policies. However, others collect connection metadata or suffer from DNS and IP leaks. Without reviewing the technical specs and policies of a provider, you risk using a service that weakens your privacy instead of strengthening it.
Here's what to evaluate before choosing a VPN:
- Privacy and logging policy. Make sure the provider has a strict no-logs policy and explains exactly what data it collects and for how long. Some connection logs are necessary for the service to function, but browsing history and activity data are not necessary.
- Encryption and security features. Look for strong encryption standards like 256-bit AES, plus support for secure protocols. A kill switch, DNS leak protection, and IPv6 leak prevention are essential.
- Speed and server reliability. VPNs route traffic through remote servers, which introduces latency and potential bottlenecks. Choose a provider with a high-performance network, low server load, and efficient routing to maintain consistent speeds.
- Vendor's transparency and experience. Choose providers that have a solid background in cybersecurity. Avoid unknown companies without clear ownership or a history of protecting user data.
- Location and data laws. VPN companies must follow laws based on where they operate. Some countries force providers to store user data or hand it over to authorities. Know the jurisdiction your provider falls under.
- Free vs. Paid. Free VPNs usually have limited server options, slower speeds, and fewer privacy guarantees. Paid services provide faster performance, stronger encryption, and more advanced features like kill switches or multi-hop routing.
- Credibility. VPN review sites rely on affiliate links or sponsored placements, which sometimes give biased rankings. Review methodology, check for performance benchmarks, and prioritize reviews that disclose testing conditions and financial relationships.
- Extra security options. Some providers offer DNS firewalls, malware blocking, or double VPN routing. These features are useful layers of protection for high-risk use cases.
Conclusion
This text provided several ways to change your IP address on different operating systems. It also elaborated on the best way to choose a VPN provider. Changing your IP address helps fix network problems, hide your location, or bypass regional restrictions.
Next, learn how to find your IP address on Linux.