A Linux kernel is the core of the Linux operating system. As new versions of Linux are released, your system updates the kernel. Modern Linux versions keep the current kernel plus one older version by default.
In some instances, Linux doesn't remove the old kernels at all. A common problem when keeping old kernels is having an extensive list of bootable images on the GRUB (boot) menu.
This guide will help you remove old and unused Linux kernels on your Ubuntu system (20.04, 22.04, and 24.04).

Prerequisites
- A system running Ubuntu (tested on Ubuntu 20.04, 22.04, and 24.04).
- A terminal window/command line.
- A user account with sudo privileges.
How to View Installed Kernels and the Kernel in Use
Linux keeps older kernel versions in case an update requires a rollback. To find all kernel packages on a Linux machine, use:
dpkg --list | egrep -i --color 'linux-image|linux-headers'
The output shows a list of all installed kernels with the following flags:
ii. Marked for installation (i) and currently installed (i). Packages with these flags are safe to remove.rc. Removed (r) and configuration files present (c). The package is removed, and configuration files require purging.iU. Marked for installation (i) and unpacked (U) to install at the next reboot. Do not remove packages with this flag.
Do not remove any packages that have the current kernel version. To see the current kernel version, use the uname command with the -r flag:
uname -r
All other versions, except the one in the output, can be removed.
How to Remove Old Kernels on Ubuntu
There are several ways to remove old kernel versions in Ubuntu and free up disk space. The sections below show three methods: using apt autoremove, apt remove, and the GUI.
Remove Kernels on Ubuntu Using apt autoremove
Use the apt command with the autoremove option to automatically remove all old kernels and unrequired packages on the system.
Note: Alternatively, use the apt-get command for the same results. Read about the difference between apt vs. apt-get.
Run the following command in the terminal:
sudo apt autoremove --purgeIt keeps the latest version and one prior version on the system by default. In some cases, old kernels will not be removed with this command.
Remove Kernels on Ubuntu Using apt remove
The apt remove command removes a specified package without removing its dependencies. Manually installed kernels or ones the system kept as an extra backup require this removal method.
Use the following commands to delete a specific kernel version:
sudo apt remove --purge linux-headers-[version]sudo apt remove --purge linux-image-[version]
Replace [version] with the actual kernel version number. Press Y to confirm the deletion and wait for the process to complete. The commands remove the specified kernel and its configuration files.
After removing the kernel, clean up unused packages and dependencies:
sudo apt autoremove --purgeThe command removes any leftover files and dependencies.
Remove Kernels on Ubuntu Using GUI
This section focuses on how to remove old kernels using Synaptic. The program is a graphical frontend for the APT package manager.
Follow the steps below to install Synaptic and remove old kernels.
Install and Run Synaptic
Follow the steps below to install and run Synaptic:
1. Install Synaptic with the following:
sudo apt install synaptic -yThe installation takes a few moments to complete.
2. Type the following to launch the Synaptic interface from the terminal:
sudo synapticThe Synaptic Package Manager graphical interface opens in a new window.
Remove Old Kernels
To remove old kernels via Synaptic on Ubuntu, follow the steps below:
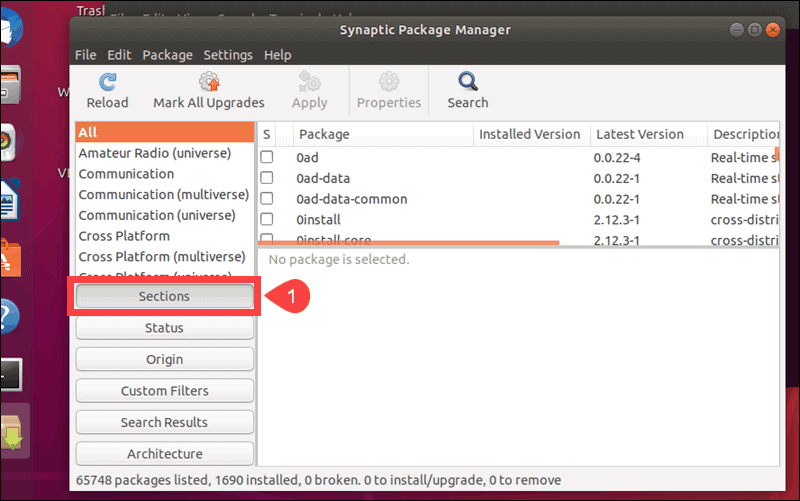
1. Click the Sections button in the left menu.
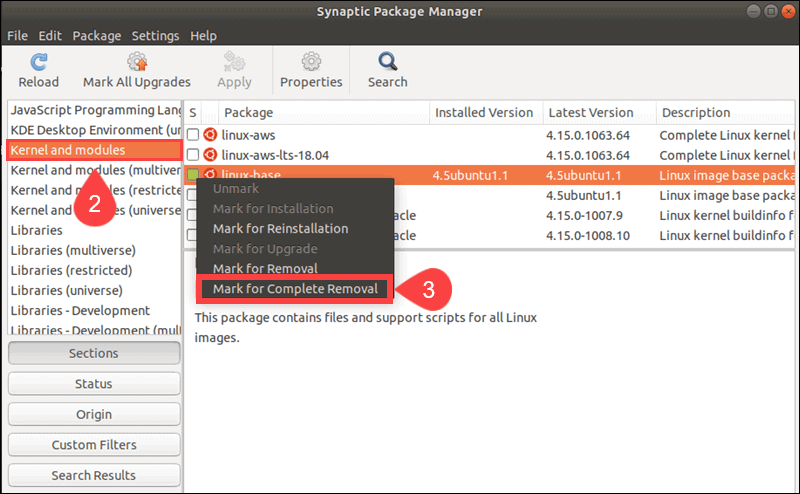
2. Locate and select the Kernel and modules option on the list.
3. Right-click the kernel name in the menu and select the Mark for Complete Removal option.
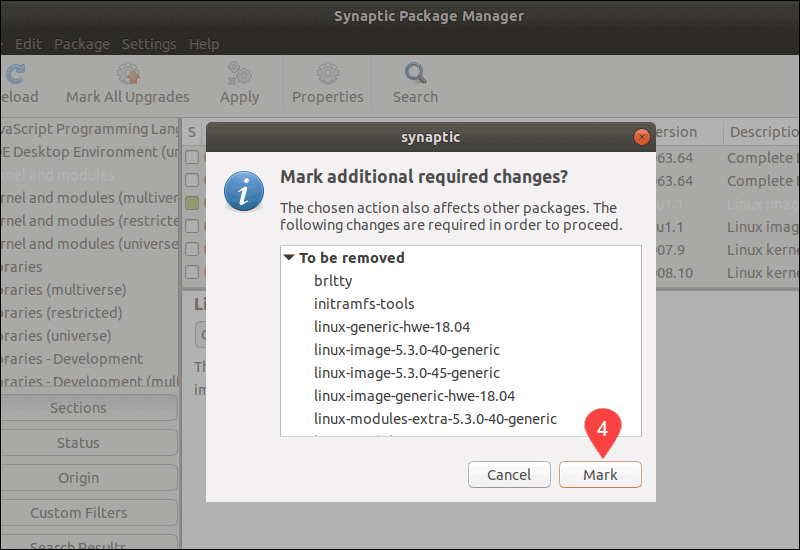
Synaptic lists additional dependency packages for the kernel.
4. Click the Mark option to mark the dependencies for removal.
5. Review the marked packages and click Apply to mark the packages for removal.
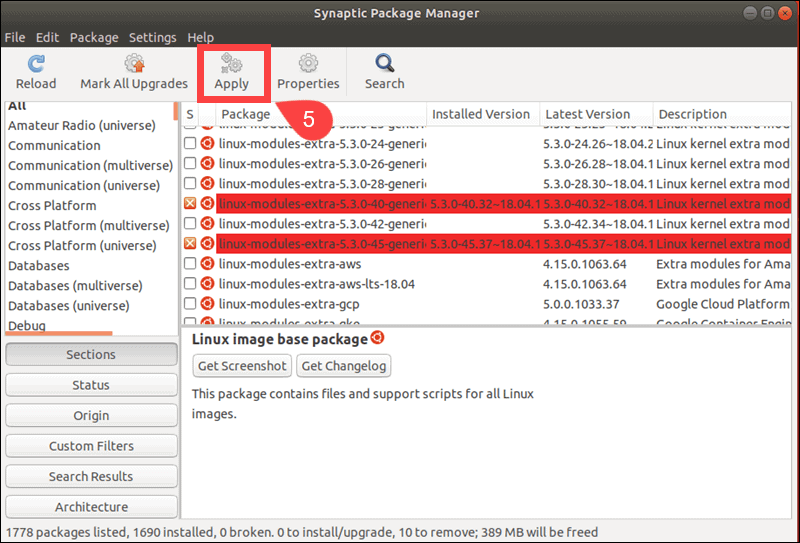
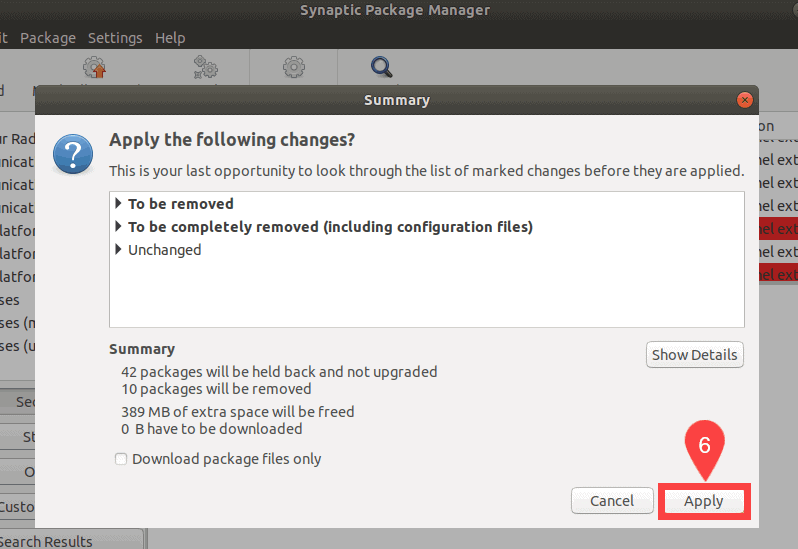
6. Click Apply in the pop-up Summary window to begin the removal.
7. A progress bar and the details window display the removal process. Check the box to close the window automatically after removal.
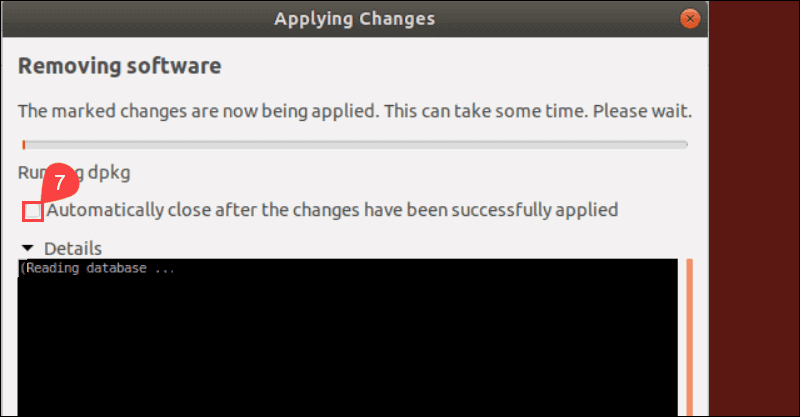
Alternatively, close the window manually when the removal is completed.
Conclusion
The guide showed you several methods to remove old kernels from Ubuntu 20.04, 22.04, or 24.04. Purging old kernels can help you recover disk space in Linux. It is also good practice to prune out old files and dependencies.
Next, see how to build a Linux kernel.
