Logical Volume Management (LVM) brings flexibility to Linux storage by allowing administrators to resize, move, and manage volumes without the limitations of traditional partitions. It enables dynamic disk space allocation, making it easier to adapt to growing data requirements and reduce downtime during maintenance.
In this tutorial, we will explain how LVM works in Linux and show you how to set up and manage logical volumes effectively.
Prerequisites
- A machine running Linux (this tutorial uses Ubuntu 24.04).
- A user account with root access.
What Is Logical Volume Management (LVM)?
Logical Volume Management (LVM) is a system for managing disk storage in Linux that provides a layer of abstraction between physical disks and file systems. Unlike traditional partitioning, where disk space is divided into fixed segments, LVM allows users to dynamically allocate, resize, and move storage without disrupting system operations.
LVM's flexibility is ideal for environments that require frequent scaling, reorganizing, or maintenance with minimal downtime. By decoupling logical storage from physical hardware, LVM simplifies capacity planning and improves data management efficiency. Administrators can adjust storage layouts as needs evolve, without having to rebuild partitions or risk data loss.
Another major advantage of LVM is that logical volumes can be created, resized, or removed while the system is running, eliminating the need for reboots and allowing administrators to respond to changing storage needs in real time.
LVM Architecture
At its core, LVM implements a software abstraction over physical storage devices. That way, it provides greater flexibility than fixed partitions. It consists of three main layers:
- Physical Volume (PV). A block device (entire disk, partition, or device-mapper device) initialized for LVM use. Metadata written to each PV allows it to be recognized as part of a volume group.
- Volume Group (VG). A storage pool created by combining one or more physical volumes. The total VG capacity can be distributed among multiple logical volumes.
- Logical Volume (LV). A "virtual partition" carved out from a volume group. Logical volumes are formatted with a file system, mounted, and used just like standard partitions.
Internally, LVM divides each PV into small units called physical extents (PEs), while logical extents (LEs) map onto those physical extents. When you create an LV, LVM allocates the required number of LEs, mapping them to available PEs within the VG. All extents in a volume group share the same size (configurable, but the default is 4 MiB).
Due to this mapping, LVs can span multiple PVs. This allows administrators to extend or shrink volumes without being limited to a single physical disk. LVM operates on top of the Linux kernel's device mapper, which manages how logical devices correspond to their underlying physical storage.
Since LVM volumes can span multiple physical disks, they are not limited by a single device's size. Administrators can also configure striped logical volumes to improve disk I/O performance by distributing data across several drives in parallel. LVM also supports snapshots (read-only or read-write clones of logical volumes), useful for consistent backups or as restore points before major system changes.
Logical Volume Management (LVM) in Linux
LVM exists across multiple operating systems. UNIX variants like HP-UX and AIX introduced early forms of LVM, Windows provides similar capabilities through Dynamic Disks and Storage Spaces, and macOS offers flexible storage management using APFS containers.
However, LVM is most closely associated with Linux, where it has evolved into a robust and feature-rich storage management framework.
The following are Linux-specific features, limitations, and common use cases:
- Modern Linux distributions use LVM2 (LVM1 is deprecated), which supports advanced capabilities such as snapshots, thin provisioning, and online resizing.
- Many distributions (such as RHEL, Rocky Linux, Ubuntu) allow the root filesystem (and sometimes /boot) to reside on an LV, making it possible to adjust even critical partitions dynamically.
- Because LVM metadata is stored on each physical volume, recovery after disk failure may be possible depending on redundancy, although it increases complexity.
- LVM supports striped, mirrored, and snapshot volumes, offering performance, redundancy, and point-in-time recovery options.
- Fragmentation can occur when extents are noncontiguous, potentially reducing performance. Use tools like pvmove to optimize the layout.
- In clustered environments, LVM can be used with cluster-aware locking (CLVM), allowing coordinated metadata updates across multiple nodes.
To manage LVM in Linux, use user-space utilities such as pvcreate, vgcreate, lvcreate, lvresize, lvrename, vgextend, and pvmove, along with display tools like pvdisplay, vgdisplay, and lvdisplay.
Setting Up LVM in Linux
Before you can use Logical Volume Management (LVM), you must prepare the physical storage devices and organize them into flexible, logical structures.
The process typically involves three stages:
- Physical volume initialization.
- Creating a volume group.
- Defining logical volumes within that group.
Each layer builds on the previous one, forming the foundation for LVM's dynamic storage capabilities.
Step 1: Initialize Physical Volume
A physical volume (PV) represents a storage device or partition that LVM can manage. Initializing a disk marks it for use with LVM by adding the necessary metadata.
Initialize a PV with the following command:
sudo pvcreate /dev/sdb
Note: If your disk uses GPT or already contains partitions, initialize the partition (e.g., /dev/sdb1) instead of the entire disk.
Verify the initialization with:
sudo pvdisplay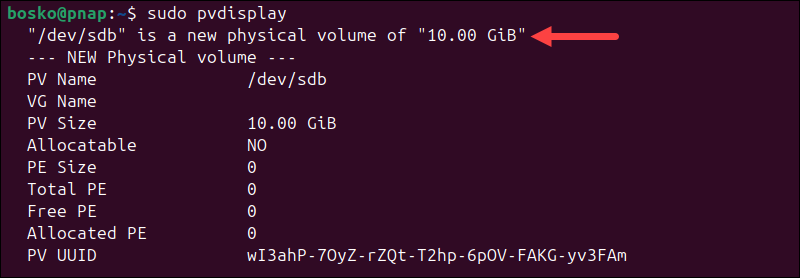
This process can be repeated for multiple disks if you want to combine several devices into a single logical storage pool.
Step 2: Create Volume Group
A volume group (VG) aggregates one or more physical volumes into a single storage pool from which logical volumes can be allocated. This makes it easier to manage space across multiple disks.
sudo vgcreate vg_data /dev/sdb
To confirm the creation, run:
sudo vgdisplay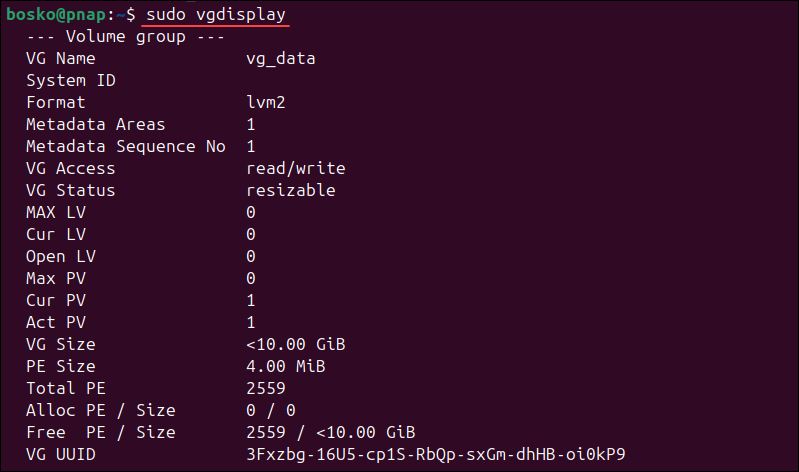
You can later extend the group with additional disks using vgextend if your storage needs to grow.
Step 3: Create Logical Volume
A logical volume (LV) is the storage space you actually use to create and mount filesystems. Think of it as a flexible, resizable partition inside your volume group.
sudo lvcreate -L 5G -n lv_backup vg_data
In this command:
-L 5Gspecifies the size of the logical volume.-n lv_backupassigns the name.vg_datais the volume group name from which space is allocated.
After creating the logical volume, you need to format it and make it accessible. Follow these steps:
1. Format the logical volume:
sudo mkfs.ext4 /dev/vg_data/lv_backup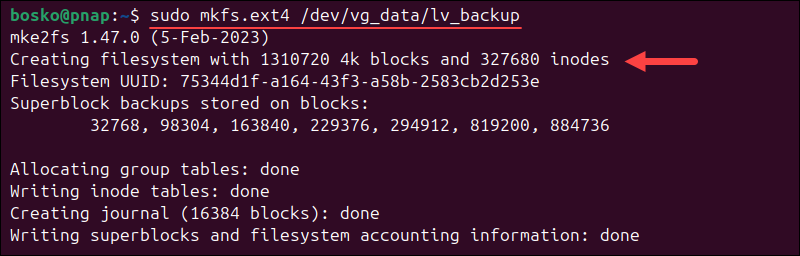
2. Create a mount point:
sudo mkdir /mnt/backupThis command creates a directory that will serve as the mount point for the logical volume.
3. Mount the logical volume:
sudo mount /dev/vg_data/lv_backup /mnt/backupYou can now use /mnt/backup like any other directory, but with the flexibility of LVM underneath.
Common Logical Volume Management Operations in Linux
Once you configure an LVM, you can resize, extend, or remove logical volumes without the disruption associated with traditional partitioning. These commands allow system administrators to adjust storage dynamically as requirements change.
Extend a Logical Volume
Expanding a logical volume lets you allocate additional space to an existing filesystem. It is ideal when a data partition is running low on space.
1. First, extend the logical volume with:
sudo lvextend -L +4G /dev/vg_data/lv_backup
The command increases the size of the logical volume by 4 GB. Specify your own size, or use +100%FREE to extend the LV by all free extents in the VG.
2. Next, check the filesystem before resizing it. Run:
sudo e2fsck -f /dev/vg_data/lv_backup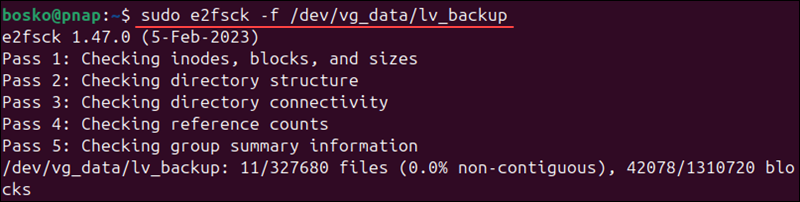
The command runs five checks and shows progress. If it prompts "Fix?", press y for all.
3. Resize the filesystem:
sudo resize2fs /dev/vg_data/lv_backup
This example adds 4 GB to the logical volume and resizes the filesystem to match. Most modern filesystems support resizing while mounted, so downtime is minimal.
Note: If the system does not see the logical volume after extending it, remount it with:
sudo mount /dev/vg_data/lv_backup /mnt/backupReduce a Logical Volume
Shrinking a volume is less common but sometimes necessary to reclaim unused space. Always back up your data before performing this operation. Shrinking a live filesystem without precautions can cause data loss.
Follow the steps below:
1. Unmount the logical volume:
sudo umount /mnt/backup2. Check and repair the filesystem:
sudo e2fsck -f /dev/vg_data/lv_backup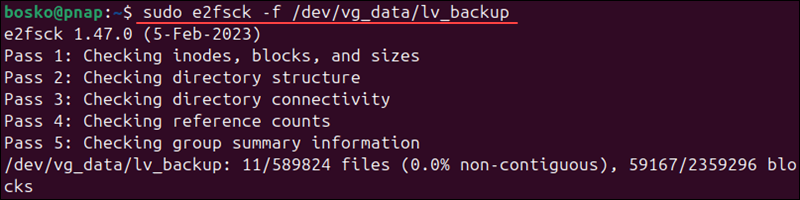
This ensures filesystem integrity before resizing.
3. Shrink the filesystem:
sudo resize2fs /dev/vg_data/lv_backup 6G
This resizes the filesystem to 6 GB. You can specify your own size in the command.
4. Reduce the logical volume to match the filesystem:
sudo lvreduce -L 6G /dev/vg_data/lv_backupWhen prompted, type y and press Enter to confirm. The command reduces the logical volume's size.

5. Remount the volume:
sudo mount /dev/vg_data/lv_backup /mnt/backupThe volume is now smaller but still accessible at the same location.
Display Volume Information
LVM provides several commands to monitor and verify your setup. Use the following commands to get summaries of your physical volumes, volume groups, and logical volumes:
List physical volumes:
sudo pvs
To list volume groups, run:
sudo vgs
List logical volumes:
sudo lvs
These commands provide a quick overview of available storage, capacity usage, and configuration details.
Remove a Logical Volume
When you no longer need a logical volume, remove it to free space in the volume group.
1. Unmount the logical volume:
sudo umount /mnt/backup2. Run the following commands to remove the logical volume, volume group, and physical volume:
sudo lvremove /dev/vg_data/lv_backup
sudo vgremove vg_datasudo pvremove /dev/sdbConfirm each deletion with y when prompted. The space previously occupied by the logical volume is now available for other uses.
Conclusion
In this guide, you learned how to set up, extend, reduce, and manage logical volumes in Linux using LVM2. Its flexibility allows administrators to resize or move storage with minimal downtime.
Next, learn how to create partitions in Linux or see how to create a swap partition.