A Windows share is a folder on a Windows machine that can be accessed by other machines within a network. The contents can be modified or retrieved by authorized users on other machines connected to the same network.
On the other hand, CIFS (Common Internet File System) is a network file-sharing protocol that allows different operating systems, including Linux, to access files and services on Windows and vice versa.
In this tutorial, you will learn to mount a Windows share on a Linux machine using CIFS.
Prerequisites
- A system running Linux.
- Root or sudo access.
- A shared folder or drive on a Windows machine.
How to Mount CIFS Share
Mounting a remote Windows share via CIFS is similar to mounting regular file systems. Follow the steps below to mount a CIFS share on Linux.
Step 1: Install CIFS Utilities Packages on Linux
The CIFS-Utils package provides the utilities needed to mount SMB/CIFS shares on a Linux system. The installation steps differ depending on which Linux distribution you are using.
For Debian-based systems:
First, update the local package repository to ensure the latest available package gets installed:
sudo apt updateRun the following command to install the CIFS-Utils package:
sudo apt install cifs-utils -yFor RHEL-based systems:
First, update the system repository:
yum updateNext, install the CIFS-Utils package by running the following command:
yum install cifs-utilsFor Fedora:
Run the following command to update the package repository:
sudo dnf updateInstall CIFS-Utils by running:
sudo dnf install cifs-utilsAfter the package installs, move on to the next section to create a mount point for the Windows share.
Step 2: Create a Directory to Mount Windows Share
To mount the Windows Share, create a directory on the Linux machine to act as a mount point for the Windows Share. You can create this directory anywhere you want.
For this tutorial, we'll create a directory named winshare in the /mnt directory:
sudo mkdir /mnt/winshareStep 3: Mount a CIFS Windows Share
After creating a directory, mount the Windows share. Use the following syntax:
sudo mount -t cifs //[IP_Address]/[share_name] /mnt/winshare -o username=[username]Replace the [IP_Address], [share_name], and [username] with your details.
When prompted, enter your password and hit Enter.

After running the command and mounting the share, you should be able to access it from the /mnt/winshare directory on your Linux machine. Use the cd command to move to that directory and list the contents using ls:

If you don't have access to the share, check if it is mounted correctly by running:
df -h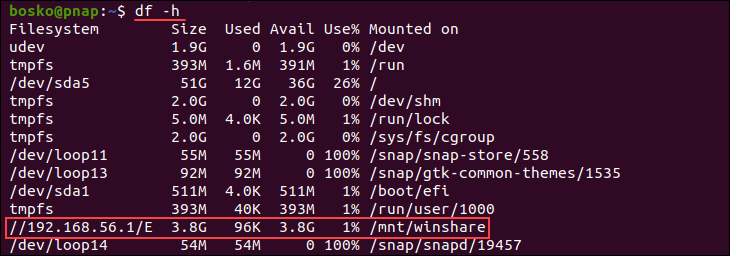
If the share is correctly mounted, the output shows an entry for the remote Windows share and its mounted location on your Linux system.
Note: Check out our tutorial for mounting remote file systems over SSH.
Step 4: Make the Windows Share Automatically Mount at Boot
Make the Windows share mount automatically at boot to avoid mounting it after each system reboot. To do so, edit the /etc/fstab file using a Linux text editor. In this tutorial, we will use nano.
Follow the steps below:
1. Store your login credentials in a separate file for security reasons. Use this command to create a new file:
sudo nano /etc/cifs-credentials2. Add your username and password to the file using the following format:
username=[username]
password=[password]
Replace [username] and [password] with your credentials.
For example:

Save and close the file.
3. Change the file permissions to prevent unauthorized changes or access:
sudo chmod 600 /etc/cifs-credentials4. Open the /etc/fstab file:
sudo nano /etc/fstab5. Add the following line at the end of the file:
//[IP_address]/[share_name] /mnt/winshare cifs credentials=/etc/cifs-credentials 0 0Replace [IP_address] and [share_name] with your information.
Save and close the file. Your Windows share will now automatically mount at boot.
How to Unmount CIFS Windows Share
Unmount the Windows share from your Linux machine with the umount command:
sudo umount /mnt/winshareThe command unmounts the Windows share from the /mnt/winshare directory. If you used a different directory as the mount point during setup, specify that directory in the command.
If errors arise when unmounting the share, it may be because a user is currently accessing the share or a file is open.
Force unmount the share by running the following command:
sudo umount -f /mnt/winshareThe -f (--force) flag force unmounts the share from your system.
Conclusion
This guide showed how to mount a Windows share on a Linux machine using CIFS and how to unmount it. The CIFS Windows is handy when you need to access files on a Windows machine using Linux.
Next, see how to install Samba on Ubuntu, an open-source Linux utility that enables file sharing, or install an NFS server on Ubuntu and view, store, share, or update files on remote computers.