Setting up cron jobs in Windows is a powerful way to automate tasks and enhance system efficiency. There are three ways to easily create, edit, and delete cron jobs.
This article explains how to set up and manage cron jobs in a Windows environment using each of the three methods.
Requirements
- A Windows system (this tutorial uses Windows 10).
- Windows Task Scheduler installed (for some examples).
- Access to the Command Prompt or Windows PowerShell (for some examples).
What Is a Cron Job
Cron jobs are scheduled tasks that automate repetitive processes. Users configure them to execute specific commands or scripts at predetermined intervals without manual intervention.
The cron daemon, a background process, manages the scheduling and execution of these tasks. Users set the frequency of cron jobs, specifying exact times, dates, or recurring patterns. Cron jobs are widely used to automate routine system maintenance, file backups, and other repetitive tasks in a streamlined, efficient manner.
While primarily used in Linux, creating a cron job in Windows is possible using three different methods.
How to Create and Configure a Cron Job in Windows
There are several ways to create and run a cron job in Windows. The methods include using the Windows Task Scheduler, the Command Prompt, or PowerShell.
The following text explains each method for creating a cron job on this operating system.
Create a Cron Job via Task Scheduler
Utilizing the Windows Task Scheduler on a Windows machine enables users to automate tasks whenever specified conditions are met. The following steps explain how to create a cron job by running a script in Windows Task Scheduler.
Note: This tutorial is based on Windows 10, and there may be slight variations in using Task Scheduler on other Windows versions.
Step 1: Create an Example Script
To create a basic script for demonstration purposes, write a simple batch file. A batch file is a plain-text file with a series of commands executed sequentially. To make a simple one, follow these steps:
1. Open a text editor, like Notepad, on your Windows machine.
2. Type the following into the text editor:
echo Hello. This is a basic batch file > "C:\Scripts\backup_script.bat"
The echo command writes the text Hello, this is a basic batch file to a file named backup_script.bat in the C:\Scripts directory.
3. Save the file with a .bat extension. In Notepad, do this by selecting Save As, entering backup_script.bat as the file name, and ensuring Save as type is set to All Files.

The process creates a batch file named backup_script.bat in the C:\Scripts directory. Use this file as an example to set up a scheduled task with the Windows Task Scheduler.
Step 2: Access the Task Scheduler.
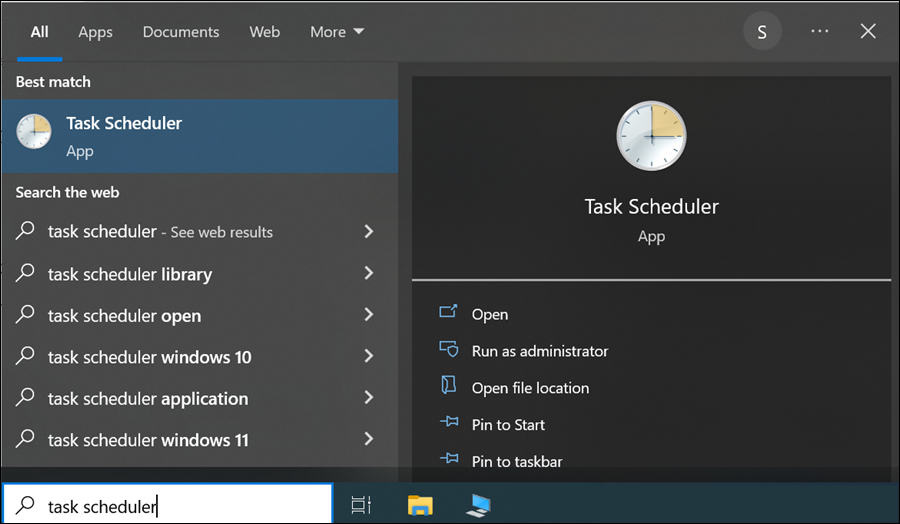
To create a cron job in Windows, type Task Scheduler in the search bar and open it.
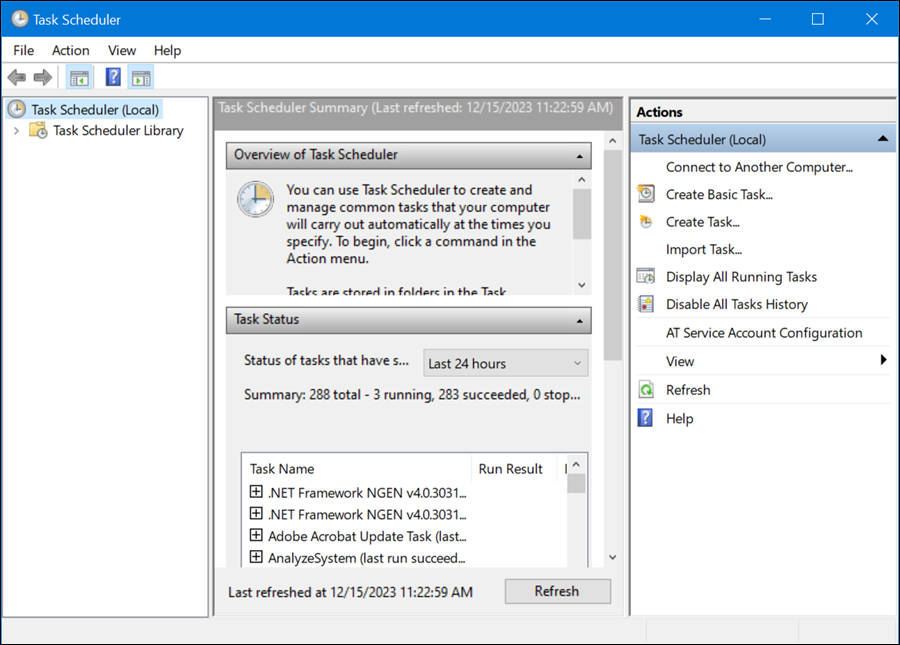
Once you access the program, the Task Scheduler interface opens.
Step 3: Create a Basic Task.
The next step is to create a basic task. This initiates a wizard to guide you through setting up a straightforward task. To do this, follow these steps.
1. Click the Action tab in the menu.
2. Select Create Basic Task.
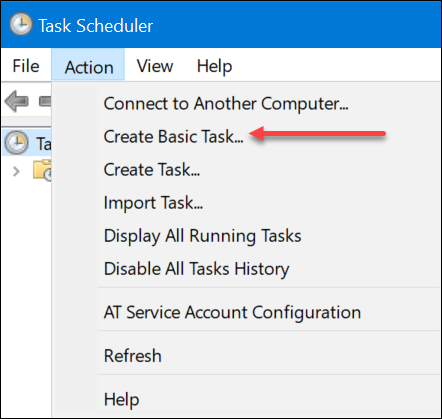
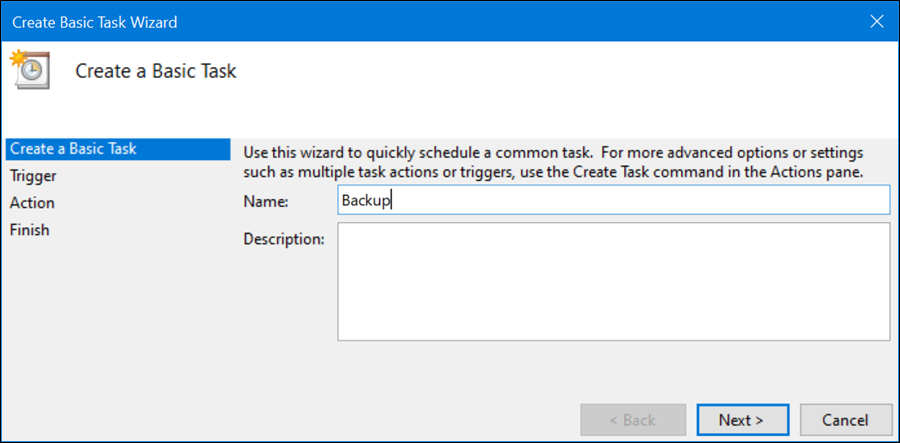
3. Name the task and click Next. In this tutorial, we will name the task Backup. The description is optional.
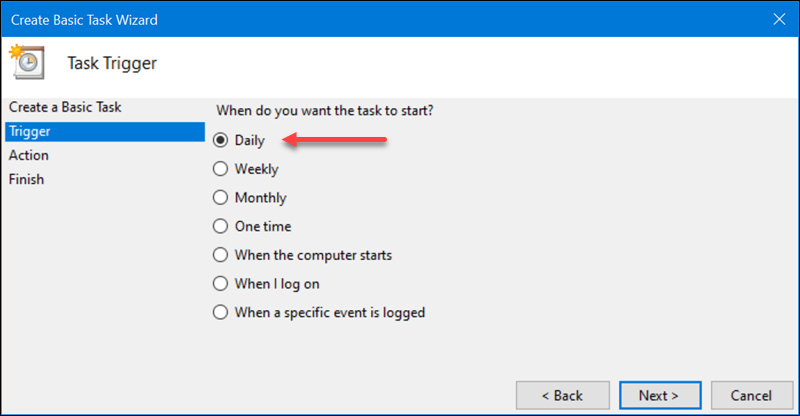
4. Set the trigger. Choose the cron job frequency. For example, select Daily and click Next.
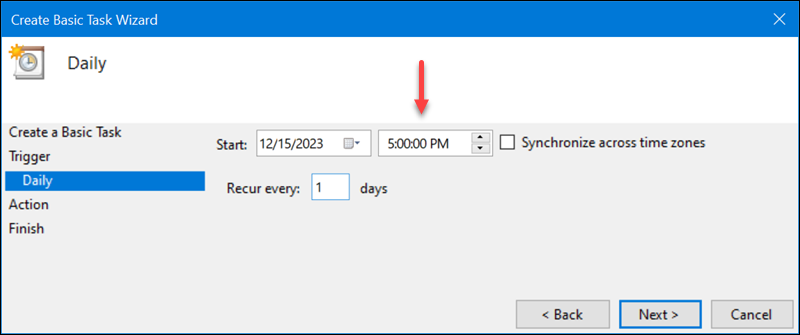
5. Choose a specific time for the task to run and click Next. In this example, the time is 5:00 p.m.
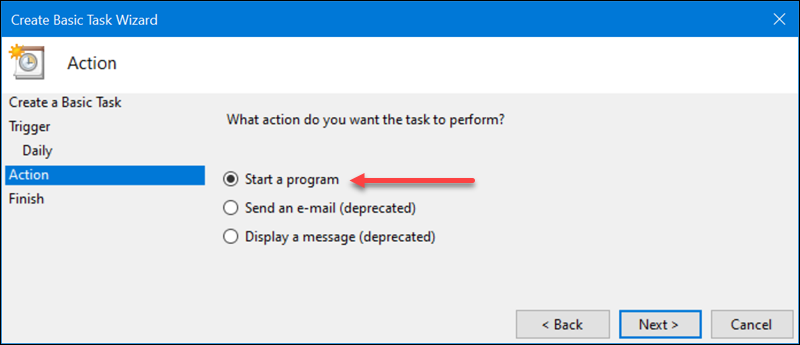
6. The wizard prompts you to select the action for the task. To execute a script, choose Start a Program and click Next.
7. Provide the path to the script you want to run. For our example, the script is backup_script.bat, located in the C:\Scripts directory. Make sure to enter the full path to the script.
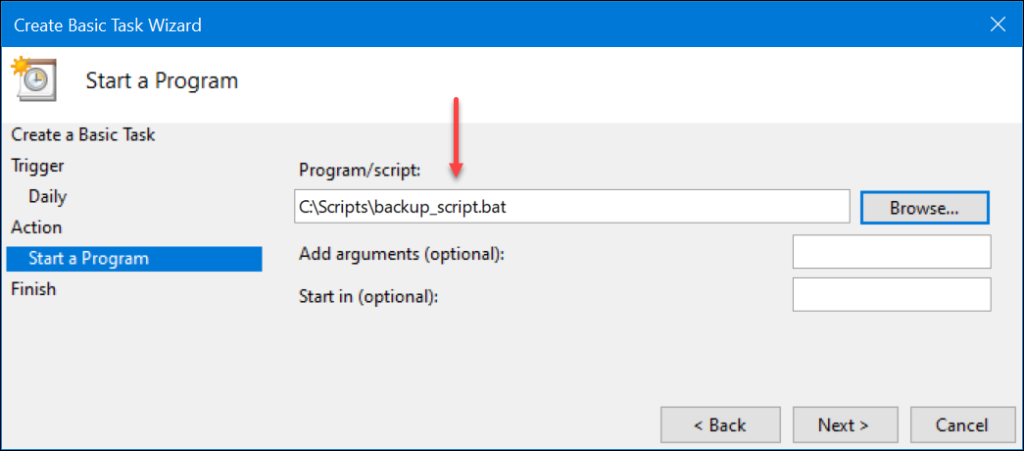
8. Leave the Add arguments and Start in fields empty. The Add arguments field is used when the script needs command-line arguments. The Start in field is used when the script depends on a specific directory. However, that is not the case in this example.
9. Click Next and Finish.
Now, the task is set up to run the backup_script.bat script daily at 5:00 p.m. The Windows Task Scheduler executes the script according to the defined schedule.
How to Create Cron Jobs in PowerShell
Windows PowerShell is a less user-friendly method for creating cron jobs on Windows than Task Scheduler. However, it is still a quick way to set up a cron job.
The following text explains how to create the same cron job as with Task Scheduler using the same script.
Step 1: Find the Script Path
Locate the script path and copy it. In our case, it is C:\Scripts\backup_script.bat.
Step 2: Define the Script Path
Once the path to the script is known, define it in PowerShell using the following:
$scriptPath = "C:\Scripts\backup_script.bat"
The command has no output but assigns a file path to a variable in PowerShell. In this case, it sets the variable $scriptPath to the file path C:\Scripts\backup_script.bat.
Step 3: Set up a Trigger
The cmdlet used to create a new trigger for a scheduled task is called New-ScheduledTaskTrigger. This cmdlet allows users to define trigger settings, including start time, end time, repetition interval, and more.
Run the following command to set the script to execute every day at 5 p.m:
$trigger = New-ScheduledTaskTrigger -Daily -At 5:00PM
Step 4: Set an Action
Create a new scheduled task action with:
$action = New-ScheduledTaskAction -Execute "cmd.exe" -Argument "/c $scriptPath"
The command:
- Utilizes the
New-ScheduledTaskActioncmdlet. - Configures the task to execute Command Prompt (
cmd.exe). - Uses the
-Argumentparameter to set input for the Command Prompt. - Incorporates
/c $scriptPathto instruct the Command Prompt to run a specific command from the variable$scriptPathand then exit.
The $scriptPath contains the complete path for executing the designated script. It creates a scheduled task that runs the specified script using Command Prompt.
Step 5: Register the Scheduled Task
Run the following to register the task:
Register-ScheduledTask -Action $action -Trigger $trigger -TaskName "DailyBackupTask"
The command creates a new scheduled task named DailyBackupTask with the specified action ($action) and trigger conditions ($trigger). The task is now registered with the Windows Task Scheduler and runs based on the defined schedule and actions.
How to Create Cron Jobs in Command Prompt
To create a cron job in the Command Prompt, use this command, but replace the path with your own path:
set "scriptPath=C:\Scripts\backup_script.bat"
The command sets a variable (scriptPath) that holds the full path to the batch script file.
Then, run this command:
schtasks /create /tn "DailyBackup" /tr "\"%SystemRoot%\System32\cmd.exe\" /c \"%scriptPath%\"" /sc daily /st 17:00
When you run this command, it creates a scheduled task named DailyBackup that runs the Command Prompt, which, in turn, executes the script specified by %scriptPath%. The task is scheduled to run daily at 5:00 p.m.
Potential Issues When Running Cron Jobs
Sometimes, Windows cron jobs run differently than expected. If users can identify causes, it's easier for them to troubleshoot the issue. To address potential problems, make sure that:
- The task has been scheduled accurately.
- The environment variables are configured correctly.
- The time settings, frequency, and command used are configured correctly.
- Enough system memory and disk space are available for successful job execution.
- You have the necessary permissions.
- The application or script is up to date and compatible with the operating system.
How to Edit Cron Jobs
As with creating a cron job, there are three methods for editing it. The following text elaborates on how to edit a cron job using Task Scheduler, Windows PowerShell, and Command Prompt.
Edit a Cron Job in the Task Scheduler
To edit a Cron Job in the Task Scheduler, follow these steps:
1. Open the Task Scheduler.
2. Find the Task Library in the left-hand pane.
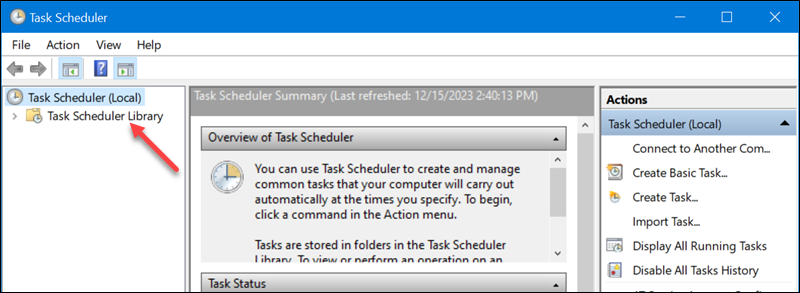
3. Expand the Task Scheduler Library and find the desired task. For example, the Backup text created for this tutorial is in the library's root.

4. Double-click the selected task to open it in a new window.
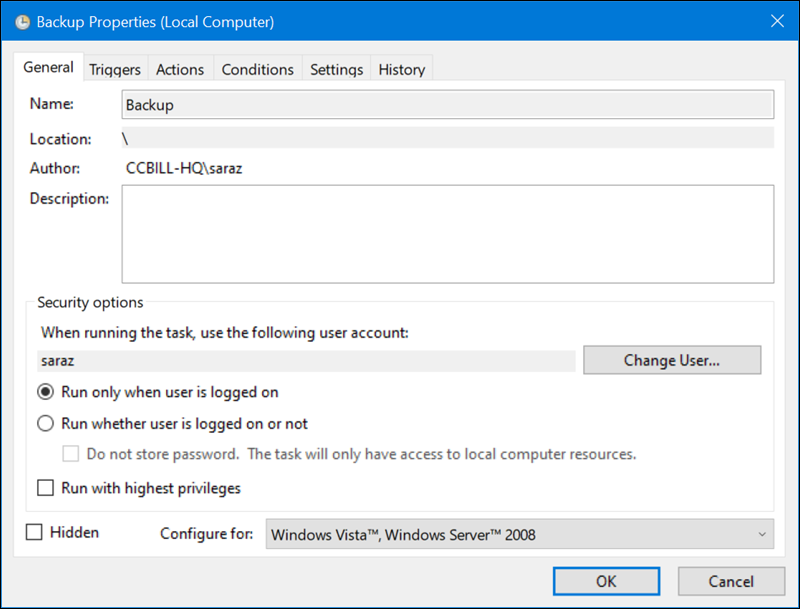
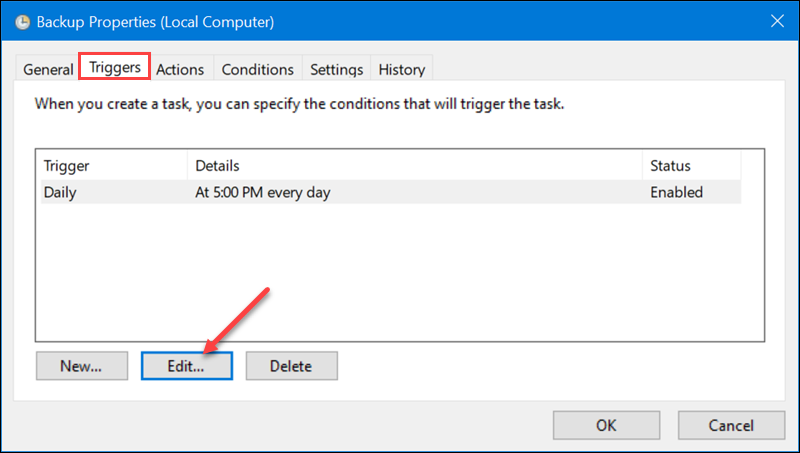
5. Edit the desired task. For instance, to change the trigger, go to the tab Triggers and click Edit.
The following window allows users to change the trigger time.
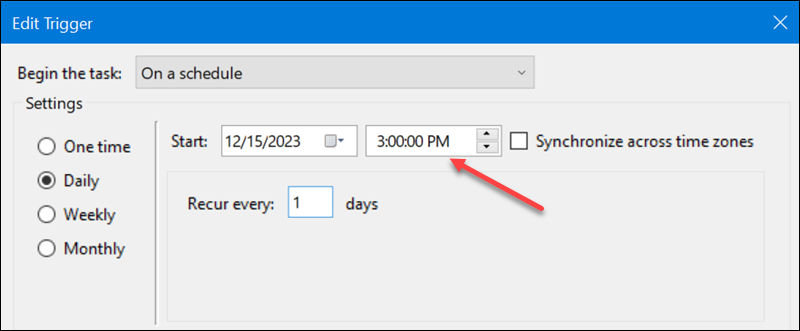
Click OK on both windows to complete the change.
Edit a Cron Job in PowerShell
To edit a cron job in PowerShell, run the same cmdlet used to set it up. For example, to change the time the script runs to 6 p.m., run:
$trigger = New-ScheduledTaskTrigger -Daily -At (Get-Date '18:00')
The command has no output but creates a new trigger for the daily scheduled task, setting it to run at 6:00 p.m.
Next, run the following command to apply the new trigger to the existing task named DailyBackupTask and update the trigger settings for the specified task:
Set-ScheduledTaskTrigger -TaskName "DailyBackupTask" -Trigger $trigger
Edit a Cron Job in Command Prompt
To edit the scheduled task in Command Prompt, use the schtasks command again with the changed parameters.
For instance, change the run time from 5:00 p.m. to 6:00 p.m. with:
schtasks /change /tn "DailyBackup" /tr "\"%SystemRoot%\System32\cmd.exe\" /c \"%scriptPath%\"" /st 18:00
If asked, type in the password and hit Enter. The command prints a confirmation output.
How to Delete Cron Jobs
Cron jobs can be deleted using the Task Scheduler, Windows PowerShell, or Command Prompt. The methods differ, but are all straightforward and quick.
The following text elaborates on each method.
Delete a Cron Job Using the Task Scheduler
The Task Scheduler also lets you delete cron jobs. Access the Task Scheduler and:
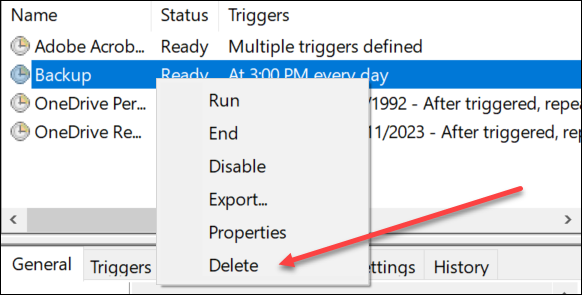
1. Locate the Task Library.
2. Right-click the desired task.
3. Select Delete.
Delete a Cron Job Using the Windows PowerShell
To delete a task using Windows PowerShell, run:
Unregister-ScheduledTask -TaskName "DailyBackupTask" -Confirm:$false
Replace the cron job name with your own. The command has no output.
Delete a Cron Job Using the Command Prompt
To delete a cron job in Windows via the Command Prompt, use the schtasks command with the <strong>/delete</strong> and /tn parameters:
schtasks /delete /tn "DailyBackup" /f
Replace the cron job name with your own. The output confirms the scheduled task has been deleted.
Benefits of Cron Jobs in Windows
Leveraging cron jobs in Windows enhances efficiency, reliability, and overall system management. Cron jobs improve resource utilization and streamline workflows.
Using cron jobs in Windows offers several benefits:
- Automation. Cron jobs automate repetitive tasks, saving time and reducing the need for manual intervention.
- Reduced human error. Automating tasks with cron jobs reduces the risk of human error in manual execution. This is especially crucial for critical processes that require precision and consistency.
- Workflow optimization. Windows cron jobs streamline workflows by automating routine processes.
- Efficient system administration. Task scheduling enhances system administration efficiency by automating maintenance tasks, updates, and backups.
- Timely script execution. Cron jobs provide a reliable way to schedule and execute scripts automatically. This benefits tasks such as data synchronization, report generation, and system monitoring.
- Resource management. Scheduled jobs can run during off-peak hours, minimizing the impact on system resources during regular business hours. This is particularly important for resource-intensive tasks such as system backups or updates.
- Task scheduling. Windows cron jobs allow users to schedule tasks based on various criteria, including specific times, intervals, or predefined schedules.
- Email notifications. Cron jobs can send email notifications upon completion or upon errors.
- Maintenance and cleanup. Cron jobs help schedule routine maintenance tasks, such as deleting old files, archiving data, or performing system cleanup.
- Versatility. Cron jobs in Windows are versatile and applicable to a wide range of tasks, making cron jobs a powerful tool for system administrators and developers.
Conclusion
After reading this article, you know how to create, edit, and delete cron jobs in Windows using three different methods.
Next, learn how to execute a cron job automatically at boot.
