A package manager is a centralized mechanism for finding, installing, and managing software. APT and YUM are popular package management systems created for Debian-based and Red Hat-based Linux distributions, respectively.
The two package managers are among the most popular and easiest-to-learn package managing utilities.
In this article, you will learn the difference between APT and YUM and their basics.
YUM vs. APT: What Are the Differences?
YUM and APT offer the same core functionalities when it comes to installing packages. Both tools keep the information in a database and provide the same basic command-line features. However, some key differences set the two package managers apart.
The following table shows an overview of the crucial differences between YUM and APT:
| Package Manager | YUM | APT |
|---|---|---|
| Used in | Red-Hat-based distros, such as RHEL, Fedora, CentOS, Rocky Linux, OpenSUSE, etc. | Debian and Ubuntu-based distros, such as Debian, Ubuntu, Lubuntu, Kubuntu, etc. |
| Supported Installation Package Format | .rpm files. | .deb files. |
| Configuration Files | /etc/yum.conf file with two sections. allows users to set YUM options with global and repository-specific effects. | /etc/apt/apt.conf file organized in a tree with options organized into functional groups. |
| Command Options | The most used yum options are:installremovesearchinfoupdate | The most used apt options are:updateupgradeinstallremovepurgelistsearch |
| Upgrades | The yum update command is used to upgrade the installed packages to the latest version. | The sudo apt upgrade command is used to upgrade all packages to the latest stable version. |
| Change Rollbacks | YUM allows any changes to be rolled back. | Allows changes to be rolled back by specifying the version you want to downgrade to. |
| GUI Front-End Support | Yumex and PackageKit. | Nala and Synaptic. |
The sections below explain each package manager in detail and show examples of basic YUM and APT usage.
What Is YUM?
YUM (Yellowdog Updater, Modified) is an open-source package management system designed for RPM-based distributions (systems such as RHEL, CentOS, or its successor Rocky Linux). The tool installs, updates, manages and removes software packages.
YUM manages packages either from software repositories (local or remote) or from .rpm packages and automatically resolves any dependencies during installation.
Note: There is a newer improved version of the YUM package manager called DNF (Dandified YUM). The tool offers better performance and more features when installing, updating, or removing software in a RedHat-based Linux system.
The sections below show basic package management operations with YUM.
Installing Packages with YUM
To find and install a package using YUM, follow the instructions below:
Important: Some commands in the article require sudo or root privileges to make changes to the system.
Search for a Package
Find a package in a repository using the search option. The option allows you to search through all the available packages and match the name of the specified package. The syntax is:
yum search [package_name]For example, to find the Firefox package, run:
yum search firefox
The output shows a list of all available packages in the repository that match the specified keyword.
List Packages
The list option is another way to search for a specific package. The syntax is:
yum list [package_name]For example:
yum list firefox
The output lists all the packages matching the specified keyword.
Note: Although the search and list options are used to find a package, yum search is more comprehensive. Running yum search outputs results with the keyword in the package name, summary, or description. Running yum list only looks for the search term in the package name.
Install Packages
Install a package with YUM using the following syntax:
sudo yum install [package_name]For example, to install the Firefox package, run:
sudo yum install firefox
The command automatically finds and installs the package and all required dependencies for Firefox. Add the -y flag to the command to answer yes to all prompts.
Package Management with YUM
YUM allows users to manage the installed packages, get details, and update or remove them. Follow the instructions below to learn how to complete those actions.
Note: Learn the difference between RPM and YUM, two RedHat-based package managers.
List Installed Packages
The list option followed by the --installed flag allows you to see the information about all installed packages:
yum list --installed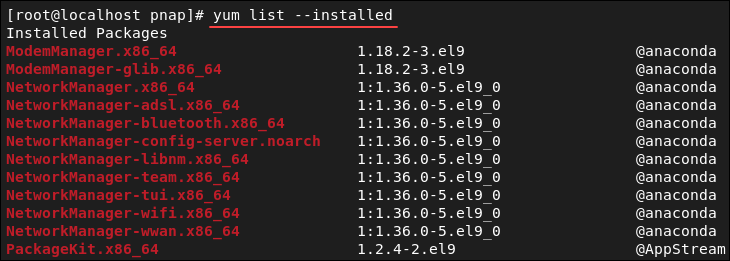
The output shows a list of all packages on the system installed using YUM, their program version, and the repository they were installed from.
Get Package Details
The info option shows details about a specified package. The syntax is:
yum info [package_name]For example, to get details about the Firefox package, enter:
yum info firefox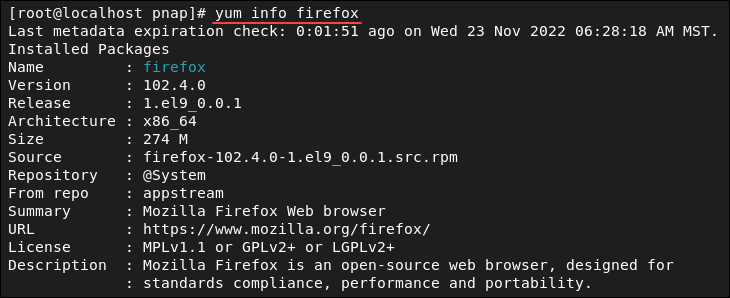
The output includes the program name, version, release, supported architecture, the size on disk, source package, source repository, package summary, URL, license, and description.
Update Packages
Use the update option to keep all the packages up to date and to ensure you have the latest software on the machine. Run the following command:
sudo yum update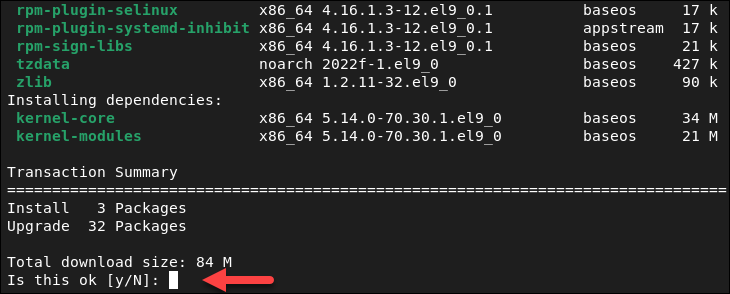
Confirm the update with y and press Enter. The command updates all the installed packages to the latest version. Alternatively, pass the package name after the command to update only a single package.
For example, to update the python3 package, run:
yum update python3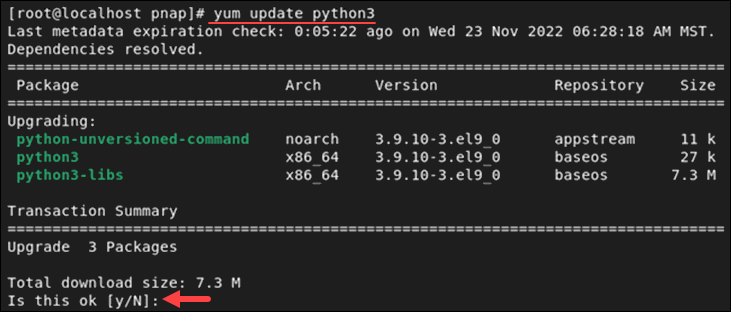
Confirm when prompted, and the command updates the specified package if a new version is available.
Removing a Package with YUM
Remove a package and all its dependencies using the remove option and passing the package name. The syntax is:
yum remove [package_name]For example, to remove Firefox, run:
yum remove firefox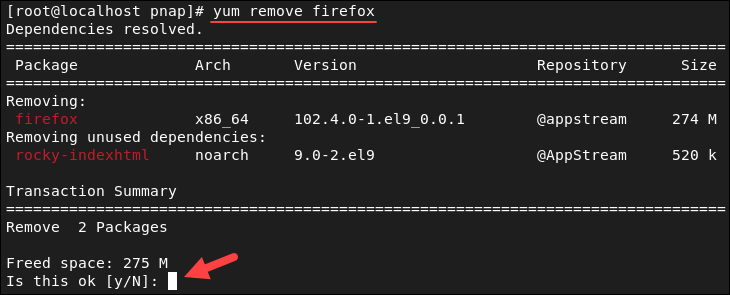
The command removes the specified package and all its dependencies.
Repository Management with YUM
A software repository contains software packages, files, databases, or information accessible over a network. YUM allows users to configure which repositories the tool uses by adding new repos or removing existing ones.
Display Existing Repositories
To see a list of software repositories enabled on your machine, run:
yum repolist
The command displays the enabled software repositories.
Add a Repository
There are two ways of adding a new repository in YUM:
- By adding a
[repository]section to the /etc/yum.conf file. - By adding a .repo file in the /etc/yum.repos.d/ directory, which is the recommended way.
YUM repositories usually provide their own .repo file. We will add a Docker YUM repository which automatically adds the .repo file to the directory. Follow these steps to do so:
1. Make sure to have the yum-utils package installed first. If it's not installed on your system, install it by running:
sudo yum install -y yum-utils2. Add the repository using the following syntax:
sudo yum-config-manager \
--add-repo \
[repository_URL]
For [repository_url], specify the repo URL. For example, to add the Docker repository, run:
sudo yum-config-manager \
--add-repo \
https://download.docker.com/linux/centos/docker-ce.repo
Disable a Repository
Disable a particular repository using the following syntax:
yum-config-manager --disable [repository_ID]For [repository_ID], specify the unique repo ID obtained by listing all repositories:
yum repolist all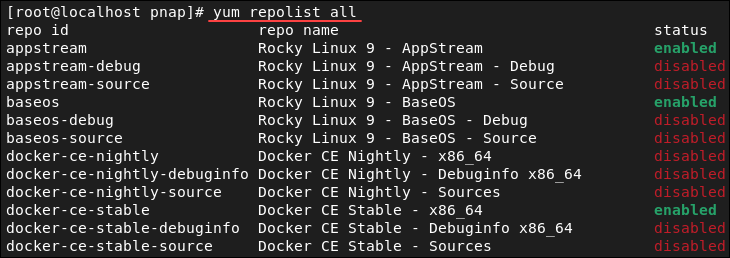
In the example above, the ID of the repository we want to disable is docker-ce-stable. Enter this command to disable the Docker repository:
yum-config-manager --disable docker-ce-stable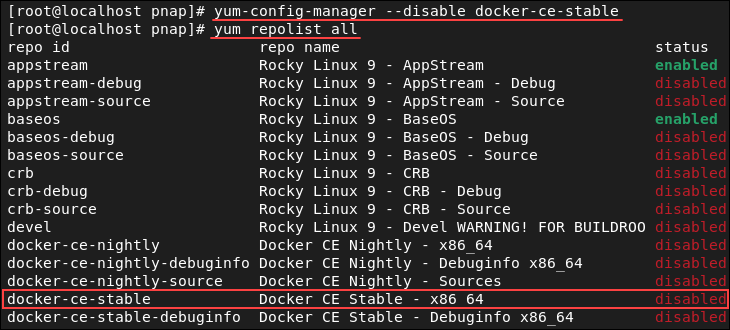
Listing the repositories again shows that the repository has been disabled.
What Is APT?
APT (Advanced Packaging Tool) is an open-source package management tool used for installing, updating, upgrading, uninstalling, and configuring software packages on Debian-based Linux distributions. The tool works with repositories and installs any package dependencies automatically.
Note: Learn the difference between apt and apt-get or the difference between Snap and APT.
The sections below show how to manage packages using APT.
Installing Packages with APT
Install packages using APT by searching for a package in a repository and installing it via the CLI or a GUI app if you are using one.
Follow the instructions below to search for a package and install it.
Search for Packages
Search for a package with a specific keyword in its name or description using the search option. The syntax is:
apt search [package_name]For [package_name], specify a keyword to search for. For example, to search for openssh packages, run:
apt search openssh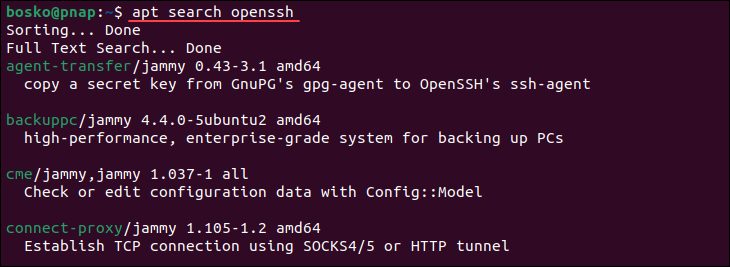
The command outputs all the available packages containing the keyword in the name or in the description.
Install a Package
Install a package using the following syntax:
sudo apt install [package_name]For example, to install the openssh-server package, run:
sudo apt install openssh-server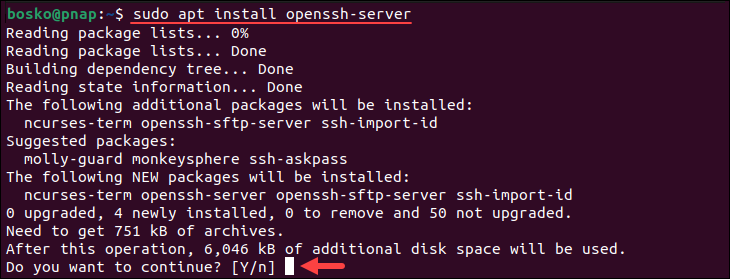
When prompted, type y and press Enter to continue with the installation or add the -y flag to the command to automatically answer yes to all prompts.
Install Specific Package Version
Install a particular package version by specifying the version you want to install. Follow the steps below:
1. See which package versions are available using the following syntax:
apt-cache showpkg [package_name]For example:
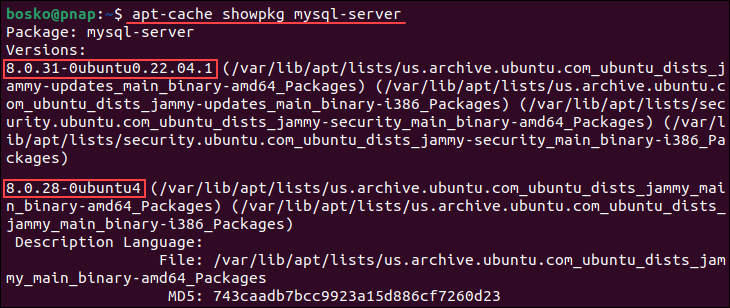
The list contains all available versions of MySQL server.
2. Install the package using the syntax below:
apt install [package_name]=[version_number]For example:
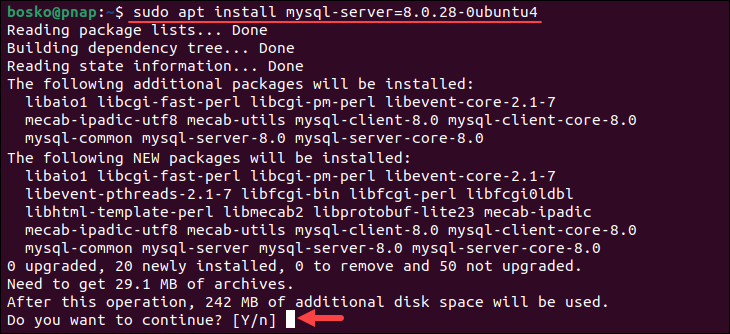
Press y and Enter to confirm, and the command installs the specified version of the MySQL server package.
Install Multiple Packages
The APT package manager allows users to install multiple packages at once. Use the syntax below:
sudo apt install package1 package2 package3Provide the package names separated by spaces. For example:
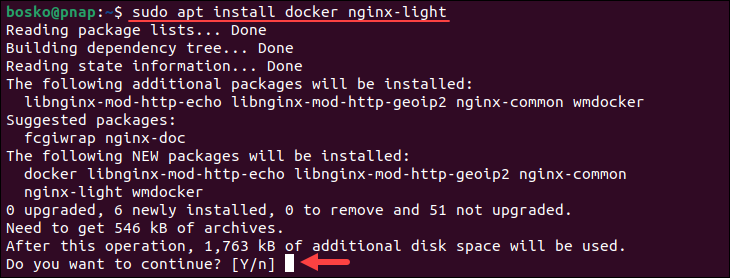
The command in the example installs docker and nginx packages. Add as many package names as needed.
Reinstall a Package
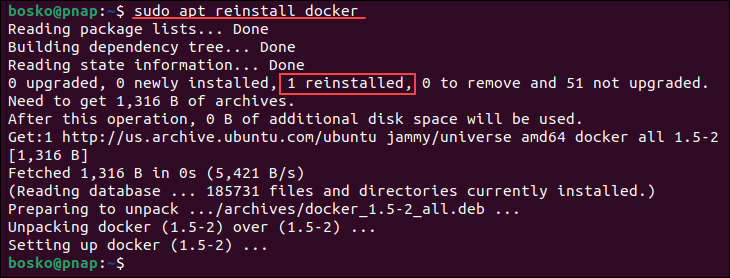
Reinstalling a package is sometimes necessary if the installation fails, the package is corrupted, or some files are missing. Reinstall a package using the syntax below:
sudo apt reinstall [package_name]In the following example, we reinstall the docker package:
Package Management with APT
Package management with APT involves listing installed packages, obtaining package details, and upgrading or removing installed packages.
List Packages
APT allows users to list packages in a repository or the packages installed on the system. To do so, use this command:
apt listSince the list is very long, containing thousands of packages, pipe the output into a pager such as less for easier navigation. For example:
apt list | lessAlternatively, to list only the installed packages, run:
apt list --installed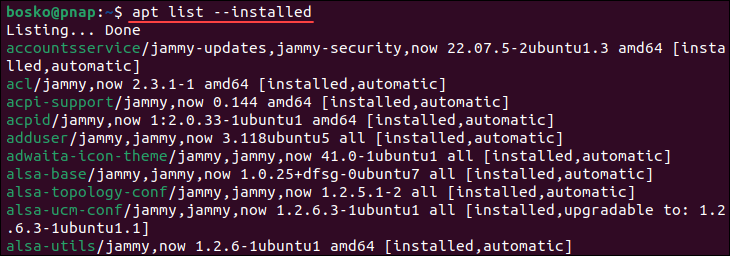
The output shows a list of packages available on the system.
Get Package Details
To obtain specific package details, use the following syntax:
apt show [package_name]For example:
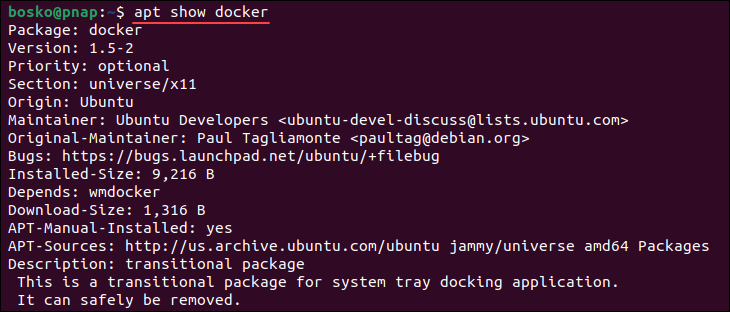
The output shows the package name, version, publisher, size, and description.
Upgrade All Packages
Upgrading a package installs the latest stable version of the package. Follow the steps below to upgrade a package:
1. Ensure you get the latest version by updating the package index. Run:
sudo apt update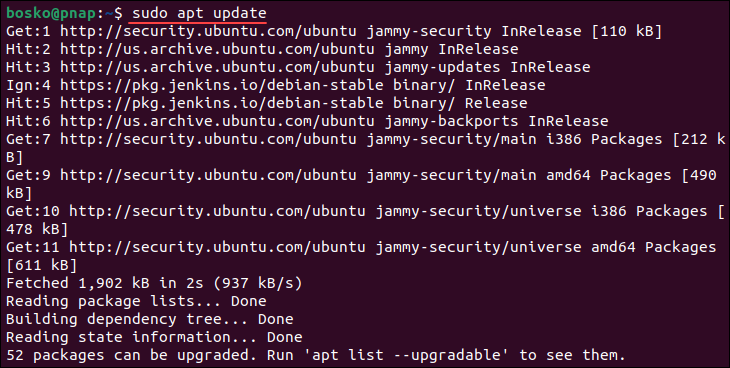
The command doesn't update any installed package but downloads the latest information about the packages that can be installed or upgraded.
2. Update all packages on the system by running:
sudo apt upgrade -yEnter the password and wait for the process to finish.
To update every package and their dependencies, run:
sudo apt full-upgradeNote: Upgrading the packages and their dependencies involves uninstalling existing software and installing new software if the upgrade process requires it.
Upgrade a Single Package
If you want to update only one package, use the syntax below:
sudo apt install --only-upgrade [package_name]For example:
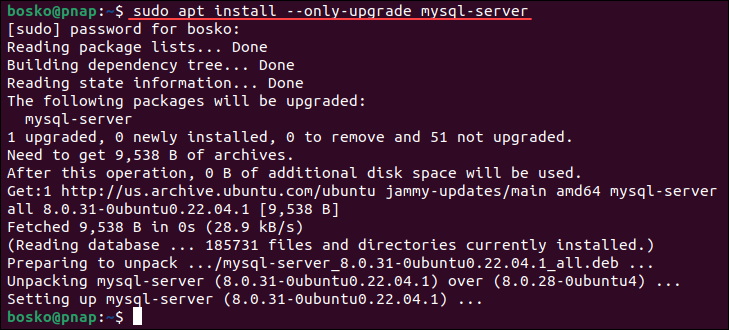
The command upgrades only the specified package.
Remove Package
Removing a package with APT requires the remove option. The syntax is:
sudo apt remove [package_name]For example, to remove the MySQL package we previously installed, run:
sudo apt remove mysql-server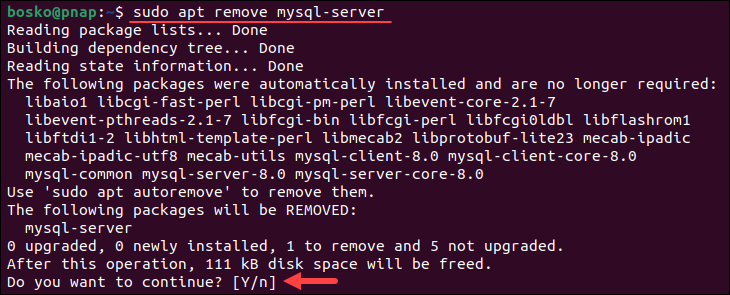
Press y and Enter to confirm and remove the specified package. However, some configuration files may still be left after the package removal.
To remove a package along with all its configuration files and clean up the system, specify the purge option. For example:
sudo apt purge mysql-server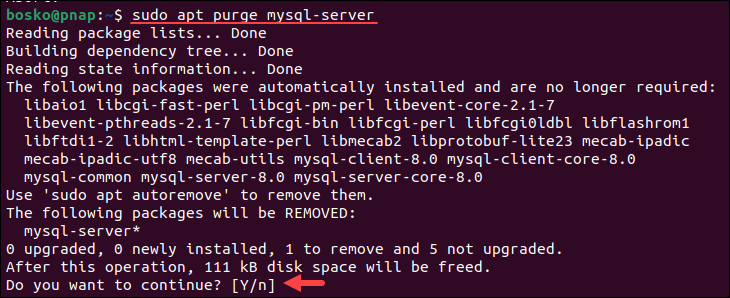
Repository Management with APT
The APT software repositories are defined in the /etc/apt/sources.list file, or as individual files under the /etc/apt/sources.list.d/ directory.
Although the default APT repository contains thousands of applications, sometimes the software you need must be installed through a third-party repository.
This section shows how to add a third-party repository or remove one.
Add a Repo
Adding a repository to APT sources has two steps:
- Adding the repository GPG key.
- Installing the repo using the
add-apt-repositorycommand.
Follow the steps below to add a repository:
1. Adding a GPG key verifies the authenticity of a software package. For example, to install Docker on Ubuntu, first add the GPG key to the APT keyring. Run:
curl -fsSL https://download.docker.com/linux/ubuntu/gpg | sudo apt-key add -
2. Add the repository to APT sources using the add-apt-repository command:
sudo add-apt-repository "deb [arch=amd64] https://download.docker.com/linux/ubuntu focal stable"
Press Enter to confirm and wait for the process to finish.
Remove a Repository
Removing a repository in APT requires the add-apt-repository command with the --remove option. The syntax is:
sudo add-apt-repository --remove [ppa]For [ppa], specify the repository name/URL. For example, to remove the Docker repo we previously added, run:
sudo add-apt-repository --remove 'deb [arch=amd64] https://download.docker.com/linux/ubuntu focal stable'
Press Enter to confirm, and the command removes the Docker repository from APT sources.
Conclusion
This comparison article has shown the similarities and differences between two popular package managers, APT and YUM. You also learned the basic commands for using the two package managers and how to manage the repositories.
