Secure Shell (SSH) is a cryptographic protocol that allows a client to interact with a remote server in a secure environment.
High-level encryption protects the exchange of sensitive information and enables secure file transfers and issuing commands on remote machines.
Learn how to enable SSH on CentOS 7 by following the instructions in this short tutorial.

Prerequisites
- CentOS 7 system to act as an SSH server.
- A user with necessary permissions.
- Access to a command line (Ctrl-Alt-T).
- yum utility (included by default).
Installing and Enabling OpenSSH on CentOS 7
SSH software packages are included on CentOS by default. However, if these packages are not present on your system, install them by completing the steps outlined below.
Step 1: Install OpenSSH Server Software Package
Enter the following command from your terminal to start the installation process:
sudo yum –y install openssh-server openssh-clientsThis command installs both the OpenSSH client applications and the OpenSSH server daemon, sshd.

In this example, the system informs us that the latest version is already present.
Step 2: Starting SSH Service
To start the SSH daemon on the OpenSSH server:
sudo systemctl start sshdWhen active, sshd continuously listens for client connections from any client tool. When a connection request is received, sshd establishes the correct connection.
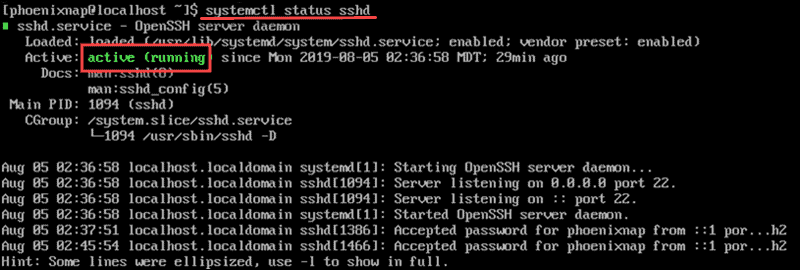
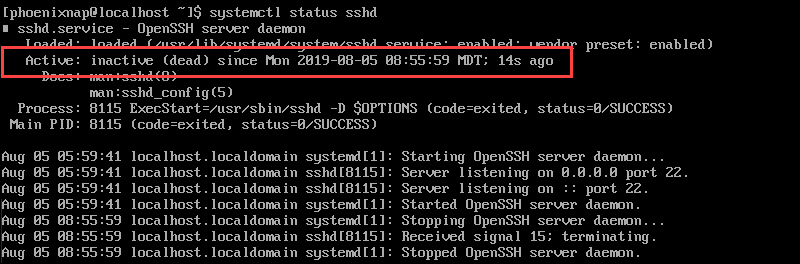
Step 3: Check sshd status
Check the status of the SSH daemon:
sudo systemctl status sshdThe output confirms that the service is active.
To stop the SSH daemon, enter:
systemctl stop sshdVerify the status to check if the service has stopped. The output shows that the service is inactive and the time and date of the last status change.
Step 4: Enable OpenSSH Service
Enable SSH to start automatically after each system reboot by using the systemctl command:
sudo systemctl enable sshdTo disable SSH after reboot, enter:
sudo systemctl disable sshdOpenSSH Server Configuration
Properly configuring the sshd configuration file hardens server security. The most common ways to enhance security are changing the port number, disabling root logins, and limiting access to only certain users.
To edit these settings, access the /etc/ssh/sshd_config file:
sudo vim /etc/ssh/sshd_configOnce you open the file with a text editor (in this example, vim), you can disable root logins and change the default port number. To disable root login:
PermitRootLogin noChange the SSH port to run on a non-standard port. For example:
Port 2002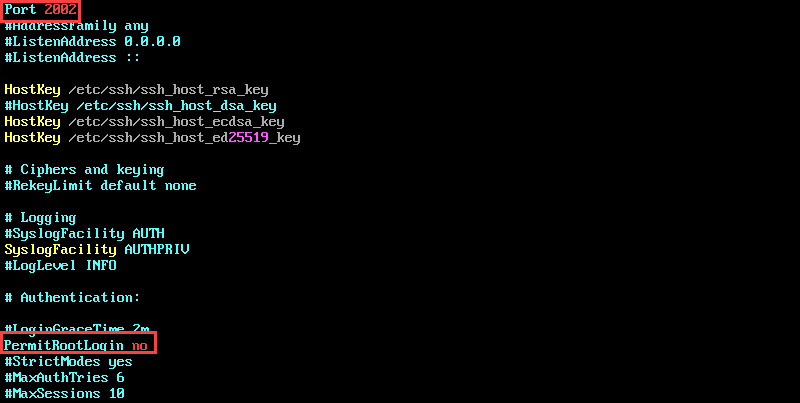
Remember to uncomment the lines that you edit by removing the hashtag.
Save and close the file. Restart sshd:
service sshd restartNote: It is recommended to use SSH keys for authentication, as a safer alternative to passwords.
Firewall Settings
After successfully enabling SSH and configuring the sshd file, adjust the firewall settings to make sure there are no compatibility issues.
It is also possible to restrict IP access to further secure the connection.
To restrict IP access, edit the iptables file by typing:
sudo vim /etc/sysconfig/iptablesTo allow access using the port defined in the sshd config file, add the following line to the iptables file:
-A RH-Firewall-1-INPUT -m state --state NEW -m tcp -p tcp --dport 2002 -j ACCEPTTo restrict access to a specific IP, for example, 133.123.40.166, edit the line as follows:
-A RH-Firewall-1-INPUT -s 133.123.40.166 -m state --state NEW -p tcp --dport 2002 -j ACCEPT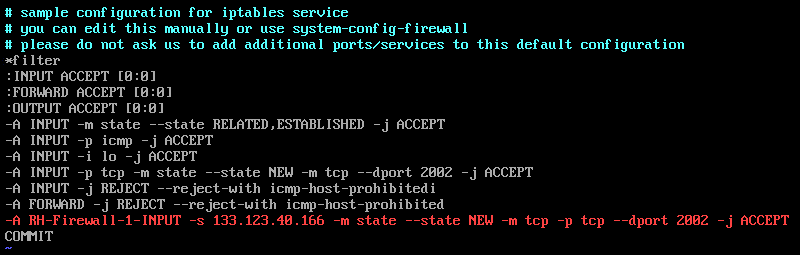
If your site uses IPv6, and you are editing ip6tables, use the line:
-A RH-Firewall-1-INPUT -m tcp -p tcp --dport 2002 -j ACCEPTSave and exit the file by pressing Escape (Esc), type :X, followed by Enter to confirm.
Restart iptables to apply the changes:
sudo systemctl restart iptablesConclusion
You learned how to enable SSH on a CentOS 7 server and configure your firewall and SSH rules to limit access.
Your CentOS 7 server is now accepting SSH connections.
Check out our guide on “ssh_exchange_identification: Read: Connection Reset By Peer” error if you notice it while connecting to your remote server.