VMware Cloud Director Availability (VCDA) is a disaster recovery and migration solution designed for cloud environments using VMware Cloud Director.
You can use VCDA to:
- Migrate workloads (vApps and virtual machines) from on-premises vCenter Server environments to provider cloud sites with VMware Cloud Director (VCD).
- Protect workloads from cyberattacks, hardware failures, or natural disasters by replicating them to a VCD cloud environment.
- Temporarily move workloads during on-premises maintenance without downtime.
In this article, you will learn how to configure VCDA for on-prem to cloud migrations through the VMware Cloud Director interface.
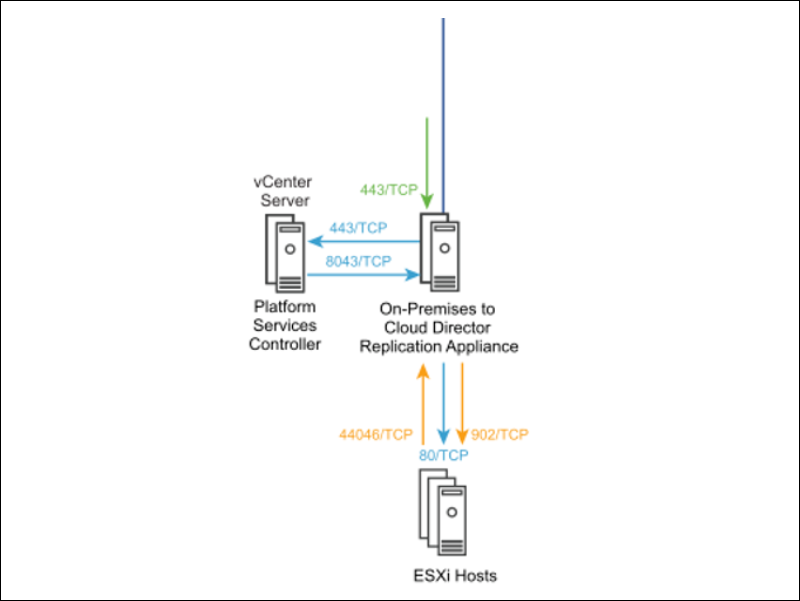
Network Requirements for Tenant On-Premises Deployment
The following table outlines the network requirements for deploying VCDA on tenant premises:
| Source | Port | Protocol | Destination |
|---|---|---|---|
| VCDA Tenant Replicator | 443 | TCP | Tenant PSC |
| VCDA Tenant Replicator | 443 | TCP | Tenant vCenter |
| VCDA Tenant Replicator | 80 and 902 | TCP | Tenant ESXi Host(s) |
| Tenant vCenter | 8043 | TCP | VCDA Replicator |
| Tenant ESXi Hosts | 44046 | TCP | VCDA Replicator |
This diagram illustrates the network communication flow and interactions between the Tenant VCDA Replicator, PSC, vCenter, and ESXi Hosts.
Note: Refer to the official VMware Cloud Director Availability documentation for a detailed overview of network, connectivity, and deployment requirements.
Install and Configure VCDA On-Premises Appliance
The VCDA On-Premises Appliance is deployed as an Open Virtual Appliance (OVA). To enable replication, you must install the On-Premises Appliance OVA into the vCenter you want to replicate to or from. It assumes three primary roles:
- Replication Engine. Handles data replication.
- Tunnel Node. Connects the on-premises vCenter with the vCloud Director environment.
- User Interface (UI). Provides a management interface loaded into the on-premises vCenter.
The deployment process has the following stages where you:
1. Deploy VCDA On-Premises Appliance.
2. Complete the VCDA Configuration Wizard.
3. Configure Protection Replication.
The sections below provide a step-by-step guide for each stage.
Step 1: Deploy VCDA On-Premises Appliance
To deploy the VCDA On-Premises Appliance:
1. Download the latest VCDA on-premises OVA file, which contains the binaries for the VMware Cloud Director Availability cloud appliances. You can contact our support team to receive a direct download link.
2. Log in to the vCenter Server using the vSphere Client.
3. Navigate to the target object where you want to deploy the VCDA appliance. The target object can be a data center, cluster, folder, host, or resource pool.
4. Right-click the target object and select Deploy OVF template from the drop-down menu.
5. Select the VCDA On-Premises Appliance OVA file and click Next.
6. Enter a name for the appliance, choose a deployment location, and select Next.
7. Choose a host or a cluster for the appliance and click Next to validate the resource.
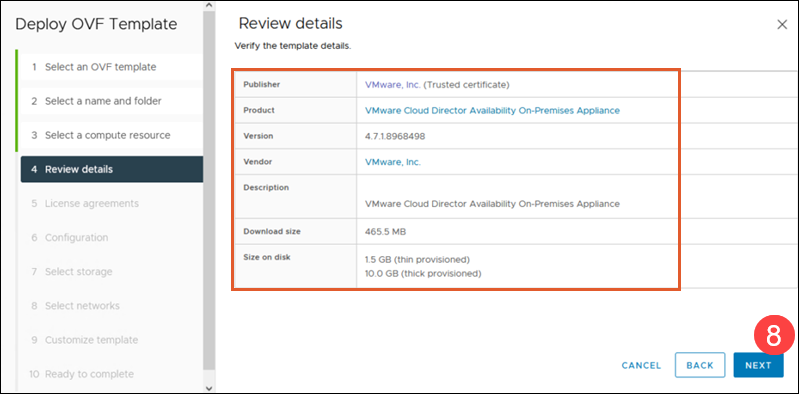
8. Verify the OVF template details and select Next.
9. Check the I accept all license agreements checkbox and click Next.
10. Select the On-Premises to Cloud Director Replication Appliance deployment configuration.
11. Select the virtual disk format and the storage policy for the appliance and click Next.
12. Configure network settings and click Next.
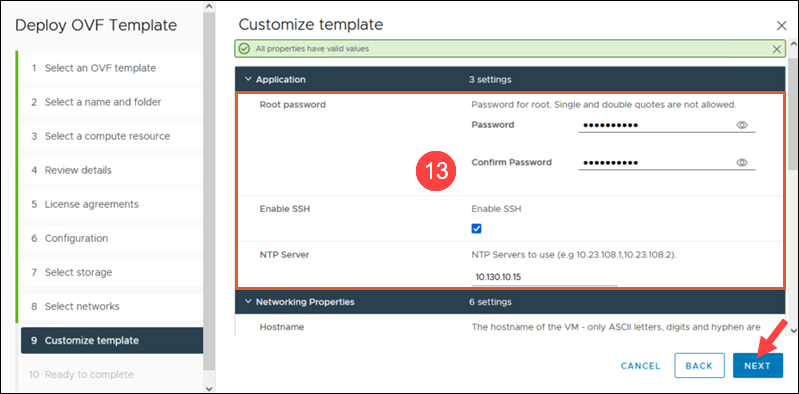
13. Customize the deployment properties of the on-premises appliance. Ensure the following configurations are set:
- Define a root password (to be changed after first login).
- Enable SSH access.
- Set the NTP server to ensure time synchronization across the infrastructure.
14. Review the settings and click Finish to begin the OVA installation process.
Note: Visit the official VMware Cloud Director Availability documentation for additional deployment details and reference materials.
Step 2: Configure VCDA On-Premises Appliance
The appliance is now deployed, but you still need to configure VCDA. Follow the steps below:
1. Access the VCDA appliance at:
https://your-appliance-FQDN/ui/adminor
https://your-appliance-IP/ui/admin2. Use the root password defined during OVA deployment to log in.
3. Create a strong password (minimum 8 characters, including lowercase, uppercase, numeric, and special characters).
4. Click Apply to open the Getting Started tab.
5. Click Pair now to start the New Cloud Pairing wizard.
6. Enter a name that identifies this on-premises site to the cloud provider and click Next.
7. Provide connection details for the vCenter Server Lookup Service and click Next to establish a connection.
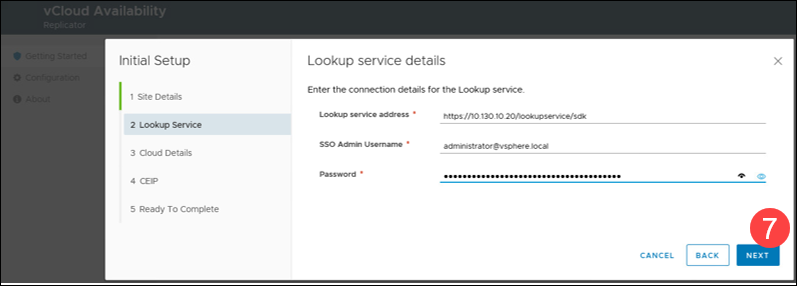
8. Verify the thumbprint and accept the Lookup Service SSL certificate.
9. On the Cloud Details page, pair the On-Premises to Cloud Director Replication Appliance with the cloud provider and click Next. The Public Service Endpoint address required for pairing is included in your Welcome Letter.
Note: To generate an API token for authentication, log in to VMware Cloud Director (VCD), and follow the steps outlined in the official VMware documentation. This token is a security credential required to authenticate the pairing process.
10. (Optional) Configure on-premises local placement settings and click Finish to complete the wizard.
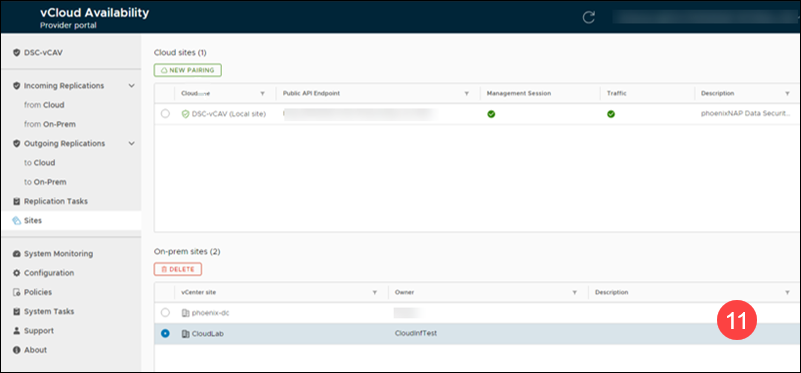
11. Verify that the site and replicator appear in the VCDA management interface.
Step 3: Configure Protection Replication
Once the appliance is deployed, configure protection replication to enable the replication of workloads.
Note: The Protection option includes Migration. If your purchase only includes the Migration feature, use Migration instead of Protection in the following steps. Migration does not allow a custom SLA; the default SLA is set to 24 hours.
Follow the steps below:
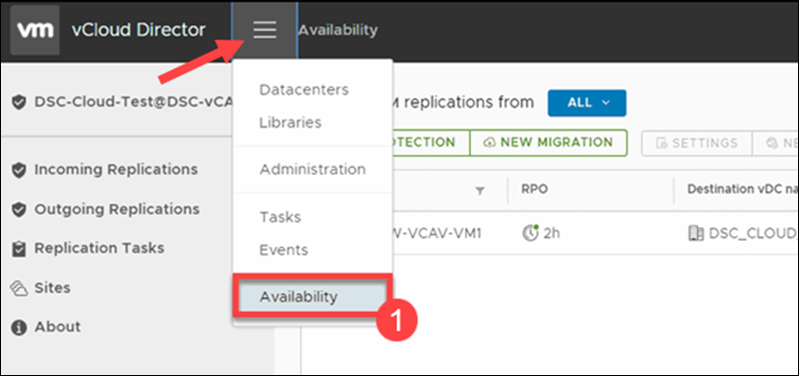
1. Log in to the tenant Cloud Director Org and select Availability from the menu.
Note: If prompted to select or confirm a certificate, click Cancel.
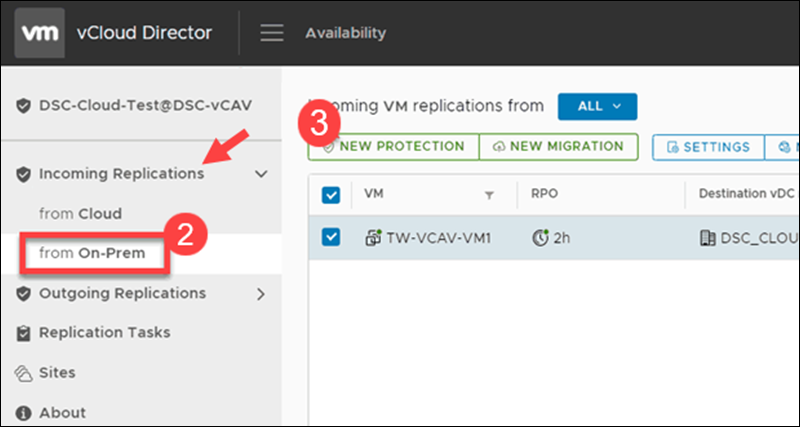
2. Go to Incoming Replications and select from On-Prem.
3. Click New Protection to open the replication configuration window.
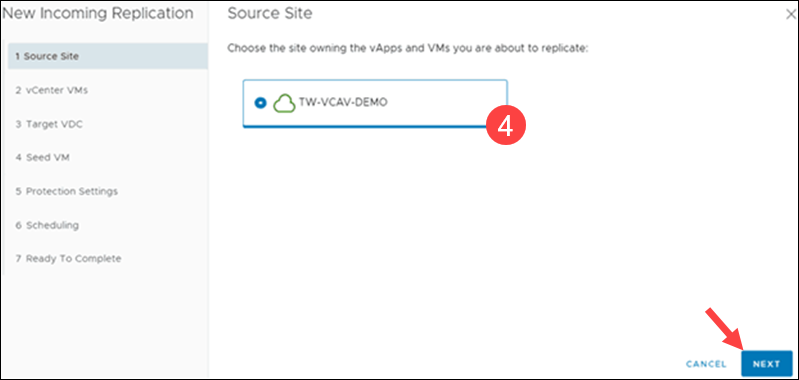
4. Select the Source Site, which is the on-premises site owning the VMs you want to replicate, and click Next.
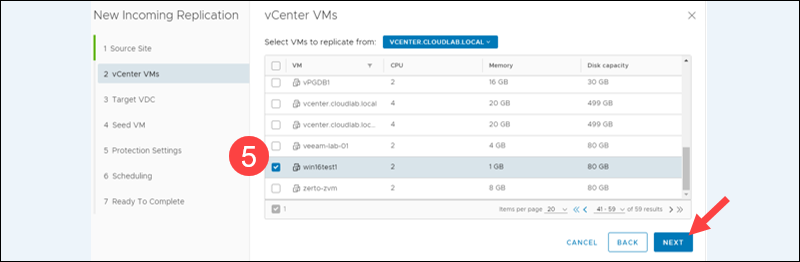
5. Select the VMs to replicate by checking the corresponding box(es) and click Next.
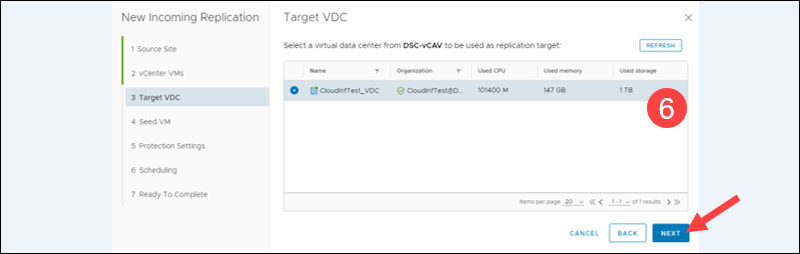
6. Select the Target VDC (Cloud Org VDC) and click Next.
7. Choose whether to enable seeding.
Note: This option is only available if the VMs selected for replication already have an older copy on the target site. The older version is then used as a seed to speed up data transfer.
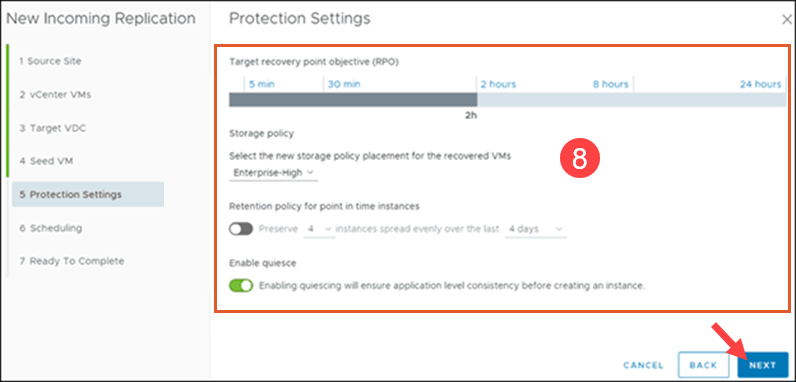
8. Configure replication settings (if paid for):
- Recovery Point Objective (RPO). Define the target recovery interval.
- Storage policy. Specify the storage tier (e.g., Enterprise-High).
- Retention policy. Determine the number of recovery points to preserve.
- Enable Quiesce. Ensure application-level consistency before snapshots.
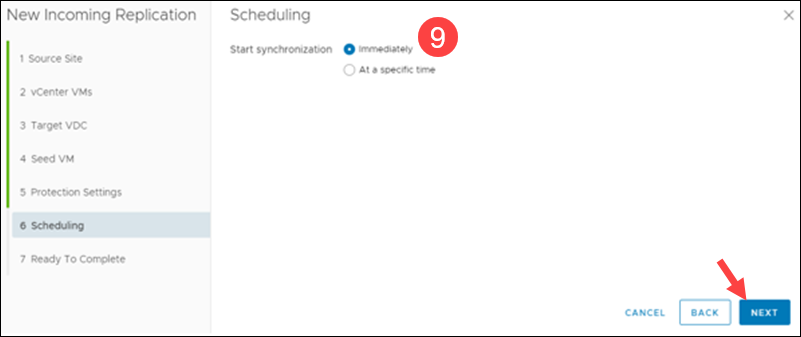
9. Continue to Scheduling. Check if you want to start synchronization Immediately or At a specific time, and click Next.
10. Review the settings and click Finish.

Note: Refer to the official VMware Cloud Director Availability documentation for more information on advanced replication configurations and troubleshooting.
A new protected VM is now listed in the VCDA interface and the phoenixNAP VCDA Manager. You can review the state and details of all on-premises incoming replications. The interface provides information on source and destination configuration, replication health, and workload status.
Conclusion
You have successfully deployed the VCDA on-premises appliance, configured site pairing, and set up protection replication.
This setup enables you to migrate workloads to the cloud, recover from disasters, and maintain business continuity during planned maintenance.