VMware vSphere Hypervisor (ESXi) is a bare-metal hypervisor, a vSphere virtualization suite component. By using it, system administrators can consolidate multiple server workloads and optimize the use of their physical hardware.
This document provides a technical guide for the installation and configuration of VMware ESXi.
Prerequisites
- Intel 6th generation or AMD Zen 2 CPU (or newer).
- 8 GB RAM (12 GB RAM recommended).
- 32 GB HDD or SSD.
- At least one compatible 1 GB network interface.
- A Broadcom user account.
What Is VMware ESXi?
VMware ESXi is a Type-1 hypervisor installed directly onto physical server hardware. This architecture allows ESXi to interact with system resources, including CPU, memory, and storage, without relying on an intermediate operating system. The hypervisor partitions the hardware into virtual machines (VMs), each running its own operating system and applications.
As the core component of the larger VMware vSphere virtualization suite, ESXi enables enterprise-grade features that are critical for modern data centers. These features include:
- vMotion. A core VMware vSphere technology that allows administrators to migrate a running VM from one ESXi host to another without any service interruption.
- High Availability (HA). A resilience mechanism that automatically restarts VMs on other hosts in the event of a host failure.
- Distributed Resource Scheduler (DRS). A capability that intelligently balances workloads across a cluster of ESXi hosts.
- vCenter Server. A centralized management utility for control and advanced automation, which transforms a collection of physical servers into a unified cloud computing platform.
How Does VMware ESXi Work?
ESXi creates a server virtualization layer that divides the physical server's resources into separate pools. It then uses a specialized component called the Virtual Machine Monitor (VMM) to create isolated environments for each virtual machine. This feature allows multiple, completely independent operating systems and applications to run concurrently on the same server.
The ESXi architecture is lightweight and efficient, utilizing its own kernel (VMkernel) to manage physical hardware resources and allocate them to virtual machines via a resource scheduler.
The VMkernel performs several critical functions:
- Hardware abstraction. The kernel provides an abstraction layer between the hardware and the virtual machines.
- Resource management. It manages physical resources, such as CPU, memory, storage, and network interfaces.
- Virtual machine execution. Virtual machines run as isolated processes on the VMkernel. When a VM needs hardware access, the VMkernel mediates the request.
- Hardware access. Device drivers run within the VMkernel, providing efficient access to physical hardware for virtual machines.
Latest VMware ESXi Version
Currently, the latest generally available version is VMware ESXi 8.0. Deployment should target the latest supported build for security and stability assurance.
VMware ESXi 8.0 introduced the following new features:
- vSphere Distributed Services Engine. The capability that enables hardware acceleration by offloading infrastructure tasks, such as network processing and security functions, to Data Processing Units (DPUs).
- vSphere Configuration Profiles. A lifecycle management update to simplify host configuration.
- New methods for parallel host remediation to speed up cluster updates.
- Improved scalability and hardware support.
Free ESXi Version
VMware offers a permanently free version of the ESXi hypervisor, which is now at version ESXi 8.0U3e. This version is functionally complete for basic virtualization but has limitations unsuitable for enterprise environments that require advanced management or high availability.
The main limitations of the free hypervisor include:
- vCenter server integration. vCenter Server cannot manage the free version. Management is performed through the single-host vSphere Host Client.
- API restrictions. Access to the vStorage APIs for Data Protection (VADP) is unavailable, preventing host-level backup using third-party tools.
- vCPU limit. Virtual machines are typically restricted to a maximum of 8 vCPUs.
- Advanced features. Enterprise features like vMotion, Storage vMotion, High Availability (HA), and Distributed Resource Scheduler (DRS) are not available.
How to Install VMware ESXi
Installing ESXi is a process performed on the physical server. The procedure requires bootable installation media and running an installation wizard.
Follow the steps below to install VMware ESXi:
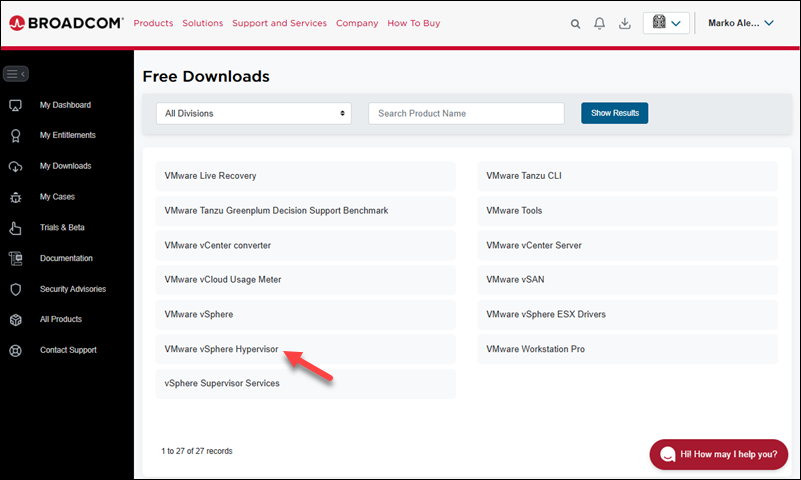
1. Log in to the Broadcom Support Portal.
2. In the Free Downloads section, find and download the ESXi Installer ISO image.
3. Create a bootable USB drive or mount the ISO via the server's remote management card (e.g., iDRAC, iLO).
4. Start the server and boot from the installation media.
The ESXi installer loads the VMkernel and shows the initial screen.
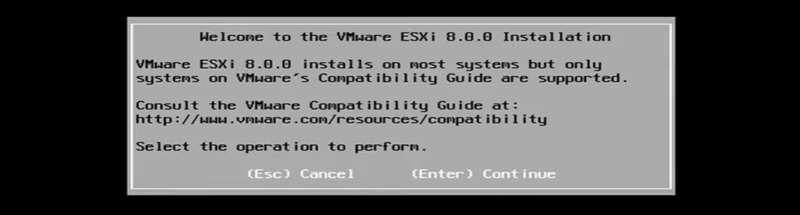
5. Press Enter to initiate the installation process.
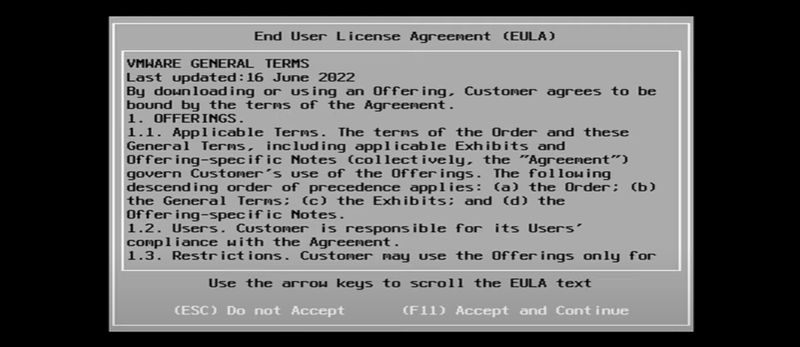
6. Review the End User License Agreement and press F11 to accept and proceed.
7. Use the arrow keys to choose the target disk for ESXi installation and select it by pressing Enter. This disk must meet the minimum storage requirements.
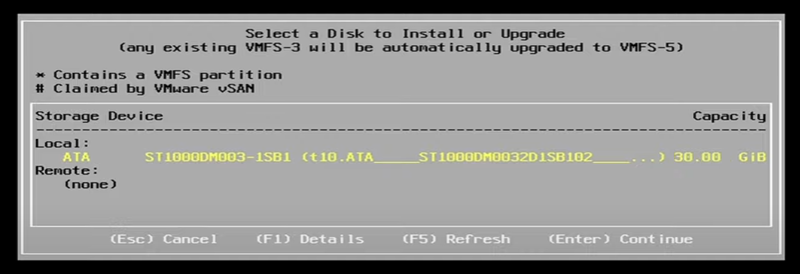
8. Press Enter again to confirm disk selection.
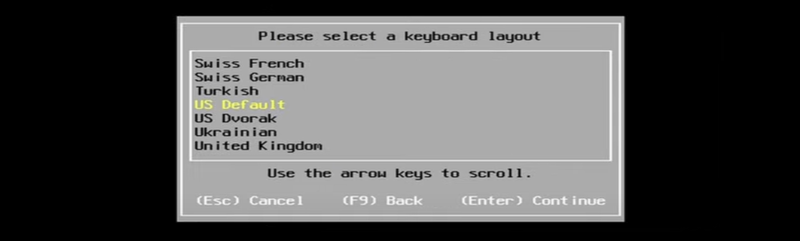
9. Choose a keyboard layout with the arrow keys, then confirm it by pressing Enter.
10. Enter and confirm a root password.
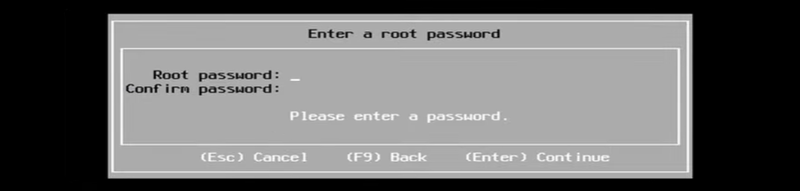
This credential provides administrative access to the host.
11. Press F11 to confirm the installation target and begin writing files to the disk.
Wait for the installation to finish. The wizard shows the Installation Complete dialog.
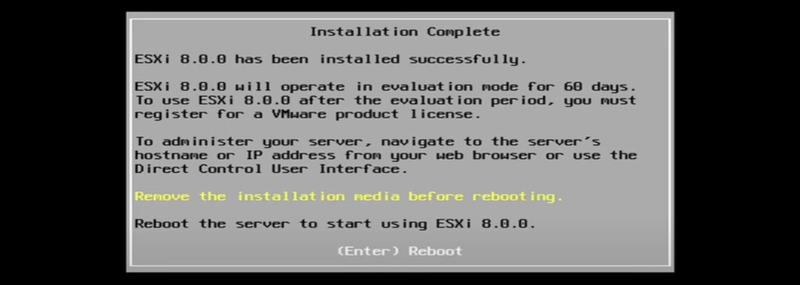
12. Remove the installation media and press Enter to reboot the host.
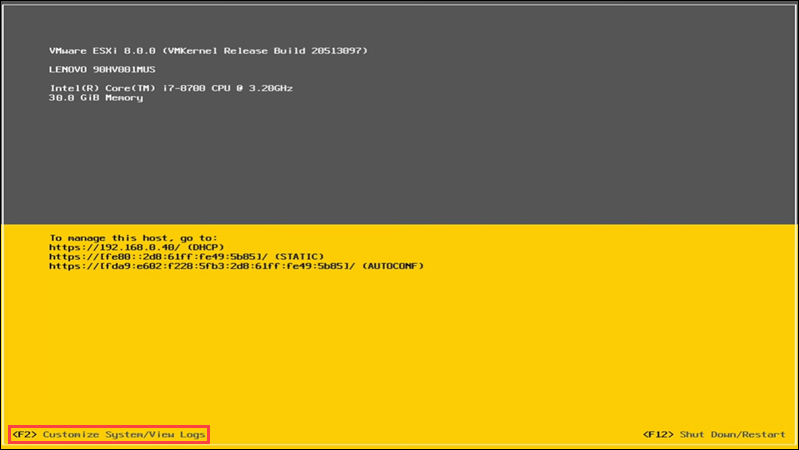
The ESXi Direct Console User Interface (DCUI) loads.
Note: Learn how to work with VMware shared folders.
VMware ESXi: Basic Configuration
Following installation, essential network configuration is required for remote management. Perform the following steps using the DCUI:
1. After the host boots, press F2 on the DCUI screen.
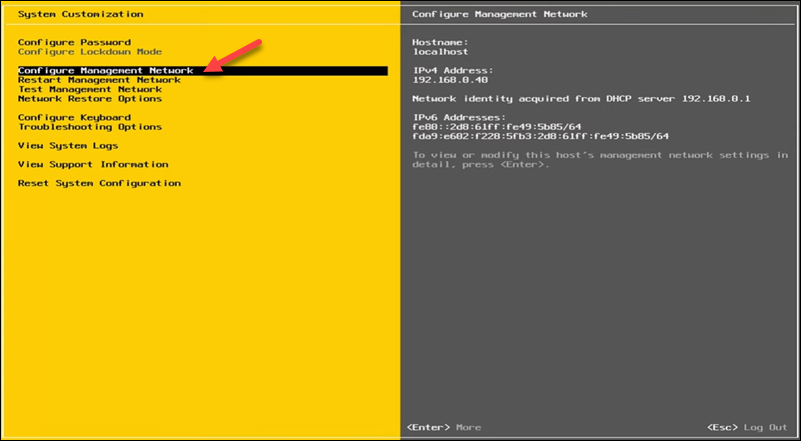
2. Log in using the root credentials.
3. Select Configure Management Network.
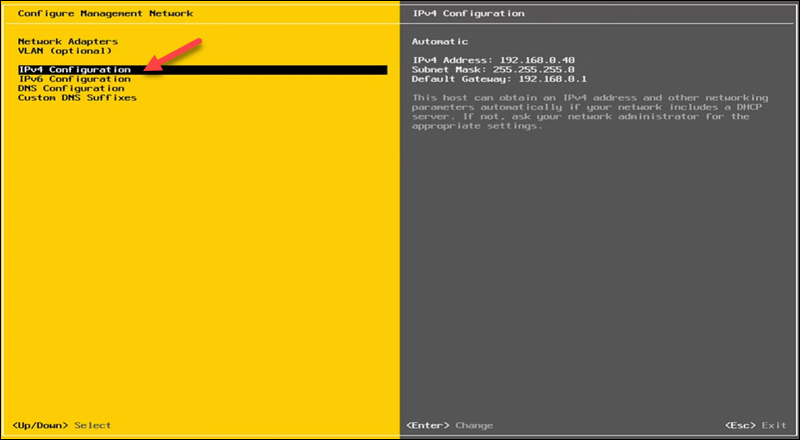
4. Select IPv4 Configuration.
5. Change the setting from Dynamic to Static mode. Enter the required IPv4 Address, Subnet Mask, and Default Gateway parameters.
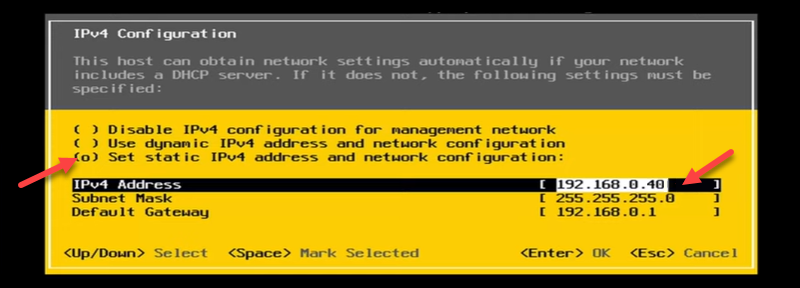
Press Enter to confirm the configuration.
6. Select DNS Configuration.
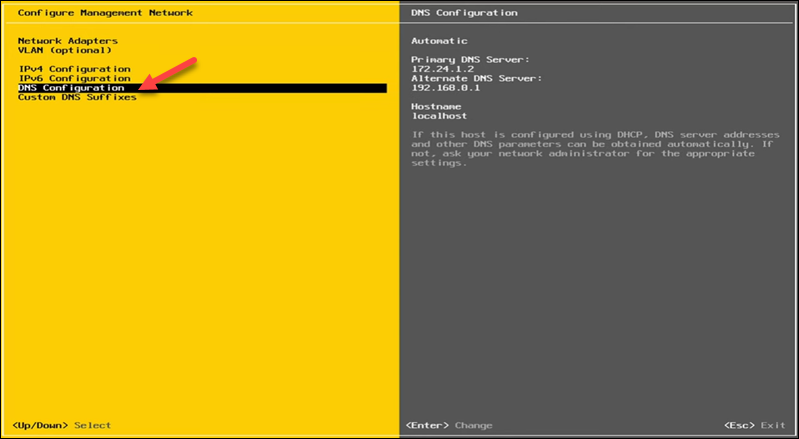
7. Enter the Primary and Alternate DNS Server addresses. Set the Hostname for the ESXi host.
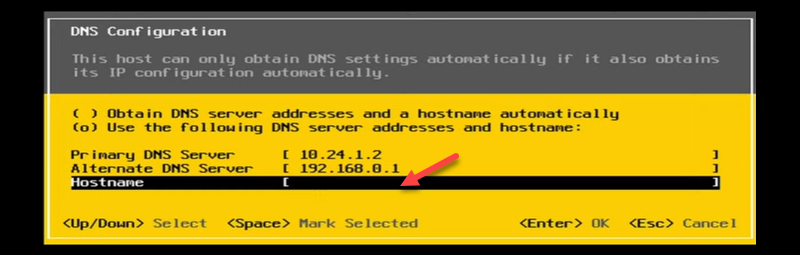
Press Enter to confirm the configuration.
8. Press Esc to exit the configuration menu.
9. Press Enter to confirm the changes and restart the management network.
10. Use a web browser to navigate to the management IP address. This action launches the vSphere Host Client for management access.
VMware ESXi: Advanced Configuration
Advanced configuration involves storage and networking optimization, often required for enterprise deployment and feature enablement.
These settings are typically managed using the vSphere Host Client or vCenter Server.
Networking Configuration
Network optimization is crucial for performance and availability, requiring careful configuration of virtual switches and network segmentation:
- Virtual switches (vSwitches). Create vSphere Standard Switches to handle VM and VMkernel traffic. Each vSwitch must be mapped to one or more physical Network Interface Cards (pNICs or Uplinks). Implement NIC Teaming to configure load balancing and failover policies across multiple uplinks for redundancy and increased throughput.
- Port groups and VLANs. Create port groups on vSwitches to define network policies and security. Assign VLAN IDs to port groups to segment network traffic and isolate management, vMotion, storage, and VM traffic on different logical networks.
- VMkernel ports. Create dedicated VMkernel network adapters for services like vMotion, iSCSI/NFS storage access, and fault tolerance logging. Separate network segments should be utilized for these services to mitigate congestion.
Storage Configuration
Storage configuration dictates how virtual machines access their disk files, involving datastore creation and network storage protocol setup:
- Datastore creation. You can access the Storage section in the vSphere Host Client. Create new VMFS (Virtual Machine File System) datastores on locally attached or SAN-presented LUNs. VMFS provides a high-performance cluster file system for VM files.
- Network storage (iSCSI/NFS). For network-attached storage, you can configure the Software iSCSI Adapter on a dedicated VMkernel port. Enable Jumbo Frames (MTU 9000) on the VMkernel port and the physical network for performance optimization in iSCSI traffic. Alternatively, mount NFS volumes via the host client.
- Disk partitioning. Ensures compliance with best practices for disk partitioning. You can separate high-speed storage for VM datastores from the boot volume to maximize performance.
Conclusion
After reading this tutorial, you know how to install and set up VMware vSphere Hypervisor on your machine. The article also provided important facts about ESXi and offered suggestions for optimizing storage and networking on an ESXi server.
Next, read our Proxmox vs. ESXi comparison for more information about the two hypervisors.