Apache Cassandra is a well-established, wide-column NoSQL database. It uses a column-based storage model to capture large amounts of unstructured data. Cassandra focuses on operating in a distributed cluster of commodity servers and boasts high availability and flexible horizontal scaling.
This tutorial shows how to install Apache Cassandra on Windows.

Important: Windows support was removed since Cassandra 4.0 was released, so the latest Cassandra version that runs natively on Windows is 3.11. If you need to install the latest version, we suggest to install Cassandra on Linux, or use the Windows Subsystem for Linux (WSL).
Prerequisites
- Java 8 installed.
- Python 2.7 installed.
- A user account with administrator privileges.
How to Install Cassandra on Windows 11
The last natively supported Cassandra version on Windows is 3.11. Cassandra 3.11 requires Java 8u202 and Python 2.7 to work on Windows. Installing a later version of Java or Python can cause compatibility issues, so stick to the supported versions to ensure stability.
Step 1: Install Java 8 on Windows 11
The Java Development Kit contains all the tools and software you need to run applications written in Java. It is a prerequisite for software solutions such as Apache Cassandra.
Download Oracle JDK 8 (Java Development Kit)
Java 8 is an LTS version that will receive updates until 2030. Follow the steps below to install the Java 8 version compatible with Cassandra:
1. Navigate to the official Oracle download page to download the Java JDK 8u202 software package for Windows x64 or x86.
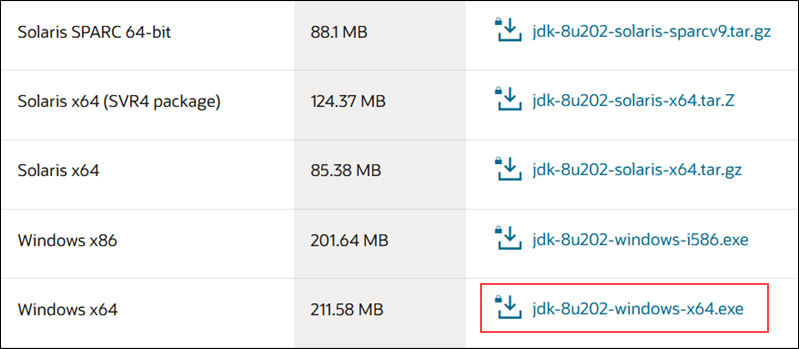
If you do not have an Oracle account, the website guides you through a quick signup process. The Java 8 download starts automatically after signing up.
2. Once the download completes, double-click the downloaded executable file. Select Next on the initial installation screen.
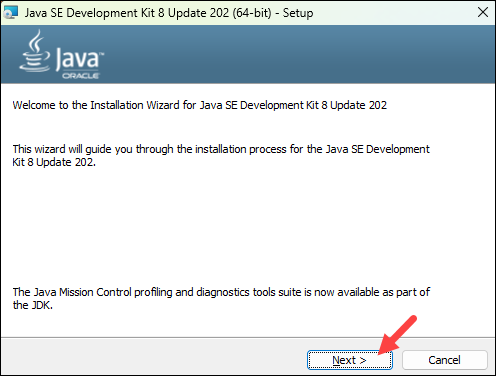
3. Select optional features and define the installation location. Accept the default settings and take note of the full path to the installation folder. Once you are ready to proceed, click Next.
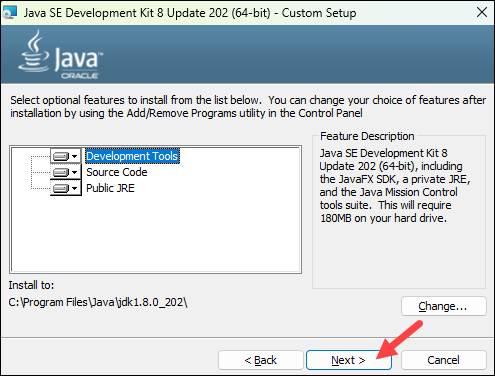
4. When prompted, confirm the Java installation destination folder. Click Next to continue.
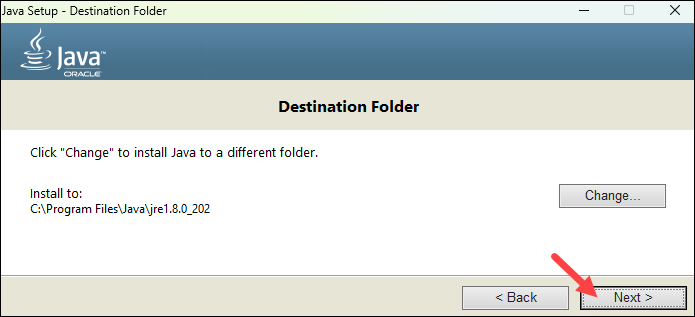
5. Wait for the installation process to complete, click Close to finish, and exit the installer.
Configure Environment Variables for Java 8
It is vital to configure environment variables in Windows and set the correct path to the Java 8 installation folder for the installation to work properly. Follow the steps below:
1. Press the Windows key and search for Environment variables. Press Enter to open the Advanced system settings window.
2. Click the Environment Variables… button.

3. Click New in the System Variable section.
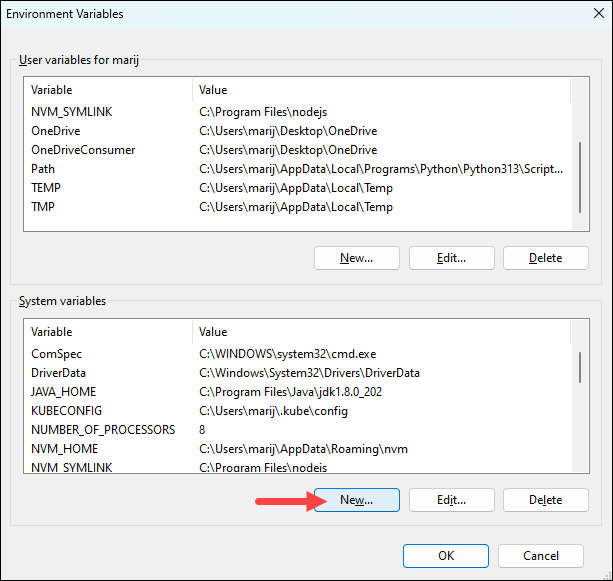
4. Enter JAVA_HOME for the new variable name. Select the Variable value field and enter the path to the Java installation folder. Alternatively, use the Browse Directory... option, navigate to the folder where Java is installed, and select OK to add the variable.

5. Find the PATH variable in the System variables section and click the Edit... button.
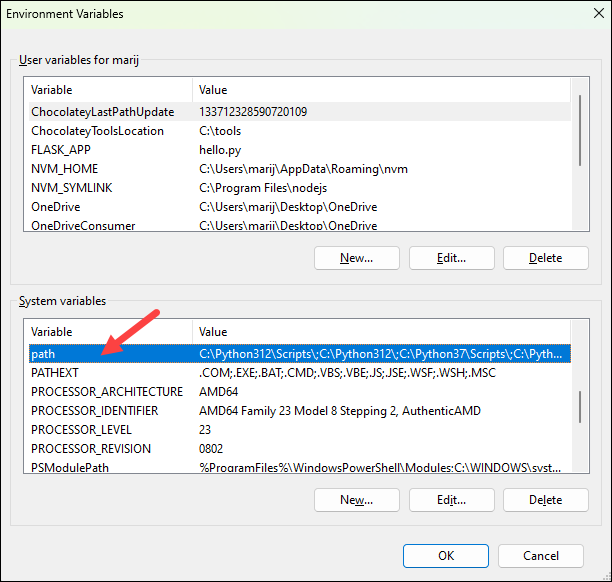
6. Click the New button and enter the path to the Java installation bin folder. You can enter the path manually or use the Browse... button to navigate to the bin folder with Windows Explorer. Click OK to confirm the changes.
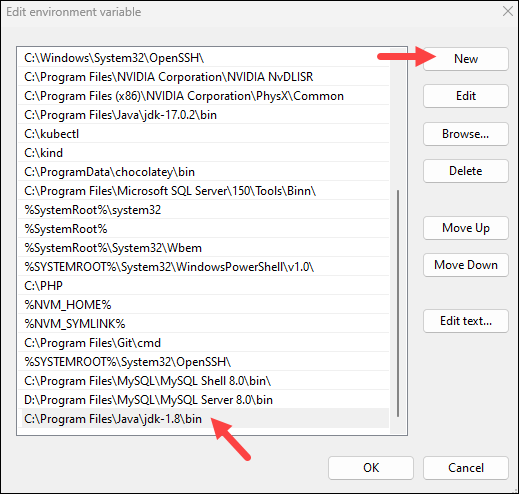
7. Click OK in the main Environment Variables window to complete the process.
Step 2: Install and Configure Python 2.7 on Windows
Users interact with the Cassandra database with the cqlsh bash shell. You need to install Python 2.7 for cqlsh to handle user requests properly.
Install Python 2.7 on Windows
Although deprecated, Python 2.7 is the last version supported by Cassandra 3 on Windows. Follow the steps below to install it on your machine:
1. Visit the Python official download page and select the Windows x64 version link.
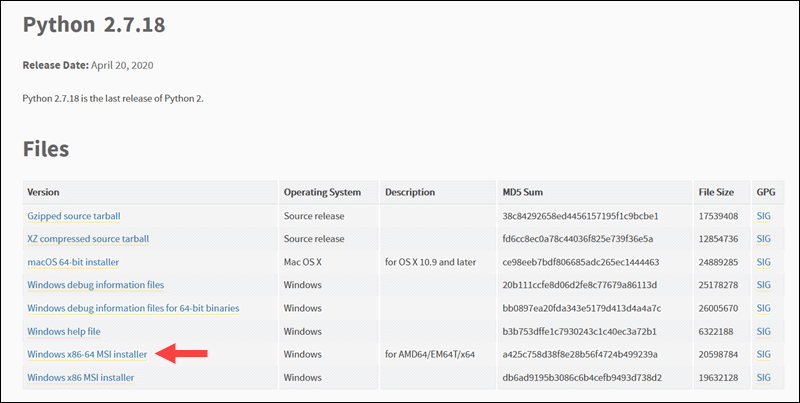
2. Double-click the downloaded file to start the installation.
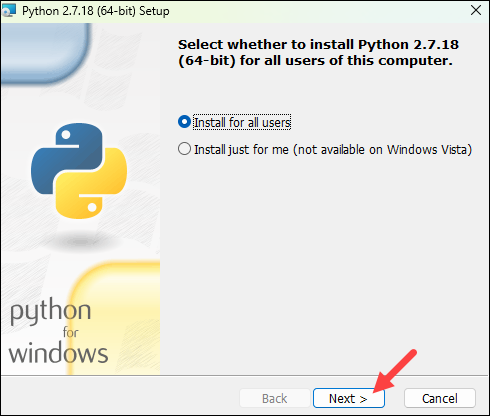
3. In the initial screen, select whether you want to install Python for all users on this machine or just for your user account, and click Next.
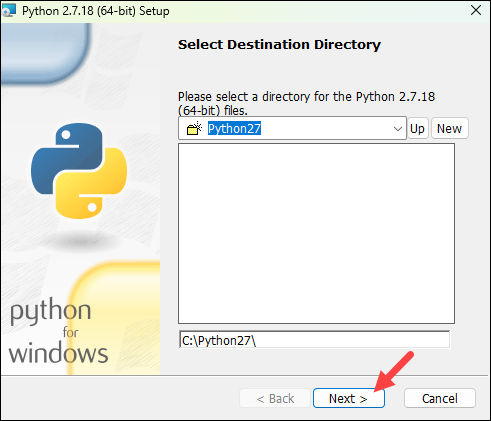
4. Specify the Python installation folder. Feel free to leave the default location and click Next.
5. The wizard prompts you to customize the Python installation package. Select Next to continue the installation using the default settings.
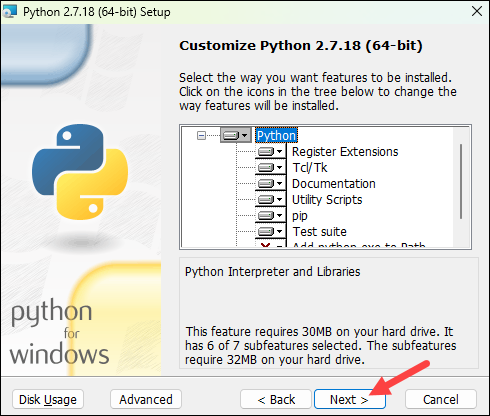
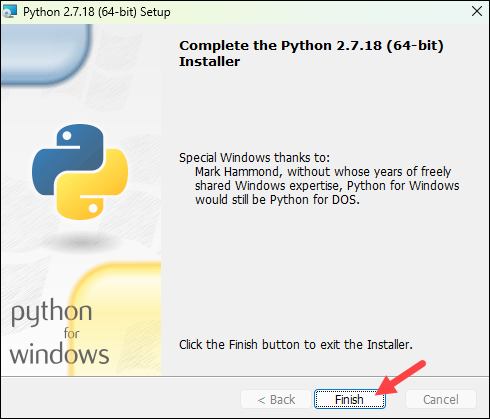
6. Wait for the installation process to complete. Once done, select Finish to complete the installation.
Configure Environment Variables for Python
For Python to work, you need to configure the environment variables, as we did with Java. Follow the steps below:
1. Search for Environment variables and press Enter to open the Advanced system settings window. Click the Environment Variables… button.
2. Double-click the existing Path system variable in the System variables section.
3. Select New and enter the path to the Python installation folder. You can also use the Browse button to locate the folder. Once you have confirmed that the path is correct, click OK.
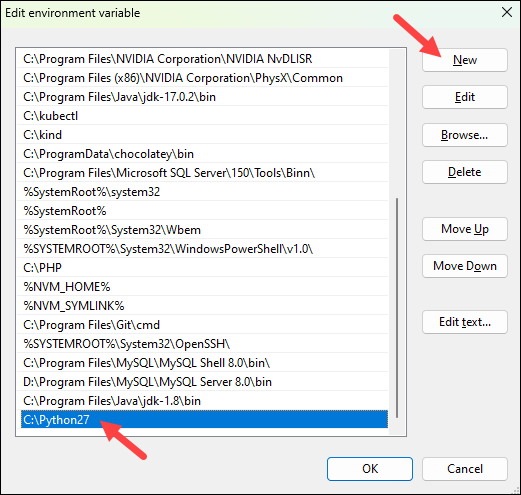
4. Click OK again to confirm the changes.
Step 3: Download and Set Up Apache Cassandra
After setting up Java 8 and Python 2.7 on your machine, you can now install Cassandra. Follow the steps below:
Download and Extract Cassandra tar.gz Archive
Cassandra comes in a tar.gz archive that contains the core binaries, configuration files, libraries, and tools required to run and manage Apache Cassandra. To download it and unpack:
1. Download Apache Cassandra version 3.11.9, the latest Cassandra 3 version.
2. Unzip the archive using a compression tool such as 7-Zip or WinZip. The native Windows extractor does not support .gz archives, which are more common on Linux. Place the uncompressed folder in the root of your drive for easy access later.
Configure Environment Variables for Cassandra
Repeat the process to set up environment variables for Cassandra to enable the database to interact with other applications and run on Windows.
1. Open the Environment Variables window.
2. Add a new variable in the System Variables section by selecting the New option.
3. Enter CASSANDRA_HOME for Variable name, and provide the location of the unzipped Apache Cassandra folder for the Variable value column. Press OK to confirm the changes. For example:

4. Add Cassandra to PATH. In the System variables section, double-click the Path variable to edit it.
5. Select New and then provide the location to the Apache Cassandra bin folder. You can also use the Browse option.
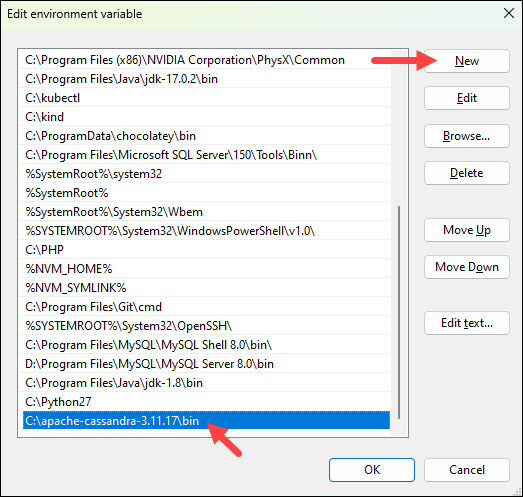
6. Click the OK button and then again OK in the main window to save the edited variables.
Note: Check out our article to learn more about the difference between MongoDB and Cassandra.
Step 4: Start Cassandra from Windows CMD
After setting up Java, Python, and Cassandra, it is time to start the server. Follow the steps below:
1. Open Windows Explorer and navigate to the Cassandra bin folder.
2. Start the Windows Command Prompt directly from the bin folder by typing cmd in the address bar and pressing Enter.

3. Run the following command to start the Cassandra server:
cassandraThe system starts the Cassandra Server.

Keep the current cmd session open.
Step 5: Access Cassandra cqlsh from Windows CMD
While the initial command prompt is still running, open a new command line prompt from the same bin folder. Enter the following command to access the Cassandra cqlsh bash shell:
cqlsh
You now have access to the Cassandra shell and can proceed to issue basic database commands to your Cassandra server.
How to Uninstall Cassandra on Windows
If you no longer need Cassandra on your system, follow the steps below to uninstall it.
Step 1: Stop Cassandra Services
Navigate to the Cassandra bin folder and open the Command Prompt by typing cmd in the address bar.
Run the following command to stop any running Cassandra service:
cassandra -fStep 2: Remove Cassandra Installation Files
Delete the Apache Cassandra directory to remove the installation files from your machine.
Step 3: Remove Environment Variables
Remove the environment variables to ensure that the old references to Cassandra's binaries or configuration do not interfere with future installations or system operations.
1. Open the Environment variables setting.
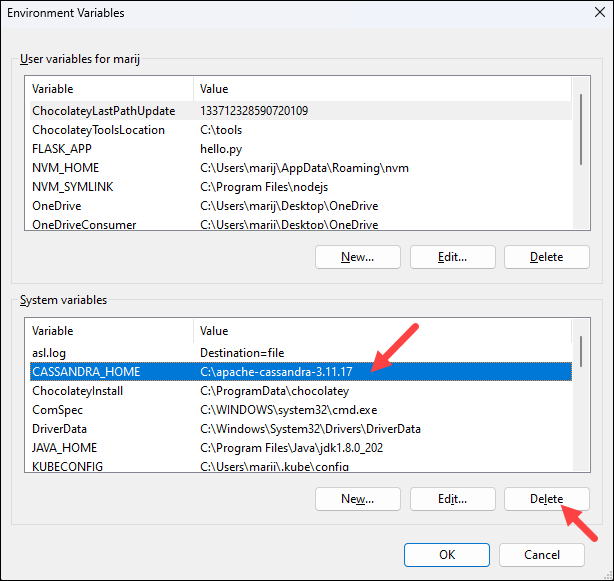
2. Find the CASSANDRA_HOME environment variable from the System variables section and click Delete:
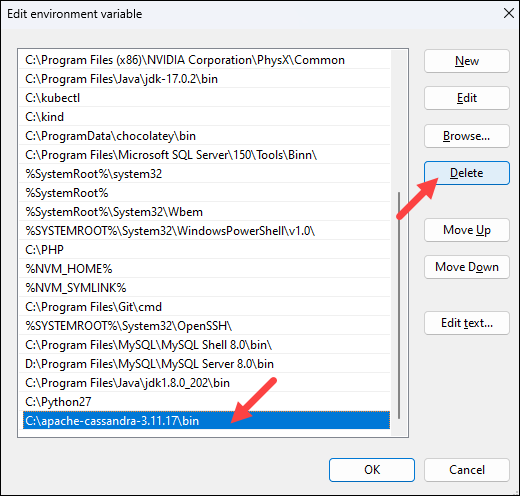
3. Find the PATH environment variable and click Edit....
4. Select and delete the path to the Cassandra bin folder. Press OK in all windows to confirm the changes.
Step 4: Delete Data (Optional)
By default, Cassandra stores its data in the C:\Program Files\DataStax folder. Delete the folder to remove any residual Cassandra data from your computer.
You have now successfully removed Cassandra from your computer.
Conclusion
This article showed how to install, configure, and remove Cassandra on a Windows 11 computer. Cassandra is a popular NoSQL database solution that allows users to capture and store large amounts of data.
Next, see how to use Cassandra in our guide on how to create, drop, alter, and truncate Cassandra tables.
