PostgreSQL is an open-source relational database management system. Users can access PostgreSQL databases via an interactive terminal program, psql, or a graphical interface called pgAdmin.
These tools enable administrators to edit, automate, and execute database queries within PostgreSQL. Both programs are compatible with Linux and Windows.
Follow the steps in this guide to learn how to connect to a PostgreSQL database and start managing your tables and data sets.

Prerequisites
- PostgreSQL installed.
- pgAdmin4 installed.
- Access to a command line/terminal window.
- Sudo or root privileges on Linux.
How to Access a PostgreSQL Database from Linux
PostgreSQL creates a default user account called postgres during the installation. Users can switch to this account to access PostgreSQL databases.
The examples in this guide are presented using Ubuntu 22.04. The same commands work in other Linux distributions.
Connect to PostgreSQL Database via SQL Shell (psql)
Enter the following command to open a bash shell and switch the current user context to the default postgres user:
sudo -i -u postgres
The same command applies if you have created a different user. Simply substitute the postgres user account name with the name of your existing user.
Note: Check out our in-depth article on different ways to create a Postgres user.
Use the following command to access psql, a terminal-based front-end to PostgreSQL:
psql
To retrieve information about the current connection and user, type:
\conninfo
The output helps you determine which user and database you are currently interacting with.
PostgreSQL can support and maintain multiple databases and users simultaneously. Enter the following command to list available users and databases:
\l
Use the \c command and the database name to connect to a different database owned by the postgres user:
\c template1
In this example, the name of the database is template1. Enter the name of the database you want to connect to.
To exit the psql prompt, enter:
\qUse the exit command to leave the postgres Linux command prompt and return to your regular system user:
exit
The logout message confirms the action.
Connect to PostgreSQL Database from Terminal
If all the components of your databases and users are correctly configured, you can bypass the intermediary bash shell and connect to PostgreSQL directly.
Use the following command to log into psql directly from the Linux terminal window:
sudo -u postgres psqlThe -u (user) option causes sudo to run the specified command as a user other than root, specifically the postgres user.

As with the previous method, you can now work on databases by executing queries interactively. Enter \q to exit the prompt.
Connect to PostgreSQL Database via pgAdmin
PgAdmin 4 is a graphical front-end tool for PostgreSQL. It provides a visual, user-friendly environment with many practical database management solutions.
1. Open a web browser and enter the pgAdmin 4 instance URL. For example, if pgAdmin 4 is installed locally, type:
http://127.0.0.1/pgadmin4or
http://localhost/pgadmin42. Enter your credentials to access the pgAdmin 4 dashboard.
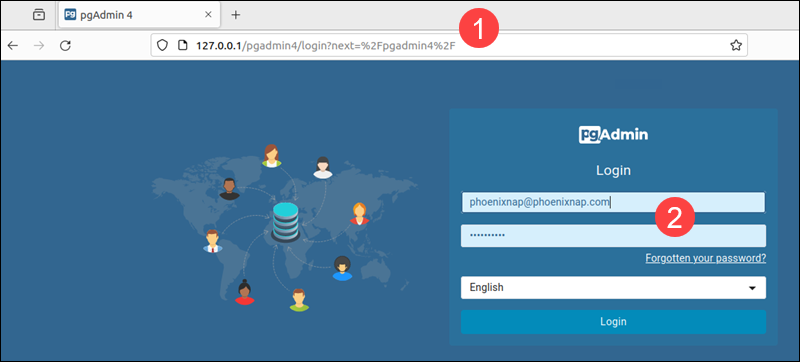
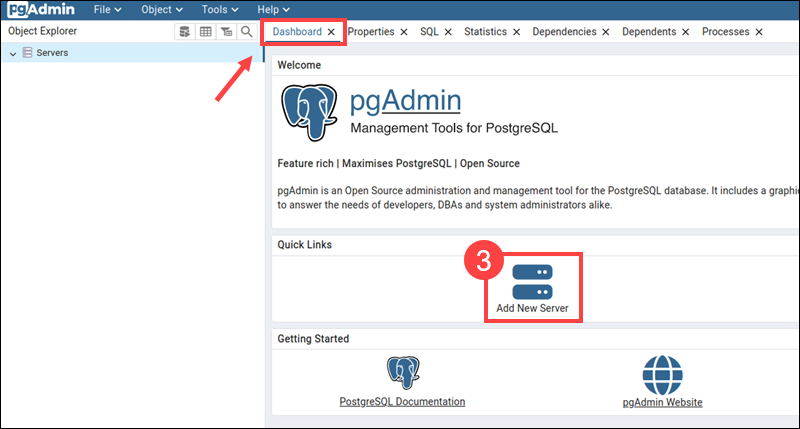
3. Click Add New Server on the Dashboard tab.
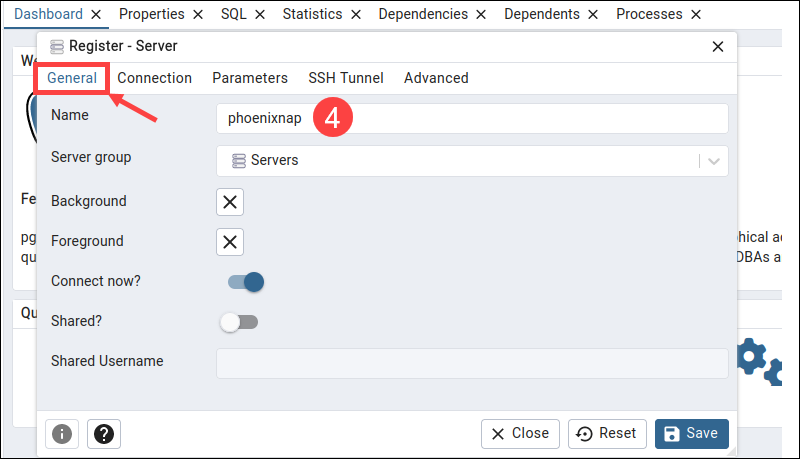
4. Open the General tab and enter a server name in the Name field.
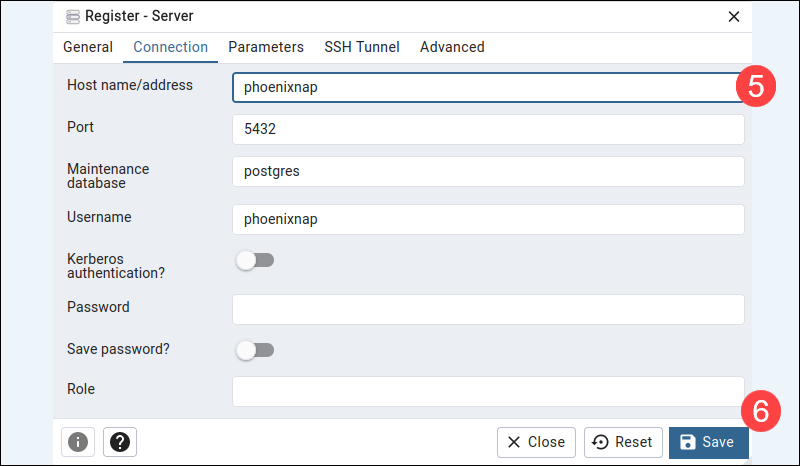
5. Access the Connection tab and enter the server's hostname and database user credentials.
Note: The Host name/address is the location of the machine where the PostgreSQL server is running.
6. Click Save to establish a database connection.
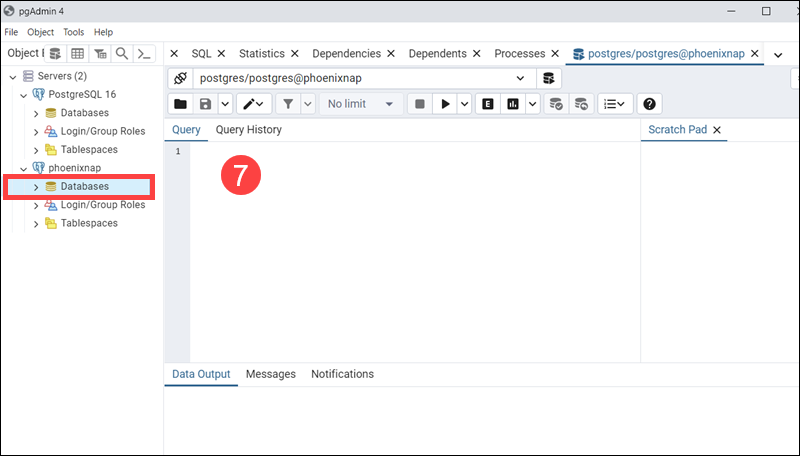
7. The interface provides an overview of the databases that your user account has access to. Press ALT+Shift+Q within the current database to enter and execute queries.
Note: Read our comprehensive guide if you need help creating new databases in PostgreSQL.
How to Access PostgreSQL Database from Windows
On headless servers, the most common way to access PostgreSQL from Windows is via a terminal-based client such as psql.
In environments that support graphical tools, users can utilize pgAdmin 4 or other GUIs like DBeaver and Navicat.
Note: Before proceeding, ensure that you have installed PostgreSQL and added PostgreSQL's bin directory to the Windows PATH environment variable.
Connect to PostgreSQL Database via PowerShell
PowerShell is a built-in Windows shell capable of running standard psql commands. It also has advanced scripting capabilities that allow users to automate database management tasks.
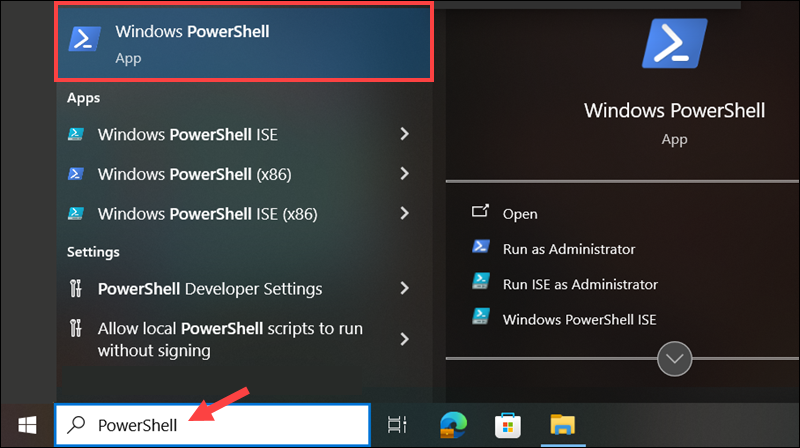
1. Type PowerShell in the Windows Start menu and open the app.
2. Enter the psql command and specify the database name, username, and host:
psql -U [username] -d [database_name] -h [host]Replace:
[username]with your PostgreSQL database username.[database_name]with the name of the database you want to connect to.[host]with the hostname or IP address of the PostgreSQL server.
If the database is on a local machine, you can enter localhost. For example, to connect to a local database called phoenixnap, using the postgres user, enter:
psql -U postgres -d phoenixnap -h localhostIf the database is password-protected, psql prompts for the password.
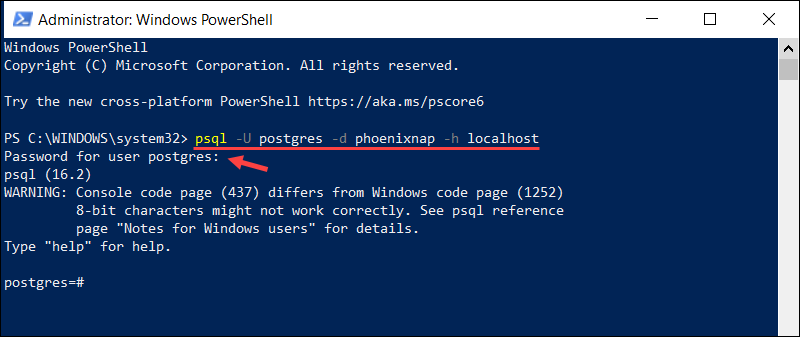
You can now use standard psql commands to manage the database.
Note: The PostgreSQL server uses port 5432 by default. If your server is configured to use a custom port, add the -p [port] option to the psql command to specify the port number.
Type \q to close the connection and exit the psql session.
Connect to PostgreSQL Database via CMD
To connect to a PostgreSQL database from the Windows Command Prompt (CMD):
1. Type Command Prompt in the Windows search bar and launch the app.
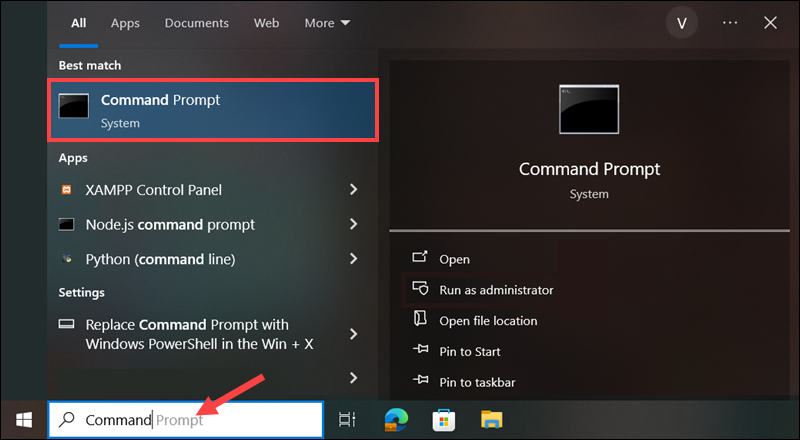
2. Enter the following command to initiate a session as the postgres user:
psql -U postgresThe system prompts you to enter the password for the postgres user. If you already created a different user, replace postgres in the command above with your PostgreSQL username.
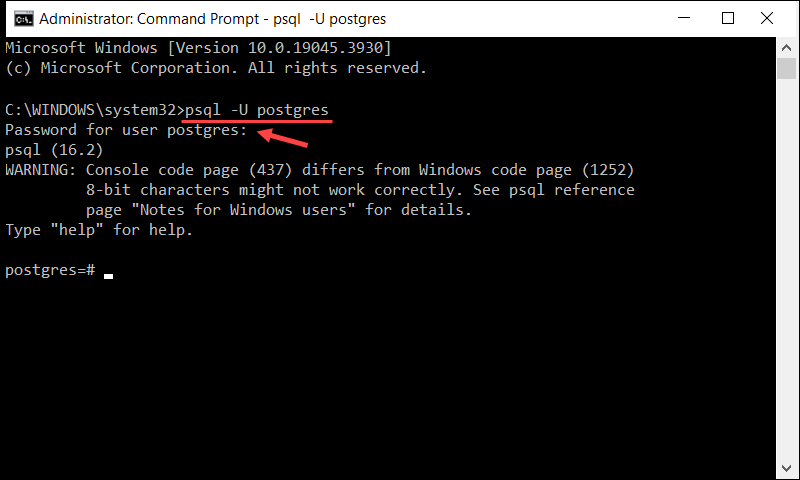
3. To list existing databases, use the \l meta-command:
\l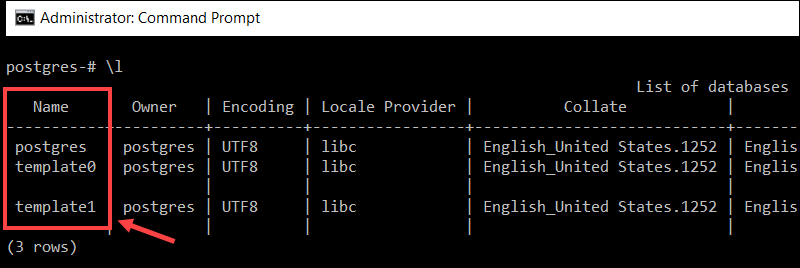
4. To switch to a different database, type \c followed by the database name. For example, to connect to the template1 database, enter:
\c template1
Replace template1 with the name of the database you wish to connect to.
Use the \q command to exit psql and return to the main CMD interface.
Access PostgreSQL Database via pgAdmin
When installing PostgreSQL on Windows, pgAdmin 4 is often included in the installation bundle.
This graphical interface provides an easy, user-friendly way to log in, administer, and shape databases to meet your requirements.
To access a database using pgAdmin 4:
1. Launch pgAdmin 4 from the Start Menu or double-click the desktop shortcut.
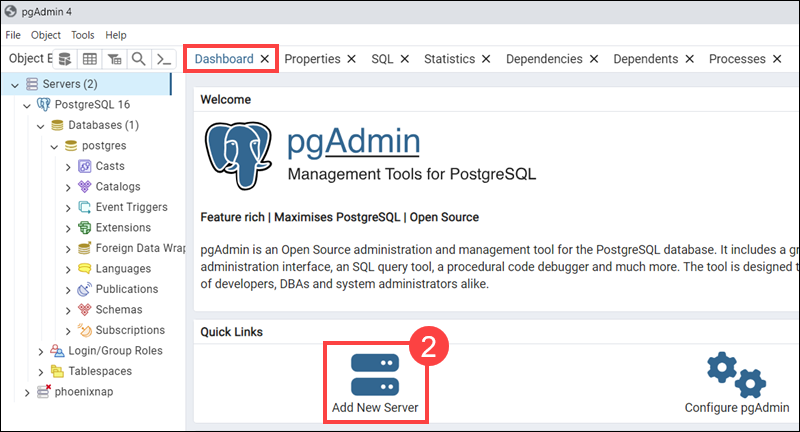
2. Select Add New Server in the Dashboard tab.
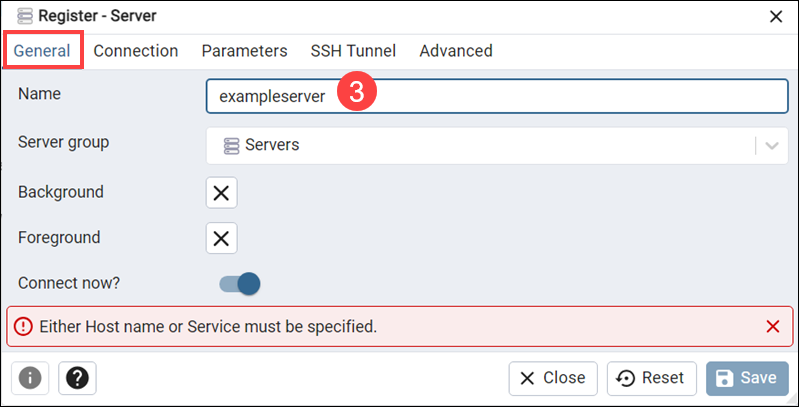
3. Enter the server name in the Name field in the General tab.
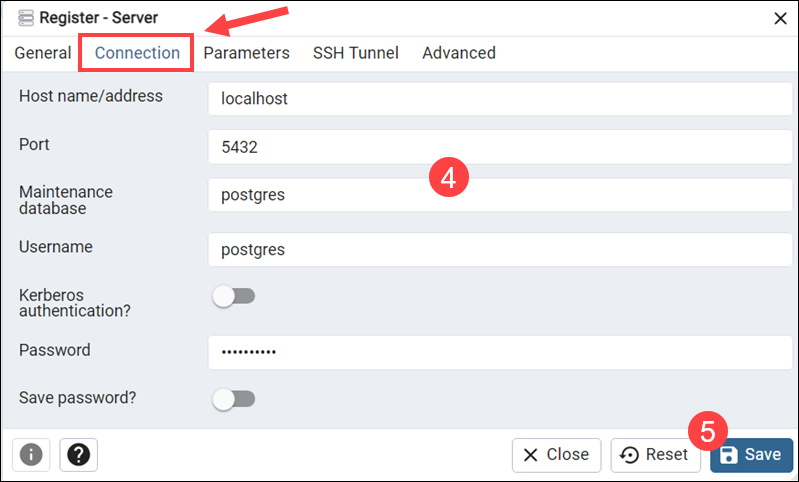
4. Add the necessary server information and credentials to the Connection tab. These include the PostgreSQL hostname/address, port, maintenance database, username, and password.
5. Click Save to establish a connection.
A list of servers and databases appears in the left navigation panel. To start querying a database, right-click a database and select the Query Tool option.
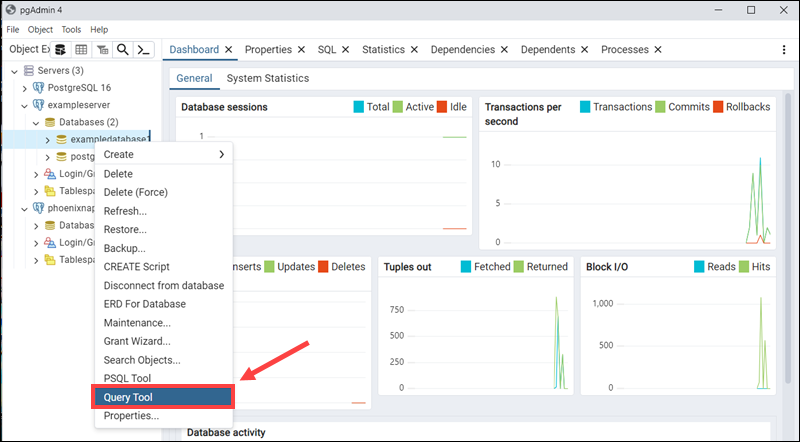
The central field can be used to enter the SQL query.
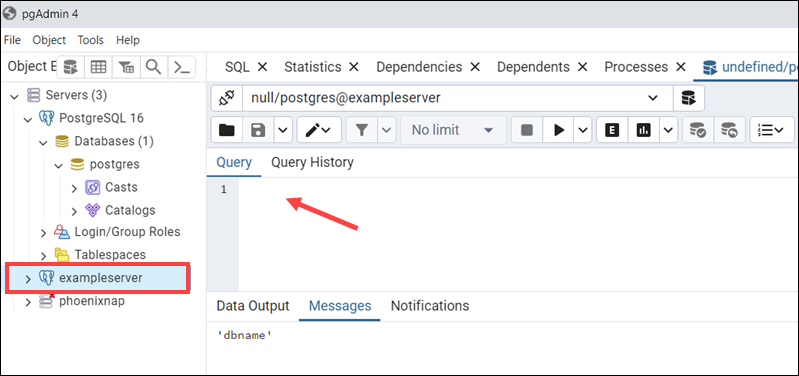
You can also press ALT+Shift+Q to start writing queries for the selected server.
Conclusion
This guide showed you how to connect to your PostgreSQL database on both Linux and Windows servers.
Establishing a connection is an essential first step. Next, explore querying and viewing data within databases using the PostgreSQL SELECT statement.
