Border Gateway Protocol (BGP) allows the dynamic exchange of routing information between autonomous systems on public networks. Bare Metal Cloud supports BGP for dynamic routing and region route steering, route failover, and equal cost multipathing (ECMP).
This guide shows how BGP works within Bare Metal Cloud and provides BGP-related information.
Prerequisites
- BMC portal credentials. If you are a new client, create an account for Bare Metal Cloud.
- (For BGP peering) At least one deployed server connected to a server network or a public network.
- (For BGP peering) A BGP-compatible package, software, or virtual machine running on the server.
BGP Features on BMC
The following sections describe how BGP works within phoenixNAP's Bare Metal Cloud. Use the sections as references when setting up BGP on your account.
Peering
BMC supports peering with IP blocks associated with server public addresses or public networks. Both server and public network IP blocks can peer with the phoenixNAP BGP endpoints, provided they are in the same account. BMC supports both IPv4 and IPv6 BGP sessions, handled as separate peering sessions.
The following information is necessary to establish peering in BMC successfully (any non-specific properties are shared by both IPv4 and IPv6 address families):
- phoenixNAP's peering router IP loopback addresses are:
- IPv4: 169.254.247.0 and 169.254.247.1
- IPv6: fd00:0:0:1005::1 and fd00:0:0:1005::2
- eBGP multihop of 7 for peering with phoenixNAP's BGP endpoints.
- The phoenixNAP ASN and the default tenant ASN are 65400 and 65401, respectively.
- BGP Keep Alive and Hold timers at 10 seconds and 30 seconds, respectively.
Note: Under regular operation, ensure peering is established with both BMC BGP endpoints to provide redundancy.
Currently, BMC does not support the following types of peering:
- Peering over private IP addresses.
- Loopback peering with logical or loopback interfaces on servers.
Prefix Advertisement
Any IP block associated with an account can be advertised to the BGP endpoints, including blocks bound to a server network, public network blocks, and unassigned IP blocks. Advertisements can be of any size, from /32 for IPv4 or /64 for IPv6 up to the exact match for the associated IPv4 or IPv6 block.
Advertising the following address types does not work or may potentially negatively impact your BMC experience:
- Network addresses as a /32.
- Gateway addresses as a /32.
- Network and gateway addresses as a /31.
- Broadcast addresses as a /32.
- IP addresses utilized for BGP peering as a /32 or a longer match when compared to a deployed server network or public network.
- An exact match of the IPv4 or IPv6 CIDR used on server networks or public networks.
- IPv4 or IPv6 blocks not bound to your account.
- Activating an address family different than the peering family. Peering over IPv4 and activating the IPv6 address family or vice versa.
When advertising in BMC, you should familiarize yourself with the following terms:
- Local vs. Global BGP. How long a prefix is and how it propagates within or outside BMC.
- Prefix Origin. The Internet placeholder route origin.
- Bring-Your-Own ASN & IPs. User-owned IPs and ASNs utilizing BMC as a transit network for reachability.
The following sections explain the terms mentioned above in more detail.
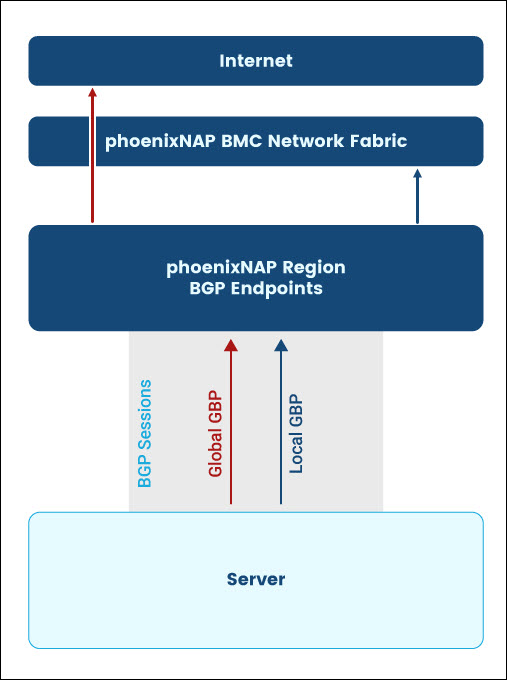
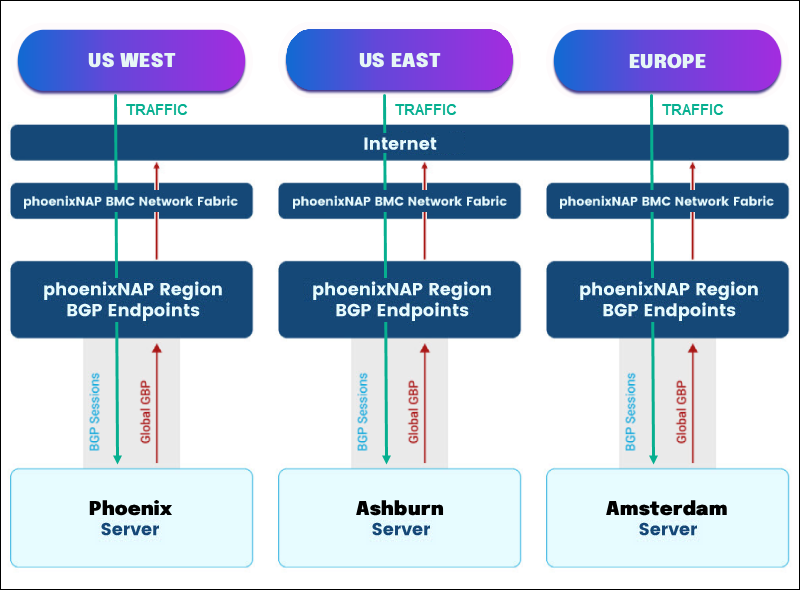
Local BGP vs. Global BGP
Local BGP includes any prefix that does not appear in the Global Internet Routing Table. In BMC, Local BGP advertisements range from /25 to /32 for IPv4 and /49 to /64 for IPv6.
Use Local BGP with Global BGP to divert longer-match prefixes to desired destinations within a region. Additionally, Local BGP can help achieve Equal-Cost Multi-Path (ECMP) deployments of up to 6 active best paths.
Global BGP includes any prefix visible on the Global Internet Routing Table. Advertisements of /24 or larger for IPv4 and /48 or larger for IPv6 fall under this category. The user can achieve Global BGP in BMC by:
- Using BYO IPs and prefixes originating from phoenixNAP's ASN.
- Using BYO ASN with BYO IPs.
- Purchasing an IPv4 /24 or larger IP block from phoenixNAP and using it with Global BGP through your default private ASN. To use Global BGP in this way, please contact support.
Note: All servers within a region support Local and Global BGP for the IPs bound to the user's account within a region. The local and Global BGP advertisement strategy depends on the use case.
Below is a diagram illustrating the difference between Local and Global BGP:
Prefix Origins, RPKI, and ROA
A prefix origin device is the origin of a Global BGP advertisement. For BYO prefixes utilized over BGP, the user is responsible for originating the Global BGP route and any Local BGP routes from their servers. If transitioning from using BYO prefixes on public or server networks to using them over BGP, please contact support to avoid route origin issues.
Note: To achieve stability, phoenixNAP recommends you to origin a Global BGP advertisement from multiple servers.
Maintaining Resource Public Key Infrastructure (RPKI) Route Origin Authorization (ROA) entries is highly recommended for prefix hijack prevention. When using BYO Prefixes and phoenixNAP as your route origin, the phoenixNAP region ASN will need to be used for your ROA entries. This functionality is provided via the 'rpkiRoaOriginAsn' API field, i.e., phoenixNAP's public ASN for the region.
BMC-provided IPv4 /24 prefix blocks or larger can be advertised over BGP as a route origin, with phoenixNAP responsible for ROA entries. However, your public ASN will appear as the originating ASN on the Global Internet routing table.
When the user is responsible for prefix origin, it's crucial to ensure that the prefix is stable and constantly visible to the rest of the Internet. Advertisement flaps can trigger BGP route-dampening in parts of the Internet and cause connectivity issues while dampening rules are in effect.
Prefix Receipt
BMC has the capability of sending default routes, or no routes, to your peers. This configuration applies to all your peers in a single region. If you want to receive the default route from BMC, be aware of the capabilities and defaults of the BGP package you use. Certain BGP packages require further route processing rules to avoid interfering with your host's default gateway, potentially causing your peer to constantly flap at the set hold timer.
It is highly recommended that you utilize additional static routes for your management sessions to facilitate troubleshooting while validating your desired BGP topology.
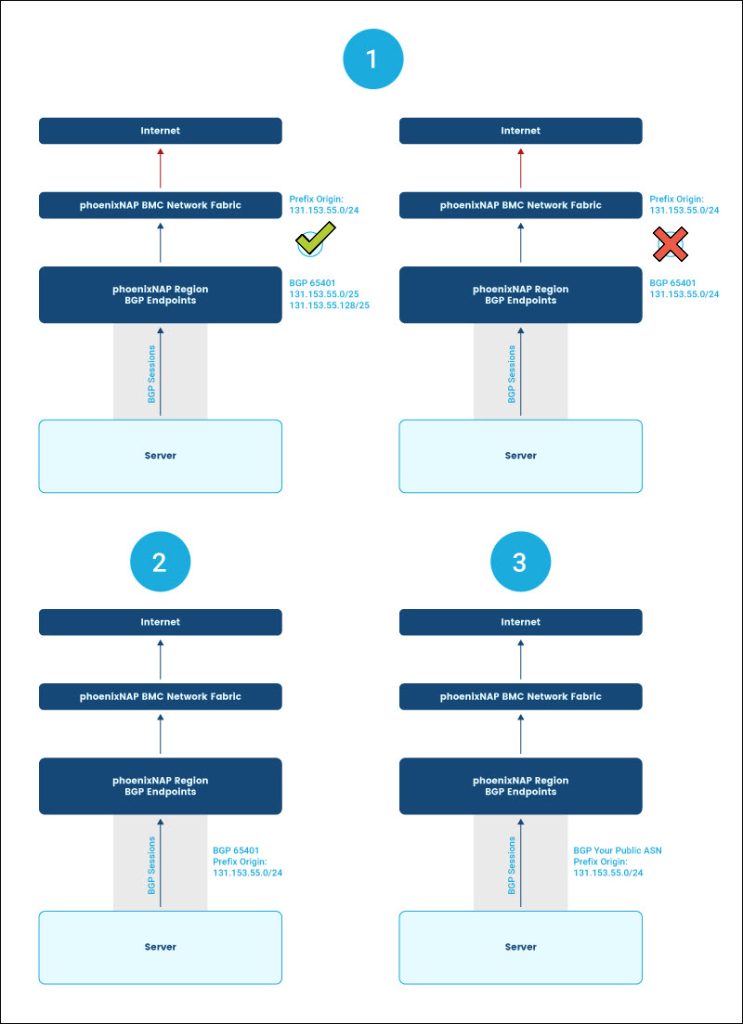
Bring-Your-Own IPs and Prefixes
Prefixes must always be onboarded, even in a BYO ASN use case. Ensure that any prefixes you want to advertise are onboarded to your account and in the correct advertising location.
Utilize onboarded BYO IPs in the following ways:
- With a phoenixNAP ASN-originated prefix. In this case, phoenixNAP is responsible for Internet-level route origin stability. This method is unsupported if you intend to use the exact match prefix on a public network.
- Advertised to BMC via the default 65401 ASN. The user is responsible for prefix origin backing the Internet table route and route advertisement stability. Exact match and longer match prefixes can be advertised.
- With BYO ASN. The user is responsible for prefix origin backing the Internet route table and route advertisement stability. Exact match and longer match prefixes can be advertised.
The diagram below illustrates the ways to utilize BYO IPs.
Bring-Your-Own ASN
A BYO ASN is a public ASN obtained through a Regional Internet Registry (RIR). BYO private ASNs are not supported. Ensure the following prerequisites are met before using BYO ASN:
- The Abuse contact within RIR is up to date in the abuse-c field for ARIN, RIPE, APNIC, LACNIC, or the abuse-mailbox field for AFRINIC within your org object (org:).
- The org object is referenced under aut-num or within the abuse-c field directly within the aut-num object.
- All the prefixes are correctly associated with the ASN using route objects, an AS-SET object, or defined in the respective RIR's Internet Routing Registry (IRR) database. phoenixNAP only accepts aut-num or as-set objects from the RIR to which the ASN is registered.
- Relevant prefixes are imported into BMC. For more information, see our BYO IP page.
- The abuse contact email address is set up to receive phoenixNAP communication.
Note: Originating phoenixNAP-provided prefixes from your own ASN is supported. However, phoenixNAP appears as the origin at the Internet level.
Inputting your public ASN triggers a vetting process, and phoenixNAP support staff requests information through the RIR-listed abuse contact. Unless you receive a reply with the requested information within four business days, the request for BYO ASN fails.
Warning: Once approved, the ASN changes instantly. Any established BGP sessions will be torn down. Exercise caution if transitioning from the default BGP ASN to a BYO ASN.
After a BYO ASN is verified, allow 24 hours for our upstream providers to start accepting your BYO IPs. The same applies to any alterations performed to a BYO IP's as-set object in the RIR’s IRR. Users can immediately utilize any prefixes purchased through BMC.
Note: BMC accepts validated BYO ASN only in the location it has been validated in. Utilizing your ASN to transit prefixes originating from any ASN other than your validated ASN is not supported.
If you require further information about how to create and maintain IRR objects within RIR, please reference your respective RIR's documentation:
Prefix Limit
phoenixNAP has a limit of 50 IPv4 and 10 IPv6 prefixes per neighbor. If you exceed the prefix limit on a peer, you need to contact phoenixNAP support to reset the session manually.
Unassigned Prefixes
Unassigned prefixes are prefixes that are imported into phoenixNAP's BMC but are not registered as bound to any specific resource. These prefixes can be captured using the "inUse" field in the BMC API.
Communities
Bare Metal Cloud allows the sending of communities. However, these are non-transitive.
If the community is not defined as a parsable community within this section, it will be ignored and stripped from the route information. If another specific behavior is desired, contact support with your request so it can be evaluated.
Bring-Your-Own IPs and Anycast
Anycast is a networking mechanism by which a single IP address can be assigned to multiple devices across different geographical locations. This configuration enables end-clients to connect to their nearest location, providing a lower-latency experience for the service. For any deployed topology, application-level considerations will most likely apply and will be specific to your desired setup.
The Bare Metal Cloud (BMC) supports Anycast for both IPv4 and IPv6 address families.
Anycast in Local BGP Scenario
In the Local BGP scenario, the Anycast mechanism is best thought of as an Equal-Cost Multi-Path (ECMP) function, aligning with the scenario described in the ECMP section of this document. This type of Anycast is limited to operation within a single datacenter.
The Local BGP rules described in the Local BGP vs. Global BGP section apply here. Furthermore, the user needs to have multiple servers advertising the same prefix.
This method applies only to prefixes onboarded within a single location. If the same prefix is required in multiple locations, Global BGP is the only supported method.
Anycast in Global BGP Scenario
Global BGP is supported and can be advertised to the Bare Metal Cloud via the default ASN 65401 or through the BYO ASN method of advertisement. Prefixes that require an Anycast setup must be onboarded in all locations that need this type of configuration. In the case where prefixes are advertised to the BMC via the default ASN 65401, you will need to create a ROA entry for every data center where Anycast is enabled.
Global BGP prefix size minimums of /24 for IPv4 and /48 for IPv6 apply.
Originating the Prefix Origin to the Internet is the user's responsibility. The user also manages withdrawals should a node require removal from the Anycast setup.
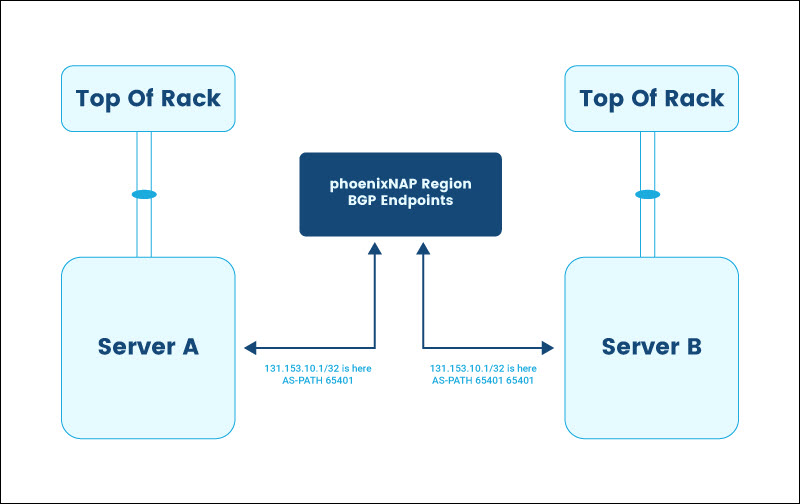
AS-PATH Prepends
Use AS-PATH prepends to achieve automatic failover. phoenixNAP only allows AS-PATH prepends using the ASN associated with the regional BGP settings. The following diagram provides an example of allowed AS-PATH prepends:
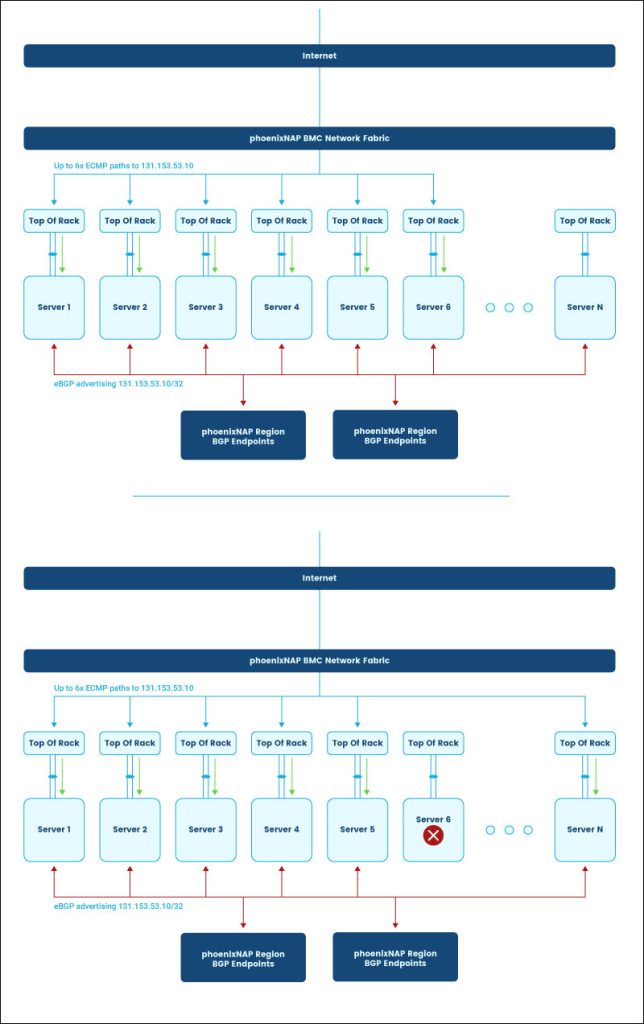
Equal-Cost Multi-Path (ECMP)
A prefix can be advertised to phoenixNAP BMC from multiple client BGP endpoints. There is no technical limit to how many endpoints advertise a prefix.
phoenixNAP allows up to six active best paths towards the same prefix achieving ECMP, as shown in the diagram below:
BGP Peer Group Management via Portal
The BMC portal has a graphical interface for creating, viewing, editing, and deleting BGP peer groups. The sections below explain how to manage BGP peer groups.
Note: phoenixNAP recommends testing any BGP failover and route advertisement before putting it into production.
Create BGP Peer Group
Enable BGP capability in BMC by creating a peer group in the desired region.
Note: Peering is only supported with IP Blocks associated with server public addresses or public networks. Peering over private IP addresses is not supported at the moment. Enabling a BGP peer group in a location enables peering capability for both IPv4 and IPv6 address families.
Proceed with the steps below to create a BGP peer group in the BMC portal:
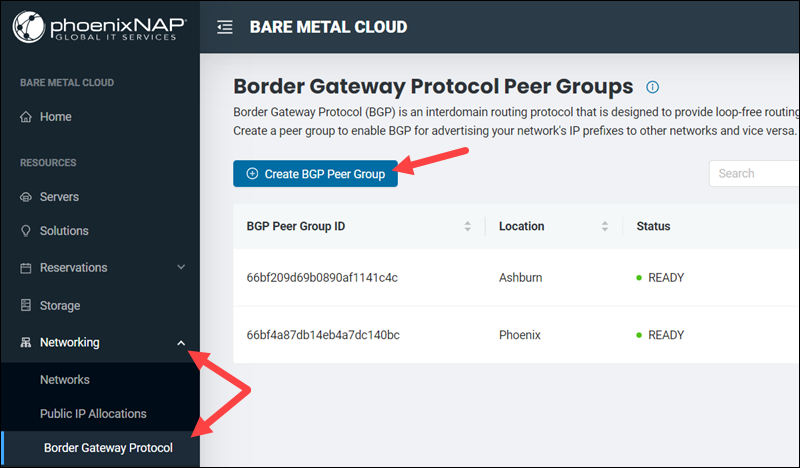
1. Log in to the BMC portal.
2. Select Networking from the menu on the left side of the screen.
3. Click Border Gateway Protocol from the Networking menu. Border Gateway Protocol Peer Groups page opens.
4. Click the Create BGP Peer Group button.
5. Select the peer group location. The location field is the only mandatory field for peer group creation.
6. Optionally, enter your Autonomous System Number (ASN). All the sessions within a region will utilize this ASN. If you leave this field blank, phoenixNAP will provide a private ASN, which is 65401 by default.
Note: You can switch between the default ASN & BYO ASN anytime. Altering your ASN in a region will tear down any BGP-established sessions once the new ASN takes effect.
7. Optionally, select Enable Default Routing to advertise the default route. If you leave the option unchecked, phoenixNAP's BGP endpoints will not advertise any routes to your BGP endpoints.
8. If you want to specify a custom password, type and confirm the entry. The password should be between 8 and 32 characters long. Allowed characters are [a-z][A-Z][0-9][!@#$%^&*()-/|\[]{}=;:<>,.]. If you leave the fields blank, the system automatically creates the password.
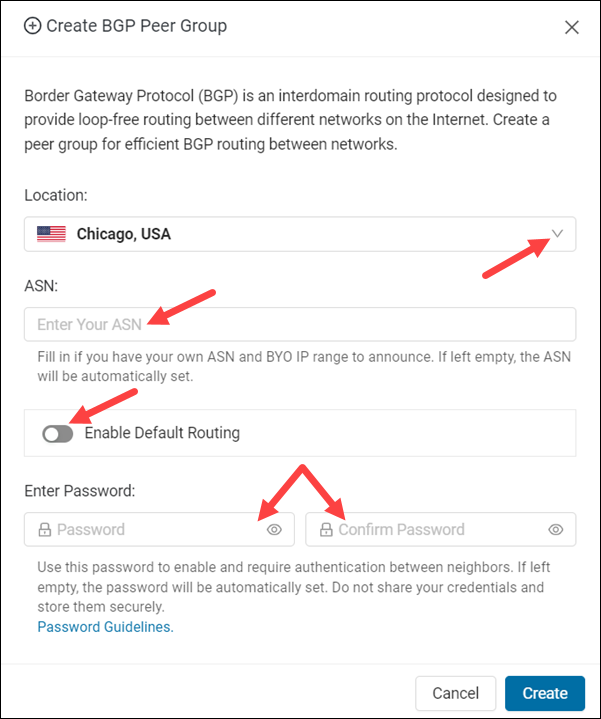
9. Click Create to finish creating a peer group.
View Available BGP Peer Groups
Once created, the new BGP peer group appears on the list on the Border Gateway Protocol Peer Groups page.
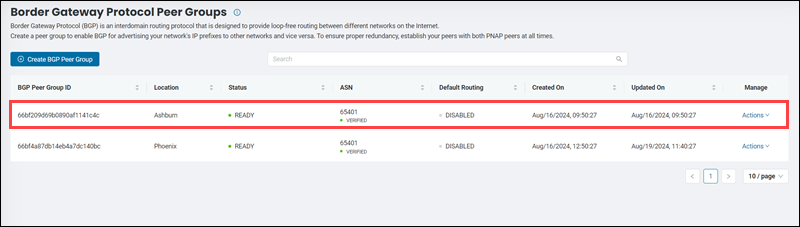
The list contains the following columns:
- BGP Peer Group ID. A unique alphanumeric string for the BGP peer group.
- Location. The location of the BGP peer group.
- Status. The current state of the BGP peer group. Possible statuses are:
PENDING: A BGP Peer Group was created or updated. However, the system still needs to propagate the changes.BUSY: The system is currently configuring the requested changes.READY: The BGP Peer Group is ready for use.ERROR: An error occurred while trying to update the configuration of the BGP Peer Group. The system will make another attempt to complete the configuration. In the meantime, the user can make changes to rectify the BGP Peer Group configuration.PENDING DELETION: The BGP Peer Group has been marked for deletion and will be removed shortly. Any related resources, such as IP Block Allocations, are still attached to the BGP Peer Group until removed.DELETING: The BGP Peer Group configuration is being removed.
- ASN. The Autonomous System Number.
- Default Routing. The state of the default routing option. The values can be
ENABLEDandDISABLED. - Created On. The BGP peer group's date and time of creation.
- Updated On. The date and time of the BGP peer group's last update.
- Manage. The column hosting the Actions menu.
Note: BGP is a slow-running process. As you add or remove resources, please allow 10 minutes for your newly bound resources to take effect.
Edit BGP Peer Group
Note: Note: Editing the BGP password, ASN or toggling the default routing parameters impacts both IPv4 and IPv6 address families.
Edit a BGP peer group by following the steps below:
1. Select the Actions item in the Manage column for the respective peer group.
2. Click Edit BGP Peer Group to open the dialogue box.

3. Change the ASN by typing another number in the ASN text box. You can only input a public ASN.
4. Enable or disable default routing by selecting the switch.
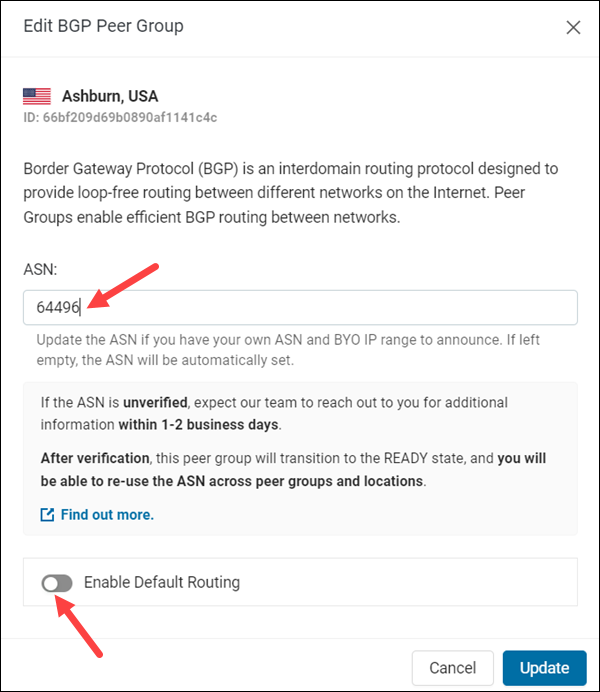
5. Click Update to finish editing the BGP peer group and save the changes.
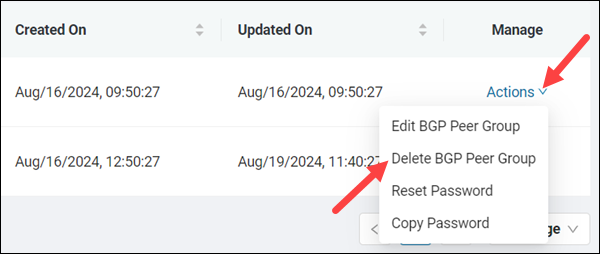
Delete BGP Peer Group
The following steps describe how to delete a BGP peer group:
1. Select the Actions item in the Manage column for the respective peer group.
2. Click Delete BGP Peer Group from the menu.
3. Type your login email in the text box.
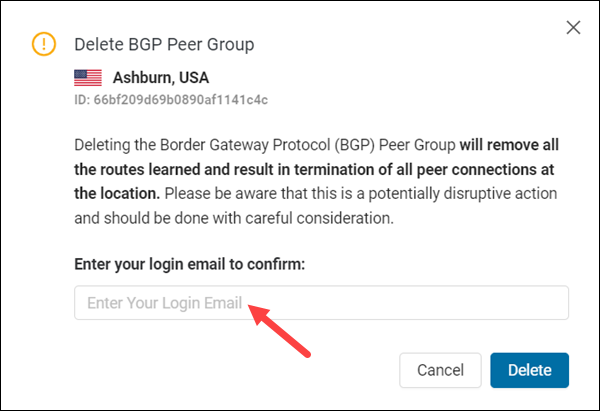
4. Click Delete to confirm the deletion.
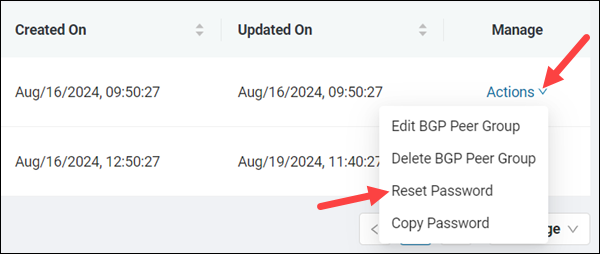
Reset Password
If you want to change your password, use the steps below to reset it and create a new one:
1. Select the Actions item in the Manage column for the respective peer group.
2. Click Reset Password in the Actions menu.
The Reset Password dialog appears.
3. Type a new password in the left field. Then, confirm the password by retyping it in the right field.
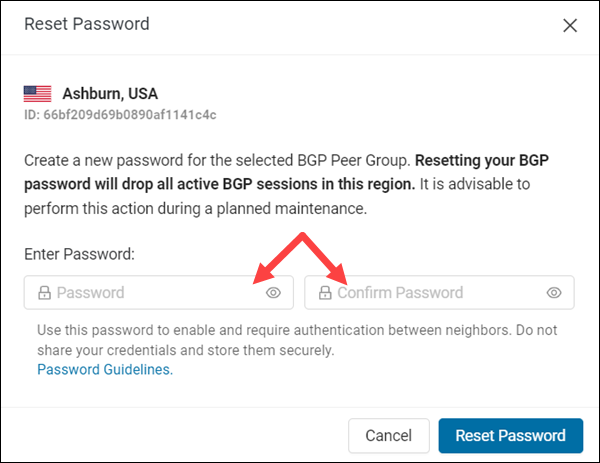
4. Select the Reset Password button to activate the new password.
Note: Altering the BGP password for a region will tear down any BGP established sessions once the password takes effect.
Copy Password
To copy the password to a clipboard:
1. Select the Actions item in the Manage column for the respective peer group.
2. Choose Copy Password from the Actions menu.
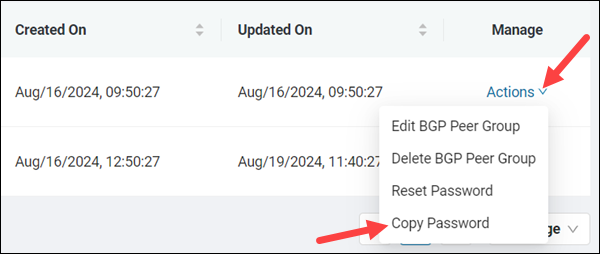
The password is copied to your clipboard.
BGP Peer Group Management via API
BMC BGP API allows you to create, view, update, and delete BGP peer groups. The following sections explain how to use API requests to manage BGP peer groups in BMC.
Create BGP Peer Group via API
Create BGP peer groups by using the POST request. The HTTP request URL for creating a BGP peer group is:
https://api.phoenixnap.com/networks/v1/bgp-peer-groups/The property consists of four fields:
location(mandatory)asn(optional)password(optional)advertisedRoutes(optional)
Define the location of the BGP peer group in the location field. Use the following syntax:
{
"location": "[cluster-location-code]"
}
The following is the list of available locations with their corresponding location codes:
- Phoenix (
PHX) - Ashburn (
ASH) - Singapore (
SGP) - The Netherlands (
NLD) - Chicago (
CHI) - Seattle (
SEA)
This field must be provided. You can create one peer group per location.
Use the asn field to provide an ASN for the peer group. You can only input a public ASN. The syntax is:
{
"asn": "[asn-value]"
}Note: If the asn field is omitted, the ASN number defaults to the PNAP ASN (65401).
The password field allows you to create a custom password for the peer group:
{
"password": "[value]"
}
The allowed characters for the password are [a-z][A-Z][0-9][!@#$%^&*()-/|\[]{}=;:<>,.]
Note: If the password field is omitted, the password is automatically generated and returned in the output.
The advertisedRoutes field provides a way to specify advertised routes:
{
"advertisedRoutes": "[value]"
}
Supported advertised routes are DEFAULT and NONE.
Note: If the advertisedRoutes field is not provided, the field defaults to the NONE value.
View BGP Peer Groups via API
To see all BGP peer groups, send the request to the following URL:
https://api.phoenixnap.com/networks/v1/bgp-peer-groups/To view a single group, provide its ID as the id environment variable.
Update BGP Peer Group via API
Update a BGP peer group by sending a PATCH request to the following URL:
https://api.phoenixnap.com/networks/v1/bgp-peer-groups/:idSpecify the group's ID as the value of the id path variable.
Use this request to update one or more of the following fields:
asn- Provide a custom ASN.password- Create a new password.advertisedRoutes- ChangeadvertisedRoutesvalue fromDEFAULTtoNONEand vice versa.
The following is the syntax for this PATCH request:
{
"asn": [asn-number]
"password": "[password]"
"advertisedRoutes": "[value]"
}
Delete BGP Peer Group via API
Delete a BGP peer group by sending a DELETE request to the following URL:
https://api.phoenixnap.com/networks/v1/bgp-peer-groups/:idSpecify the group ID via the id path variable.
Conclusion
This article introduced you to using the Border Gateway Protocol (BGP) feature in phoenixNAP Bare Metal Cloud. It also provided instructions on setting up and managing BGP peer groups in the BMC portal and via the API.
For more information about APIs, refer to the BMC BGP API. To learn more about the BMC portal features, read our BMC Portal Quick Start Guide.