The Bare Metal Cloud portal and the Network Storage API offer a flexible way to expand storage capacity on a network through Network File Storage (NFS). The storage solution provides the performance of a general-purpose SSD on demand at an affordable price.
High-throughput and latency-sensitive projects benefit from adding NFS, allowing servers to grow in capacity and performance through a distributed file system.
This guide provides a complete overview of the BMC Network File Storage feature via the BMC portal and the Network Storage API.
Prerequisites
- BMC portal credentials. Create an account for Bare Metal Cloud to deploy a server.
- A Windows or Linux server deployed on Bare Metal Cloud.
- Access to the command line/terminal to mount the volume with administrator/sudo privileges.
BMC Network File Storage (NFS) via Portal
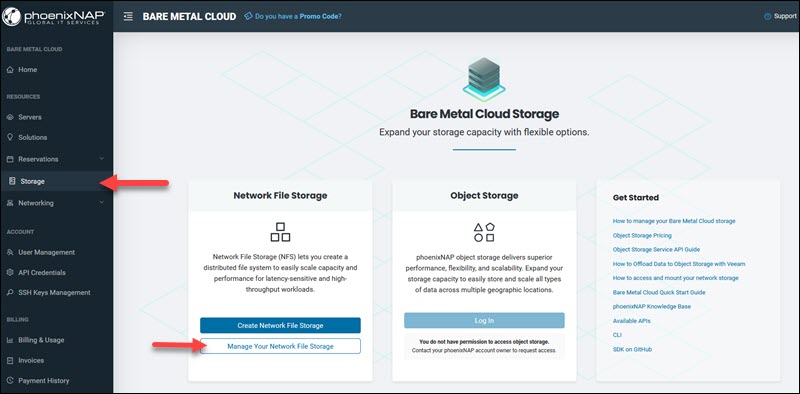
The Storage section lets you expand your BMC storage on-demand. Use this feature to increase storage capacity through a private network attached storage with SSD performance.
Note: A network file storage creates a private network. Only servers in the same network have access to the storage.
Create Network File Storage
Log into the BMC portal and navigate to the Storage page. Three sections appear on the page, including Network File Storage.
The Storage page allows you to create a network file storage or manage an existing one.
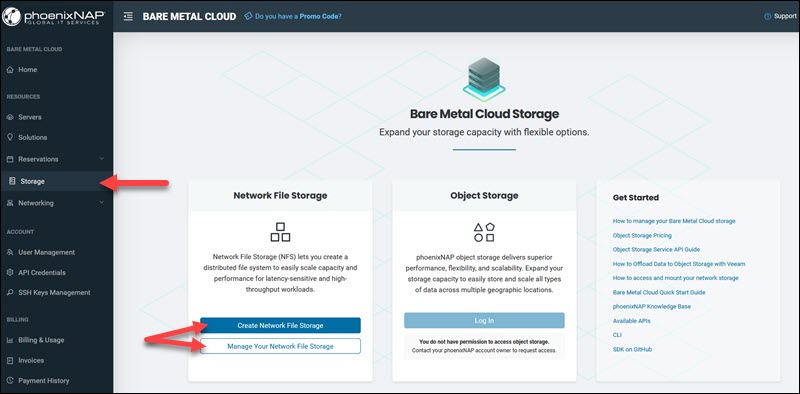
Select the Create Network File Storage button to start the creation process.
1. Choose the data center location for the network file storage.
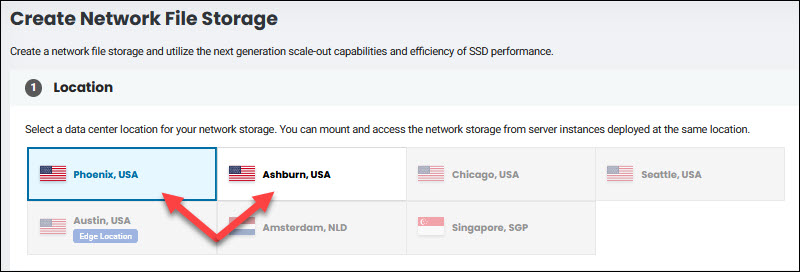
Note: The network file storage and the deployed server instance must be in the same location. The available data center locations are Phoenix and Ashburn. Additionally, only one storage and one volume are available per network.
For example, to create a network file storage for servers deployed in Phoenix, choose Phoenix for the storage location. A matching location enables accessing and mounting the storage to a server.
The network storage creates a private network for the provided location. You cannot create network file storage if you have reached the maximum number of networks.
2. Enter a descriptive name in the Storage Name field. Open the Add Description dropdown to add an optional description.
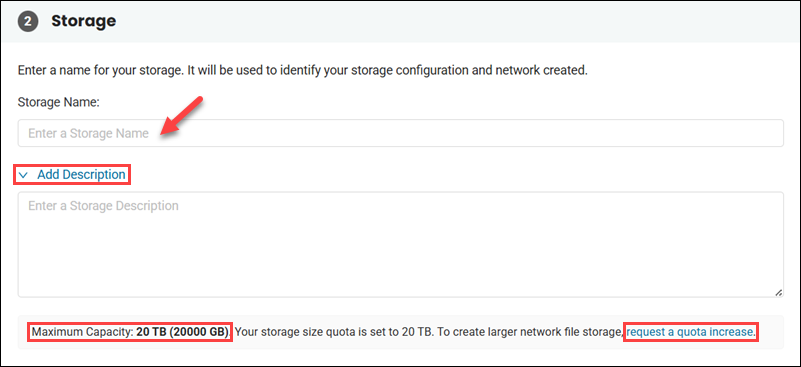
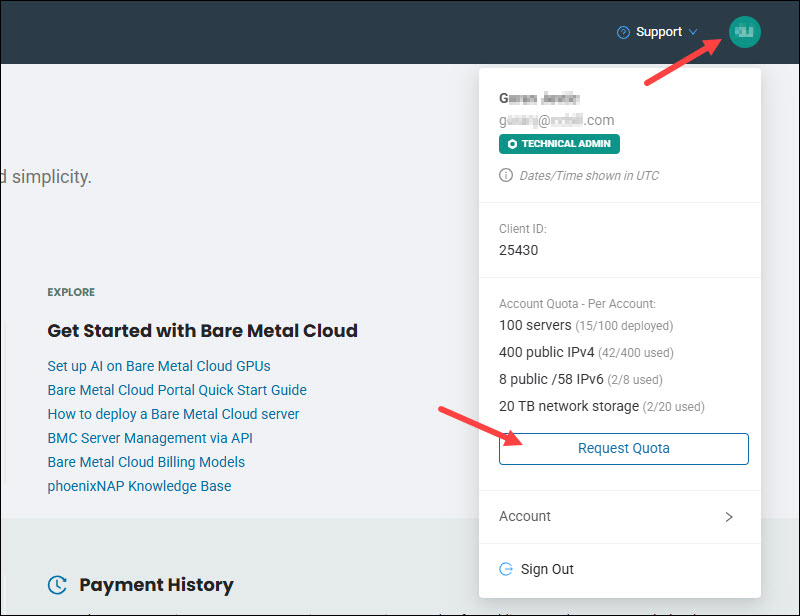
The end of the Storage section states the maximum capacity. To increase the size, click the request a quota increase link. The link is also available in the top-right profile menu.
3. Enter a Volume Name to help identify the storage volume.
4. Add a Path Suffix for the volume. Open the Add Description dropdown to provide an optional description for the volume.
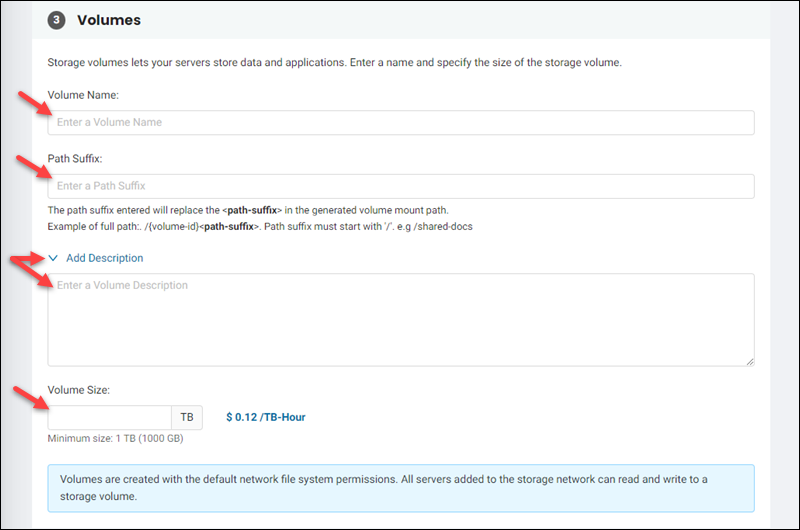
The suffix represents a custom part of the volume path and helps visually identify a volume. The path suffix is optional but recommended.
5. Set the volume size in TB. The size cannot exceed the maximum capacity stated in the Volumes section. The price per TB-Hour is next to the volume size. For more information, refer to the billing models article.
Note: The total price is calculated based on the quantity and unit price. Quantity is a calculated value that depends on the volume size and the number of hours.
For example, a 1TB storage used for 10 hours yields a quantity of 10 TB-hours (1TB*10h).
For a storage with a quantity of 10TB-hours at a unit price of $0.12 per 1TB-hour gives a total price of $1.20 (10TB-hours * $0.12).
6. Review the network file storage in the summary box. Click Create Network File Storage when ready to complete the creation process.
The network storage list loads. While the storage creation is in progress, the status is set to BUSY. You cannot delete the storage until the status changes.
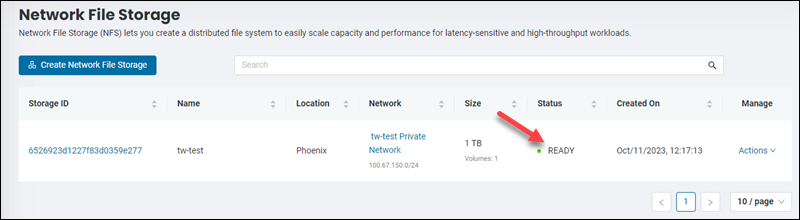
When completed, the status changes to READY. If the status is ERROR, try repeating the creation process or contact support for further assistance.
View Network Storage Details
To see the details of a network storage:
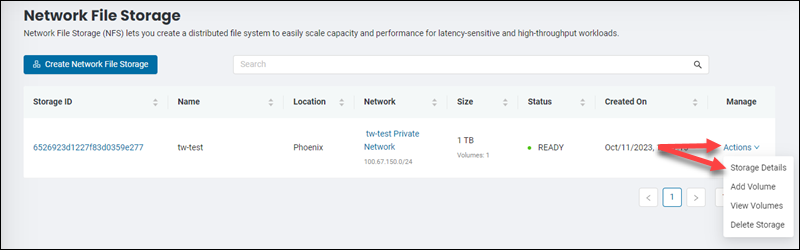
1. Navigate to Storage -> Manage Your Network File Storage.
The page shows brief details about your storage. The columns include storage ID, name, location, network, size, creation time, and the management column.
2. Locate the network file storage for which you want to view the details.
3. Click Actions -> Storage Details.
The storage details page loads with the Storage Info and Volumes tabs.
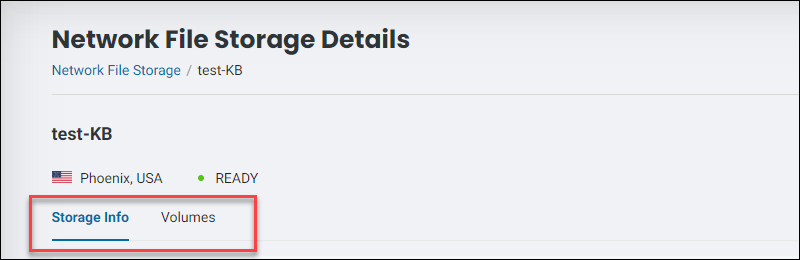
Storage Info
The Storage Info tab shows the following sections:
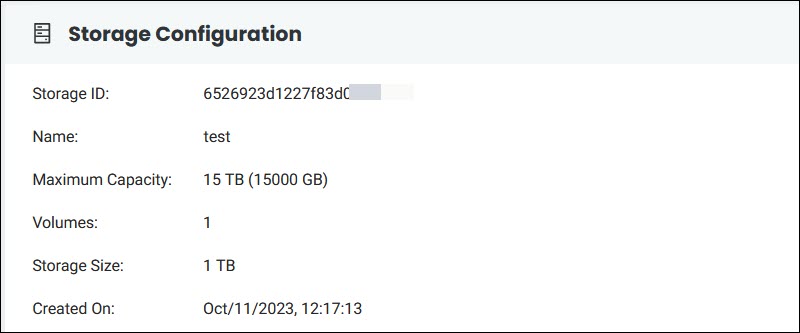
- Storage Configuration. Shows the basic details about the storage, such as the storage ID, name, maximum capacity, the number of volumes, the storage size, and the date of creation.
- Storage Network. Displays the private network information for the network storage and its IP addresses. The details include the network ID, name, CIDR, VLAN ID, the IP addresses of the storage network, and the number of IPs in use. The server instances on this network can mount and access the NFS. Click the Private Networks link to add/remove servers to the storage network. More information on adding and configuring servers in the storage network is in the following section.

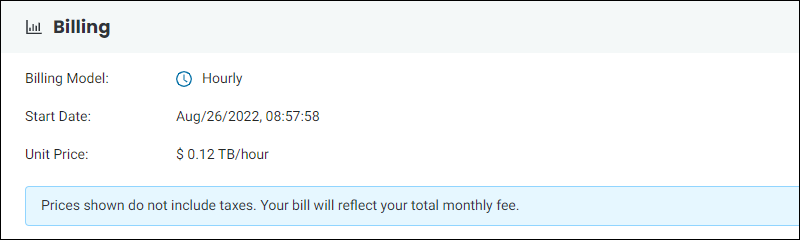
- Billing. Shows the billing model, the start date, and the price per unit (measured in TB/hour).
Volumes
The Volumes tab shows the following volume details:
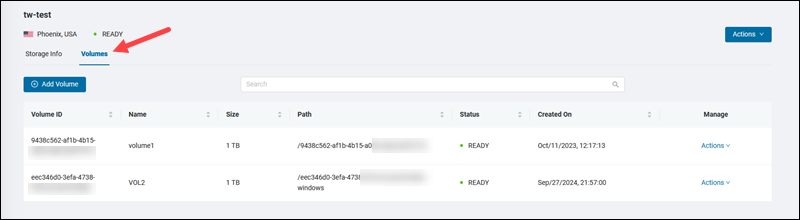
- Volume ID. A unique identifier for the volume. Note the information if you plan to use the API to view and manage the volume.
- Name. The volume name in a human-readable format.
- Size. The volume size in GB.
- Path. The path is the combination of the Volume ID and path suffix provided during creation. Use this information to mount the storage.
- Status. Shows the status of the volume as either BUSY, READY, or ERROR.
- Created on. Displays the creation time for the volume.
- Manage. Contains the option to edit or delete the volume, and the link to the mount command for Linux-based servers. The volume must be in a READY state, and the server must be on the same private network to mount. Click the Mount Command link, copy the command, and run on a server instance to mount the volume. Replace <local directory> with the path to a local empty directory.
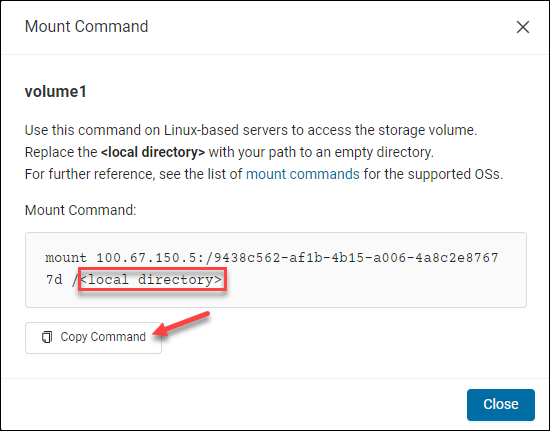
Click Close to close the Mount Command box.
Add Server to Storage Network
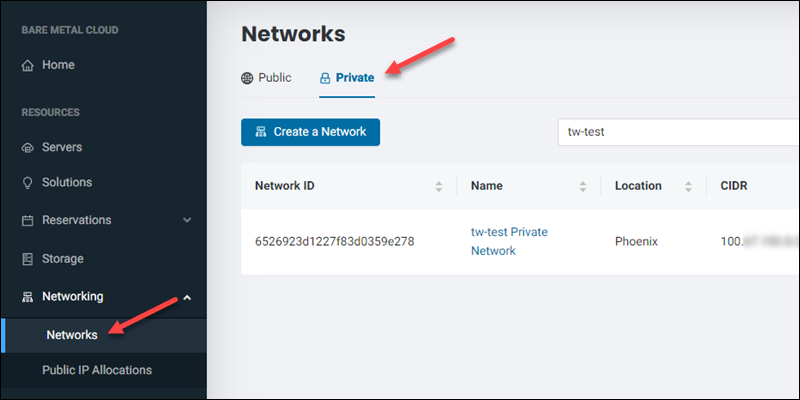
Creating a network file storage creates a private network. All servers on this network can mount and access this storage. The network is visible on the Networks page in the Private tab.
Adding an Existing BMC Server
If working with an existing BMC server, add it to the same private network as the storage. After adding it to the network, the server requires additional setup. For complete instructions, see our guide on adding and configuring a server after adding it to a network.
Deploying a New BMC Server
If deploying a new BMC server, add the server to the same private network as the network storage. Servers deployed this way do not require additional setup to access and mount the storage.
During the server creation process, the final step is the Network & IP Settings page, which comes after server selection and instance configuration. Add the network storage in the Private Networks section to enable access from that server. Follow the steps below to add a server to a storage network during server creation:
1. On the Network & IP Settings page in the Private Networks section, click the Add To Network button to assign the server to a private network.
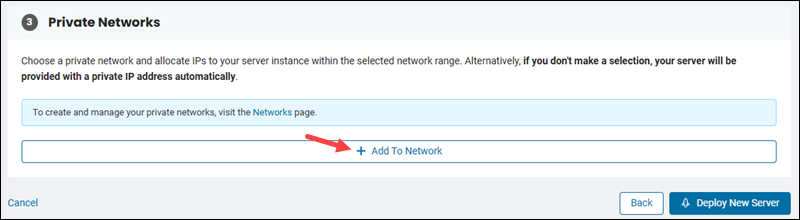
2. Open the Private Network dropdown menu and select the storage network with the NFS label.
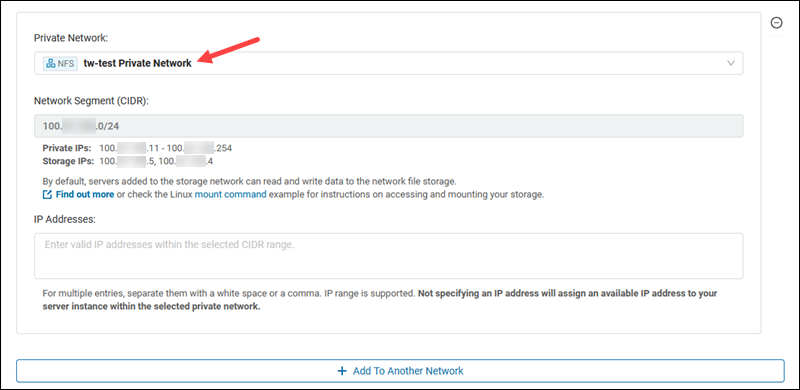
The Network Segment (CIDR) automatically fills out and shows the private IP range and the storage IPs.
3. Optionally, assign IP addresses from the range in the previous section. Leave blank to automatically assign an available IP address to the server instance within the storage network.
Add Volumes to a Network File Storage
To add additional volumes to a network file storage:
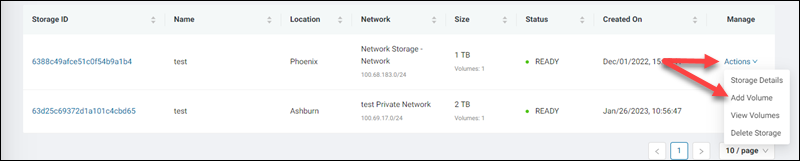
1. Navigate to Storage->Manage Your Network Storage.
2. Click Actions->Add Volume.
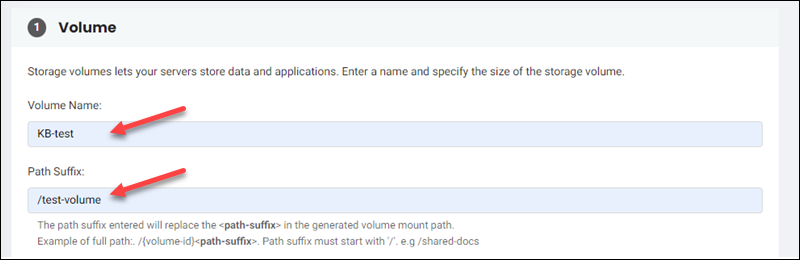
3. In the Volume section, enter a descriptive Volume Name.
4. Add a Path Suffix for the volume.
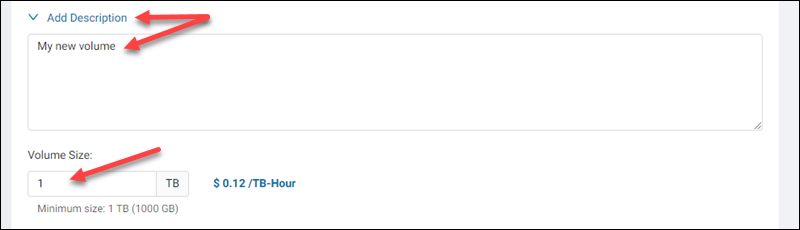
5. Optionally, expand the Add Description field and enter the volume's description.
6. Enter the Volume Size in terabytes (TB). The minimum is 1TB and cannot exceed the maximum capacity across all storages.
7. Review the details in the right pane. Once ready, click the Add Volume button to add the new volume to the network file storage.
Delete Network File Storage
Deleting network file storage deletes the private network and all the data on it. Before deleting network file storage, you must remove all servers residing on the network.
Warning: The delete action cannot be undone and all data on the network file storage is also deleted. Before deleting the network file storage, backup all critical data.
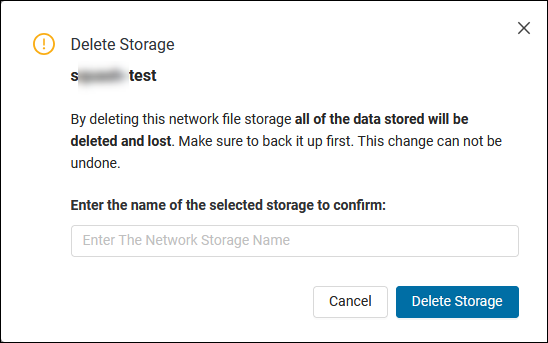
To delete a network file storage, do the following:
1. Navigate to Storage -> Manage Your Network File Storage.
2. Locate the network file storage on the list.
3. Click Manage -> Delete Storage in the Manage column.
4. Enter the storage name to confirm deletion and click Delete Storage.
BMC Network File Storage (NFS) via API
The BMC Network Storage API lets you create and manage a network file storage. The API creates a private network, and BMC servers added to the private network have access to the storage volume.
The HTTP Request URL for the Network Storage API is:
https://api-dev.phoenixnap.com/network-storage/v1/Create Network Storage and Volume
Use the POST method and the /storage-networks endpoint to create a network storage and volume.
Note: The maximum number per network is one storage and volume.
The body consists of the following fields:
name(required)location(required) – available locations arePHXandASH.description(optional)volumes(required) – additional information for the volume with the following fields:name(required)capacityInGb(required) – the account quota determines the maximum for individual and total volume capacity.description(optional)pathSuffix(optional)tags(optional) - an array with descriptive tags for the resource. Refer to the Tags API to create a new tag or list existing tags.
clientVlan(optional) - custom client VLAN for the network storage.
For example, to create a network storage volume, use the following format for the data:
{
  "name":"My Network Storage",
  "location":"PHX",
  "description":"My first network file storage",
  "volumes": [
    {
      "name":"My Volume",
      "capacityInGb":1000
      "description":"1TB capacity for My Network Storage",
      "pathSuffix":"/my-documents",
    }
  ]
}
The request is accepted when the 202 response shows. The output prints the object with the status BUSY.
Use the POST method and the /storage-networks/{storageNetworkId}/volumes endpoint to create additional volumes on an existing storage.
The body consists of the following fields:
name(required)description(optional)pathSuffix(optional)capacityInGb(required) - Total maximum for all volumes, which cannot exceed the total account quota.permissions(optional) - Permissions for the volume.nfs- Network file storage permissions. Controls the read and write operations and the squash policy. Omitting permissions defaults toreadWriteandrootSquashfor all servers in the CIDR block.
tags(optional) - an array with descriptive tags for the resource.
For example, to create a 1TB volume to an existing network storage, use:
{
  "name":"My Volume",
  "capacityInGb":1000
  "description":"1TB capacity for My Network Storage",
  "pathSuffix":"/my-documents",
  "permissions": {
    "nfs": {
      "readWrite": ["1.1.1.1"],
      "rootSquash": ["1.1.1.1"]
    }
  }
}
The volume capacity cannot exceed the 3TB total quota for all volumes.
Retrieve Network Storage and Volume Details
Use the GET method and the /storage-networks endpoint to retrieve the details of all storage networks owned by the account.
To filter the result by location, add the location query parameter like in the following endpoint:
https://api-dev.phoenixnap.com/network-storage/v1/storage-networks?location=PHXTo show the details for a single network storage, use the /storage-networks/{storageNetworkId} endpoint.
For example:
https://api-dev.phoenixnap.com/network-storage/v1/storage-networks/63088b16a0c7de215b88bb1d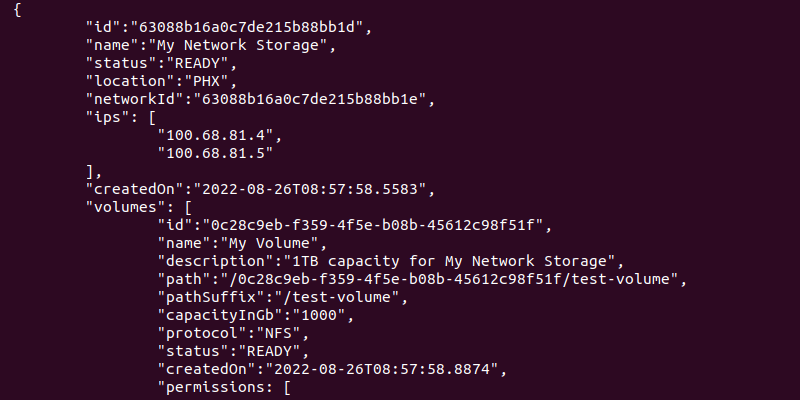
The storage network has:
- The
networkIdof the storage network. The ID can further be viewed through the private networks API. Add a server to this network to use the storage. - IPs
x.x.x.4andx.x.x.5for accessing and mounting the volumes.

Note: To optimize the NFS and achieve load balancing, add a hostname (A record) with both IP addresses.
To display the storage network volume array, use the /storage-networks/{storageNetworkId}/volumes endpoint.
The full HTTP link with an example storageNetworkId looks like the following:
https://api-dev.phoenixnap.com/network-storage/v1/storage-networks/63088b16a0c7de215b88bb1d/volumesFor a specific volume belonging to a storage network, use the /storage-networks/{storageNetworkId}/volumes/{volumeId} endpoint.
For example:
https://api-dev.phoenixnap.com/network-storage/v1/storage-networks/63088b16a0c7de215b88bb1d/volumes/0c28c9eb-f359-4f5e-b08b-45612c98f51fAdd Server to Private Network
The storage and server must be in the same private network. Add a new BMC server to the private network during server creation, or add an existing server where you plan to use the storage. Both cases require the private network ID (networkId).
Add an Existing BMC Server
If adding an existing BMC server to the storage network, use the POST method and the /servers/{serverId}/network-configuration/private-network-configuration/private-networks endpoint. Add the serverId as a path parameter.
The relevant body parameters are:
id(required) - Add thenetworkIdfrom the storage network details.ips(optional) - Assign a specific IP address or range. Leave out the field to assign the first available IP address.
Deploying a New BMC Server
If deploying a new BMC server through the POST method and /servers endpoint, set the networkType body parameter as USER_DEFINED. Add the following body parameters to the networkConfiguration section:
configurationType- Set toUSER_DEFINED.privateNetworks- An array containing a list of private networks. Provide the following:id- The network ID (networkId) visible in the storage network details.ips- An IP address or range. Leave out the field to automatically assign the first available IP address.
For example:
"networkType": "USER_DEFINED"
"networkConfiguration": {
    "privateNetworkConfiguration": {
      "configurationType": "USER_DEFINED",
      "privateNetworks": [
        {
          "id": "<networkId>"
        }
      ]
    }
  }
Update Network Storage and Volume Details
Use the PATCH method and the /storage-networks/{storageNetworkId} endpoint to update storage network and/or volume details.
The fields you can update for the storage are:
name- Specify a new name for the network storage or leave it as is.description- Update the public network description.
For example:
{
  "name":"New storage network name",
  "description:"Updated description for storage network"
}
To update the volume information, use the /storage-networks/{storageNetworkId}/volumes/{volumeId} endpoint.
The fields you can update for the volume are:
name- Provide a new name to change the current value.description- Update the volume description.capacityInGB- Change volume capacity.pathSuffix- Update the last part of the volume's path.permissions- Change storage permissions.nfs- Update the NFS permissions. The read/write operation fields are:readWriteandreadOnly. The squash policy fields are:rootSquash,noSquash, andallSquash. Add at least one read/write operation and squash policy.
For example:
{
  "name":"New volume name",
  "description:"Updated description for the volume"
  "capacityInGb":<updated capacity>
  "pathsuffix:"<new suffix>
  "permissions": {
    "nfs": {
      <new permissions>
    }
  }
}
State the capacity in gigabytes as a multiple of 1000 (which corresponds to the whole number of terabytes). For instance, to update the volume capacity to 3TB, enter 3000.
To set up the permissions, use:
- CIDR notation to indicate a subnet. For example:
{
  "permissions": {
    "nfs": {
      ...
      readWrite: ["1.1.1.0/24"]
    }
  }
}
This field gives read/write permissions to all servers in the 1.1.1.0-1.1.1.255 range.
- Wildcard notation to indicate a range. For instance:
{
  "permissions": {
    "nfs": {
      ...
      rootSquash: ["1.1.*.*"]
    }
  }
}
The permission applies the root squash policy to all servers in the 1.1.0.0-1.1.255.255 range.
- An empty array to remove permission for all servers. For example:
{
  "permissions": {
    "nfs": {
      ...
      readOnly: []
    }
  }
}
The permission indicates there are no servers with read-only access.
Overwrite Volume Tags
The PUT method for the /storage-networks/{storageNetworkId}/volumes/{volumeId}/tags endpoint overwrites previously assigned tags to a volume with provided new tags. Provide the request body in the following format:
[
  {
    "name": "Environment",
    "value": "PROD"
  }
]
Provide the tag name(s) and value(s) in an array.
Delete Network Storage and Volume
Warning: Before deleting a storage network and volume, remove all servers from the network and backup any critical data. Deleting the storage and volume removes all information from the private network storage.
Use the DELETE method and the /storage-networks/{storageNetworkId} endpoint to remove a storage and its volume.
To delete a specific volume from a storage network, use the DELETE method and the /storage-networks/{storageNetworkId}/volumes/{volumeId} endpoint.
Mount Network File Storage (NFS)
The server must be added to the storage network to mount the NFS. Depending on the server OS, the mount process and commands differ. Below are instructions for both Linux and Windows servers.
Mount NFS on Linux (Ubuntu, Debian, CentOS)
To mount the storage on a Linux server, do the following:
1. Create a local directory to serve as a mount point:
mkdir <local directory>2. Show the available volumes for mounting and provide the storage IP as an endpoint:
showmount -e <storage IP>
Note: The command requires installing the nfs-common. If the above command does not work, install the package with the following command:
sudo apt install nfs-commonThe output lists the available volumes for mounting in the format <volume ID>/<path suffix>. Use the listed volume ID and path suffix in the following step.
3. Run the mount command as sudo:
sudo mount <storage IP>:/<volume ID>/<path suffix> /<local directory>The command contains the following fields:
<storage IP>is the network storage IP.<volume ID>/<path suffix>is the NFS volume path.<local directory>is the local mountpoint directory.
4. View the mount with:
df -h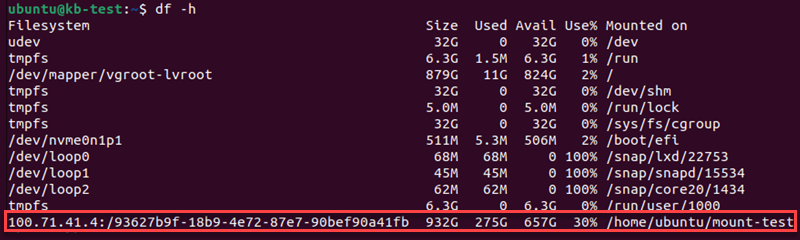
The mount does not persist after restart.
(Optional) Persist Mount on Linux
To persist the mount after a restart, do the following:
1. Edit the /etc/fstab file using a text editor:
sudo nano /etc/fstab2. Append the following information:
<server IP>:/<volume ID>/<path suffix> <local directory> nfs defaults 0 0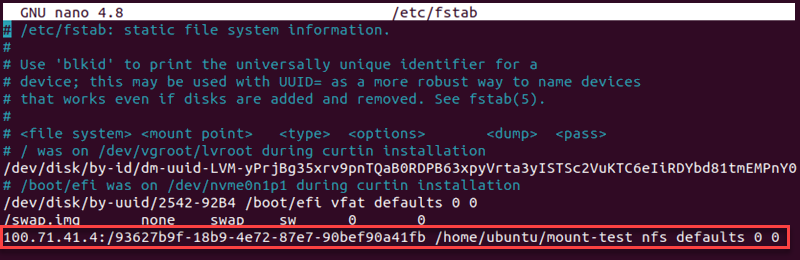
Save and close the file.
3. Mount the NFS using one of the following command formats:
sudo mount <local directory>Or alternatively:
sudo mount <storage IP>:/<volume ID>/<path suffix>The mount command reads from the /etc/fstab file, and the storage persists upon reboot.
Mount NFS on Windows Server
Use the GUI or Powershell to mount the storage on a Windows server. In both cases, install the NFS-Client Windows feature to enable mounting.
Option 1: Mount Through Powershell
Mount the NFS using the Powershell by following the steps below:
1. Install the NFS client to enable the mount command. Run PowerShell as administrator and use the following command:
Install-WindowsFeature NFS-Client2. List all mountable volumes and provide the storage IP as an endpoint:
showmount -e <storage IP>
The output lists all mountable volumes.
4. Close the Powershell and run again as a normal user.
5. Mount the storage with the following command:
mount.exe -o anon \\<storage IP>\<volume ID>\<path suffix> <drive letter | *>The command has the following fields:
<storage IP>represents the network storage IP.<volume ID>\<path suffix>is the NFS volume path.<drive letter | *>is the local drive (for exampleX:). Provide an asterisk (*) to mount on the first available drive.

The mount is visible as a mounted disk in File Explorer -> This PC.

Option 2: Mount Through the GUI
To mount an NFS through the Windows GUI, follow the steps below:
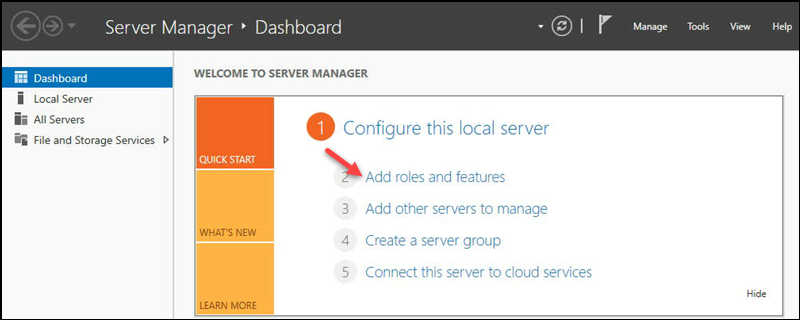
1. Navigate to Start -> Server Manager.

2. Choose Add roles and features from the dashboard.
3. Click Next until you navigate to the Features page.
4. Check the Client for NFS checkbox and click Next.
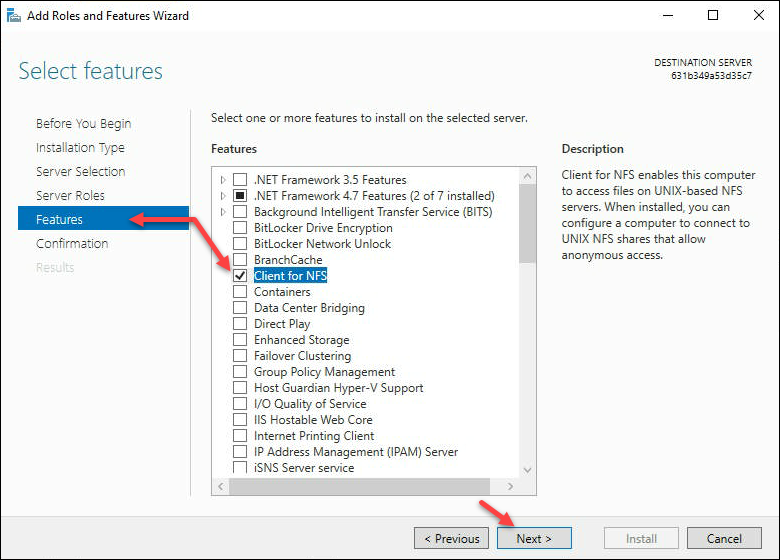
5. Click Install to confirm the installation.
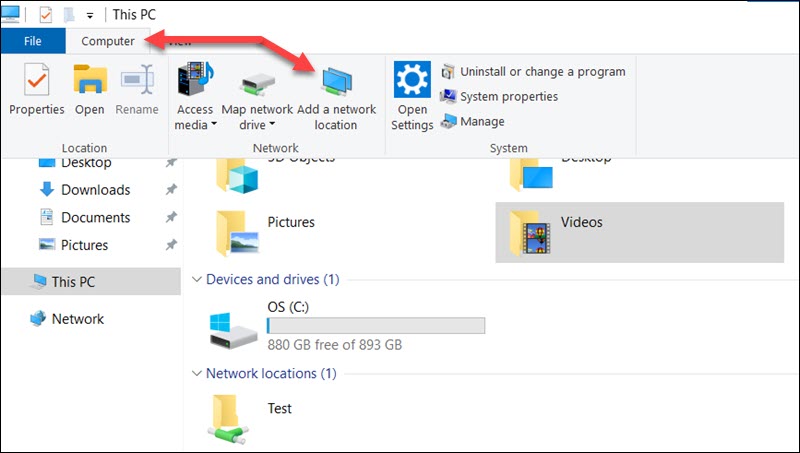
6. Open File Explorer and select This PC.
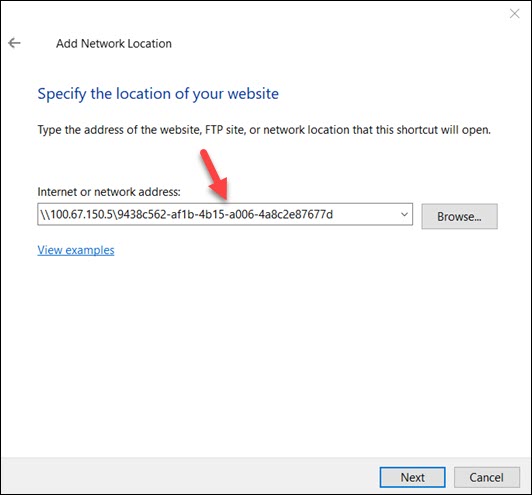
7. In the top bar, click Computer and select Add a network location to start the wizard.
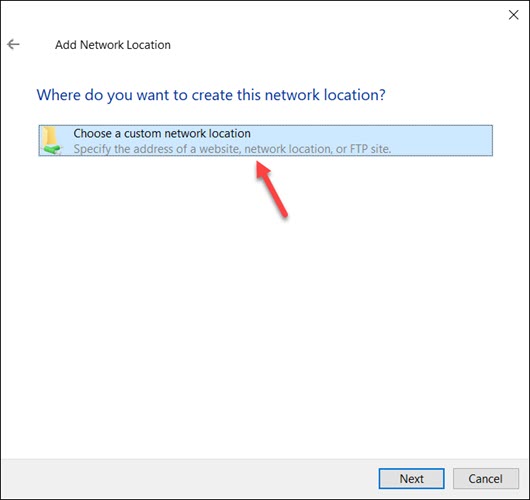
8. Click Next and select Choose a custom network location. Click Next again to continue.
9. Choose a network location from the dropdown menu and click Next.
10. Enter a network location name and click and click Next.
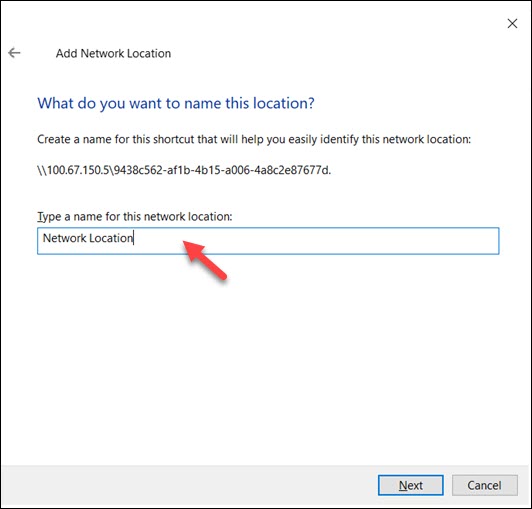
11. Click Finish to complete the process. The mount is now visible in File Explorer.
(Optional) Persist Mount on Windows
To persist the mount on a Windows server, do the following:
1. Press Start and search for the Run tool.
2. Enter shell:startup and press Enter.
3. Create a nfsmount.bat file and add the mount command:
mount.exe -o anon \\<storage IP>\<volume ID>\<path suffix> <drive letter | *>Save and close the file. The file is automatically read after reboot and the NFS mounts on startup.
Conclusion
This guide showed you how to use the Network File Storage functionality through the BMC portal and API.
To learn more about different phoenixNAP APIs, visit the Developers Portal.