Rocky Linux 9, the latest Rocky Linux version released in July 2022, is the downstream "bug-for-bug" compatible Enterprise Linux distribution built from Red Hat Enterprise Linux 9.
One of the biggest changes in Rocky Linux 9 is Peridot, a new build system that allows developers to build customized versions of Rocky Linux from scratch. Other new features include desktop and file system improvements, better performance, greater security, and much more.
This tutorial shows how to upgrade Rocky Linux 8 to version 9.
Prerequisites
- At least x86-64-v2, ARMv8.0-A, POWER 9, or IBM z14 CPU architecture.
- Minimum 2 GB of RAM.
- 40 GB of disk space for storage.
- A working Rocky Linux 8 system with an internet connection.
- Root privileges.
How to Upgrade Rocky Linux 8 to Rocky Linux 9
The upgrade process consists of updating the system package repository, adding the Rocky Linux 9 repositories, and installing the new system. Follow the steps below to upgrade your Rocky Linux system to the latest version.
Note: If you prefer a fresh copy over an upgrade, follow our tutorial for installing Rocky Linux 9.
Step 1: Check OS Version
Check the current OS version to ensure you are running Rocky Linux 8. Run the following command:
cat /etc/os-release
In our case, we are running Rocky Linux 8.8.
Step 2: Update Package Repository
The next step is to update the system package repository and upgrade all the packages to their latest versions.
Run the following command:
sudo dnf upgrade --refresh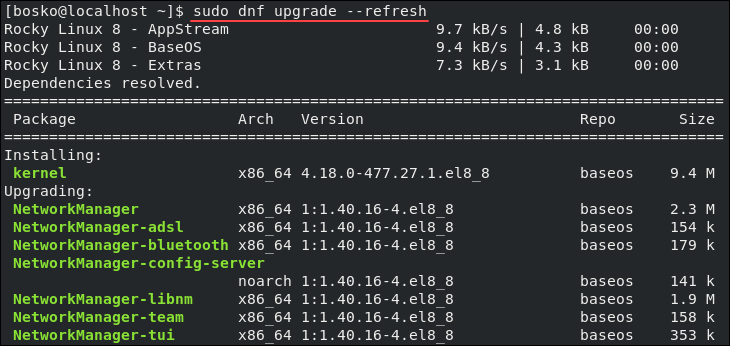
Confirm the update with y and Enter to confirm. Wait for the process to finish.
The command updates the package list and performs any available upgrades. The --refresh flag instructs dnf to refresh the package list before upgrading.
Step 3: (Optional) Backup the System
If you have important data on the machine, create a backup before proceeding. Although it should be safe, it is generally a good idea to back up your important files and system configurations.
You can use software that takes a snapshot of your whole OS or use the following command to back up the files manually:
sudo tar czf /rocky8.tar.gz \
     --exclude=/rocky8.tar.gz \
     --exclude=/dev \
     --exclude=/mnt \
     --exclude=/proc \
     --exclude=/sys \
     --exclude=/run \
     --exclude=/tmp \
     --exclude=/media \
     --exclude=/lost+found \
     /
The tar command archives all the important directories and their contents in a single tar.gz archive. You can add more --exclude= parameters if there is anything else you want to exclude from the backup.
The backup file created is rocky8.tar.gz archive in the root directory (/). Transfer the file to another machine or removable drive before proceeding.
Step 4: Add Rocky Linux 9 Repositories
In this step, export several packages (rocky-release, rocky-repos, and rocky-gpg-keys) as environment variables, which are required for the upgrade. Then, pass the variables to the dnf package manager to install the latest package versions.
Check the latest versions on the official Rocky Linux website:
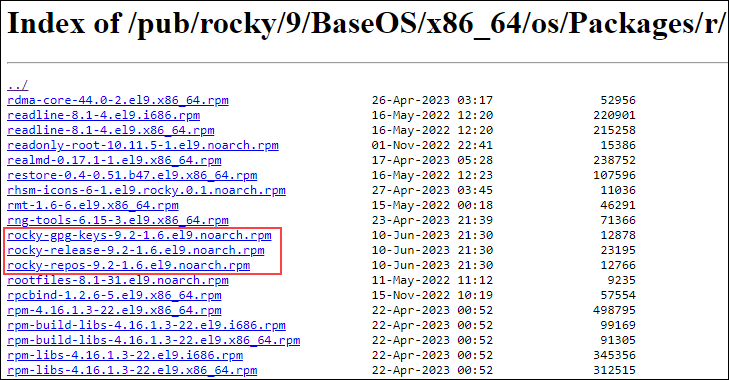
As the screenshot above shows, the latest versions of the required packages at the time this article was written were 9.2-1.6, so we will use it in our variables. Run the following commands to set the necessary variables:
REPO_URL="https://download.rockylinux.org/pub/rocky/9/BaseOS/x86_64/os/Packages/r"
RELEASE_PKG="rocky-release-9.2-1.6.el9.noarch.rpm"
REPOS_PKG="rocky-repos-9.2-1.6.el9.noarch.rpm"
GPG_KEYS_PKG="rocky-gpg-keys-9.2-1.6.el9.noarch.rpm"
After setting the variables, add the repositories by running:
sudo dnf install $REPO_URL/$RELEASE_PKG $REPO_URL/$REPOS_PKG $REPO_URL/$GPG_KEYS_PKGStep 5: Remove Unnecessary Packages
Before upgrading, uninstall unnecessary packages and remove the Red Hat branding assets directory. Keeping the packages can cause issues during the upgrade later. Run the following commands:
sudo dnf -y remove rpmconf yum-utils epel-release
sudo rm -rf /usr/share/redhat-logos
After removing the packages, Red Hat branding, and logo assets, it is time to complete the upgrade.
Step 6: Install Rocky Linux 9 Packages
Install all the required packages for Rocky Linux 9 by running the following command:
sudo dnf -y --releasever=9 --allowerasing --setopt=deltarpm=false distro-syncThe process will take some time, as many packages need to be upgraded or installed. Wait until it completes.
Note: If you get an error saying GPG key failed, remove the existing one using the following syntax:
sudo rpm -e --allmatches gpg-pubkey-[REPOKEYID]You can find the GPG key IDs by running:
rpm -qa gpg*Next, install the right GPG key by running:
sudo rpm --import https://dl.rockylinux.org/pub/rocky/RPM-GPG-KEY-Rocky-9Step 7: Rebuild RPM Database
Rocky Linux 8 uses the Berkeley DB toolkit as embedded database support for traditional and client/server applications. Rocky Linux 9 has switched over to SQLite, so the next step is to rebuild the RPM database to prevent errors.
Run the following command:
sudo rpm --rebuilddbAfter the rebuild completes, reboot the machine, and it boots into the new Rocky Linux 9 system. Run:
sudo rebootAfter rebooting, you will see the new desktop environment, and you can use the cat command to check the OS version. Open the terminal and run:
cat /etc/os-release
The output shows that the OS has been upgraded to version 9.2.
Conclusion
This article has explained how to upgrade from Rocky Linux 8 to Rocky Linux 9 using the CLI. Rocky Linux 9 comes with numerous upgrades and advantages over its predecessor, and the upgrade process is straightforward.
If you are considering the benefits of Rocky Linux over other distributions, check out our comparison articles to learn the difference between Rocky Linux and CentOS and see how Rocky compares to AlmaLinux.
