iPXE is an open-source network boot firmware that extends the standard Preboot Execution Environment (PXE) by allowing computers to boot using a network. With iPXE, Bare Metal Cloud (BMC) users can provision servers with operating systems that are PXE-booted from external repositories.
This article will show you how to use iPXE functionality via the BMC portal and API with examples.

iPXE on Bare Metal Cloud
phoenixNAP's iPXE implementation allows users to load an OS or software package of their choosing. After booting with iPXE, the deployed OS may be operated in a production environment like any other BMC-delivered server.
BMC does not constrain the use cases of iPXE-booted instances. Users can choose to keep the instance running as a constantly mutable iPXE server or transition it to a permanent OS.
Deploy iPXE Instance via BMC Portal
The Bare Metal Cloud portal lets users deploy an iPXE server instance and configure it to boot from an external repository. Create an iPXE instance in BMC by logging in to the Bare Metal Cloud portal and following the steps in the sections below.
Step 1: Select Server
Use the following procedure to select an instance for an iPXE boot:
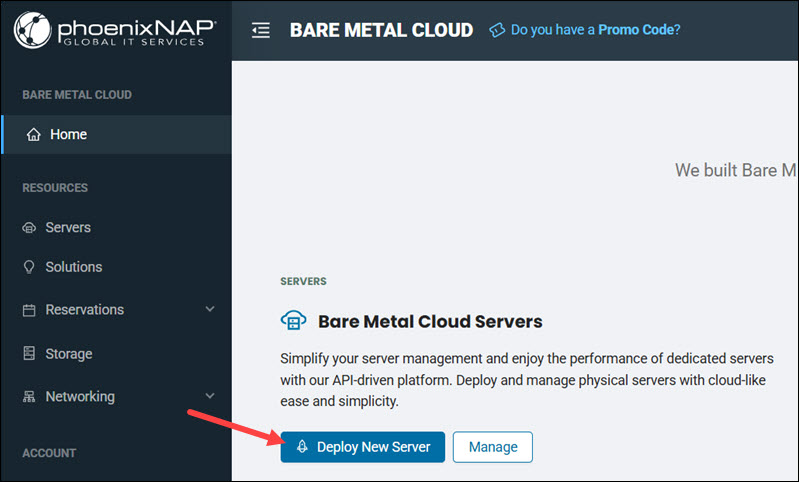
1. Select Deploy New Server.
2. Choose a data center Location for the iPXE instance.
3. Select a Billing model.
4. If deploying multiple servers, adjust the Quantity of servers.
5. Select a BMC Instance Type.
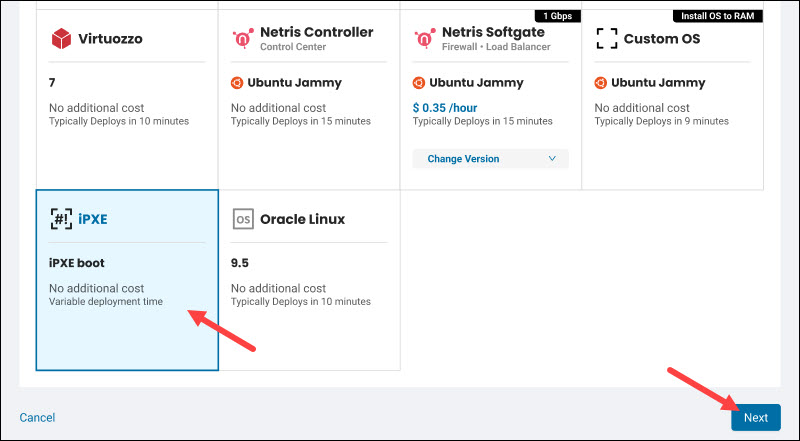
Note: The following BMC instances do not support iPXE booting: s0.d1.small, s0.d1.medium, a1.c5.large, a1.c5.xlarge, a2.c9.large, a2.c9.xlarge, as well as instance types like PLiOPS and GPU that allow only specific OSes.
6. Choose iPXE in the Operating System section. iPXE license is free, and the feature is available at no additional cost. Press Next to proceed.
Step 2: Configure Instance
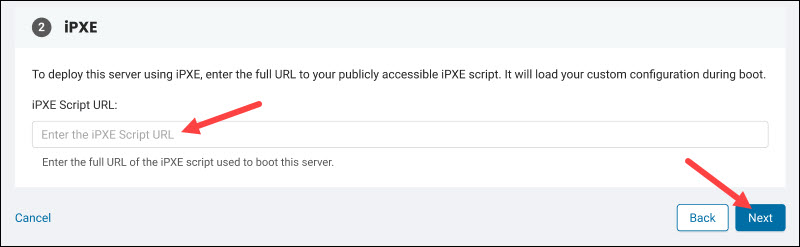
On the Configure Instance page, enter a Hostname for the instance and provide an optional description. In the iPXE section, enter the full URL of a publicly accessible iPXE script and press Next to proceed.
Step 3: Network & IP Settings
Set up the networking for the iPXE instance by following the steps below:
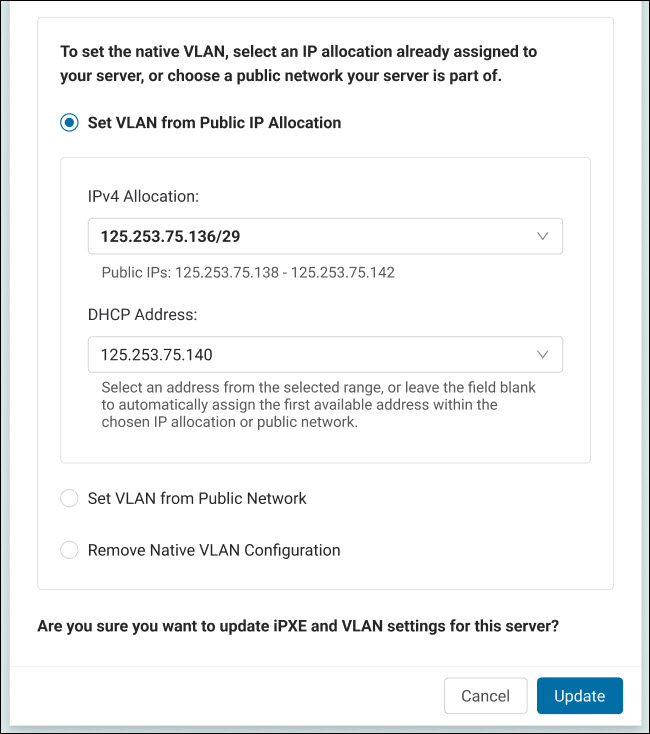
1. On the Network & IP Settings page, assign a public IPv4 address. To assign a previously purchased public IPv4 allocation, select the option and choose the allocation from the list.
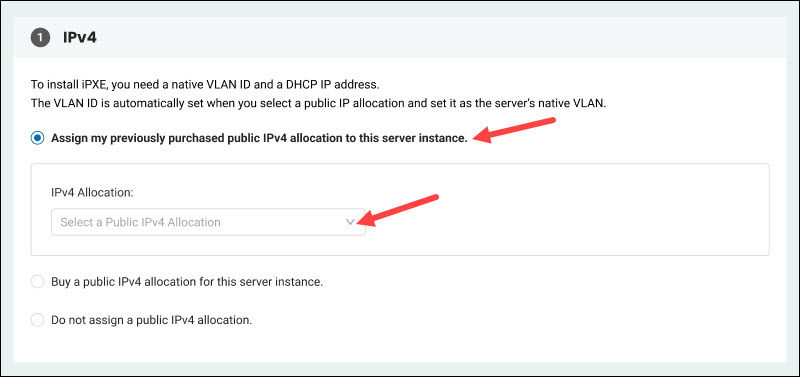
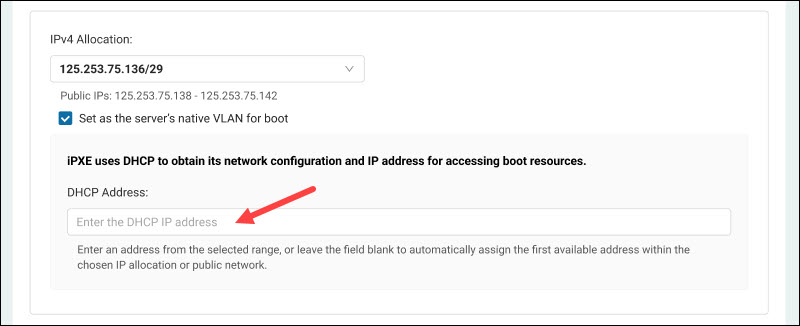
2. Select Set as the server's native VLAN for boot to set VLAN ID automatically.
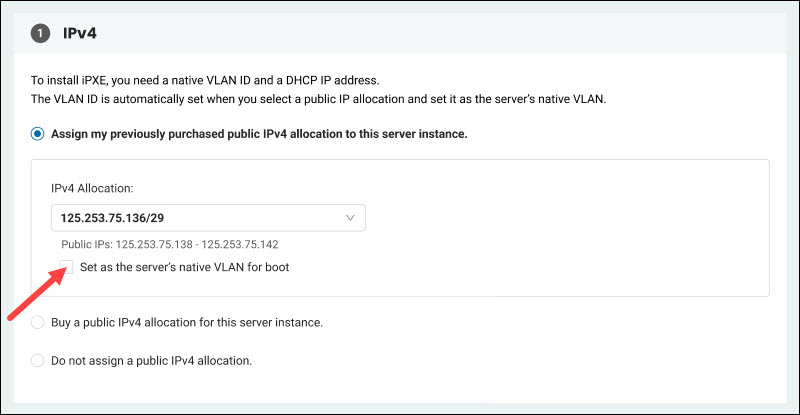
3. Type the DHCP Address.
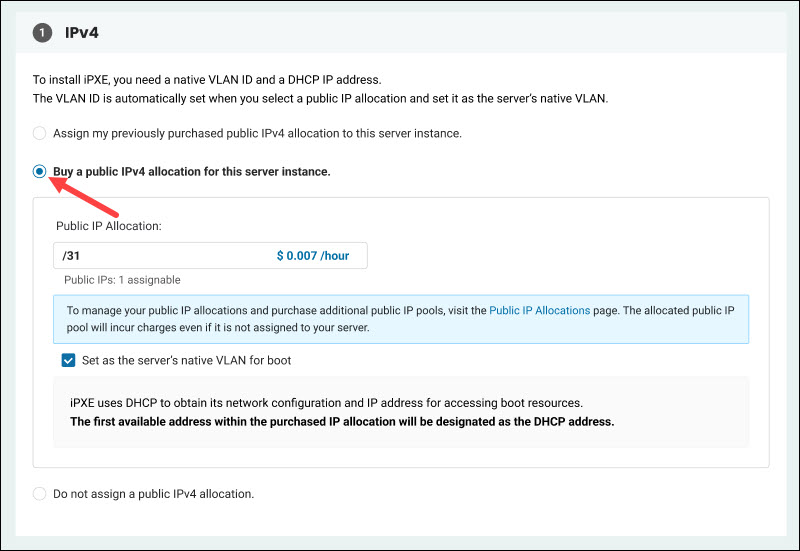
To deploy an instance using a new allocation, select Buy a public IPv4 allocation for this server instance.
To skip assigning a public IPv4 allocation, select Do not assign a public IPv4 allocation.
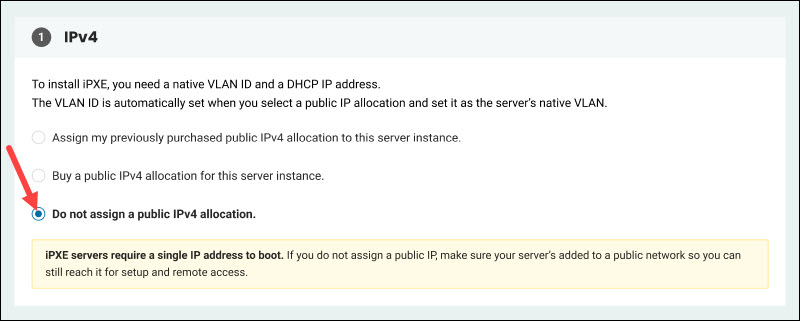
If you choose not to allocate a public IP address, add the server to a public network to enable iPXE booting.
Note: An IP address assigned to a server for iPXE booting can be moved to other servers. However, transferring ownership of an IP address between servers used in the iPXE process on a public network is discouraged, as slow convergence is highly likely. Please allow a few hours before re-using the same public IP for iPXE on a public network.
Once you finish configuring the network, select Deploy New Server and wait for the instance to boot up.
Manage iPXE Instances in BMC Portal
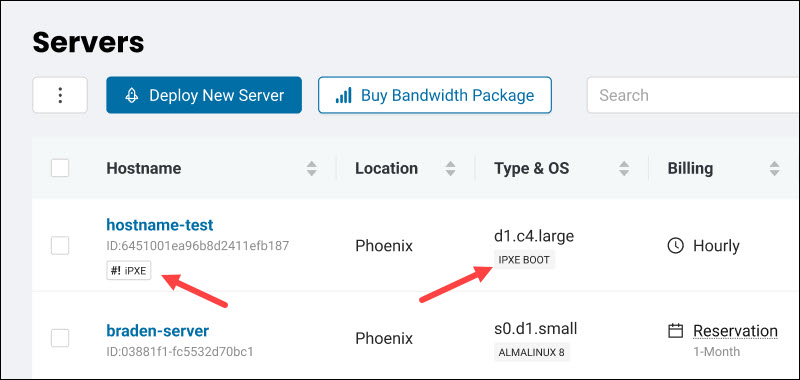
A deployed iPXE instance appears on the list on the Servers page. iPXE instances have an iPXE tag next to their Hostname, and an IPXE BOOT tag in the Type & OS column.
To manage an iPXE instance, click the Actions item in the Manage column next to the relevant server.
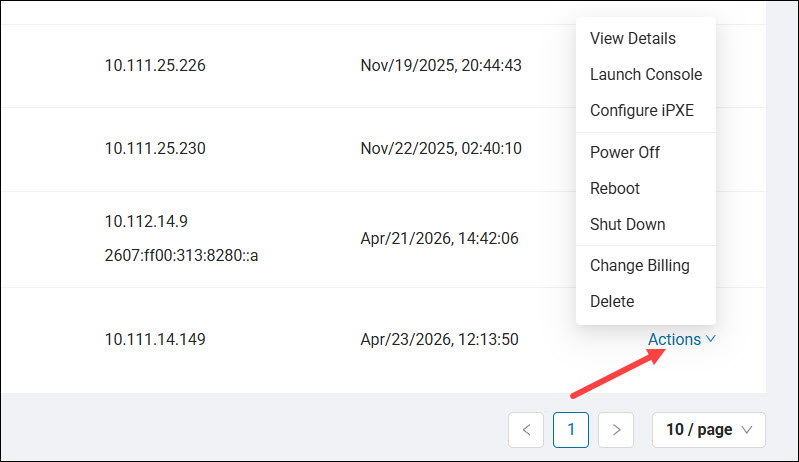
View Instance Details
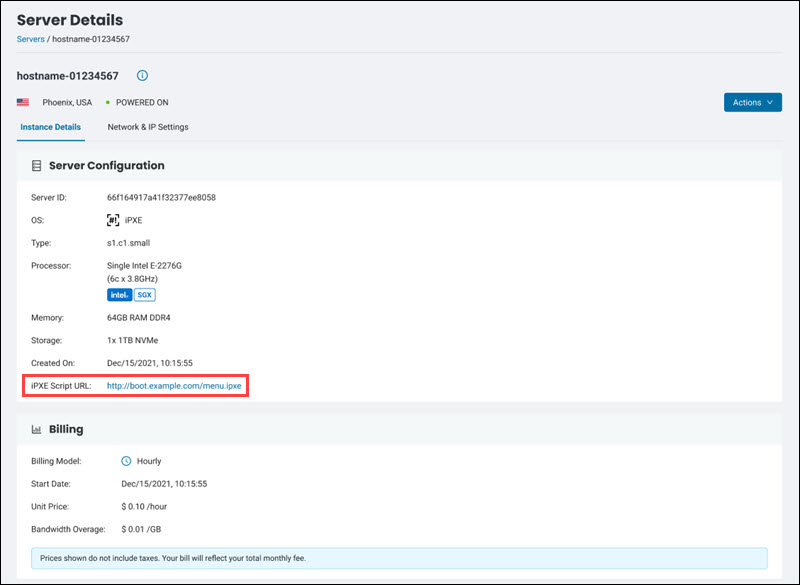
Select View Details to see the server details. The page contains basic information about the instance, including the server ID, OS, type, and boot script URL.
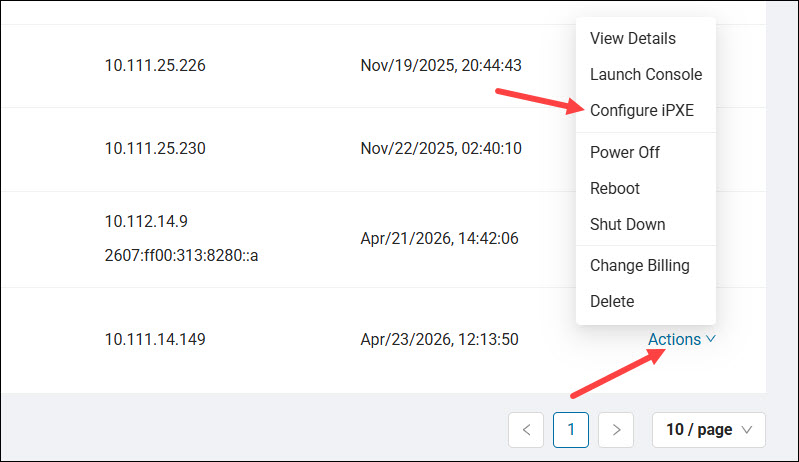
Configure iPXE
The Configure iPXE page allows you to configure iPXE options. Access it by selecting Configure iPXE from the Actions menu.
Change the iPXE script URL by typing a new URL in the iPXE script URL field.
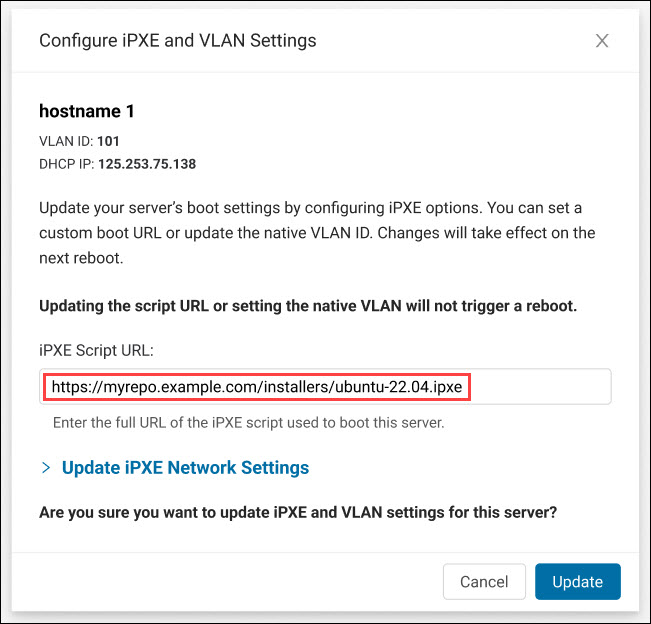
To change network settings, expand the Update iPXE Network Settings section.
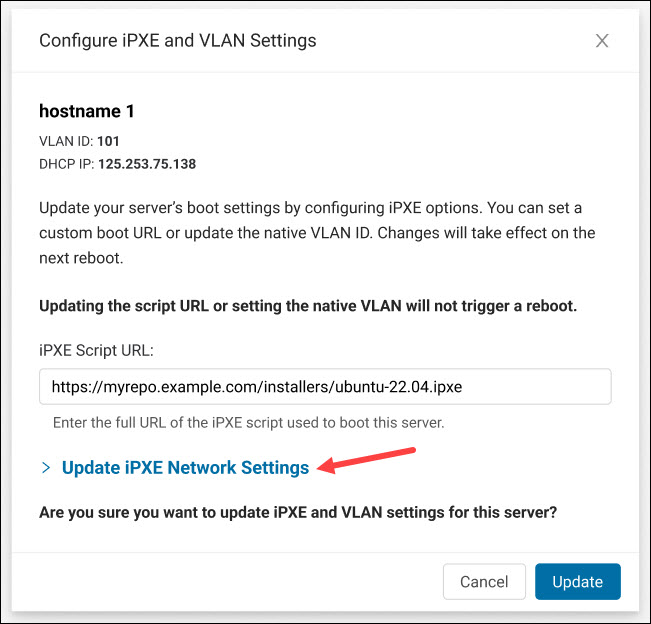
The section allows users to set a new native VLAN or remove a native VLAN configuration.
Select Update to apply the updates.
Reboot Using iPXE Script
Users can reboot a server using the configured iPXE script URL instead of local boot. Updating the URL before a reboot automatically saves it as the new default. The server connects to the network via its provisioned DHCP IP address.
To reboot an instance using the script:
1. Click Reboot in the Actions menu.
2. Select Reboot using iPXE script in the Reboot server modal.
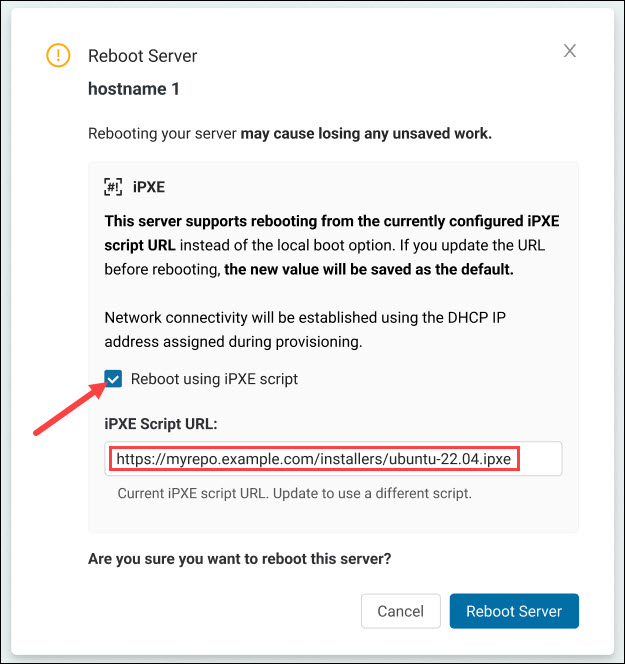
3. Update the iPXE Script URL field to choose a new script or leave it as is to use the current script.
4. Select Reboot Server.
Deploy iPXE Instance via API
The Bare Metal Cloud API allows users to deploy and manage iPXE instances. All URLs are relative to:
https://api.phoenixnap.com/bmc/v1To deploy an iPXE instance using BMC API, use the POST request and the /servers endpoint:
https://api.phoenixnap.com/bmc/v1/serversProvide the URL to the script under iPXE in the osConfiguration section:
{
  "hostname": "<server_name>",
  "description": "<description>",
  "location": "<location>",
  "os": "ipxe",
  "osConfiguration": {
    "iPXE": {
      "url": "<ipxe_script_url>"
    }
  },
  "type": "<server_type>"
}Note: Currently available locations are Phoenix (phx), Ashburn (ash), and Netherlands (nld).
Replace <ipxe_script_url> with the script address. The following example provisions an s3.c3.medium server named iPXE-server located in Phoenix. The server loads the iPXE test script:
{
  "hostname": "iPXE-server",
  "description": "Testing",
  "location": "phx",
  "os": "ipxe",
  "osConfiguration": {
    "iPXE": {
      "url": "http://boot.ipxe.org/demo/boot.php"
    }
  },
  "type": "s3.c3.medium"
}
Use the following payload to set up a public network for the server:
{
  "hostname": "<server_name>",
  "description": "<description>",
  "location": "<location>",
  "os": "ipxe",
  "osConfiguration": {
    "iPXE": {
      "url": "ipxe_script_url",
      "nativeVlanConfiguration": {
        "vlanId": <id>,
        "staticDhcpAddressV4": "<address>"
      }
    }
  },
  "type": "<server_type>",
  "networkType": "PUBLIC_AND_PRIVATE",
  "networkConfiguration": {
    "publicNetworkConfiguration": {
      "publicNetworks": [
        {
          "id": "<network_id>",
          "ips": [
            "<ip_address>",
            "<ip_address>"
          ]
        }
      ]
    }
  }
}
Create iPXE Boot Script
An iPXE boot script helps customize and automate network boots. It checks for an IP address and lists the iPXE commands required to boot from an external repository.
Follow the steps below to create an iPXE script. The tutorial uses Fedora as an example OS:
1. Create a text file on the remote system. For example, on a Linux server, use a text editor such as Nano:
nano boot.ipxe2. Start with the iPXE header:
#!ipxe3. Let the script automatically configure a network interface by requesting an IP address and other network settings from a DHCP server:
dhcp4. Set a base URL to create a single point of reference for all subsequent file requests:
set repo http://mirror.i3d.net/pub/fedora/linux/releases/44/Everything/x86_64/os5. Specify the boot components by loading the kernel with its required parameters and fetching the initial files into memory:
kernel ${repo}/images/pxeboot/vmlinuz initrd=initrd.img inst.repo=${repo}
initrd ${repo}/images/pxeboot/initrd.img
6. Set the boot command:
bootThe final script should look like the example below:
#!ipxe
dhcp
set repo http://mirror.i3d.net/pub/fedora/linux/releases/44/Everything/x86_64/os
kernel ${repo}/images/pxeboot/vmlinuz initrd=initrd.img inst.repo=${repo}
initrd ${repo}/images/pxeboot/initrd.img
boot
7. Save the script on a publicly accessible server and load it using methods described in the sections Deploy iPXE Instance via BMC Portal and Deploy iPXE Instance via API.
Useful iPXE Debugging Commands
If the script does not behave as expected, use the following commands to troubleshoot the issue:
| Command | Description |
|---|---|
ifstat | Shows the status of network interfaces (Check for "Link: up"). |
route | Displays the current IP, netmask, and gateway. |
imgstat | Lists currently loaded kernels and initrd files. |
config | Opens a text-based GUI to edit settings like IP addresses manually. |
iPXE Boot Again
If an iPXE deployment fails or you want to start the iPXE process again, re-trigger it with the following POST request to the /servers/{serverId}/actions/reboot endpoint:
{
  "bootType": "IPXE"
}
Replace {serverId} in the endpoint with the server's actual ID.
Changing iPXE URL
When performing iPXE boot again, the original URL provided during the server deployment will be used by default. To change the URL, the POST request to the /servers/{serverId}/actions/reboot endpoint needs to contain the ipxeURL field:
{
  "bootType": "IPXE",
  "ipxeUrl": "<script_url>"
}
For example:
{
  "bootType": "IPXE",
  "ipxeUrl": "https://example.com/boot.ipxe"
}
The native VLAN utilized to deliver iPXE is permanently available during the lifetime of an iPXE deployed server, regardless of which OS is deployed after the initial iPXE phase.
iPXE Native VLANs
Server IP block allocations and public networks are both supported as native VLANs, while backend networks are not currently supported.
To change the native VLAN, send the following PUT request to /servers/{serverId}/os-configuration/ipxe, replacing {serverId} with the ID of the server:
{
  "url": "<script_url>",
  "nativeVlanConfiguration": {
    "vlanId": <id>,
    "staticDhcpAddressV4": "<ip_address>"
  }
}
For example:
{
  "url": "https://example.com/boot.ipxe",
  "nativeVlanConfiguration": {
    "vlanId": 10,
    "staticDhcpAddressV4": "185.74.213.56"
  }
}
After the initial iPXE process, the OS or deployed package on the server can consume VLANs. VLANs can be set up during the server provision stage or configured later.
iPXE NIC Redundancy
iPXE on BMC is delivered on servers with dual NIC cards. However, given the nature of iPXE, no network-level configuration redundancy is provided upon provisioning.
Note: phoenixNAP is not responsible for any outages on servers left in single-homed mode. To ensure network redundancy, configure LACP immediately after server deployment.
Use LACP to elevate the server's network redundancy status after the server is released. Server-side LACP configurations depend heavily on the host OS, so follow the OS documentation to learn how to configure them.
Where applicable, use the following settings to establish LACP:
lacp-rate: fast
mode: 802.3ad
transmit-hash-policy: layer3+4

mii-monitor-interval: 100
up-delay: 200msec
down-delay:200msec
The following example shows the configuration in Ubuntu/Debian, using Netplan. The code below is part of the configuration file (e.g., /etc/netplan/01-netcfg.yaml):
network:
  version: 2
  renderer: networkd
  ethernets:
    enp3s0f0:
      dhcp4: no
    enp3s0f1:
      dhcp4: no
  bonds:
    bond0:
      interfaces:
        - enp3s0f0
        - enp3s0f1
      dhcp4: yes
      parameters:
        mode: 802.3ad
        lacp-rate: fast
        transmit-hash-policy: layer3+4
        mii-monitor-interval: 100
        up-delay: 200
down-delay: 200Note: Never use different VLAN configurations across NIC cards on the same production server. phoenixNAP is not responsible for outages on servers left in single-homed mode or any equivalent configuration.
Using an LACP bond is recommended for server redundancy. Once LACP is established, any VLANs consumed by the server should be set on the bond interface.
To keep IP assignment via DHCP on the LACP bond interface's native VLAN, clone the physical MAC address of either of the NIC cards. Random MAC addresses assigned to the bond interface will not obtain any IP addresses via DHCP.
For more details about how BMC VLANs work, read our introduction to Bare Metal Cloud.
Note: While hypervisor-level virtual switching can handle redundancy internally, you must still perform a failover test to verify that the mechanism works as intended.
Conclusion
After reading this article, you should know how to deploy an iPXE instance on a Bare Metal Cloud instance and use it to boot an operating system from a remote location. The article covered the Portal and API deployment procedures, showed you how to create a custom iPXE script, add NIC card redundancy, and handle networking.
Next, learn how to connect to a server using the BMC Remote Console feature.