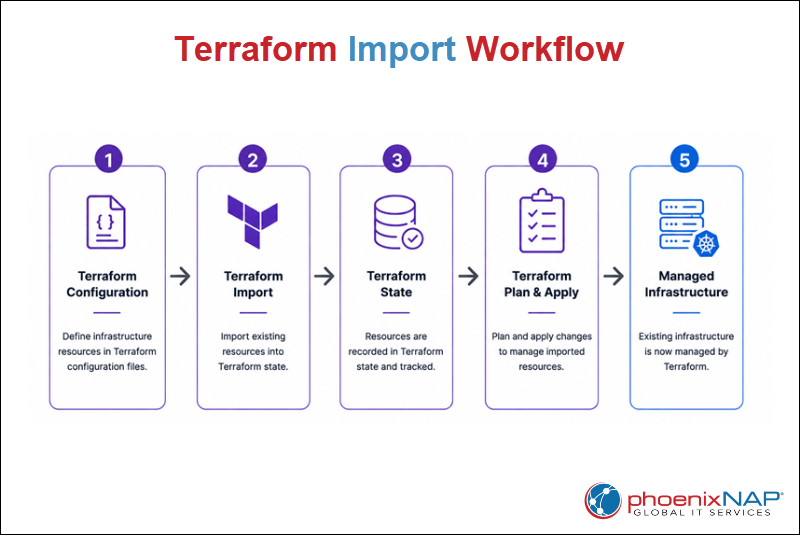
Terraform Import allows users to bring existing infrastructure under Terraform management without recreating resources. The feature associates existing resources with Terraform state, making them manageable through Infrastructure as Code (IaC) workflows.
Terraform supports multiple import methods, including the traditional command-line interface (CLI) workflow and modern declarative import blocks.
This article will explain how Terraform Import works, its limitations, and how to import resources across different deployment scenarios.
What Is Terraform Import?
Terraform Import adds existing infrastructure resources to Terraform state. Once imported, Terraform is able to track and manage those resources using the same workflow as for resources created with Terraform. Terraform state is a file that stores information about the infrastructure Terraform manages, allowing it to track resources and compare their current state with the desired configuration.
Importing a resource does not create, modify, or delete the underlying infrastructure. Instead, Terraform reads the resource's current state and associates it with a resource address defined in the Terraform configuration.
Terraform supports multiple import methods. Traditional imports use the terraform import command, while newer Terraform versions support declarative imports through import blocks.
Terraform is also able to generate configuration automatically for some resources, which reduces the amount of manual configuration required after an import operation.
Terraform Import Importance
Organizations adopt Terraform after infrastructure is already in place. These existing environments often contain virtual machines, Kubernetes resources, databases, storage volumes, and networking components created manually or via provider-specific tools.
Recreating those resources solely to bring them under Terraform management is impractical and introduces unnecessary risk.
Terraform Import addresses this challenge because it associates existing resources with Terraform state. Therefore, organizations are able to adopt Infrastructure as Code (IaC) practices without redeploying production workloads or rebuilding existing environments.
Some benefits of Terraform Import are:
- Enables Terraform adoption in existing environments.
- Eliminates the need to recreate production resources.
- Reduces the risk associated with infrastructure migrations.
- Improves infrastructure consistency and state visibility.
- Allows teams to manage existing resources through Infrastructure as Code workflows.
- Simplifies the transition from manually managed infrastructure to automated provisioning.
Terraform Import Basics
Terraform Import allows organizations to bring existing infrastructure under Terraform management without recreating resources. For example, a team is able to provision servers manually, deploy Kubernetes resources outside Terraform, or inherit an environment that lacks Infrastructure as Code (IaC) management.
However, importing resources affects Terraform state, configuration, and resource management in specific ways. Understand these concepts to prevent state inconsistencies, configuration mismatches, and unexpected changes after an import operation.
The following sections explain the purpose of importing existing infrastructure, how Terraform handles state and configuration during an import, and the limitations of the import process.
Core Purpose of Importing Existing Infrastructure
Terraform Import is useful when infrastructure already exists but is not managed through Terraform. Instead of recreating resources, administrators import them into Terraform state and bring them under Infrastructure as Code (IaC) management.
The following scenarios require Terraform Import:
- Adoption of Terraform in an existing environment.
- Migration from manual infrastructure management.
- Migration from another Infrastructure as Code (IaC) tool.
- Management of inherited infrastructure without Terraform configuration.
- Standardization of resource management across teams and environments.
After the import, teams define resource configurations and manage imported resources alongside those provisioned by Terraform. This approach enables organizations to adopt consistent infrastructure management without rebuilding existing environments.
Terraform State and Configuration During Import
Terraform Import adds resource information to the Terraform state file, but it does not automatically create a complete Terraform configuration for every resource. Therefore, state and configuration are separate components of the import process.
During an import operation, Terraform reads the current state of a resource and associates it with a resource address in the state file. Terraform then uses that information to track the resource and compare its actual state against the Terraform configuration.

For the import process to work correctly, the resource must also have a corresponding configuration block. During the next terraform plan operation, Terraform compares the imported state with the configuration. If the configuration does not match the imported resource, Terraform detects differences and proposes changes.
Modern Terraform versions can generate configuration automatically for some resources. However, teams should always review generated code and verify that it matches organizational requirements before adding it to production workflows.
Terraform Import Limitations
Although Terraform Import simplifies Terraform adoption, it has several limitations organizations should consider.
The following list outlines the main Terraform Import limitations:
- Imports one resource at a time by default. The traditional
terraform importcommand imports a single resource per execution. While modern import blocks and third-party tools support bulk imports, large environments still require additional planning. - Does not automatically generate complete configuration for every resource. Some providers support configuration generation, but users must review and refine the generated code before using it in production.
- Does not resolve existing infrastructure drift. Terraform imports the current resource state but does not correct configuration differences or changes made outside Terraform.
- Requires accurate resource identifiers. Each import operation requires the correct resource ID or provider-specific identifier. Incorrect values cause the import to fail.
- Cannot import unsupported resource types. Only resources supported by the Terraform provider can be imported and managed through Terraform.
How Does Terraform Import Work?
Terraform Import follows a structured workflow that associates existing infrastructure with Terraform state. During the process, Terraform identifies an existing resource, maps it to a resource address defined in the configuration, and records the relationship in the state file.
The same workflow applies whether organizations manage local resources, cloud infrastructure, or Bare Metal Cloud deployments.
The following sections explain how Terraform maps existing resources to Terraform addresses, updates the state file during an import, and transitions imported resources into standard Terraform management.
Mapping Real-World Resource IDs to Terraform Addresses
Terraform identifies existing resources through provider-specific resource IDs. However, before Terraform is able to manage a resource, it has to associate it with a Terraform resource address defined in the configuration.
The resource ID identifies the existing infrastructure, while the Terraform resource address specifies where Terraform stores that resource in the state file.
During the import operation, Terraform creates a mapping between these two values without modifying the underlying infrastructure.
The following example imports an existing Kubernetes namespace. A Kubernetes namespace is a logical partition that groups resources within a Kubernetes cluster. The example demonstrates how Terraform maps the namespace's existing resource ID to a Terraform resource address without modifying the resource.
To import the namespace, perform the following steps:
1. Create or open the Terraform configuration file with a text editor of choice. In this example, the configuration is stored in a file named main.tf. Open it with Nano, for example:
nano main.tf2. Create a Terraform resource block that matches the resource you want to import:
resource "kubernetes_namespace_v1" "imported_demo" {
  metadata {
    name = "imported-demo"
  }
}
3. Run the following terraform import command:
terraform import kubernetes_namespace_v1.imported_demo imported-demo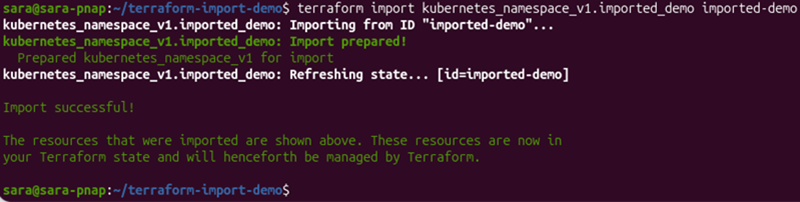
The command imports the existing Kubernetes namespace into Terraform state without modifying the namespace itself. After the import completes successfully, Terraform begins managing the imported resource.
4. Verify that Terraform added the resource to the state file:
terraform state list
The output lists all resources currently managed by Terraform. Confirm that the imported resource appears in the list before proceeding.
How Terraform Updates the State File
When Terraform imports a resource, it communicates with the provider to retrieve information about the existing infrastructure. The provider returns the resource attributes, and Terraform stores that information in the state file according to the provider's resource schema.
The resource schema defines the attributes Terraform expects for a specific resource type. During the import operation, Terraform validates the imported data against that schema before recording it in the state file. This process allows Terraform to understand the current state of the resource and manage it during future operations.
Importing a resource updates only the Terraform state file. The underlying infrastructure remains unchanged because Terraform does not modify resource settings during the import process.
The state file contains the information Terraform needs to track imported resources, compare them with the configuration, and determine whether future changes are required.
Lifecycle of a Successfully Imported Resource
After Terraform successfully imports a resource, it becomes part of the regular Terraform workflow. Terraform tracks the imported resource in the state file and compares it with the configuration during subsequent operations.
The lifecycle of an imported resource typically follows these stages:
1. Import. Terraform associates the existing infrastructure resource with a Terraform resource address and records it in the state file.
2. Validation. Run terraform plan to verify that the Terraform configuration accurately represents the imported infrastructure.
3. Management. Terraform continuously compares the imported resource with the configuration during subsequent terraform plan operations.
4. Change management. When approved configuration changes are introduced, apply them with terraform apply.
To verify that the imported resource is managed correctly, run:
terraform plan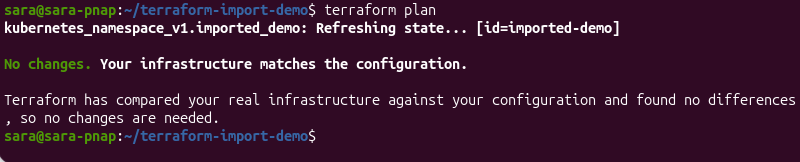
The output confirms that Terraform compared the imported resource with the Terraform configuration and found no differences. The message "No changes. Your infrastructure matches the configuration." indicates that the imported resource is fully managed and no additional changes are required.
Future terraform plan operations continue to compare the imported resource with the Terraform configuration. When Terraform detects approved changes that should be applied to the infrastructure, use terraform apply to implement them.
Terraform Import Methods
Terraform supports two primary methods for importing existing infrastructure. The traditional command-line interface (CLI) method uses the terraform import command, while modern Terraform versions also support declarative imports through import blocks defined in the configuration.
Both methods associate existing resources with Terraform state without recreating the underlying infrastructure. The choice between them depends on the Terraform version, workflow, and whether the import process is performed interactively or managed as code.
The following sections explain the CLI and declarative import methods, their syntax, and the advantages of each approach.
CLI Method
The CLI method uses the terraform import command to associate an existing resource with a Terraform resource address defined in the configuration. During the import process, Terraform records the resource in the state file without modifying the underlying infrastructure.
The CLI workflow requires you to:
1. Identify the correct resource ID.
2. Create a corresponding Terraform resource block.
3. Run the import command manually.
Although newer Terraform versions support declarative imports, the CLI method remains widely used because it is supported across Terraform versions and works well for individual import operations.
The following sections explain the terraform import command syntax, how to identify resource IDs, how to create the required configuration block, and how to interpret the command output.
Syntax and Structure of the Command
The terraform import command associates an existing infrastructure resource with a Terraform resource address.
The basic command syntax is:
terraform import [TERRAFORM_RESOURCE_ADDRESS] [PROVIDER_RESOURCE_ID]Where:
[TERRAFORM_RESOURCE_ADDRESS]. The Terraform resource address defined in the configuration. It identifies where Terraform stores the imported resource in the state file.[PROVIDER_RESOURCE_ID]. The existing resource identifier assigned by the provider. The required format depends on the resource type and provider.
Finding Resource IDs
Every terraform import operation requires a provider-specific resource ID that uniquely identifies the existing infrastructure resource. Terraform uses this identifier to locate the resource and associate it with the corresponding Terraform resource address.
The required resource ID format depends on the provider and resource type. Some resources use simple names, while others require fully qualified resource identifiers, paths, or globally unique IDs.
For example, the Kubernetes provider identifies namespaces by name, while many cloud providers assign unique resource IDs to infrastructure resources.
Always consult the provider documentation to determine the correct resource ID format before running the terraform import command.
Creating the Blank Resource Configuration Block Manually
Before importing a resource, Terraform requires a corresponding resource block in the configuration. During the import operation, Terraform associates the existing infrastructure with this resource block and records the mapping in the state file.
To create the required resource block, perform the following steps:
1. Create or open the Terraform configuration file. In this example, the configuration is stored in a file named main.tf:
nano main.tf2. Add a resource block that matches the existing resource you want to import. In this example, the resource is an existing Kubernetes namespace named imported-demo:
resource "kubernetes_namespace_v1" "imported_demo" {
  metadata {
    name = "imported-demo"
  }
}
The resource block defines the resource type, name, and attributes Terraform uses to create the corresponding resource address.
During the import operation, Terraform associates the existing Kubernetes namespace with this resource block without modifying the namespace itself.
Running the Command and Interpreting Output
After you create the resource configuration block, associate the existing infrastructure resource with the Terraform resource address.
To do so, run the following command:
terraform import kubernetes_namespace_v1.imported_demo imported-demo
The command imports the existing Kubernetes namespace named imported-demo. The output shows the progress of the import operation:
Import prepared!indicates that Terraform successfully identified the existing resource and prepared it for import.Refreshing state...confirms Terraform retrieved the resource information from the provider and recorded it in the state file.Import successful!confirms Terraform now manages the imported resource.
To verify that Terraform added the resource to the state file, run:
terraform state listThe terraform state list command displays all resources currently managed by Terraform. Verify that the imported resource appears in the list before proceeding.
Modern Declarative Method (Import Blocks)
The declarative method uses import blocks to define imports directly in the Terraform configuration. Instead of running a separate terraform import command, administrators declare the resources to import and let Terraform process them during the planning phase.
Because import blocks are stored in the configuration, they support version control, code reviews, and repeatable workflows. This approach is useful when you need to import multiple resources or manage infrastructure through collaborative Infrastructure as Code (IaC) practices.
The following sections explain the import blocks syntax, the advantages of the declarative approach, how to automatically generate configuration, and how to review the generated code before managing imported resources.
Syntax of the import Configuration Block
The declarative method defines imports by using an import block in the Terraform configuration. Each block specifies the Terraform resource address and the provider-specific resource ID required to associate an existing resource with Terraform state.
The basic syntax is:
import {
  to = [TERRAFORM_RESOURCE_ADDRESS]
  id = [PROVIDER_RESOURCE_ID]
}
Where:
[TERRAFORM_RESOURCE_ADDRESS]. Specifies the resource address defined in the Terraform configuration.[PROVIDER_RESOURCE_ID]. Specifies the existing resource identifier assigned by the provider.
Terraform processes import blocks during the planning phase. After a successful import, Terraform records the resource in the state file and treats it the same way as resources originally provisioned through Terraform.
Benefits of Code-Driven Import Over CLI
Unlike the CLI method, declarative imports define the import process directly in the Terraform configuration. This approach makes imports reproducible, easier to review, and simpler to integrate into Infrastructure as Code (IaC) workflows.
The declarative method:
- Stores import definitions alongside the Terraform configuration.
- Supports version control and collaborative code reviews.
- Enables repeatable import workflows across multiple environments.
- Reduces manual execution of individual
terraform importcommands. - Simplifies bulk imports by defining multiple import blocks in a single configuration.
Generating Code Automatically via the -generate-config-out Flag
Terraform is able to generate resource configuration automatically during the import process. Instead of writing the entire resource configuration manually, define an import block and use the -generate-config-out flag to create a Terraform configuration based on the imported resource.
To generate a configuration file automatically, take the following steps:
1. Create or open the Terraform configuration file. In this example, the import block is stored in a file named configmap-import.tf:
import {
  to = kubernetes_config_map_v1.app_config
  id = "imported-demo/app-config"
}
2. Run the following command:
terraform plan -generate-config-out=generated.tf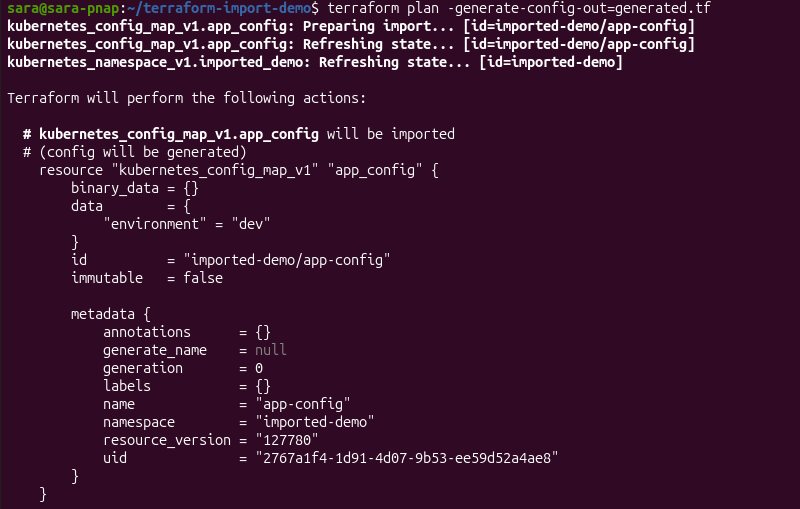
The -generate-config-out flag instructs Terraform to generate a configuration file for the imported resource.
During the planning phase, Terraform prepares the import, retrieves the current resource state, and displays a preview of the generated configuration.
After the operation completes, Terraform writes the generated configuration to generated.tf for review.
Reviewing and Refining Auto-Generated Configuration
Although Terraform generates a valid configuration, the generated code may contain provider-specific attributes, computed values, or default settings that are unnecessary for long-term management. Before using the configuration in production, review it to ensure it accurately represents the desired infrastructure state.
To review the generated configuration, display the contents of generated.tf. For example, use the cat command:
cat generated.tf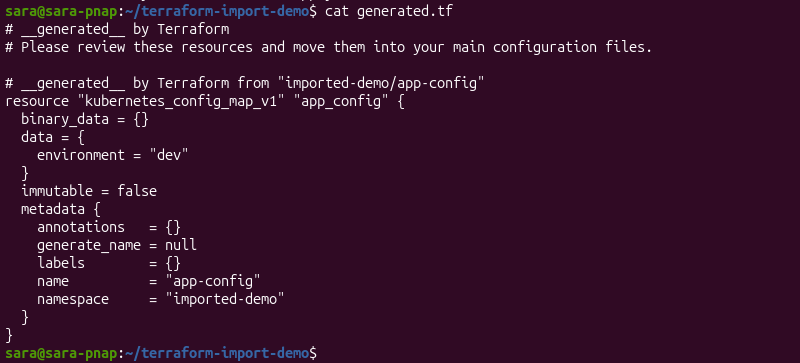
The generated configuration contains the imported resource definition and its current attributes.
Review the configuration to verify that it accurately represents the existing infrastructure. Remove unnecessary or provider-generated values, organize the configuration according to your team's standards, and move the resource definition to the appropriate Terraform configuration file if necessary.
After reviewing and refining the configuration, run terraform plan again to verify that the updated configuration still matches the imported infrastructure before applying future changes.
Troubleshooting Drift and State Alignment
When you import a resource into Terraform state, it does not guarantee the Terraform configuration fully matches the existing infrastructure. Differences between the imported resource and the configuration result in planned changes, missing arguments, or infrastructure drift.
Infrastructure drift occurs when the actual state of a resource differs from the Terraform configuration, typically because the resource was modified or deleted outside Terraform. State alignment helps detect and resolve these differences by ensuring that the Terraform state, configuration, and existing infrastructure accurately reflect one another.
Verifying state alignment after an import helps identify configuration mismatches and infrastructure drift before future changes are applied.
The following sections explain how to verify imported resources with terraform plan, resolve configuration mismatches, and distinguish between computed and user-defined resource attributes.
Running terraform plan Post-Import
After you import a resource, verify the Terraform configuration state file and that the existing infrastructure remains aligned. Use Terraform plan to compare these components and identify any differences before applying changes.
To demonstrate how Terraform detects infrastructure drift, manually delete a Terraform-managed Kubernetes namespace with the following:
kubectl delete namespace terraform-created
After deleting the namespace, run:
terraform plan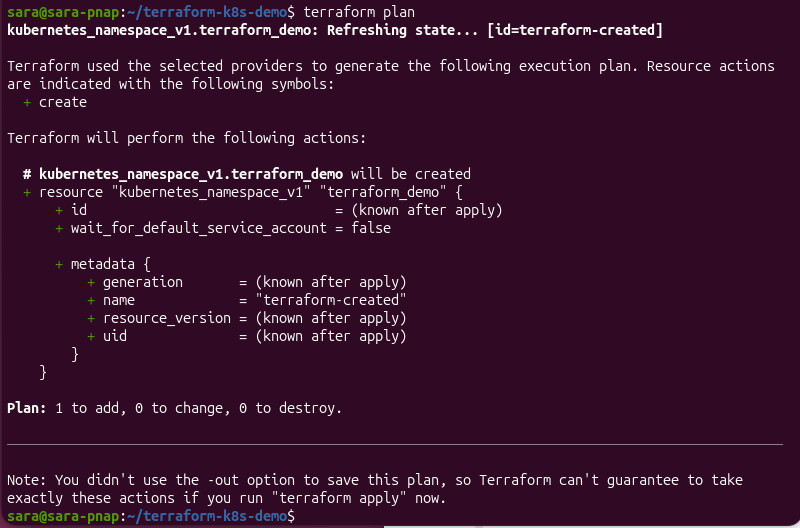
Terraform detects that the namespace recorded in the state file no longer exists and generates an execution plan to recreate it.
In this example, the output shows Plan: 1 to add, 0 to change, 0 to destroy, which indicates Terraform proposes creating the missing resource to restore the desired infrastructure state.
Reviewing the execution plan before applying changes helps identify infrastructure drift and configuration mismatches before they affect the managed environment.
Resolving Attribute Mismatches and Missing Arguments
When you import a resource into Terraform state, it does not guarantee the Terraform configuration fully describes the existing infrastructure. As a result, terraform plan sometimes proposes changes even though the resource was imported successfully.
Attribute mismatches commonly occur because the configuration does not accurately reflect the imported resource. For example, required arguments may be missing, provider defaults may differ from the existing resource settings, or manually created configurations may omit attributes that Terraform expects to manage.
The following example shows a terraform plan operation failing because the imported Kubernetes Service configuration is missing the required spec block.
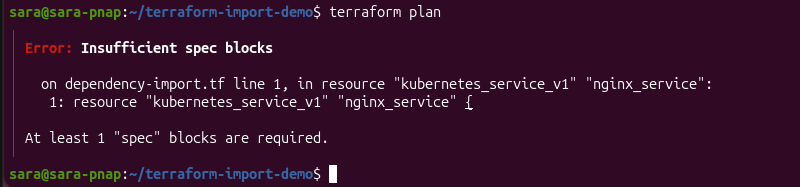
The error occurs because importing a resource associates it with the Terraform state, but it does not generate a complete Terraform configuration. Before Terraform can produce an execution plan, the configuration must include all required resource arguments defined by the provider.
To resolve these differences:
1. Review the terraform plan output to identify the affected resource attributes.
2. Update the Terraform configuration so it accurately reflects the existing infrastructure.
3. Verify all required resource arguments are defined.
4. Run terraform plan again to confirm that the configuration, state file, and existing infrastructure are aligned.
5. Repeat this process until the execution plan reflects the intended infrastructure state before applying any future changes.
Handling Computed Attributes vs. User-Defined Configurations
Terraform configurations contain two types of attributes:
- User-defined attributes. Values administrators explicitly configure.
- Computed attributes. Values assigned automatically by the provider when the resource is created or updated.
During an import, Terraform records both types of attributes in the state file. Therefore, automatically generated configurations include computed values that do not require manual management.
When reviewing imported or generated configurations:
- Keep attributes that define the desired infrastructure state.
- Remove computed attributes Terraform or the provider manages automatically, unless the provider documentation specifies otherwise.
- Retain only the configuration necessary to consistently reproduce and manage the resource.
Reviewing computed and user-defined attributes keeps Terraform configurations concise, maintainable, and less likely to produce unnecessary changes during future terraform plan operations.
Advanced Import Scenarios
Many Terraform environments contain more than individual resources in the root module. Production deployments often include complex resource types, nested modules, resource dependencies, and infrastructure distributed across multiple regions or accounts.
Although Terraform Import uses the same core workflow in these environments, importing complex infrastructures requires additional planning to ensure resources are imported into the correct locations and remain consistently managed.
The following sections explain how to import complex resources, handle dependencies, work with nested modules, and manage imports across multi-region and multi-account environments.
Importing Complex Resource Types
Some infrastructure resources are more complex to import than others because they contain nested attributes, references to other resources, or provider-managed values. Examples include Kubernetes ConfigMaps, network security rules, load balancers, and other resources that store structured configuration data.
Although Terraform Import associates these resources with the Terraform state in the same way as simpler resources, it’s important to carefully review the generated or manually created configuration after the import. Missing nested attributes, incorrect references, or provider-generated values cause Terraform to detect unexpected differences during subsequent terraform plan operations.
When importing complex resource types:
- Verify that nested resource attributes accurately reflect the existing infrastructure.
- Confirm that references to other managed resources remain valid.
- Review provider-generated or computed values before adding them to long-term Terraform configurations.
- Run
terraform planafter the import, to verify that the configuration matches the existing resource.
Importing Resources with Multiple Dependencies
Resources often depend on other infrastructure components to function correctly. Importing only part of a deployment can result in incomplete Terraform management, even when the imported resource itself is successfully associated with the Terraform state.
Dependencies vary by provider and resource type. For example, a virtual machine may depend on a virtual network and subnet, different Kubernetes objects may depend on a namespace, and a cloud load balancer may reference multiple backend resources. Before importing dependent resources, identify these relationships to ensure Terraform can accurately represent the infrastructure.
When importing resources with dependencies:
1. Identify the resources required for the imported infrastructure to function correctly.
2. Import dependent resources in a logical order when they are managed separately.
3. Verify that resource references and identifiers remain consistent across the Terraform configuration.
4. Run terraform plan after each import to confirm that the execution plan reflects the intended infrastructure state.
Planning imports around resource dependencies reduces configuration inconsistencies and minimizes unexpected changes during future Terraform operations.
Handling Modules and Importing into Nested Module Paths
Terraform modules are reusable collections of Terraform configuration files that organize related infrastructure resources into logical units. Modules simplify infrastructure management, promote code reuse, and improve consistency across environments. They are used to structure larger Terraform deployments, such as infrastructure provisioned on cloud and Bare Metal Cloud platforms.
When importing a resource managed by a module, Terraform requires the full module path in addition to the resource address. This ensures the imported resource is associated with the correct module in the Terraform state, rather than with the root module.
The same approach applies to nested modules. For resources defined inside multiple module levels, include each module name in the resource address. For example, a resource inside a child module may use a resource address like:
module.parent.module.child.resource_type.resource_nameIn nested module structures, continue extending the resource address by including each module level before it.
The following example demonstrates the import process using a single-level module. The same syntax applies to nested modules by extending the module path.
Do the following:
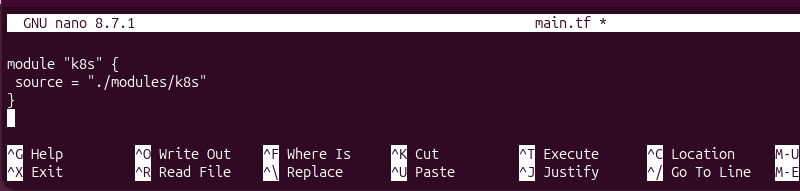
1. Create or open the main Terraform configuration file. In this example, the module is placed in main.tf:
module "k8s" {
  source = "./modules/k8s"
}
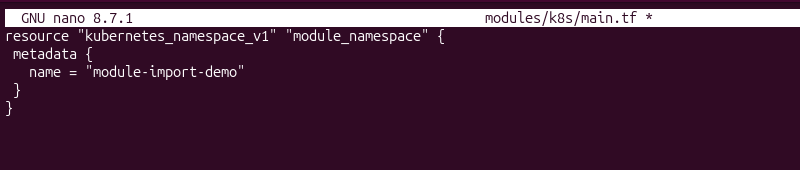
2. Create or open the module configuration file. In this example, the resource is defined in modules/k8s/main.tf:
resource "kubernetes_namespace_v1" "module_namespace" {
  metadata {
    name = "module-import-demo"
  }
}
3. Initialize the Terraform working directory:
terraform init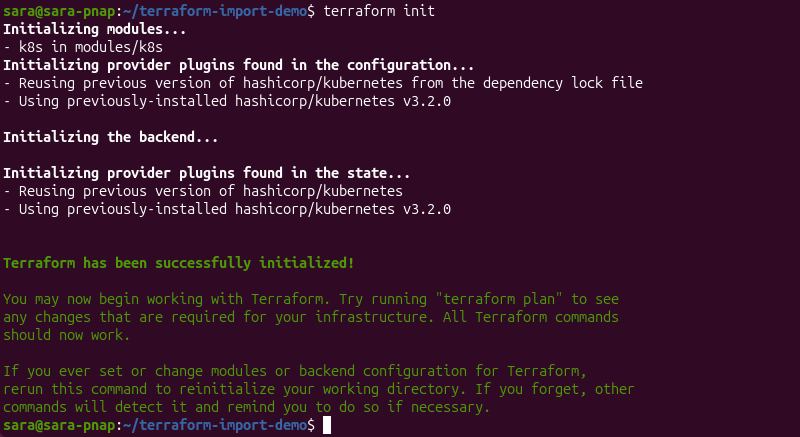
The command initializes the working directory, installs the module, and prepares the required provider plugins for Terraform operations.
4. Create the Kubernetes namespace that will be imported into the module:
kubectl create namespace module-import-demo
5. Verify that the namespace exists:
kubectl get namespace module-import-demo
6. Import the namespace into the module by specifying the full module path:
terraform import module.k8s.kubernetes_namespace_v1.module_namespace module-import-demo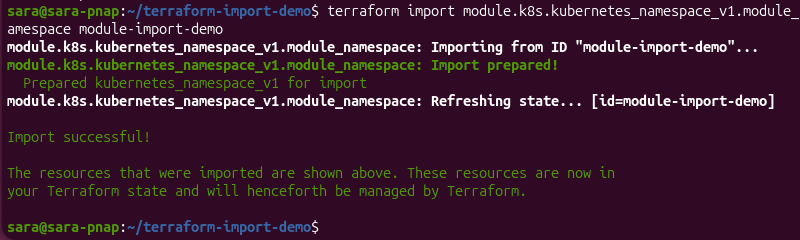
The module.k8s.kubernetes_namespace_v1.module_namespace resource address tells Terraform to associate the existing namespace with the resource defined in the k8s module rather than the root module.
The module.k8s prefix identifies the module, while kubernetes_namespace_v1.module_namespace identifies the resource within that module.
After the import completes successfully, Terraform records the resource in the module's section of the state file and manages it as part of the module configuration.
Importing Multi-Region or Multi-Account Infrastructures
Organizations often manage infrastructure across multiple regions, cloud accounts, or subscriptions. In these environments, Terraform imports require additional planning to ensure resources are associated with the correct provider configuration and Terraform state.
Terraform uses provider aliases to manage resources across multiple environments. During an import, ensure the resource is imported using the provider configuration that corresponds to the region or account where the resource exists. Importing a resource with the wrong provider configuration results in failed imports or unintended infrastructure changes.
When importing resources across multiple regions or accounts:
- Verify that the correct provider configuration and credentials are in use.
- Confirm that the resource ID matches the target environment.
- Keep Terraform state files separated for independent environments whenever possible.
- Run
terraform planafter each import to verify that the imported resource matches the Terraform configuration before applying changes.
Carefully planning imports across multiple environments helps maintain consistent Terraform state and reduces the risk of managing resources in the wrong region or account.
Dynamic and Bulk Imports
Importing individual resources works well for small environments, but manually importing dozens or hundreds of existing resources can become time-consuming and difficult to maintain. As infrastructure grows, Terraform offers features and tools to automate and simplify large-scale import operations.
Terraform supports declarative bulk imports with for_each, while features such as dynamic blocks simplify configuring imported resources with repetitive nested attributes. For larger infrastructure migrations, administrators can also automate command-line imports or use third-party tools to accelerate the migration process.
The following sections explain common approaches for importing multiple resources efficiently while maintaining accurate Terraform state and configuration.
Using For-Each and Dynamic Blocks with Import Constructs
Managing large numbers of similar resources individually makes Terraform configurations difficult to maintain. During import operations, for_each enables you to import multiple resources using a single import block and resource definition.
Although dynamic blocks are not used to perform imports, they help simplify the Terraform configuration for managing imported resources after the import completes. Instead of manually defining multiple identical nested blocks, dynamic blocks generate them automatically from a collection of values.
The following example demonstrates how to use for_each to import multiple Kubernetes namespaces.
1. Create or open the Terraform configuration file. In this example, the configuration is stored in foreach-import.tf:
locals {
  namespaces = {
    dev  = "foreach-dev"
    prod = "foreach-prod"
  }
}

import {
  for_each = local.namespaces

  to = kubernetes_namespace_v1.foreach_namespaces[each.key]
  id = each.value
}

resource "kubernetes_namespace_v1" "foreach_namespaces" {
  for_each = local.namespaces

  metadata {
    name = each.value
  }
}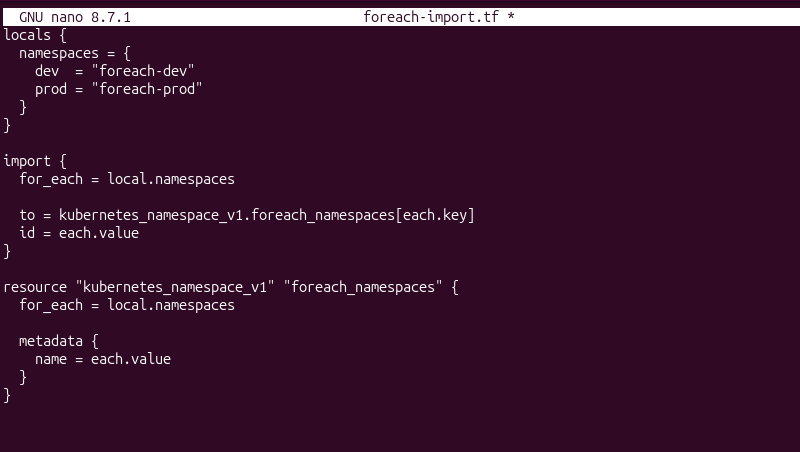
The locals block defines the collection of namespaces to import. Terraform then uses for_each to iterate over each entry and automatically creates a corresponding import operation and resource instance.
2. Initialize the Terraform working directory:
terraform init3. Run the following command:
terraform plan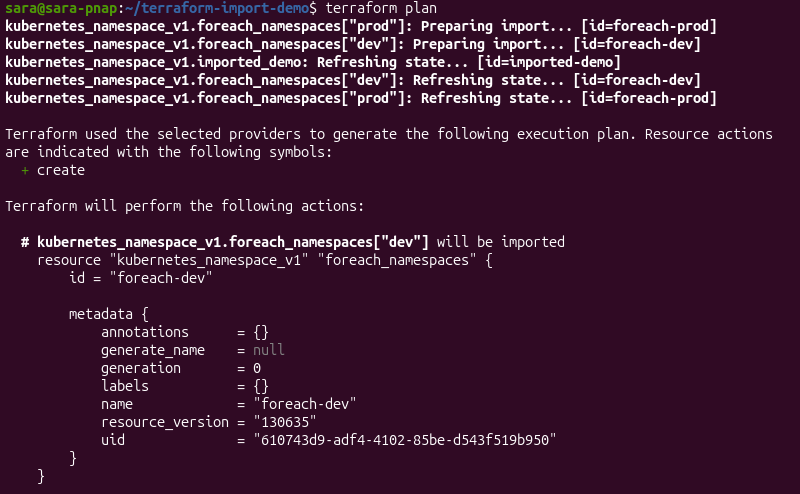
The execution plan shows Terraform preparing a separate import operation for each namespace in the collection. Using for_each eliminates the need to define individual import blocks for every resource, making large-scale imports easier to manage and maintain.
Scripting CLI Imports for Large-Scale Infrastructure Migrations
Organizations often automate the import process by generating and executing Terraform Import commands with scripts. Scripting automates repetitive tasks by executing a predefined sequence of commands without requiring manual intervention.
Scripts can retrieve existing resource identifiers from cloud provider APIs, Kubernetes clusters, inventory files, or other infrastructure management systems. The collected resource IDs are then used to generate terraform import commands that import resources into the appropriate Terraform resource addresses.
Scripting the import process provides several benefits:
- Reduces repetitive manual work and the risk of human error.
- Improves consistency across large import operations.
- Simplifies the import of resources distributed across multiple environments.
- Enables organizations to integrate Terraform imports into migration or infrastructure automation workflows.
Although scripting automates the import process, users still need to review the generated Terraform configuration and run terraform plan after the import to verify the imported resources accurately reflect the existing infrastructure before applying any changes.
Utilizing Third-Party Tools
Large infrastructure environments often contain hundreds or thousands of existing resources, which makes manual imports difficult to manage.
Third-party tools are able to automate resource discovery, generate Terraform configuration, and reduce the amount of manual work required during infrastructure migrations.
The following table compares two common approaches for automating Terraform imports, Terraformer and common cloud-native tools:
| Feature | Terraformer | Cloud-Native Export Tools |
|---|---|---|
| Primary purpose | Discovers existing infrastructure and generates Terraform configuration and state for supported providers. | Export existing infrastructure into Terraform-compatible configuration using provider-specific tools. |
| Best suited for | Multi-cloud environments and large-scale infrastructure migrations. | Organizations using a single cloud provider, such as Azure or AWS. |
| Advantages | Supports many providers, automates resource discovery, and reduces manual configuration. | Optimized for specific cloud platforms and often provides better provider-specific support. |
| Considerations | Generated configuration should always be reviewed and refined. | Availability and capabilities vary by cloud provider. |
Regardless of the tool used, always review the generated Terraform configuration, validate resource mappings, remove unnecessary provider-generated attributes, and run terraform plan before applying changes.
Terraform Import in CI/CD Automation
Organizations often integrate Terraform into continuous integration and continuous deployment (CI/CD) pipelines to standardize infrastructure management. Automating Terraform imports within these workflows helps reduce manual effort, improve consistency, and support large-scale infrastructure migrations.
However, importing resources in automated environments requires additional considerations beyond the import operation itself. Pipeline execution, state locking, authentication, and provider permissions all influence whether imports complete safely and consistently.
The following sections explain key considerations when incorporating Terraform Import into CI/CD workflows.
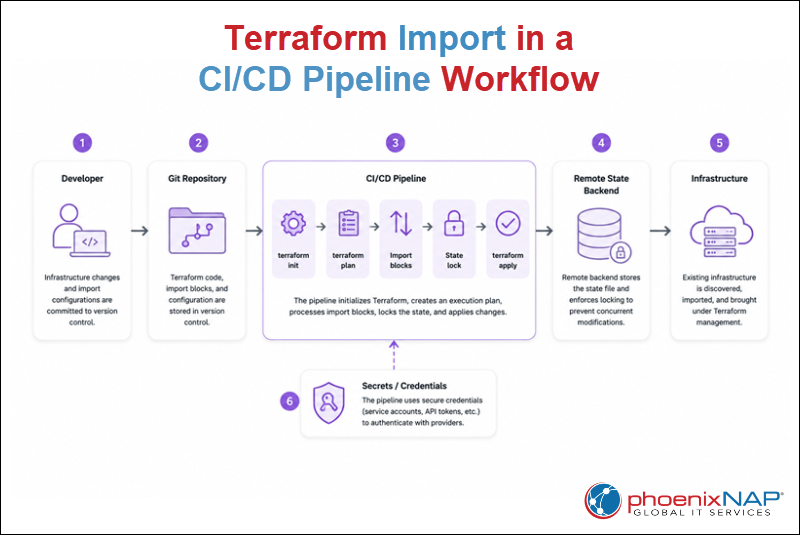
Running Declarative Imports in Pipelines
CI/CD pipelines automate Terraform workflows by executing infrastructure changes from version-controlled configuration.
Instead of running terraform import commands manually, modern Terraform workflows define import blocks directly in the configuration, which allows imports to become part of the standard planning and deployment process.
As shown in the workflow above, the CI/CD pipeline:
1. Initializes the Terraform working directory
2. Evaluates the import blocks during the planning stage
3. Applies the import as part of the deployment workflow.
This approach keeps the import process consistent, repeatable, and fully integrated with the existing infrastructure-as-code lifecycle.
Running declarative imports in CI/CD pipelines provides several benefits:
- Stores import definitions alongside the Terraform configuration in version control.
- Enables code reviews before importing existing infrastructure.
- Provides a consistent and repeatable import workflow across environments.
- Reduces manual execution and the risk of configuration drift.
- Integrates imports with existing Terraform planning and deployment processes.
Because import blocks are part of the Terraform configuration, they can be managed, reviewed, and executed using the same CI/CD workflow as any other infrastructure change.
State Locking and Concurrency During Automated Import Operations
When Terraform imports resources in automated environments, multiple users or CI/CD pipelines may attempt to modify the same Terraform state simultaneously. Without proper coordination, concurrent operations lead to failed imports, inconsistent state, or state corruption.
As illustrated in the workflow above, Terraform uses state locking to prevent multiple operations from modifying the same state file concurrently. Before performing an import or other state-changing operation, Terraform acquires a lock on the remote state. Other operations must wait until the lock is released before continuing.
State locking is managed by the remote backend rather than Terraform itself. Many remote backends provide built-in locking mechanisms to ensure that only one Terraform operation modifies the state at a time.
To reduce concurrency issues during automated import operations:
- Store Terraform state in a remote backend that supports state locking.
- Avoid running multiple import pipelines against the same state simultaneously.
- Separate Terraform state files for independent environments whenever practical.
- Review failed or interrupted pipeline executions before rerunning import operations.
Using remote state together with state locking helps maintain a consistent Terraform state and reduces the risk of conflicting changes during automated infrastructure management.
Pipeline Authentication and Provider Permissions Required for Import
Before a CI/CD pipeline can import existing infrastructure, it must authenticate with the target provider and have sufficient permissions to discover and manage existing resources. As shown in the workflow above, pipelines use securely managed credentials, such as service accounts, API tokens, or cloud identity roles, to authenticate with infrastructure providers.
The required permissions depend on the provider and resource type. In addition to reading existing infrastructure, the pipeline must have permission to update the Terraform state during the import process. Granting excessive permissions increases security risks, while insufficient permissions can cause import operations to fail.
To improve the security and reliability of automated imports:
- Store credentials in a secure secrets management system instead of hardcoding them in pipeline configurations.
- Follow the principle of least privilege by granting only the permissions required for the import operation.
- Rotate credentials regularly according to organizational security policies.
- Verify provider authentication before executing automated Terraform workflows.
- Audit pipeline access and provider permissions periodically to ensure they remain appropriate.
Using secure authentication together with properly scoped provider permissions helps protect infrastructure while ensuring automated Terraform imports execute reliably across development, testing, and production environments.
Terraform Import Best Practices
Successfully importing existing infrastructure requires more than associating resources with the Terraform state. Following established best practices helps maintain accurate Terraform configurations, reduce configuration drift, and ensure that imported resources remain manageable throughout their lifecycles.
When importing existing infrastructure, consider the following best practices:
- Define the Terraform configuration before importing resources. Ensure each resource has a corresponding configuration block before associating it with the Terraform state.
- Verify resource IDs before running imports. Confirm that the provider-specific resource identifier matches the intended infrastructure resource.
- Review generated configuration carefully. Remove unnecessary provider-generated attributes and refine automatically generated code before managing resources with Terraform.
- Run
terraform planafter every import. Verify that the Terraform configuration, state, and existing infrastructure are aligned before applying changes. - Use remote state for collaborative environments. Store Terraform state in a shared backend that supports state locking to improve consistency across teams.
- Keep imports under version control. Store import blocks and related configuration with the rest of the Terraform code to improve collaboration, auditing, and repeatability.
- Test imports in non-production environments whenever possible. Validate the workflow before importing production infrastructure.
Terraform Import Common Mistakes
Even when an import operation completes successfully, configuration issues can cause unexpected changes during future Terraform operations. Understanding common mistakes helps reduce troubleshooting time and improves the reliability of imported infrastructure.
Avoid the following common mistakes:
- Importing the wrong resource. Using an incorrect resource ID associates the wrong infrastructure resource with the Terraform configuration.
- Assuming import creates a complete configuration. Terraform imports resources into the state file but does not automatically produce a fully optimized configuration.
- Ignoring
terraform planafter an import. Skipping the execution plan leaves configuration mismatches or missing arguments undetected. - Modifying imported resources manually after the import. Changes made outside Terraform increase the likelihood of infrastructure drift.
- Running concurrent imports against the same state. Simultaneous operations without proper state locking can result in failed imports or inconsistent Terraform state.
- Granting excessive provider permissions. Overly broad permissions increase security risks without improving the import process.
- Applying changes without reviewing the execution plan. Always verify the proposed actions before updating existing infrastructure.
Conclusion
This article explained what Terraform Import is, its basics, and how it works. It also elaborated on the main import methods, advanced import scenarios, and other related scenarios. The text provided Terraform Import best practices and introduced common mistakes and their solutions.
Next, learn what Terraform backends are and how they work.