IT infrastructure is easier to manage when it is divided into smaller components. With Terraform modules, you can define infrastructure in configuration files and reuse the same code for different projects or cloud providers.
Modules let you treat infrastructure components as black boxes. You provide input values and use the outputs, without needing to understand how everything works internally.
In this article, you will learn how Terraform modules work, what benefits they offer, and how to use them effectively in your projects.
What Are Terraform Modules?
In Terraform, a module is a collection of .tf files stored in a directory. You define the desired infrastructure, such as servers, networks, and storage, using .tf configuration files written in the HashiCorp Configuration Language (HCL).
For example, a Virtual Private Cloud (VPC) module might define networks, subnets, and gateways. You can call the module to provision a full network stack with just a few lines of code.
Every Terraform configuration has a root module, which is the directory where you run Terraform commands. Within this module, you can use module blocks to reference other modules. When you apply the configuration, Terraform loads these modules and creates the resources they define.
Modules can be stored locally (in other directories) or fetched from external sources, such as the Terraform Registry.
Terraform Module Structure
A Terraform configuration starts with a root module. The root module is the directory where you run Terraform commands, and it can reference one or more child modules using module blocks.
Note: module blocks are usually defined in the root module's main.tf file. This is not a strict requirement, but placing module blocks in main.tf keeps the configuration easier to follow.
This is an example of two module blocks in a .tf file in the root module:
module "network" {
  source = "./modules/vpc"

  cidr_block = "10.20.0.0/16"
}

module "web_server" {
  source = "./modules/web_server"

  size = "small"
}
The first block references a network module, while the second references a web server module.
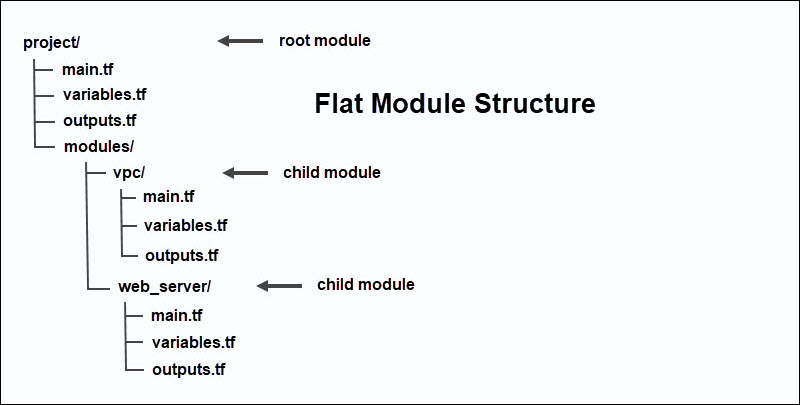
In a typical project structure, the root module contains the main configuration files, while each module has its own directory and .tf files. For example, the vpc module defines networking resources, while the web_server module defines compute resources.
A child module can also reference other modules. This creates a nested module structure in which one module depends on another. Terraform supports this, but deeply nested modules can make configurations harder to understand and maintain:
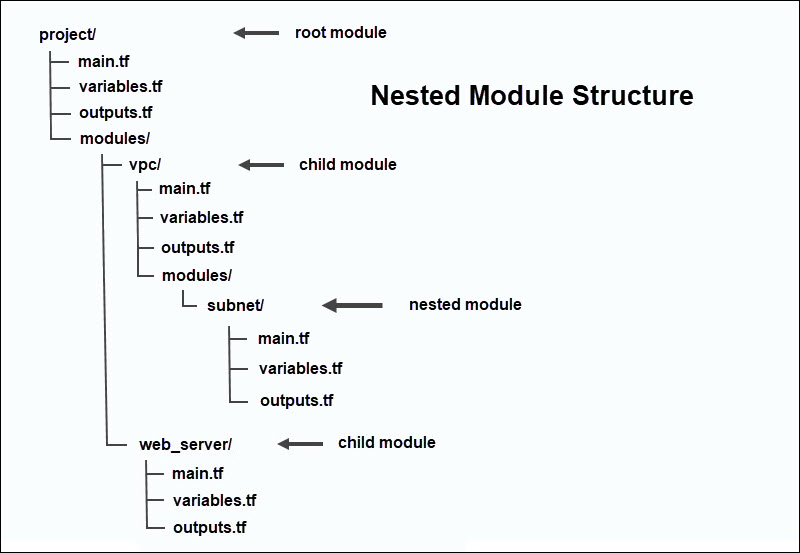
It is usually better to keep the structure simple and relatively flat. Smaller modules are also easier to understand and can be reused in different setups.
Terraform Resources vs. Modules
A resource is a single infrastructure component such as a database, virtual machine, or network. Resources are the basic parts you use to build infrastructure.
A module is a collection of these resources grouped together in a directory. Modules help you organize these parts and reuse them in different projects.
For example, instead of setting up a server or network one by one each time, you can group them into a module and use that setup in multiple configurations.
Terraform Workspaces vs. Modules
Workspaces and modules in Terraform are often used together, but they solve different problems. Workspaces let you manage separate instances of the same infrastructure using one set of configuration files.
Each workspace keeps its own record of the infrastructure it manages in a state file. This means you can track development, staging, and production environments separately without duplicating the code.
The main difference is that workspaces separate state, while modules help you break infrastructure code into reusable parts.
Types of Terraform Modules
You can classify Terraform modules based on where they are stored and how they are sourced. Different types of modules are explained in the sections below.
Local Modules
Local modules are stored in the local filesystem. They are usually used in a single project, are easy to work with, and are not shared with other projects.
To use a local module, add its path to the source argument in the module block:
module "network" {
  source = "./modules/vpc"
}
In this example, the ./modules/vpc path points to a module stored in the local project directory.
Registry Modules
Registry modules are stored in a shared online location, like the official Terraform Registry. Organizations and individuals often publish their modules so others can reuse infrastructure code and deploy resources without starting from scratch.
A public registry module usually follows this source format:
namespace/module-name/providerYou can also store modules in a private registry, so only people in your organization can use them. Companies often use private modules to share approved infrastructure setups internally.
To use a registry module, add its registry source in the module block. If you can, pin a specific version so Terraform always uses the same release.
module "web_server" {
  source  = "example-org/server/cloud"
  version = "0.31.0"
}
In this example, web_server is the local name of the module in the configuration. The source argument tells Terraform where to find the module:
- example-org. The organization or namespace that publishes the module.
- server. The name of the module in the registry.
- cloud. The platform or provider for which the module is designed.
The version argument makes sure Terraform uses a specific version of the module.
VCS Modules
You can store modules in a version control system (VCS) like GitHub or GitLab instead of a registry. This approach is very common because it allows teams to work together and maintain full control over versioning.
To use a module from a VCS, add the repository URL in the source argument of the module block:
module "server" {
  source = "git::https://github.com/example/terraform-server-module.git"
}
You can also lock the module to a specific version using the ref parameter:
module "server" {
source = "git::https://github.com/example/terraform-server-module.git?ref=v0.31.0"
}
This ensures that Terraform always uses the same version of the module.
Benefits of Terraform Modules
The advantages of using Terraform modules are clear:
- No code duplication. Modules already define the infrastructure. You only need to reference modules to provision resources. The same module can be used several times in one configuration or across different projects.
- Code stays clean and readable. HCL is straightforward to read and write. However, large configurations are hard to manage when the same code appears over and over. You can replace long, repeated blocks with a single reference inside a
moduleblock. - Consistency and compliance. By using predefined modules, you ensure that the infrastructure is created in a consistent way. This reduces configuration errors and helps teams maintain the same standards in different projects and environments.
- Simpler configuration. Modules hide the internal details of how resources are created. You can focus on providing input and output values instead of resource definitions.
- Fewer human errors. With less manual setup, there is less chance for mistakes. Teams can rely on modules to automate infrastructure provisioning and reuse components that have already been proven in practice.
Note: To see how Terraform provisions infrastructure in practice, read our tutorial on using Terraform with phoenixNAP Bare Metal Cloud.
When to Use Terraform Modules?
Modules are especially useful if you:
- Always use the same setup. If you repeatedly deploy the same configuration, modules can help you work faster.
- Need a more structured configuration. As your infrastructure grows, it becomes harder to manage. Modules help by dividing your setup into smaller components that are easier to handle and reuse.
- Want reusable building blocks. Many configurations only differ slightly. Instead of starting from scratch every time, you can reuse existing modules and only make small adjustments to the input values.
- Share infrastructure across teams. Different teams can use the same modules and deploy identical configurations throughout your organization.
- Need more control over updates. When a shared module is updated, changes are not automatically applied everywhere. Teams can review and test the update before applying it to different projects or environments.
Note: If you are ready to take the next practical step but have not installed Terraform yet, read our guide on how to install Terraform on Windows, Linux, and macOS.
How to Create Terraform Modules
You can create a Terraform module by placing .tf configuration files in a directory. The module can then be referenced from the root module using a module block.
Step 1: Create a Directory
Use the mkdir command to create a new directory to hold the module's .tf files:
mkdir -p modules/serverUse clear and descriptive names so the module is easy to recognize in your code. In this example, modules/ is a typical directory name for reusable modules, while server is the module itself.
Step 2: Add Configuration Files
Create one or more .tf files inside the module directory. Most modules use the following structure:
| main.tf | In this file, you define what the module will create. For example, a resource block in main.tf can provision a web server and specify its operating system, size, location, and SSH access. |
| variables.tf | This is where you define the values the module accepts from the user. Instead of hardcoding the server's location or size, you can use variables so these options can be changed whenever you use the module. |
| outputs.tf | This file lists the values the module returns after it creates the resources. For example, the module can return the server's IP address, which other resources or modules in your setup can use. |
You do not have to follow this exact file structure, but it is a common way to keep the module organized and easier to understand. Terraform will read all .tf files in a module directory, no matter what you name them.
Step 3: Define Resources
Add the resources your module will manage to the main.tf file. A resource block tells Terraform what to build, while the arguments inside the block define the resource settings.
For example, the following module creates a Bare Metal Cloud server using the phoenixNAP provider (pnap):
resource "pnap_server" "server" {
  hostname = var.hostname
  type     = var.server_type
  location = var.location
  os       = var.os

  ssh_keys = var.ssh_keys
}
In this example, the resource block does not hardcode server details. Instead, it uses variables such as var.hostname, var.os, and var.server_type. This way, you can reuse the module by providing different values each time. These inputs are usually defined in the variables.tf file.
You can add multiple resource blocks to the same main.tf file. For example, you can define a server in one block, then use additional blocks to set up storage, security rules, or access settings. This lets you group related resources into one reusable unit.
Step 4: Define Input Variables
Variables let users pass custom values into a module at runtime. These variables are usually defined in the variables.tf file, and they describe which values the module expects. The actual values are provided when you call the module from the root configuration.
variable "hostname" {
  description = "Server name."
  type        = string
}

variable "server_type" {
  description = "Server type or size."
  type        = string
}

variable "location" {
  description = "The location of the data center where the server will be deployed."
  type        = string
}

variable "os" {
  description = "The operating system to install on the server."
  type        = string
}

variable "ssh_keys" {
  description = "A List of SSH public keys to access the server."
  type        = list(string)
}
The variable name must match the names used in main.tf. Since the type = var.server_type variable is referenced in the resource block in main.tf, the variables.tf file also needs to define a server_type variable.
You can also set default values using the default argument. For example:
variable "location" {
  description = "Data center location where the server will be deployed."
  type        = string
  default     = "PHX"
}
With this default in place, the location input will always default to PHX (Phoenix). Users do not have to provide a location every time they call the module, unless they want to override it.
Step 5: Define Module Outputs
A module can return useful output values after it creates a resource. To share these values with the root module, you first need to define them in the outputs.tf file.
In this example, the module will return the server ID and public IP addresses after Terraform creates the server:
output "server_id" {
  description = "ID of the created server."
  value       = pnap_server.server.id
}

output "public_ip_addresses" {
  description = "Public IP addresses assigned to the server."
  value       = pnap_server.server.public_ip_addresses
}
After the module is called, you can reference the server_id and public_ip_addresses outputs from the root module. The root module can then use these values in the configuration or pass them to other resources.
To reuse the module, keep it in your local project directory or store it in a Git repository to share with your team.
How to Use Terraform Modules
If you are using a module that creates provider-specific resources, the required provider must be configured in the root module beforehand. In this example, the module creates a phoenixNAP Bare Metal Cloud server using the pnap provider.
Step 1: Add Module to Configuration
To use the module, add a module block to the main.tf file in the root configuration:
module "server" {
  source = "./modules/server"

  hostname    = "web-01"
  server_type = "s1.c1.medium"
  location    = "PHX"
  os          = "ubuntu/bionic"

  ssh_keys = [
    "ssh-rsa AAAA..."
  ]
}
In this block, the source argument tells Terraform where to find the module. The other arguments provide values for the input variables defined in the module's variables.tf file:
| hostname | The server's name |
| server_type | Defines the server's size. |
| location | The datacenter location. |
| os | Defines the operating system. |
| ssh_keys | Provides the SSH public key used to access the server. |
The module will use these input values to configure the pnap_server resource defined inside the server child module.
Step 2: Initialize Terraform
Navigate to the Terraform root module directory and run the following command:
terraform initTerraform will install the required pnap provider plugin and load the modules referenced in your configuration.
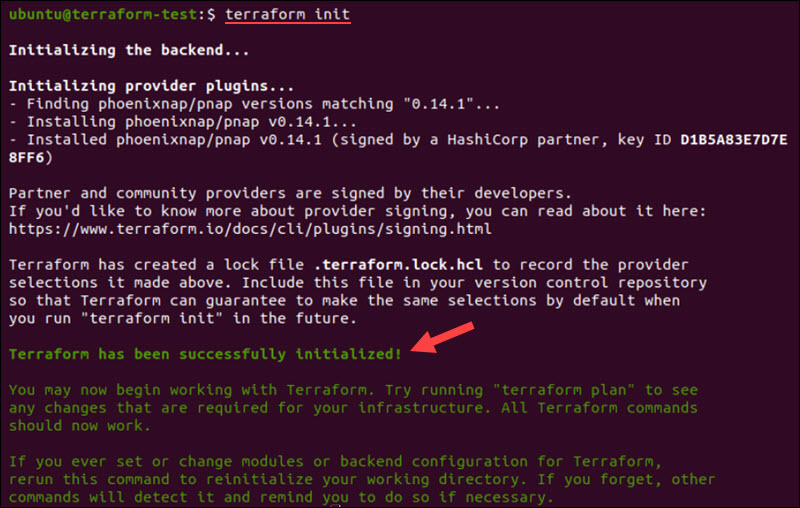
If the module is stored locally, Terraform reads it from the path you set in the source argument. If the module comes from a remote source, like a registry or Git repository, Terraform downloads it automatically.
Step 3: Review the Execution Plan
Use the following command to see the execution plan before you start creating resources:
terraform planTerraform shows a plan and lists the actions it will take. This step is important, especially if you are new to Terraform, because it lets you review the changes before you update the infrastructure.
Step 4: Apply the Configuration
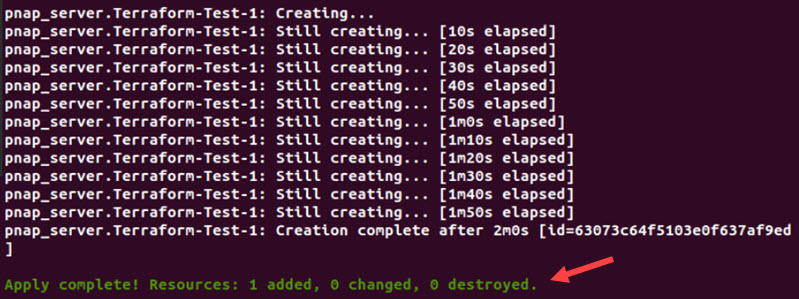
Enter the following command to apply the configuration:
terraform applyTerraform displays the execution plan and asks for confirmation before making any changes.

Once you approve, Terraform creates the resources defined inside the module and records them in a state file.
The state file helps Terraform track which real infrastructure resources are part of your configuration. This way, Terraform knows what already exists when you run commands later.
Step 5: Use Module Outputs
If you defined outputs in the module's outputs.tf file, you can reference them in the root module. For example:
output "server_id" {
  value = module.server.server_id
}

output "public_ip_addresses" {
  value = module.server.public_ip_addresses
}
After the module is called, the server_id and public_ip_addresses outputs are available through the module name. In this example, the module block is called server, so the outputs are referenced as module.server.server_id and module.server.public_ip_addresses.
You can use these values in other resources, pass them to a different module, or display them as final outputs.
Terraform Modules: Best Practices
Apply the following practices when working with Terraform modules:
- Keep modules small and focused. A module should solve one clear problem. For example, use one module to create a server, another for a network, and another for storage. Smaller modules are easier to understand, test, and reuse in different projects.
- Do not nest modules too deeply. If the root module calls one module, that module calls another, and that module calls yet another, it gets difficult to track where resources are defined and how values move between them. Troubleshooting also becomes harder because problems may appear in one module but actually originate from another.
- Build modules so they can be reused. Reusability is one of the main reasons to use Terraform modules. To make modules more reusable, avoid hardcoding names, locations, server sizes, or operating systems directly inside the module. Use input variables for these values instead.
- Document all inputs and outputs. Explain what each variable does, which ones are required, and what the module returns. Good documentation helps others use your module and reduces mistakes when it's reused.
- Use versioning for shared modules. If you are using modules from a Git repository, pin them to a specific version. This way, you avoid surprises if the module changes in the future.
- Keep provider configuration in the root module. Avoid putting provider credentials or settings inside reusable modules. This way, you can use the same child module in different environments.
- Use a standard file structure. Use clear file names, such as main.tf, variables.tf, and outputs.tf. For shared modules, include a README and examples to help understand how to use the module correctly.
Conclusion
This tutorial showed you how to create and use Terraform modules, as well as the best practices to follow in your projects. As you start using modules in your workflow, you'll find it easier to deploy and manage infrastructure.
If you want to add more infrastructure resources using Terraform, Bare Metal Cloud is a solid choice for dedicated server workloads. Use this cloud pricing calculator to find the setup that works best for you.