Link aggregation (i.e., bonding or teaming) combines multiple physical Ethernet connections into a single logical link. This technique enhances the network capacity and resilience between two networking devices.
The Link Aggregation Control Protocol (LACP) provides a dynamic and standardized method for link aggregation. LACP's automated port management and redundancy capabilities make it a preferred choice for environments that require high availability and increased bandwidth.
In this article, learn how to check dual network card LACP bonds on Linux and Windows.
How to Verify LACP Bond Status on Linux
Verifying an LACP bond on a Linux server involves inspecting the bonding driver and the individual interfaces that constitute the bond.
To check the status of the bonding driver:
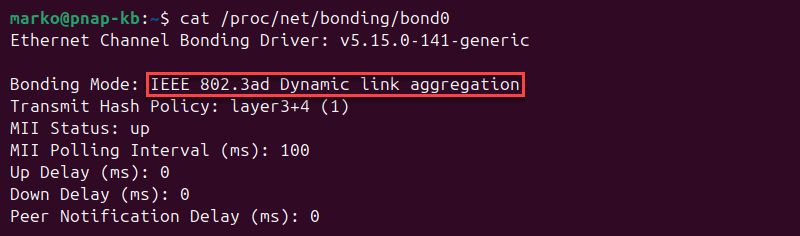
1. Use the cat command to inspect the bond interface file in the /proc/net/bonding directory:
cat /proc/net/bonding/[bond_interface]Replace [bond_interface] with the name of the bonded interface (e.g., bond0).
cat /proc/net/bonding/bond02. Ensure the Bonding Mode is IEEE 802.3ad Dynamic link aggregation.
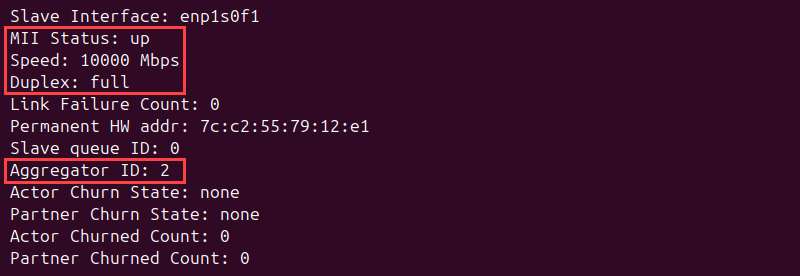
3. Verify the status of the member interfaces that constitute the bond. In the Slave Interface section for each bonded interface, the MII Status field should be up, indicating that the link is active.
Additionally, the reported Speed, Duplex, and Aggregator ID settings should match the expected values and be consistent across all member interfaces.
Note: The ip a show [interface_name] or ifconfig [interface_name] command can also be used to check the overall status of each member interface. The ethtool [interface_name] command provides more details about each interface, including link status, speed, duplex, and other relevant parameters.
4. Check the 802.3ad info section for insights into the LACP configuration, including the LACP rate and Aggregator selection policy.

Verify LACP Bond on Ubuntu with Netplan
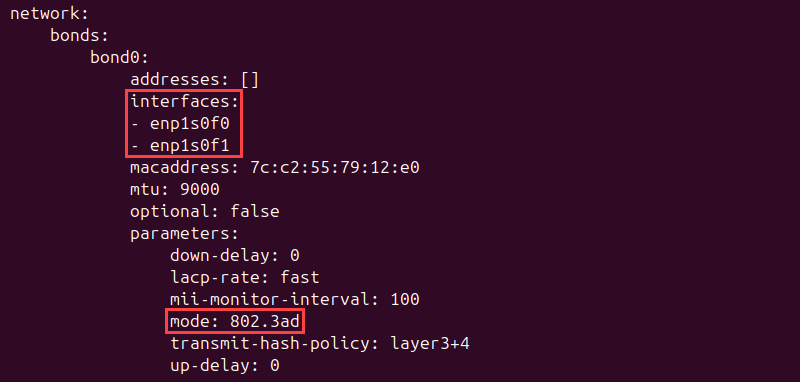
On Ubuntu systems that use Netplan for network configuration, verifying an LACP bond involves inspecting the YAML configuration files and using specific commands. The Netplan configuration files are YAML files in the /etc/netplan/ directory (e.g., 01-netcfg.yaml, 50-cloud-init.yaml, 17-bonding.yaml).
Use the following steps to access the files and check the bond status:
1. Inspect the files with the cat command:
sudo cat /etc/netplan/50-cloud-init.yaml2. Locate the bonds section in the output. This section contains the interfaces subsection, which lists the names of the physical Ethernet interfaces that are part of the bond. The parameters section should contain mode: 802.3ad, confirming that LACP is the configured bonding mode.
Netplan also provides utilities for configuration verification. The netplan status command shows the status of network interfaces managed by Netplan, including the bond interface:
netplan status
Note: For more verbose output during configuration application, use the commands sudo netplan --debug generate and sudo netplan --debug apply.
Verify LACP Bond on Rocky Linux with Configuration Files
On Rocky Linux systems configured using traditional network configuration files, the files are in the /etc/sysconfig/network-scripts/ directory. The configuration for the bond interface is usually named ifcfg-[bond_interface_name] (e.g., ifcfg-bond0), and the files for the member physical interfaces (e.g., enp1s0f0, enp1s0f1) are named ifcfg-enp1s0f0 or ifcfg-enp1s0f1.
For example, to access the configuration for the bond0 bond interface, type the following command:
cat /etc/sysconfig/network-scripts/ifcfg-bond0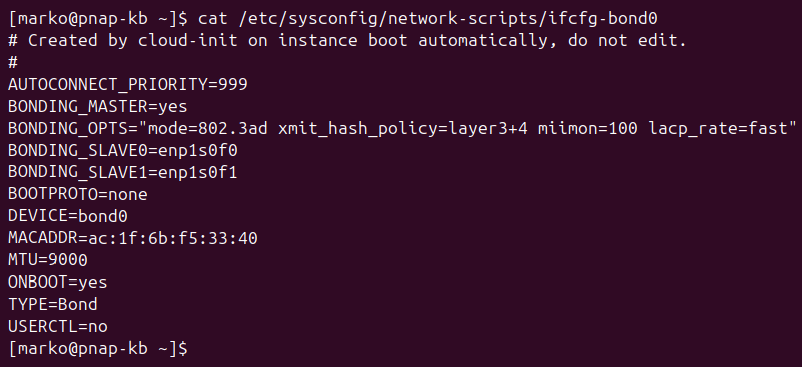
The interface file above contains the following parameters:
DEVICE=bond0andTYPE=Bond, describing the interface.- The
BONDING_OPTSdirective, setting the bonding mode and other options. For LACP, this line includesmode=802.3ad. Other standard options includemiimonfor the link monitoring interval andlacp_rate. - A
BONDING_SLAVEparameter for each enslaved interface. - The
MTUparameter showing the maximum packet size.
After checking the configuration files, proceed with the following commands to inspect the bond:
1. Check the status of the bond:
ip a show [bond_interface_name]Alternatively, use:
ifconfig [bond_interface_name]For example, if the bond interface is bond0, enter:
ip a show bond0A working interface shows the UP status.

2. View the bonding driver status, including the bonding mode, slave interfaces, and aggregator information, by typing:
cat /proc/net/bonding/[bond_interface_name]For example:
cat /proc/net/bonding/bond0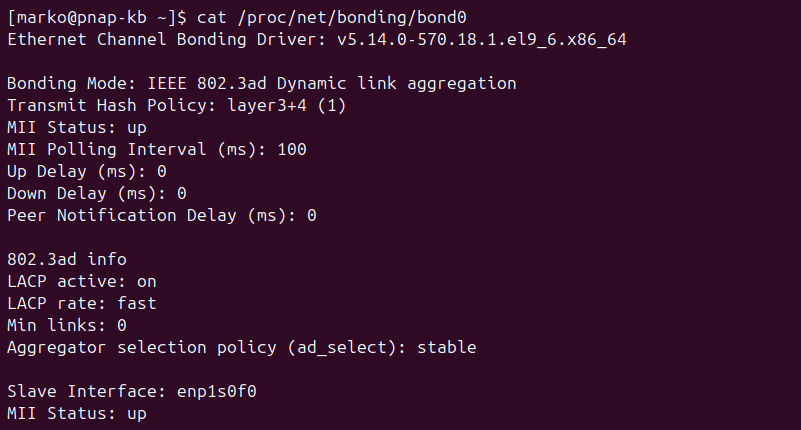
3. Verify the aggregated link speed with:
sudo ethtool [bond_interface_name]For example:
sudo ethtool bond0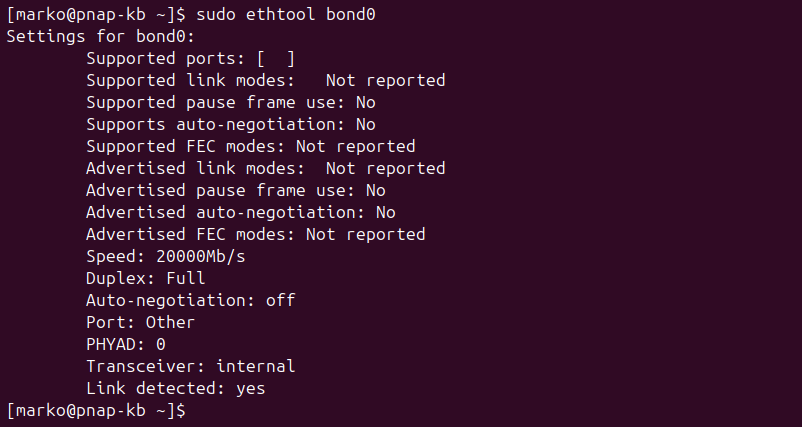
4. Check the status of individual member interfaces by typing:
sudo ethtool [slave_interface_name]For example:
sudo ethtool enp1s0f0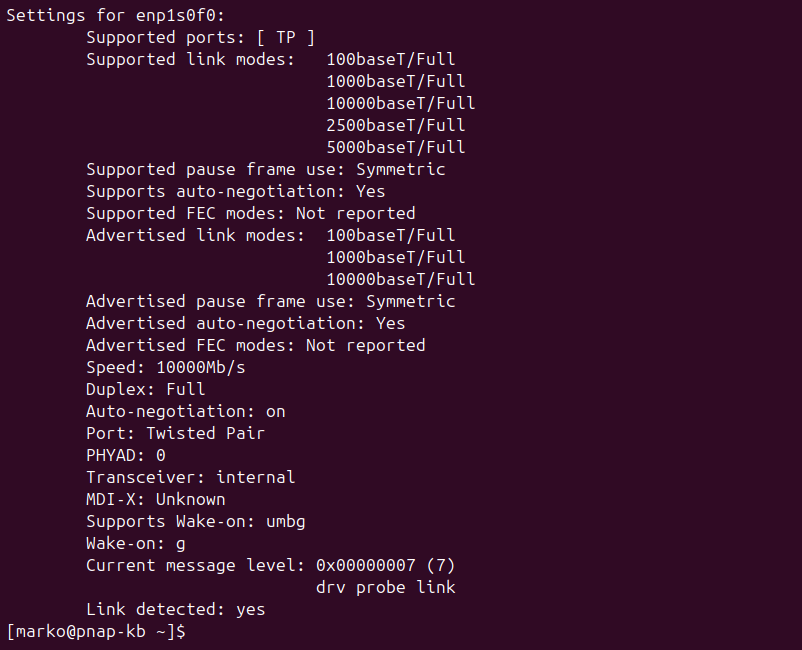
Verify Bond Status with NetworkManager
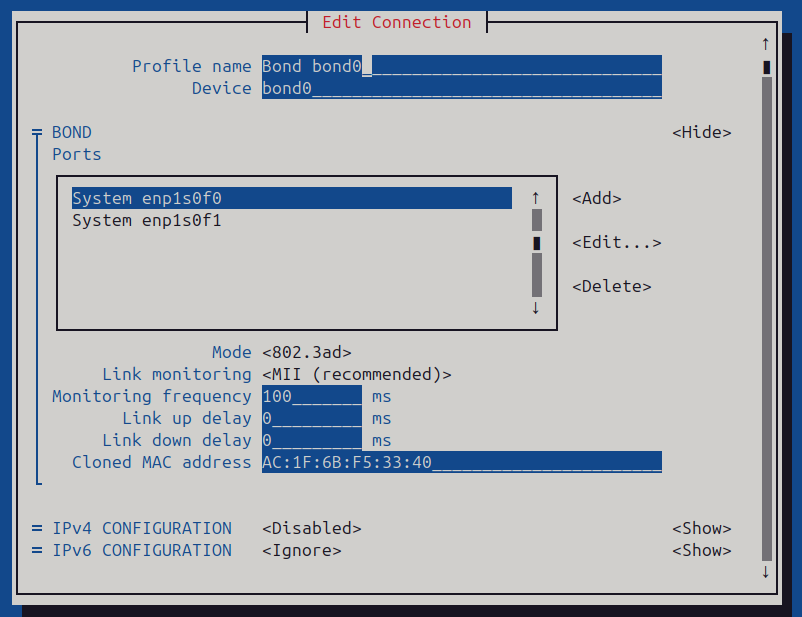
Rocky Linux uses NetworkManager as the default network management tool, even when configured with traditional files. If NetworkManager is active, use the nmtui text-based interface to check the bond status.
To verify bond status using nmtui:
1. Start the utility by typing the following command:
nmtui2. Navigate to Edit a connection.
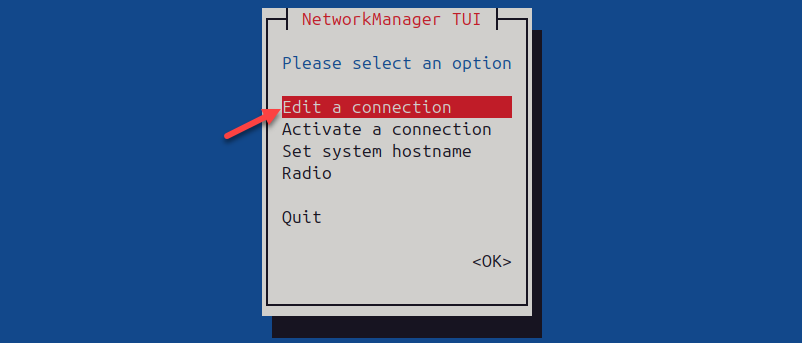
3. Choose the bond to inspect.
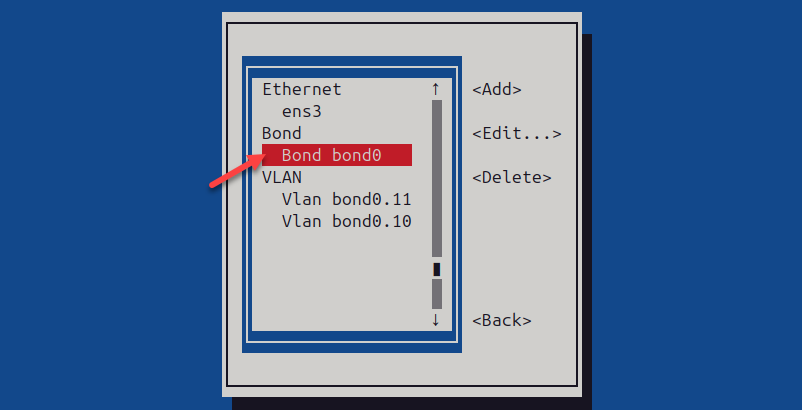
The bond information appears.
Test Redundancy of LACP Bond on Linux
Testing the redundancy of an LACP bond on Linux involves simulating a link failure by disabling one of the member network interfaces and verifying that network connectivity persists through the remaining active link(s).
To test LACP bond redundancy:
1. Identify the names of the physical interfaces in the bond.
2. Disable the first interface with this command:
sudo ip link set dev [interface_name] downOr, use the net-tools package:
sudo ifdown [interface_name]For example, to disable interface enp1s0f0, type the following:
sudo ip link set dev enp1s0f0 down3. Test network connectivity from the server by pinging a reliable target on the network, such as Google DNS:
ping 8.8.8.8For the correctly configured LACP bond, the ping should continue without interruption.

Note: To ensure traffic flow, monitor traffic on the bond interface using iftop or the tcpdump command: tcpdump -i [bond_interface_name].
4. Recheck the list of slave interfaces:
cat /proc/net/bonding/[bond_interface_name]For example:
cat /proc/net/bonding/bond0The output confirms that the remaining interfaces are still listed as active slaves. The MII Status for the disabled interface is down.

5. Use the following command to confirm the disabled state of the interface:
ip a show [slave_interface_name]For example:
ip a show enp1s0f0The output shows the interface is down.

6. Re-enable the first interface:
sudo ip link set dev [slave_interface_name] upAlternatively, type:
sudo ifup [slave_interface_name]7. Ensure the interface has rejoined the bond as an active slave by typing:
cat /proc/net/bonding/[bond_interface_name]The value of the MII Status field changes to up.

8. Repeat the entire process for another network interface. Testing the failure of each member interface independently ensures that redundancy is functional across all links in the bond.
How to Verify Network Adapter Team Status on Windows
In Windows Server, the equivalent of an LACP bond in Linux is called a NIC team. NIC teams are created using the LBFO (i.e., Load Balancing and Failover - LBFO) feature within NIC teaming.
The sections below show how to verify and test the redundancy of a network adapter team in Windows.
Verify Team Status via GUI
Check the status of a network adapter team through the graphical user interface by following the steps below:
1. Go to Settings > Network & Internet > Advanced network settings.
Note: Alternatively, open the Control Panel, navigate to Network and Internet, then Network and Sharing Center, and click Change adapter settings.
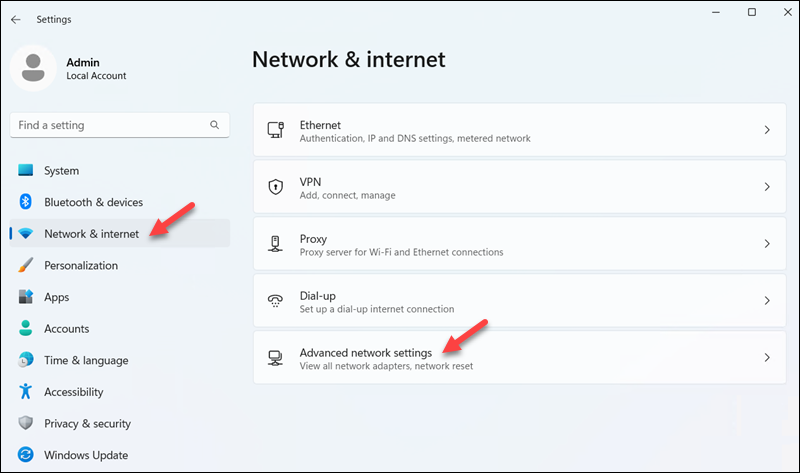
The network adapter team appears in the Network Adapters section as a single network adapter. The name typically indicates it is a team, such as NIC Team, or a custom name assigned during its creation (e.g., bond0).
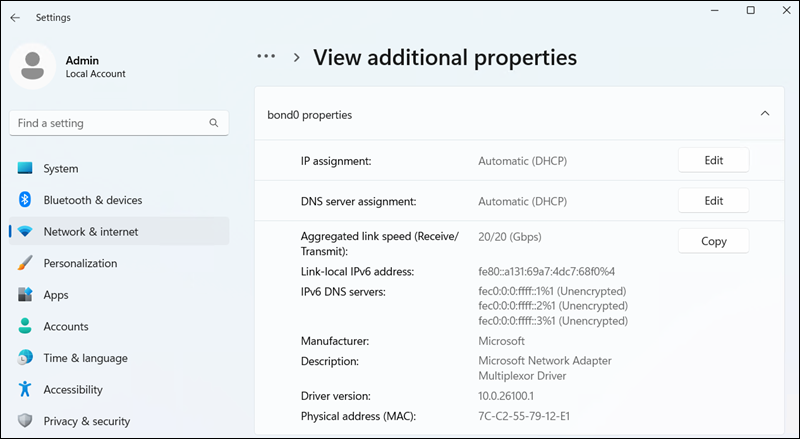
2. Select View additional properties.
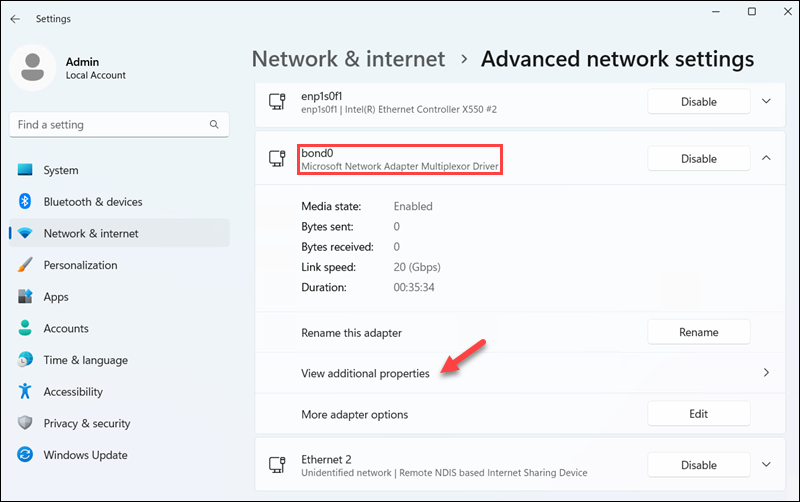
A status window appears showing the connection status. Available information includes the IP and DNS server assignment types, aggregated link speed, and the MAC address of the interface. For NIC Teams, the Description field value is Microsoft Network Adapter Multiplexor Driver.
Verify Team Status with Server Manager
Follow the steps below to use Server Manager to obtain more detailed information about a team interface:
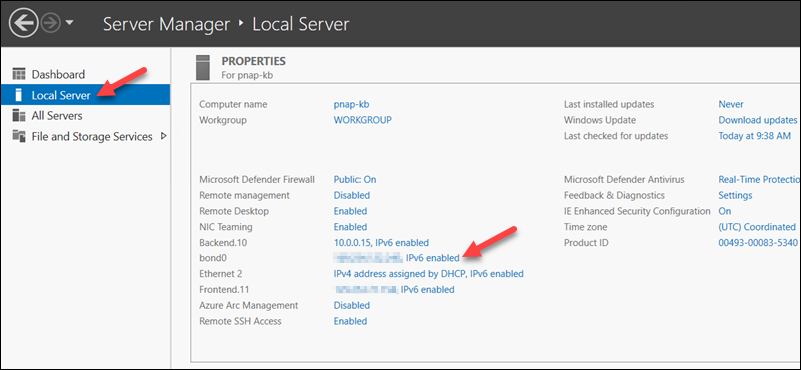
1. Open Server Manager.
2. Select Local Server from the left pane.
3. Click Enabled in the NIC Teaming section of Properties.
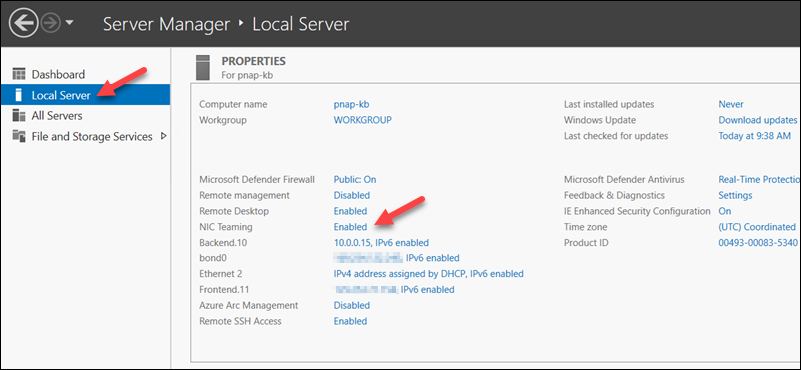
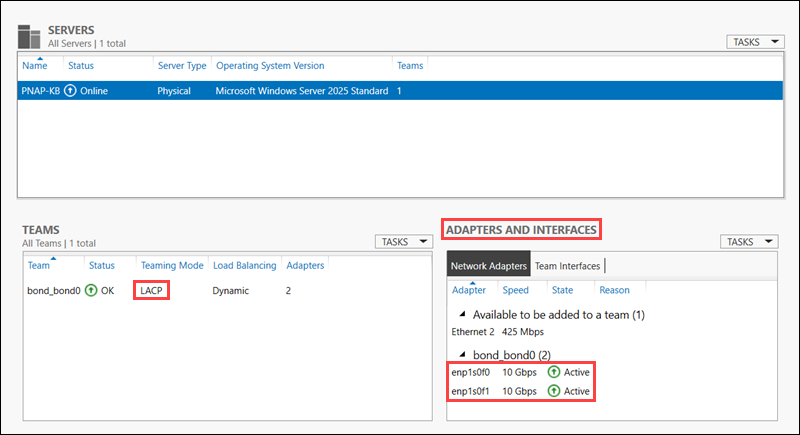
The NIC Teaming interface opens. View the status of the team, the member adapters, and the configured teaming mode (LACP).
Verify Team Status via PowerShell
PowerShell provides a command-line interface for checking the status of network adapter teams on Windows. Proceed with the steps below to view network adapter team information:
1. Open PowerShell as an administrator.
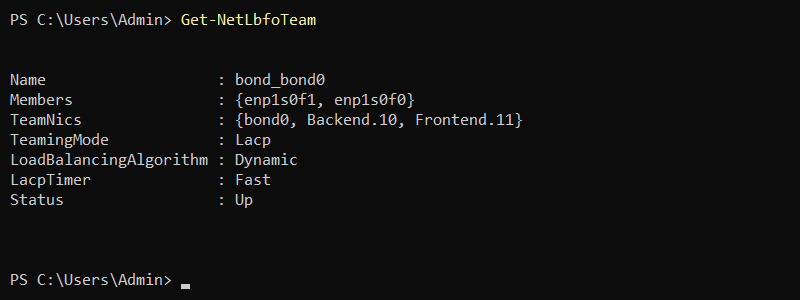
2. Enter the following command:
Get-NetLbfoTeamA list appears, containing all NIC teams configured on the system, along with their properties, such as:
- Name.
- TeamingMode (LACP).
- LoadBalancingAlgorithm (e.g., TransportPorts, IPAddresses, MacAddresses).
- Status.
3. Enter the command below to view the network adapters of a team:
Get-NetLbfoTeamMember -Team "[team_name]"For example:
Get-NetLbfoTeamMember -Team "bond_bond0"The command outputs the Name of each team member, alongside its operational status, transmit/receive link speed, and the reason for failure (for fully functioning interfaces, the reason for failure field says NoFailure).
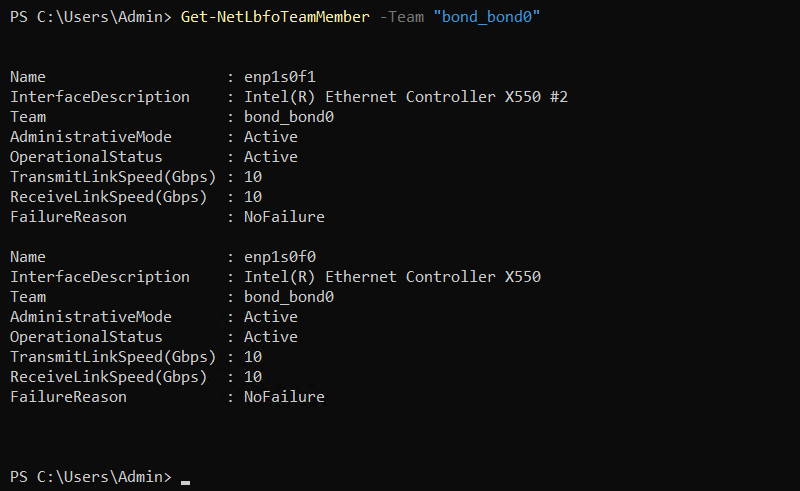
Note: Running Get-NetLbfoTeamMember without the -Team parameter lists the members of all configured NIC teams.
Test Redundancy of Network Adapter Team on Windows
Testing the redundancy of a network adapter team on Windows involves disabling one of the physical network adapters that is part of the team and verifying that network connectivity remains active. Users can perform the test through Server Manager or PowerShell.
To test redundancy using Server Manager:
1. Open Server Manager.
2. Select the value next to the bonded interface option (e.g., bond0).
The Network Connections window appears.
3. Right-click a physical adapter that is part of the team and select Disable.
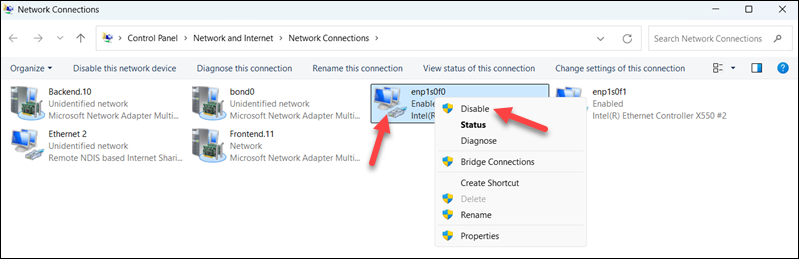
Confirm the action if prompted. The adapter now shows as Disabled.
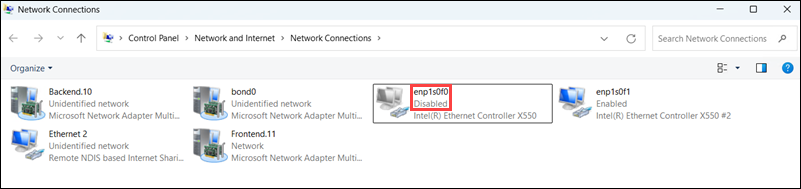
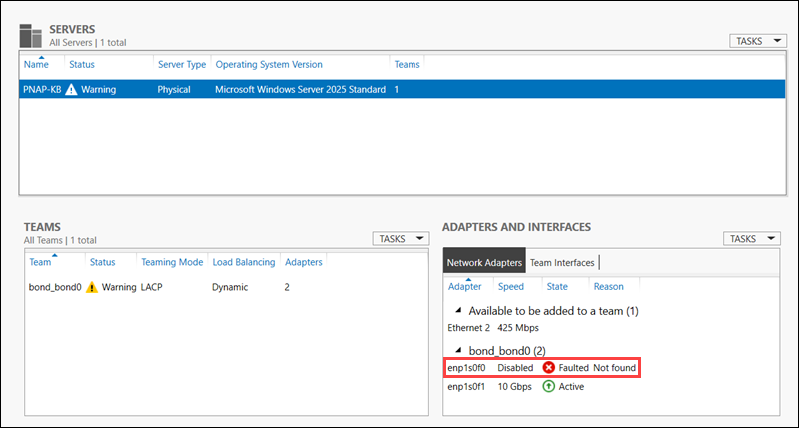
The NIC Teaming interface also shows the adapter as Disabled, and the team status changes to Warning.
4. Test if the internet connection still exists.
5. Re-enable the disabled adapter by right-clicking it and selecting Enable device.
6. Repeat this procedure for all adapters belonging to the team.
To test redundancy using PowerShell:
1. Open PowerShell as an administrator.
2. List the network adapters by typing:
Get-NetAdapter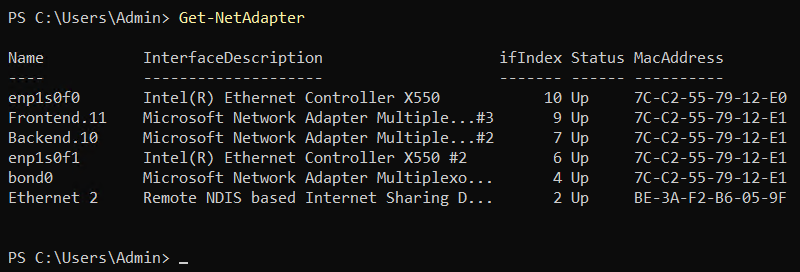
3. Type the following command to disable the adapter:
Disable-NetAdapter -Name "[network_adapter_name]"For example:
Disable-NetAdapter -Name "enp1s0f0"4. Type Y and press Enter to confirm the action.

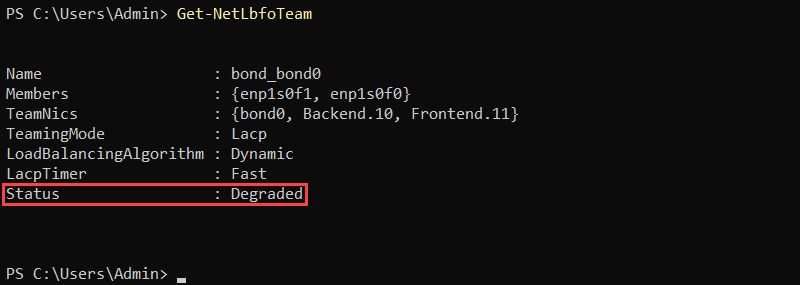
5. Check the team status with the following command:
Get-NetLbfoTeamThe team Status shows as Degraded because one of its interfaces is disabled.
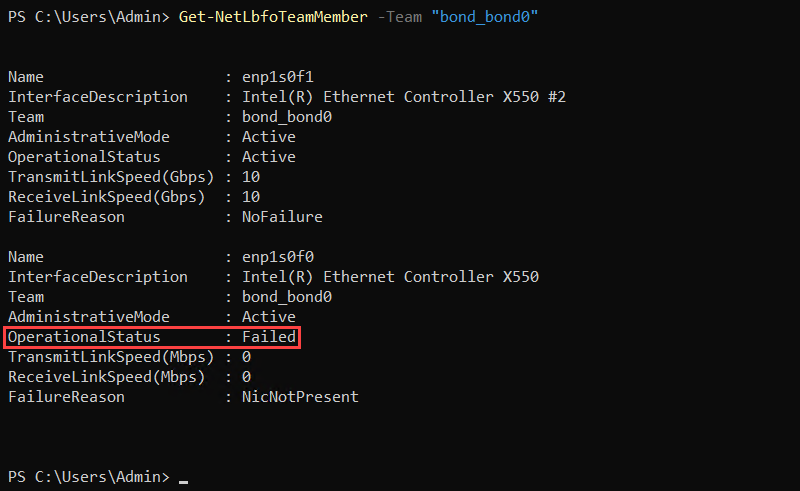
6. View individual adapters using the syntax below:
Get-NetLbfoTeamMember -Team "[team_name]"For example:
Get-NetLbfoTeamMember -Team "bond_bond0"The disabled adapter has the OperationalStatus value of Failed, while the other member shows as Active.
7. Test network connectivity from the server by pinging a reliable target:
ping 8.8.8.8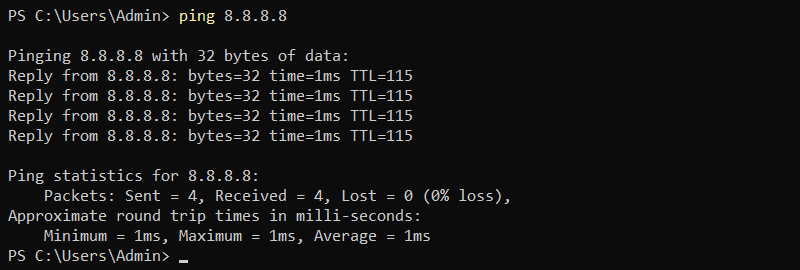
The ping continues without interruption, indicating that the remaining active adapter(s) have taken over the network traffic.
8. Re-enable the disabled adapter:
Enable-NetAdapter -Name "[network_adapter_name]"9. Repeat the process by disabling other network adapters in the team.
Conclusion
By following the steps of this guide, you learned how to verify and test dual network card LACP bonds on your system.
Verifying the proper configuration and operation of LACP bonds on Linux and network adapter teams on Windows is crucial for ensuring increased bandwidth and network redundancy.