The bash shell is among Linux's most popular login shells. However, alternatives are available for different command-line operations. The chsh (change shell) command in Linux enables users to modify the login shell.
The following tutorial explains how to use the chsh command in Linux with examples.

Requirements
- A Linux system (this tutorial uses Ubuntu 22.04 and CentOS7).
- Access to the terminal.
- Sudo privileges for some examples.
chsh Command Syntax
The chsh command is used to change the login shell for a user. The syntax is as follows:
chsh [Options] [Shell] [Username]None of the arguments are mandatory. When invoked on its own, chsh offers the opportunity to change the shell for the current user:
chsh
The terminal asks for the current user's password. Next, the command requires to specify the new shell for the current user. An alternative is hitting Enter to keep the default shell.

The options customize the output of the command. The [shell] argument is also optional, but if it is not specified, the command prompts you to enter a shell. The username is the name of the account whose shell the user wants to change.
chsh Command Options
The chsh command has several options for customizing the output. All arguments are in the table below:
| Option | Explanation |
|---|---|
-l | Specifies the user's login shell. |
-u | Shows the available shells list. |
-s | Assigns the specified shell as the user's login shell. |
-R | Directory to chroot into. |
-v | Prints details about the chsh version and exits. |
-h | Displays help text and exits. |
Note: Not all arguments work in every Linux distribution and version.
chsh Command Examples
Given the command's straightforward nature, practical examples assist in illustrating its various uses. The following sections demonstrate chsh usage through examples.
Example 1: Show Available Shells
Before using chsh to change the shell, check the available shells in the system.
Running chsh with the -l argument prints the available shell list. However, in certain Ubuntu and Debian-based Linux systems, chsh may work differently.
For instance, run the following command in Ubuntu 22.04:
chsh -l
The output does not recognize the -l option. Running man, further verifies this:
man chsh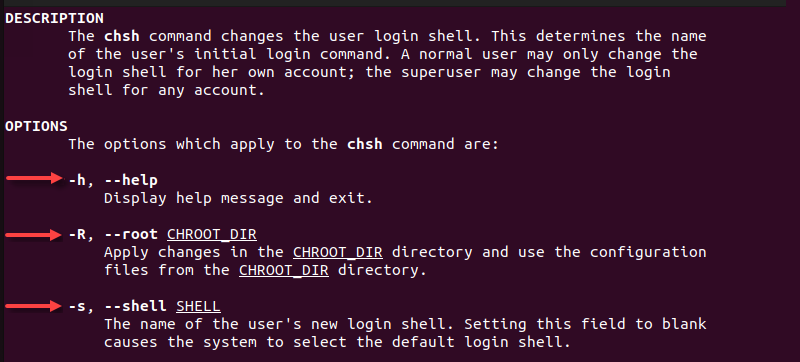
The -l option is not listed among the chsh arguments.
On the other hand, running the same command on CentOS7 provides the output:
chsh -l
To avoid such issues, use cat to list available shells:
cat /etc/shells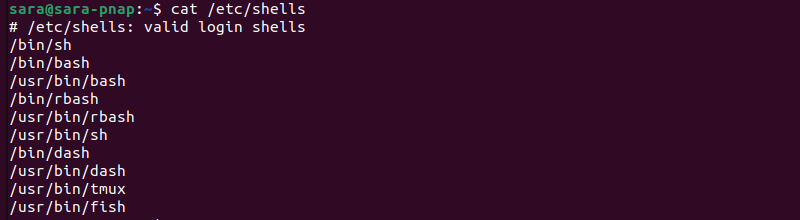
Example 2: Verify Current Shell
Apart from having a chance to change the shell for the current user, running chsh without arguments shows the current shell.
Run the command:
chsh
The square brackets in the output show the current shell is /bin/bash/.
Example 3: Change Login Shell
To change the current user shell to, for example, /usr/bin/tmux, use -s with chsh:
chsh -s /usr/bin/tmuxThe command has no output. To verify the change, run chsh with no arguments:
chsh
The value in square brackets is /usr/bin/tmux, confirming the change.
Example 4: Changing Login Shell for Another User
Root or a user with sudo privileges can set a new login shell for another user by providing the username as an argument.
For instance, change the default shell for user1 with:
sudo chsh user 1
Choose the new shell by typing the path. This example shows the /bin/sh as the chosen shell:

To verify the change:
1. Switch to user1 with su:
su user1
2. Run chsh:

The output shows the shell changed do /bin/sh.
Example 5: Change Shell Without User Interaction
By default, chsh is interactive, which means it prompts the user for the new shell. However, -s changes the shell in a non-interactive way. For example, change the current user's login shell to /bin/sh:
chsh -s /bin/sh
This command doesn’t have output. However, chsh -s changes the shell without further user input. Verify the change by running chsh.
The -s argument also allows to change the shell for a different user without any interaction. This command requires root or sudo privileges. The syntax is:
chsh -s [Shell] [Username]For example, change the shell for user1 to /bin/bash:
sudo chsh -s /bin/bash user1
Example 6: Apply Changes in Different Environment
The chsh command is able to change the shell for a user in a different environment. To do this, use -R. The -R argument tells chsh to use the configuration files from the CHROOT_DIR directory.
The chroot utility changes the root directory for a process. This means the process only sees the files and directories located inside the CHROOT_DIR directory. This is useful for security purposes, as it limits the process's access to the rest of the file system
Note: The -R option isn't a standard option for chsh in all Linux distributions and versions. If this option is still not part of the chsh command on your system, the command returns an error.
To test the command, we'll change the login shell for the user sara in a chrooted environment located in /mnt/my_chroot_dir with:
sudo chsh -R /mnt/chroot -s /bin/sh sara
If the command runs successfully, there isn't any output.
The command contains:
- -R /mnt/chroot. The part that specifies the chroot directory.
- -s /bin/sh. The part which sets the new login shell to sh.
- sara. The name of the user for whom the login shell is being changed.
Note: The -R argument only works if chsh is run as root or with sudo privileges.
Example 7: Print the Usage
Run the -u option with chsh to show the usage message and exit.
For example, run:
chsh -u
The argument displays the usage information for the chsh command without changing the login shell.
Conclusion
After reading this article, you now know everything about the chsh command to get started.
Next, learn about the usermod command.