An IP address identifies a device on a network. In some cases, you need to block an IP address to stop unwanted access, reduce spam, prevent attacks, or limit resource abuse. Blocking an IP address is one of the most effective ways to control traffic and protect systems from malicious or unauthorized connections.
This text will explain why IP blocking is useful, how to apply it on different platforms, and what best practices to follow.
Why Block an IP Address?
Blocking an IP address controls access to the system, website, or network. It reduces risk from unwanted or malicious traffic and protects system resources.
Block an IP if you want to:
- Prevent unauthorized access. Attackers often scan networks for open services. Blocking their IP addresses reduces the risk of intrusion.
- Mitigate brute-force and DDoS attempts. Many automated attacks originate from specific ranges of IP addresses. Blocking them limits exposure.
- Reduce spam and abuse. Websites, forums, and email servers often face repeated spam or attacks. Blocking public IPs that repeatedly abuse services helps stop this. However, private IPs within your network usually do not need blocking.
- Enforce regional restrictions. Businesses sometimes restrict access from specific geographic areas for compliance, licensing, or security reasons.
- Manage bandwidth usage. If certain IP addresses consume excessive resources, blocking them preserves performance for legitimate users.
Note: You can recognize a private IP by checking if it falls within standard private ranges: 10.0.0.0–10.255.255.255, 172.16.0.0–172.31.255.255, or 192.168.0.0–192.168.255.255. Any IP outside these ranges is public.
How to Block an IP Address?
Blocking an IP address is accomplished through multiple methods, depending on your environment and the required level of control. You can use built-in operating system tools, firewall configurations, router settings, or web hosting control panels. The method varies between Linux, Windows, macOS, and network devices.
The following sections cover platform-specific instructions and examples for blocking IP addresses.
Blocking an IP Address on Linux
While some Linux distributions offer graphical user interface (GUI) tools to block IP addresses, using the command line ensures consistency and compatibility across different systems.
The following steps show how to block an IP address using the Uncomplicated Firewall (UFW):
Step 1: Check Existing Rules
Before adding new rules, review the current firewall configuration to avoid conflicts. To accomplish this, run sudo with the ufw command:
sudo ufw status numbered
The output shows whether the firewall is active and lists the current rules. In this example, inbound connections are allowed on specific ports, but no IP-specific rules are set. Therefore, there are no conflicts with blocking an IP address.
Step 2: Add a Rule to Block the IP Address
Add a new firewall rule to block traffic from an unwanted IP. Enter the following:
sudo ufw deny from [IP_ADDRESS]For example, to block 192.168.10.25, run:
sudo ufw deny from 192.168.10.25
This stops the specified IP from accessing your system.
Step 3: Reload the Firewall
Apply the changes so the new rule takes effect. Enter the following command:
sudo ufw reload
Reloading enforces all rules immediately.
Step 4: Verify the Block
Confirm the IP address is successfully blocked with:
sudo ufw status
The list of active rules shows the block is in place.
Step 5: Remove a Rule if Needed
If you need to unblock an IP, delete the rule using:
sudo ufw delete deny from [IP_ADDRESS]For example, to remove the block for 192.168.10.25, run:
sudo ufw delete deny from 192.168.10.25
The IP is once again allowed to connect normally.
Blocking an IP Address on Windows
On Windows, IP blocking is done using the Windows Firewall, which is built into the operating system. This method provides a reliable way to block incoming and outgoing traffic from specific IP addresses. While third-party firewall tools exist, using the built-in Windows Firewall ensures compatibility and easier management.
The following steps show how to block an IP address using Windows Firewall with Advanced Security.
Step 1: Open Windows Defender Firewall with Advanced Security
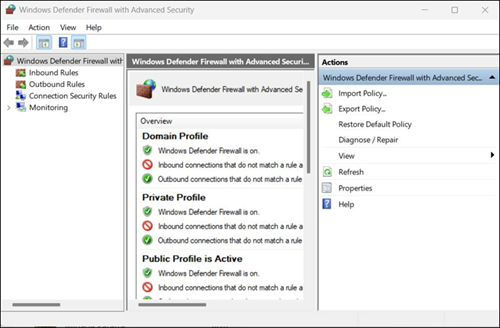
Access the firewall interface to manage rules and filters. Type Windows Defender Firewall with Advanced Security in the search bar.
This opens the Windows Defender Firewall management console, where you create custom rules.
Step 2: Create a New Inbound Rule
To add a rule to block traffic from a specific IP address, take the following steps:
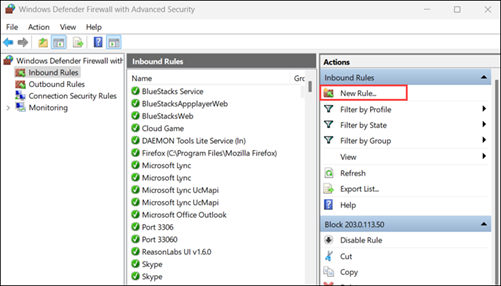
1. In the console, select Inbound Rules and choose New Rule….from the right panel.
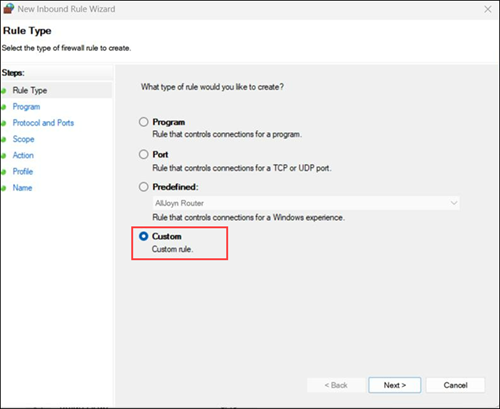
2. Choose Custom and click Next.
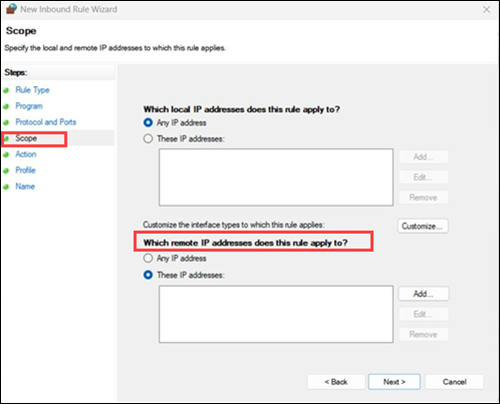
3. Under Scope, go to the Which remote IP addresses does this rule apply to? section.
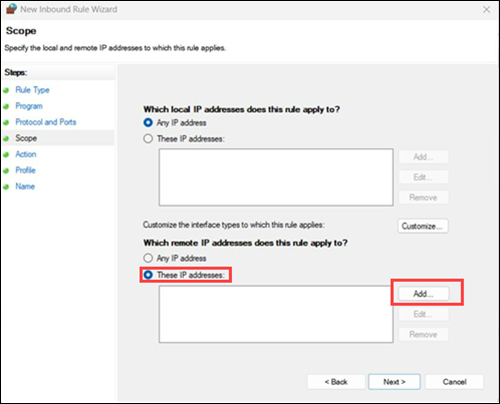
4. Select These IP addresses and click Add...
5. Type in the IP address you want to block under This IP address or subnet, and click OK.
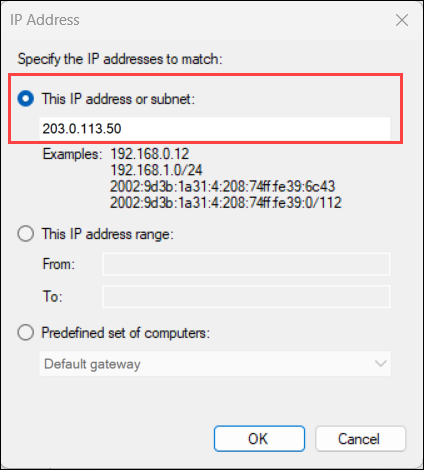
For example, to block 203.0.113.50, enter that IP in the remote address field.
6. Click Next and select Block the connection. Then, click Next again.
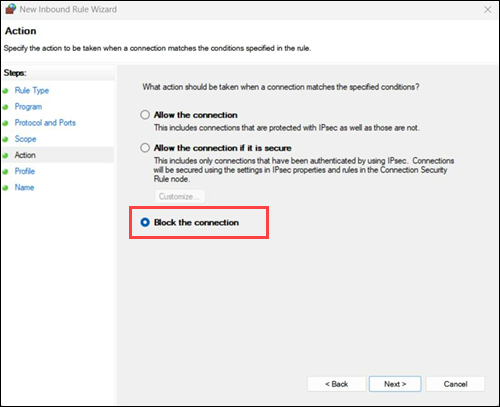
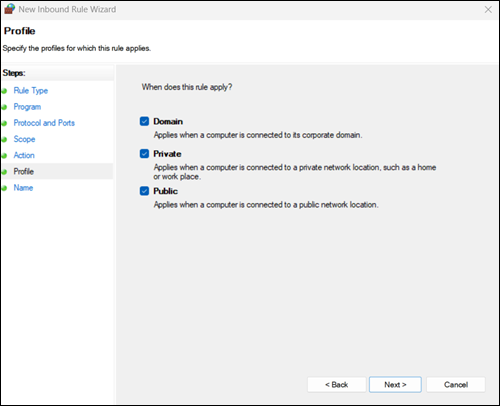
Step 3: Apply the Rule to Profiles
Select which network profiles the rule applies to: Domain, Private, Public, or all. Choose according to your security needs, then click Next.
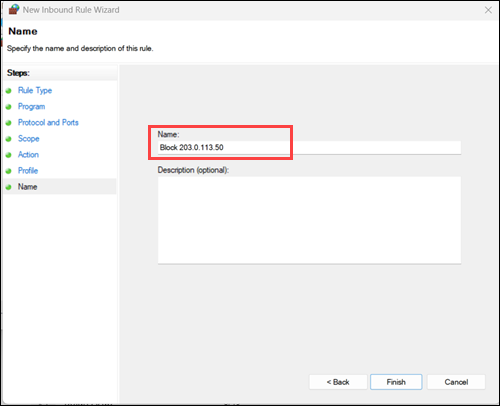
Step 4: Name and Finish the Rule
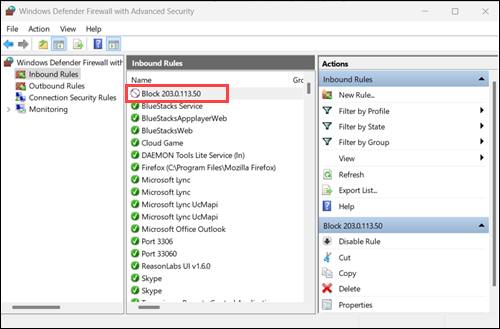
Give the rule a descriptive name, such as Block 203.0.113.50, and click Finish. The rule becomes active immediately.
Step 5: Verify the Rule
Ensure the IP address is blocked by checking the Inbound Rules list. Look for the rule you just created. Test connectivity from the blocked IP to confirm the block is working.
Step 6: Remove or Modify a Rule
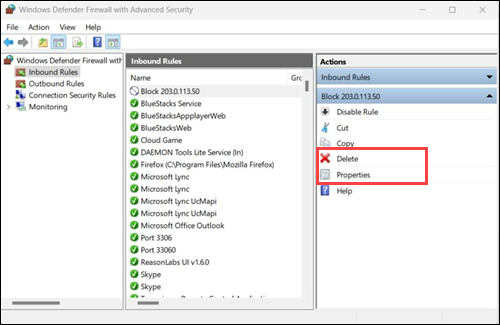
If you need to unblock the IP or adjust settings, select the rule in Inbound Rules and choose Delete or Properties in the right panel.
Blocking an IP Address on macOS
Unlike Windows, macOS does not provide a simple graphical tool for IP blocking. Instead, it uses the built-in Packet Filter (PF) firewall, which requires editing configuration files and reloading the firewall rules.
Step 1: Open the PF Configuration File
PF rules are defined in the pf.conf file. Open it with a text editor:
sudo nano /etc/pf.confStep 2: Add the Block Rule
At the end of the file, add a rule to block the IP address. Replace [IP_ADDRESS] with the address you want to block:
block drop from [IP_ADDRESS] to anyFor example, to block all traffic from 203.0.113.10, run:
block drop from 203.0.113.10 to anyStep 3: Test the Configuration
Before applying changes, check the syntax to avoid breaking the firewall:
sudo pfctl -nf /etc/pf.confThe command has no output if the syntax is correct.
Step 4: Load the New Rules
If no errors are reported, apply the changes with:
sudo pfctl -f /etc/pf.confPF loads rules without an output unless there's an error.
Step 5: Enable PF if Not Already Running
Ensure the firewall is active:
sudo pfctl -eThe command has no output.
Step 6: Verify the Block
List the active rules to confirm the IP is blocked:
sudo pfctl -sr
Blocking an IP Address on a Router
Blocking an IP address at the router level stops unwanted traffic before it reaches any device on your network. This method protects multiple devices at once and reduces exposure to malicious sources. Most modern routers provide a web interface or admin panel for managing IP filters.
Step 1: Access the Router Admin Panel
Open a browser and enter your router's IP address (commonly 192.168.0.1 or 192.168.1.1). Log in using your administrator credentials.
Note: Administrator credentials are usually printed on the router label, in the manual, or provided by your Internet Service Provider (ISP). If you don't know them, you need to reset the router to factory defaults.
Step 2: Navigate to the IP Filtering or Firewall Section
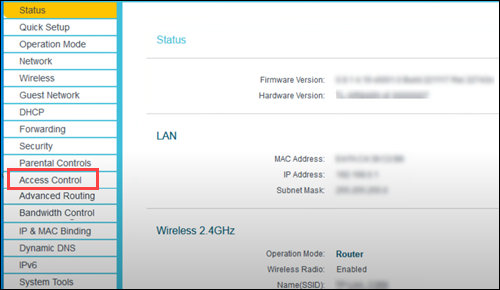
Look for menu options like Firewall, Security, or Access Control, depending on your router brand. This is where you manage IP-based rules.
Step 3: Add a New Block Rule
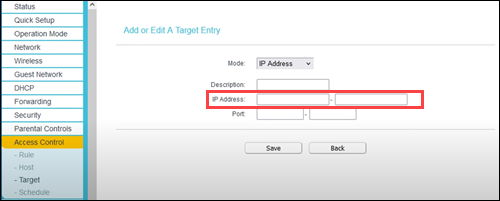
Locate the option to Add IP Filter, Create Rule, or Add New.

Enter the IP address you want to block.
Step 4: Apply the Rule to All Devices or Specific Ones
Some routers allow you to choose whether the rule applies to the entire network or only to specific devices. Select according to your security needs.
Step 5: Save and Reboot if Necessary
Click Save or Apply. Some routers require a reboot for the changes to take effect.
Step 6: Verify the Block
Test connectivity from the blocked IP (if possible) or check the router's log to confirm the IP is being denied access.
However, some modems and routers do not provide the ability to block external IP addresses. Their advanced options, such as IP Filtering, MAC Filtering, or Parental Controls, allow you to control which devices on your local network can access the internet or restrict content access by domain, time, or device. They do not let you block traffic from specific public IP addresses.
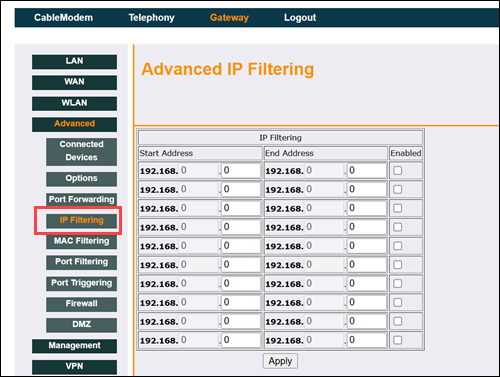
For example, the image above shows this feature only blocks internet access for devices on your local network (LAN) and does not block external IP addresses.
Note: If your router doesn't support external IP blocking, consider using a firewall on individual devices or upgrading to a router with advanced firewall capabilities.
Blocking an IP Address on Your Web Hosting Service
Blocking an IP address at the hosting level protects your website or server from unwanted visitors before they reach your applications. Most hosting providers offer tools via control panels or dashboards to manage IP access, making it easier than configuring individual machines.
Step 1: Log In to Your Hosting Control Panel
Access your hosting account and open the control panel (for example, cPanel, Plesk, or your provider's custom dashboard). Use your administrator credentials to log in.
Step 2: Navigate to the Security or IP Block Section
Look for sections named IP Blocker, Firewall, Security, or Access Control. This is where you manage IP restrictions for your hosted services.
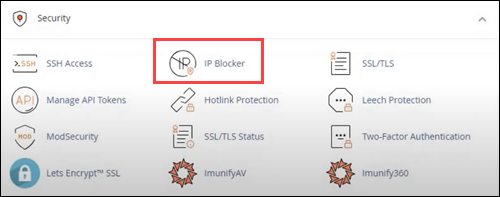
Step 3: Add the IP Address to Block
Enter the IP address you want to block and click Add, Block, or Deny.

Step 4: Apply the Rule
Some hosting panels allow you to specify whether the block applies to the entire server, specific websites, or particular services (like FTP or email). Select the appropriate scope.
Step 5: Save Changes
Click Save, Apply, or Update to enforce the new rule. Some panels apply changes immediately, while others take a few minutes.
Step 6: Verify the Block
Check your hosting logs or attempt to access your site from the blocked IP (if possible) to ensure the block is active.
Troubleshooting IP Address Blocking
Blocked users can still access your system or website. Common issues include dynamic IPs, misconfigured rules, conflicts with existing settings, and sophisticated attack techniques.
The following sections highlight potential pitfalls and how to address them.
Dynamic IPs Circumvent the Block
ISPs assign Dynamic IPs temporarily and rotate them, which means a blocked IP might eventually be reassigned to another device, making the block less predictable.
To address this, monitor logs for repeated unauthorized access from new IPs and update your block rules accordingly. Moreover, consider blocking broader subnets if multiple dynamic IPs originate from the same ISP. Note that this is risky and may unintentionally block legitimate users.
Rules May Be Misconfigured
A blocked IP may still access your system if the rule was not set correctly.
Double-check the syntax and scope of your rule. On Linux/macOS, verify with sudo ufw status numbered or sudo pfctl -sr. Windows offers the option to confirm that the rule appears in the Inbound/Outbound lists. On routers or hosting panels, ensure the IP and target devices or services are correct.
Conflicting Rules Override the Block
Other firewall rules or security software sometimes take precedence and allow traffic from the blocked IP.
Review all active rules to identify conflicts. Reorder, disable, or remove conflicting rules to ensure the IP block is enforced.
Firewall or Control Panel Changes Are Not Applied
Some systems require explicit activation or reloading for rules to take effect. Reload or enable the firewall after adding rules. Examples include:
sudo ufw reloadon Linux.sudo pfctl -f /etc/pf.confon macOS.- Click Apply or reboot on routers.
- Save changes and wait a few minutes on the hosting panels.
IP Spoofing Can Bypass Blocks
Attackers sometimes fake their IP addresses to hide the origin of traffic. Blocking a single IP does not stop them if they rotate through spoofed addresses.
Use advanced tools that monitor traffic patterns and detect suspicious behavior. Firewalls and intrusion detection systems (IDS) help verify whether IP addresses are genuine and automatically block fakes.
Legitimate Access May Be Blocked
Sometimes, overly strict rules accidentally block trusted users, such as coworkers or customers.
To prevent this, maintain a whitelist of trusted IP addresses. Always test new rules with a few known users to ensure legitimate access is not interrupted.
Note: Learn how to whitelist an SSH IP address in WHM.
Inaccurate IP Detection Causes Mistakes
Outdated IP databases or misconfigured detection systems sometimes misidentify IP addresses. This sometimes results in accidentally blocking legitimate users or failing to block malicious ones.
Update your IP database regularly and cross-check rules using multiple tools to reduce errors.
Botnets Can Overwhelm Your Block Rules
Large-scale attacks from botnets involve multiple compromised devices simultaneously attacking from different IP addresses. Blocking individual IPs is not enough.
You need specialized protection such as web application firewalls (WAFs), DDoS mitigation services, or automated traffic monitoring tools to handle these attacks effectively.
IPv6 vs IPv4 Considerations
IPv4 and IPv6 are two Internet Protocol versions used to identify devices on a network. IPv4 uses 32-bit addresses, while IPv6 uses 128-bit addresses, providing a vastly larger address space to accommodate the growing number of devices.
Blocking only IPv4 addresses won't stop attackers using IPv6. Check your firewall and hosting controls to ensure rules apply to both protocols if your network supports IPv6.
Proxy or VPN Circumvention
Some users or attackers hide behind proxies or VPNs, making it appear as though the traffic originates from different IP addresses.
Consider monitoring patterns rather than individual IPs and using rate limiting or region-based filters where appropriate.
IP Blocking Best Practices
Understanding and following best practices ensures your IP blocking efforts are effective, balanced, and sustainable.
The following list highlights key strategies to optimize IP blocking for security and accessibility:
- Update blocklists regularly. Add new suspicious IPs as threats emerge and remove addresses that no longer pose a risk to maintain accuracy.
- Review security settings frequently. Verify firewall rules, network configurations, and other security tools are current and functioning correctly.
- Maintain legitimate user access. Periodically audit your blocks to ensure critical services or valid users are not unintentionally restricted.
- Use automated management tools. Deploy systems that monitor, update, and apply blocklists to reduce human error and improve efficiency.
- Integrate into a broader security strategy. Treat IP blocking as one layer within a multi-layered defense system that includes firewalls, antivirus, and intrusion detection.
- Monitor traffic patterns. Analyze network traffic to identify unusual or malicious activity that requires temporary or permanent blocking.
- Log and document all changes. Keep detailed records of blocked IPs, rule modifications, and review dates to maintain accountability and facilitate troubleshooting.
- Apply geo-blocking where appropriate. Restrict access from regions that pose minimal business value but a high risk of attacks.
- Test and validate changes. Before applying new blocks broadly, ensure they do not disrupt legitimate services or critical applications.
Conclusion
This tutorial explained why it's sometimes necessary to block IP addresses and how to do so on different platforms. It also addressed potential issues with IP blocking and provided practical solutions and best practices.
Next, learn how to change an IP address on different devices and OSs.
