What is AWS Direct Connect?
AWS Direct Connect establishes a direct private connection from your equipment to AWS. Use AWS Direct Connect to form a dedicated network between your physical hardware (e.g., colocation environment, office, etc.) and AWS resources.
AWS connections use 802.1q VLANs, which is the industry standard. The benefit to this is that the connection can be partitioned into multiple private and public virtual interfaces. This means that an organization can use a single connection to access private resources, such as Amazon EC2, as well as access an Amazon S3 object over a public environment. AWS Direct Connect maintains network separation between public and private connections at all times.
For added network flexibility, you can edit the virtual interfaces at any time.
Benefits of Amazon Web Services Direct Connect
Besides an increase in data throughput, in many use cases, AWS Direct Connect can reduce your network costs. AWS also provides a consistently high-quality network that is a better experience than an Internet-based connection.
Flexible
Signing up for the service is simple; everything is performed via the AWS Management Console. The Management Console is a single access point for managing all AWS virtual interfaces and connections. Furthermore, after configuring at least one virtual interface, there are customized router templates available for download for diverse networking equipment.
AWS Direct Connect provides secure network scaling for every need. It can provide 1 Gbps and 10 Gbps connections, and it makes provisioning multiple connections easy. Moreover, instead of accessing your instance of Amazon VPC over an Internet-based VPN connection, you can use AWS Direct Connect. Considering VPN hardware often doesn’t support data connections above 4 Gbps, AWS can significantly improve your connectivity.
Consistent Connectivity
Connectivity over the Internet may fluctuate, as you do not have full control over how data gets from start to finish.
With AWS Direct Connect, an organization can choose which data is routed in which way, so you have more control over the connection. This kind of dedicated network may offer a more consistent flow of data than an Internet-based network. Also, there are no data limits you can transfer using AWS Direct Connect.
Compatibility with Amazon Web Services
Using AWS Direct Connect, you can establish connections to your private and public AWS resources in a given AWS region. This way, an organization can transfer data from and to AWS, and bypass Internet service providers and any possible network instability.
Maintain a Dedicated Network with Amazon’s Cloud Services
As already mentioned, AWS Direct Connect can serve as a replacement for a VPN hardware connection to your Amazon VPC. This type of connection is entirely private, and if utilizing several virtual interfaces, you can establish links to several distinct instances of Amazon VPC. Complete network isolation is guaranteed. How to Configure AWS Direct Connect
Note: Learn about the differences between AWS Direct Connect vs AWS VPN, two connectivity solutions from Amazon Web Services. The comparison included their features, capabilities, and use cases, and listed the pros and cons for each solution.
How to Configure AWS Direct Connect
Choose an AWS Edge Location
To maintain minimum network latency, Amazon Web Services are offered through AWS edge locations. A regional endpoint is a URL that serves as an entry point for Amazon’s web services. Amazon Web Locations can be checked at https://aws.amazon.com/directconnect/details/.
Customers are encouraged to access AWS Direct Connect through an AWS Direct Location. By collocating your equipment at a designated edge location, you can use the existing network circuits between a data center and an AWS device.
This connection delivers up to 10 Gbps port speeds.
Work with an AWS Partner Network or Network Provider
An alternative solution would be to work with a partner in the AWS Network Partner (APN) or a network provider to connect your on-premise or colocation router to an AWS Direct Connect location.
This connection also provides 1 Gbps or higher port speeds.
Hosted Connection
Another option is to hire a partner in the AWS Partner Network (APN) to create a hosted connection for your organization. If you opt for this solution, after signing up for an AWS Direct Connect account you need to accept this connection and then create a virtual interface.
This type of connection delivers slower port speeds at sub-1 Gbps and supports only a single virtual interface.
Account, Connection, and Virtual Interface
After deciding on an AWS location and type of connection, sign up for AWS Direct Connect and then create an AWS Direct Connect connection, download the LOA-CFA and create a virtual interface.
This article will guide you through each step.
Sign Up for AWS
Sign up for AWS Direct Connect by creating an AWS account at https://aws.amazon.com/. Follow the on-screen instructions and be prepared to receive a phone call from Amazon. You will need to enter a PIN using the phone keypad.
AWS Direct Connect Connection Request
Access the AWS Direct Connect console at https://console.aws.amazon.com/directconnect/. Select an AWS region and the required port speed. Port speed cannot be modified after the connection has been created.
Create an AWS Direct Connection
Use the AWS Direct Connect management console to create an AWS Direct Connection. Navigate to Connections and opt to create a Create Connection. A new dialog box displays the necessary fields.
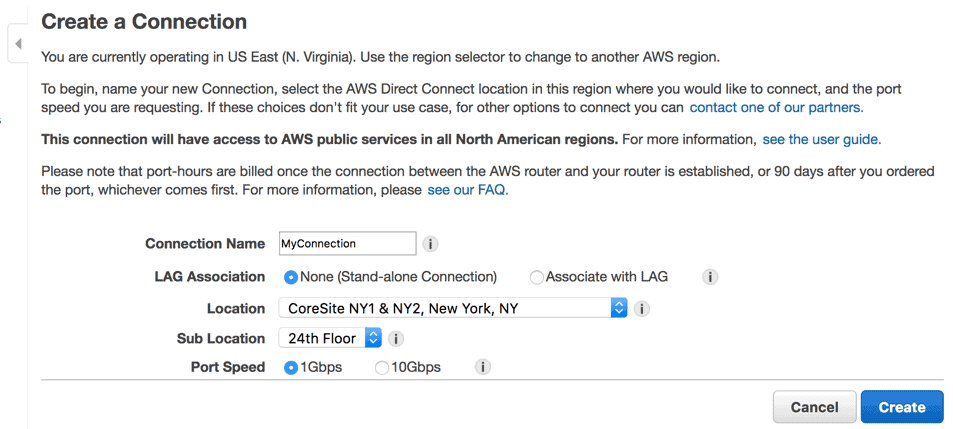
After you have created a connection, you should receive a confirmation message as seen in the image below:

The connection is in a “requested” state. The AWS Direct Connect staff is reviewing your request and will then supply a letter of authorization. Once available, you need to download LOA and send it to your network provider who is establishing the connection for you.
It may take up to three (3) business days to process the request.
| Info | Description | Example |
|---|---|---|
| Common Name or FQDN | FQDN is the fully qualified domain name of your website. It must be the same as what users type in the web browser. | www.phoenixnap.com |
| Organization Name (e.g., company) | The full legal name of your organization, including suffixes such as LLC, Corp, etc. | PhoenixNAP, LLC |
| Organizational Unit Name | The division in your organization that deals with this certificate. | NOC |
| Locality Name (e.g., city) | The city in which your organization is located. | Phoenix |
| State/Region/Province (full name) | The state or region in which your organization is located. | Phoenix |
| Country Code (2 letter code) | The country in which your organization is located. Always entered as a two-letter ISO code. | U.S. |
| Email Address | Email address used to contact the site’s webmaster. | [email protected] |
| Public Key | An automatically-created key that’s generated with the CSR and goes into the certificate. | An encoded text block similar to the private key. See an example of a private key below. |
Download the Letter of Authorization and Connecting Facility Assignment (LOA-CFA)
After filling a request for a connection, AWS will process the application. It may take up to 72-hours for Amazon to review the request and provision a connection port. Amazon may request additional information via email. Respond within seven business day or the connection will be terminated.
Once the request has been accepted, download the Letter of Authorization and Connecting Facility Assignment. Simply put, this is Amazon giving you permission to establish and use the connection.
To download the LOA-CFA, log into your AWS Direct Connect account, navigate to Connections, and select the newly created connection. Choose Actions > Download LOA-CFA.
If the link is unavailable, it means the letter of authorization is still not available. Check your email. If 72- hours have passed and you still haven’t received an email, contact AWS support.
An optional step is to enter the name of your network provider. It will appear with your organization’s name as the requester of the LOA-CFA. Download the letter of authorization. It will be downloaded as a PDF file.
Requesting Cross-Connect
After you have downloaded your letter of authorization, request a cross-connect connection. If you have equipment at the AWS Direct Connect location, contact your designated provider to establish a cross-connect connection. For example, if you have equipment at PhoenixNAP, Phoenix, you would send an email to [email protected].
For a comprehensive list of AWS providers, refer to Amazon AWS documentation.
Cross-connect must be established within 90 days of granting the LOA-CFA. After 90 days, the letter of authorization expires. If the LOA-CFA expires, download it again from the AWS Direct Connect console and resend this to your network provider.
Hosted Connections
For speeds less than 1 Gbps, you cannot use the AWS console to request a connection. Instead, hire an AWS Direct Connect partner to create a hosted connection for you.
Accept a Hosted Connection
If an AWS partner creates a hosted connection for you, you only need to accept the connection after creating an AWS account.
Log into your AWS account at https://console.aws.amazon.com/directconnect/ and select the region in which the connection is located. Choose Connections, find the hosted connection, and select it.
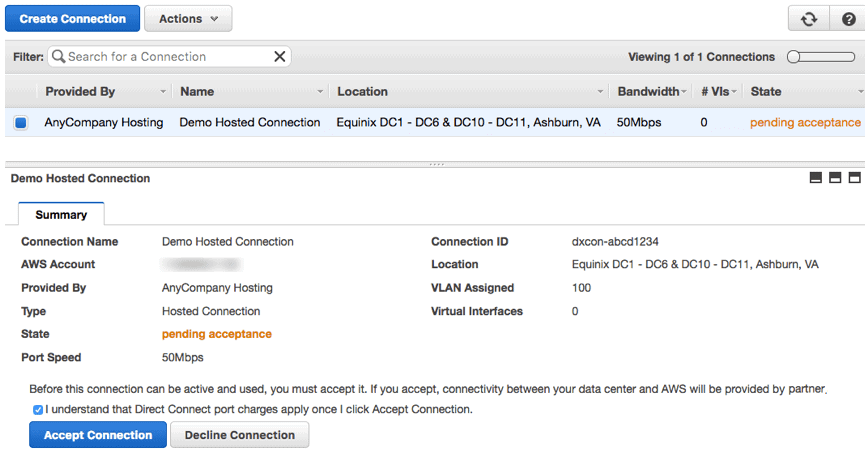
Accept the connection to activate it. After activating your connection, the next step would be to create a virtual interface.
Virtual Interface
Once your connection’s state goes from “requested” to “available, you can create a virtual interface. Virtual interfaces are a prerequisite before using AWS Direct Connect. Bear in mind that you can create multiple virtual interfaces on a single AWS connection.
First, you need to be aware of the two types of virtual interfaces. Namely, there are public virtual interfaces, which are used to connect to public AWS resources. And then, there are private virtual interfaces that are used to connect to your instance of Amazon VPC. If an organization wants to communicate with several VPC instances, it should utilize a single virtual interface per VPC.
Before you establish a virtual interface, make sure you have the necessary information. Also, take into account that sub-1G connections are limited to a single virtual interface.
How to Create a Public Virtual Interface
If you are connecting to AWS public resources, perform the following steps.
This type of virtual interface is not intended for use with Amazon VPC. For such connections, create a private virtual interface.
- Log into your AWS account at https://console.aws.amazon.com/directconnect/.
- Navigate to Connections, select the connection you intend to use and select Actions > Create Virtual Interface.
- Make sure to select Public as the appropriate option for your virtual interface.
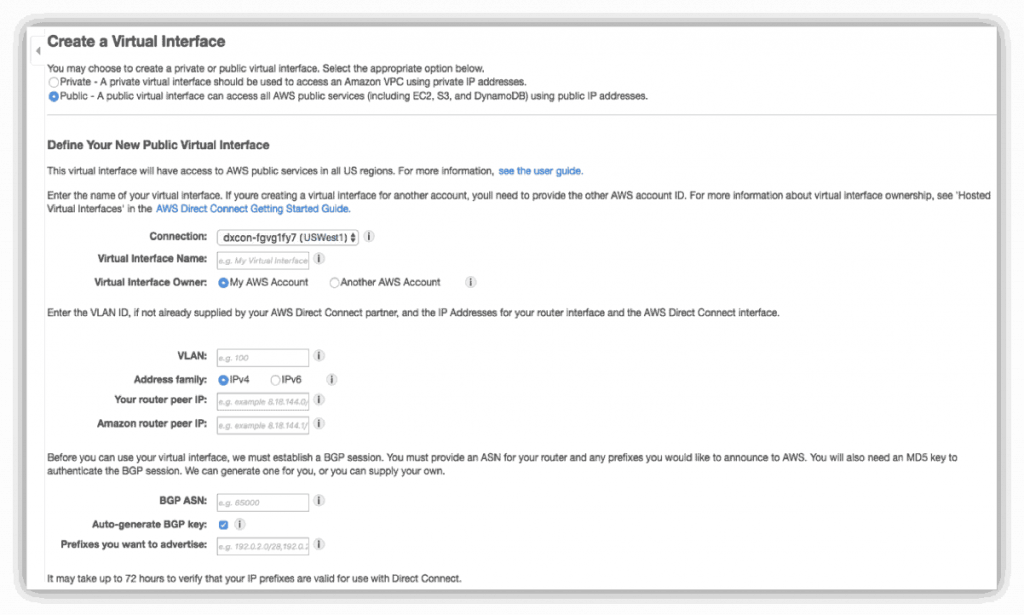
In the Define Your New Public Virtual Interface, provide the following information and select Continue.
| Field | Description | Example |
|---|---|---|
| Connection | Select an existing physical connection on which you wish to create a virtual interface. | PhoenixNAP Connection |
| Virtual Interface Name | Enter a name for your virtual interface. | PhoenixNAP Virtual Interface |
| Virtual Interface Owner | Select My AWS Account if the virtual interface is to be used by you. | My AWS Account |
| Connection to | If you do not already have a Direct Connect gateway, there will be an option to create one on the Create a Virtual Interface screen. You can create a DCG in any supported public region. If you have an existing configuration, please choose the DCG you have already configured. | |
| VLAN (i.e., virtual local area network) | The ID number VLAN. The value must be between 1, and 4094 and it mustn’t already be in use in your office. Avoid using 1, as this is typically used by management. VLAN is required for data transfer in the AWS Direct Connect network. If collocating, your provider will supply the VLAN. | 200 |
| Address Family | IPv4 or IPv6. If you opt to configure an IPv6 BGB peer, select IPv6. The IPv6 addresses are automatically assigned from the AWS pool of IPv6 addresses. IPv6 addresses cannot be custom specified. | IPv4 |
| BGP ASN | Enter your gateway’s Border Gateway Protocol (BGP) Autonomous System Number (ASN). Check the Auto-generate BGP key checkbox to have AWS generate a BGP MD-5 key. | 65000 |
How to Create a Private Virtual Interface
If connecting to phoenixNAP’s AWS Direct Connect endpoint, you will need to configure all virtual interface options except for the VLAN (i.e., virtual local area network) field. PhoenixNAP provides the VLAN Number. This number will be between 1 and 4094, and it must comply with the Ethernet 802.1Q connection standard.
To create a private virtual interface, you need a public or private ASN and the VPC virtual private gateway (VPG) ID.
To begin the process of creating a private virtual interface:
- Navigate to https://console.aws.amazon.com/directconnect/and log into your AWS account.
- Choose Connections, select the connection to use and select Actions > Create Virtual Interface.
- Select the appropriate Virtual Interface type. In this case, click Private.
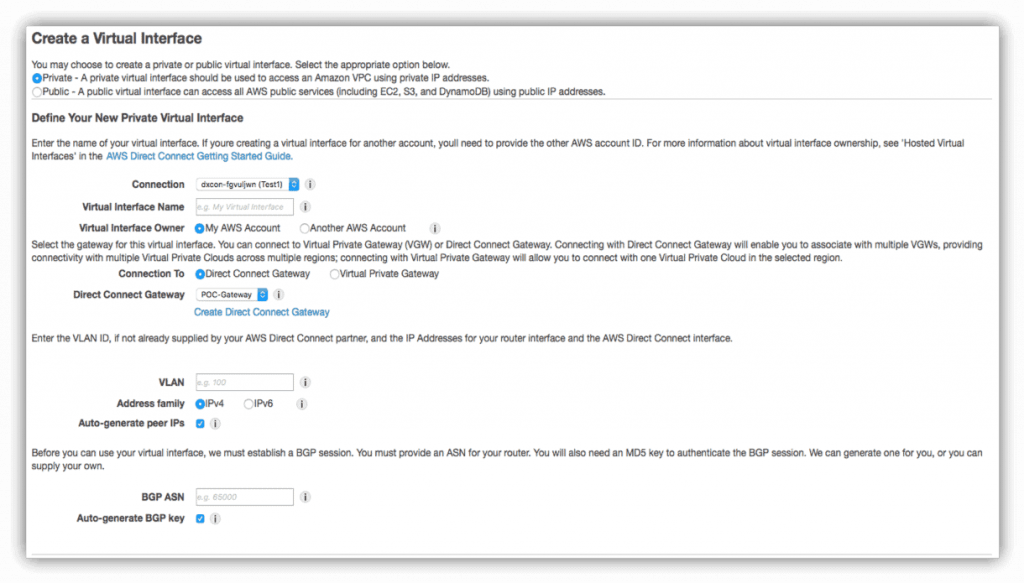
| Field | Description | Example |
|---|---|---|
| Connection | Select an existing physical connection on which you wish to create a virtual interface. | PhoenixNAP Connection |
| Virtual Interface Name | Enter a name for your virtual interface. | PhoenixNAP Virtual Interface |
| Virtual Interface Owner | Select My AWS Account if the virtual interface is to be used by you. | My AWS Account |
| Connection To | If you do not already have a Direct Connect gateway, there will be an option to create one on the Create a Virtual Interface screen. You can create a DCG in any supported public region. If you have an existing configuration, please choose the DCG you have already configured. | |
| VLAN (i.e., virtual local area network) | The ID number VLAN. The value must be between 1, and 4094 and it mustn’t already be in use in your office. Avoid using 1, as this is typically used by management. VLAN is required for data transfer in the AWS Direct Connect network. If collocating, your provider will supply the VLAN. | 200 |
| Address Family | IPv4 or IPv6. If you opt to configure an IPv6 BGB peer, select IPv6. The IPv6 addresses are automatically assigned from the AWS pool of IPv6 addresses. IPv6 addresses cannot be custom specified. On the other hand, you can specify IPv4 addresses. | IPv4 |
| BGP ASN | Enter your gateway’s Border Gateway Protocol (BGP) Autonomous System Number (ASN). Check the Auto-generate BGP key checkbox to have AWS generate a BGP MD-5 key. | 65000 |
Upon creation, the virtual interface will be in the state of “pending.”
If you used the VPC wizard to create a virtual private center, route propagation should be automatically enabled. Routes will be automatically propagated to route tables. If you want to disable route propagation, you will need to do so manually.
Direct Connect Gateways
Direct Connect gateways can group private virtual interfaces and virtual private gateways that belong to a single AWS account. Use Direct Connect gateways to connect your AWS Direct Connect connection to a VPC in the same or different region. You do so by associating the Direct Connect gateway with the virtual private gateway of a VPC.
To create a Direct Connect Gateway:
- Log into your AWS account at https://console.aws.amazon.com/directconnect/.
- Select Direct Connect Gateways > Create Direct Connect Gateway.
- Provide the necessary information.
| Field | Description | Example |
|---|---|---|
| Name | A descriptive name that will help you identify the AWS gateway. | Gateway for PhoenixNAP AWS |
| Amazon Side ASN | Provide the ASN for the AWS side of the BGP session. For 16-bit ASN, the value must be between 64,512 to 65,534. For 32-bit ASN, the value must range from 4,200,000,000 to 4,294,967,294. | 65000 |
AWS Direct Connect gateways have certain limitations
- Multiple VPCs associated with a single Direct Connect gateway cannot communicate directly.
- Multiple virtual interfaces that are associated with a single Direct Connect gateway cannot communicate directly.
- A virtual interface associated with a Direct Connect gateway and a virtual private gateway associated with that same Direct Connect gateway cannot communicate directly.
- A virtual private gateway may only be associated with a single Direct Connect gateway.
- A virtual private gateway associated with a Direct Connect gateway must be attached to a VPC.
- Currently, Direct Connect gateway cannot be used to connect to a VPC in the China region.
Create a Virtual Private Gateway in VPC – AWS Settings
Create a virtual private gateway and attach it to the VPC that contains the EC2 VMs you are trying to connect to. To create a VPG and attach it to a VPC:
- Log into your AWS account and select Virtual Private Gateways > Create Virtual Private Gateway.
- Enter a name for your VPG which will create a tag containing a key of Name and the value you have entered. If you intend to use the default AWS ASN, don’t change the ASN default selection. To type in a value, select Custom ASN and enter a value. It should be between 64512 and 65534 or 4200000000 and 4294967294.
- Select Create Virtual Private Gateway.
- Select the newly created VPG. Click Actions > Attach to VPC.
- Select the desired VPC and click Yes, Attach.
Associate the Virtual Private Gateway with an AWS Direct Connect Gateway
Associate the new VPG with the DCG you created earlier. To do so, you need to be in the same region in which the virtual private gateway is located. The same applies to the disassociation of VPGs. The VPG must be attached to a VPC.
- Log in to your AWS Direct Connect console at https://console.aws.amazon.com/directconnect/.
- Select the region in which your VPG is located.
- Select the Direct Connect Gateway drop-down, and click your desired Direct Connect gateway.
- ClickActions> Associate Virtual Private Gateway.
- Find and select the desired virtual private gateway, and select Associate.
If you want to check all your virtual private gateways in all regions associated with a single Direct Connect gateway, select Virtual Gateway Associations. This will list any existing associations.
Note: Check out the list of AWS alternatives to see how they stack up against other cloud providers.
Connecting a Bare Metal Backend to AWS via Direct Connect
The configuration outlined below is an example of how a phoenixNAP customer would typically connect their Bare Metal backend to AWS Direct Connect. This may or may not apply to your use case.
Router Server
Choose a server from your PNAP Bare Metal inventory to become your Router Server.
IP Forwarding
Enable IP & IPv6 forwarding on chosen Router Server. Create a new file and name it /etc/sysctl.d/90-routing-sysctl.conf. The file should contain the following content:
# Sysctl for routing
#
# Routing: We need to forward packets
net.ipv4.conf.all.forwarding=1
net.ipv6.conf.all.forwarding=1
net.ipv4.conf.enp1s0f0.send_redirects=0
Load the New sysctl.conf File
Run the following command to load the newly created sysctl.conf file:
sudo sysctl -p /etc/sysctl.d/90-routing-sysctl.confInstall PIP
Securely download get-pip.py.
curl https://bootstrap.pypa.io/get-pip.py -o get-pip.pyCheck whether everything seems fine with get-pip.py. If yes, run the following command:
sudo python get-pip.pyBuild FRRouting Packages on Router Server
To install the required packages, run the following command:
sudo yum install git autoconf automake libtool make gawk \
   readline-devel texinfo net-snmp-devel groff pkgconfig \
   json-c-devel pam-devel bison flex pytest c-ares-devel \
   perl-XML-LibXML python-devel systemd-devel
sudo pip install sphinx
Add FRR User and Group
sudo groupadd -g 92 frr
sudo groupadd -r -g 85 frrvt
sudo useradd -u 92 -g 92 -M -r -G frrvt -s /sbin/nologin \
   -c "FRR FRRouting suite" -d /var/run/frr frr
Download FRR Source, Configure and Compile
This document assumes that you want to compile and install FRR from Git, and not use any packages.
git clone https://github.com/frrouting/frr.git frr
cd frr
./bootstrap.sh
./configure \

  --bindir=/usr/bin \
  --sbindir=/usr/lib/frr \
  --sysconfdir=/etc/frr \
  --libdir=/usr/lib/frr \
  --libexecdir=/usr/lib/frr \
  --localstatedir=/var/run/frr \
  --with-moduledir=/usr/lib/frr/modules \
  --enable-pimd \
  --enable-snmp=agentx \
  --enable-multipath=64 \
  --enable-ospfclient=yes \
  --enable-ospfapi=yes \
  --enable-user=frr \
  --enable-group=frr \
  --enable-vty-group=frrvt \
  --enable-rtadv \
  --enable-systemd \
  --disable-exampledir \
  --enable-watchfrr \
  --disable-ldpd \
  --enable-fpm \
  --enable-nhrpd \
  --enable-eigrpd \
  --enable-babeld \
  --with-pkg-git-version \
  --with-pkg-extra-version=-MyOwnFRRVersion

make
make check
make install
Create an Empty FRR Configuration File
sudo mkdir /var/log/frr
sudo mkdir /etc/frr
sudo touch /etc/frr/zebra.conf
sudo touch /etc/frr/bgpd.conf
sudo touch /etc/frr/ospfd.conf
sudo touch /etc/frr/ospf6d.conf
sudo touch /etc/frr/isisd.conf
sudo touch /etc/frr/ripd.conf
sudo touch /etc/frr/ripngd.conf
sudo touch /etc/frr/pimd.conf
sudo touch /etc/frr/nhrpd.conf
sudo touch /etc/frr/eigrpd.conf
sudo touch /etc/frr/babeld.conf
sudo chown -R frr:frr /etc/frr/
sudo touch /etc/frr/vtysh.conf
sudo chown frr:frrvt /etc/frr/vtysh.conf
sudo chmod 640 /etc/frr/*.conf
Install Daemon Configuration File
sudo install -p -m 644 redhat/daemons /etc/frr/
sudo chown frr:frr /etc/frr/daemons
EDIT /etc/frr/daemons
To enable daemons, change noto yesfor watchfrr_enable, zebra, bgpd
Install the FRR Service
sudo install -p -m 644 redhat/frr.service /usr/lib/systemd/system/frr.service
sudo install -p -m 755 redhat/frr.init /usr/lib/frr/frr
Register System Files
sudo systemctl preset frr.serviceStart or Reboot FRR Manually
sudo systemctl start frrEdit the /etc/frr/vtysh.conf File
Add the following line to the file:
no service integrated-vtysh-configEdit the /etc/frr/zebra.conf File
hostname Zebra
password USER_PASS
enable password ENABLE_PASS
log file zebra.log
!
!
!
vrf Default-IP-Routing-Table
ip route 0.0.0.0/0 AWS_PEER_IP
ip route BACKEND_BARE_METAL NETWORK enp1s0f0
interface enp1s0f0
ip address YOUR_PEER_IP/30
!
!
!
!
line vty
!
Edit the /etc/frr/bgpd.conf File
hostname Bgpd
password USER_PASS
enable password ENABLE_PASS
log file bgpd.log
!
!
router bgp USER_ASSIGNED_ASN_AWS_SIDE
neighbor AWS_PEER_IP remote-as AWS_SIDE_ASN
neighbor AWS_PEER_IP password AWS_BGP_AUTH_KEY
neighbor AWS_PEER_IP timers 10 30
neighbor AWS_PEER_IP default-originate
neighbor AWS_PEER_IP soft-reconfiguration inbound
!
address-family ipv4 unicast
network BACKEND_BARE_METAL_NETWORK

exit-address-family
!
!
line vty
!
Reboot FRR Manually
To reboot, run the following:
sudo systemctl start frrInstall Telnet
Telnet allows management of Zebra and BGPd via VTY. To install Telnet, run the following:
sudo yum install telnetBare Metal Backend Network
On other machines in your Bare Metal Backend Network, you will need a route to the Router Server.
Edit GATEWAY=“”in /etc/sysconfig/network-scripts for your appropriate backend interface for each server that needs to connect to AWS. Set GATEWAY=“ROUTER_SERVER_IP” where ROUTER_SERVER_IP is the IP address of your Router Server.
Restart networking after making the changes.
Verify the Newly Created Virtual Interface
After successfully establishing a virtual interface with your AWS resources, it is advised to verify your connection using the following procedures.
Verify the Virtual Interface Connection to the AWS Cloud Service
Run traceroute to verify that the AWS Direct Connect identifier is in the network trace.
Use a Pingable AMI to Verify Your Virtual Interface Connection to Amazon VPC
A pingable Linux AMI, such as Amazon Linux Ami, is a great tool to check your connection to Amazon VPC. Launch your instance of EC2 into the VPC attached to your VPG (i.e., virtual private gateway).
You should see the Amazon Linux AMIs on the Quick Start tab. Make sure that the security group tied to the instance permits inbound ICMP traffic. Once the instance of EC2 is running, get its private IPv4 address (see instance details). Ping that private IPv4 address and check for a response.
Connection Redundancy
Each Direct Connect connection is a single dedicated network between your equipment and an Amazon router. If you need a redundant connection, it is strongly advised to establish a second connection.
Important Notes
IPTABLES on servers in your environment are still in effect and may disrupt traffic flows if not managed correctly.
Security Groups in AWS are still in effect and may disrupt traffic flows if not managed correctly.
