SSL certificates are essential for securing online communication, as they encrypt data between a user's browser and a server. Install an SSL certificate on NGINX to ensure a secure connection by encrypting data transmitted over the internet so it is visible only to the intended recipient.
This article will show you how to install an SSL certificate on NGINX with simple, step-by-step instructions.
Prerequisites
- A server certificate issued by a certificate authority (CA) for your domain.
- NGINX installed on your system.
- A user account with sudo privileges.
How to Install SSL Certificate on NGINX
This guide assumes you have already generated a certificate signing request and received your SSL certificate issued by a certificate authority. If you have not yet obtained a certificate, follow our guide to generating a certificate signing request (CSR) and submitting it to a CA.
Step 1: Combine All Certificates into a Single File
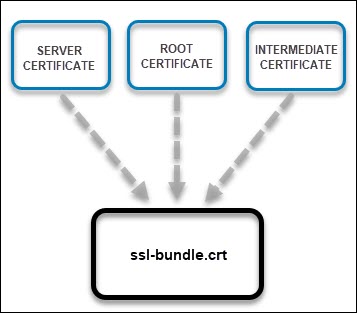
You should have received your SSL certificate via email as a .zip file. Once you download and extract the archive, you will see it consists of three files:
- Server certificate.
- Root certificate.
- Intermediate certificate.
The first step is to combine all three files into a single file.
There are two ways to combine the files into a single one:
Combine Files Manually
To manually combine the files, copy and paste their contents into a text editor. Save the new file as ssl-bundle.crt.
Combine Files Automatically
The other option is to combine the files using the command line and cat command. The syntax depends on whether you have separate intermediate files or whether they are in a single .ca-bundle file.
- If all three certificates are listed separately, use the command:
cat your_domain.crt intermediate.crt root.crt >> ssl-bundle.crt- If the intermediate certificates are in one bundle, run:
cat your_domain.crt your_domain.ca-bundle >> ssl-bundle.crtNote: Make sure you save the ssl-bundle.crt file in the etc/ssl directory.
Step 2: Edit NGINX Configuration File
After combining the files, configure the NGINX server block (the virtual host file) for your server. If you don't know the file's location, use the find command:
sudo find nginx.confOpen the file with a text editor to make the necessary modifications. The easiest way to set up the configuration is to copy the original server module, paste it below, and edit the content.
Follow these steps:
1. Instruct the server to listen to port 443:
listen 443;2. Make sure the server block includes the following line:
<code>ssl on;3. Define the SSL certificate path:
ssl_certificate /etc/ssl/ssl-bundle.crt;4. Specify the directory where the SSL Certificate Key is located:
/path/to/your_private.key;The configuration file should look similar to the one below:
server {
listen 443;
ssl on;
ssl_certificate /etc/ssl/ssl-bundle.crt;
ssl_certificate_key /path/to/your_private.key;
root /path/to/webroot;
server_name your_domain.com;
}
access_log /var/log/nginx/nginx.vhost.access.log;
error_log /var/log/nginx/nginx.vhost.error.log;
location / {
root /var/www/;
root  /home/www/public_html/your.domain.com/public/;
index index.html;
}
}
5. Save and exit the file.
Step 3: Restart NGINX Server
Restart your NGINX server so your configuration changes take place. To do so, run the command:
sudo systemctl restart nginxStep 4: Verify SSL Certificate
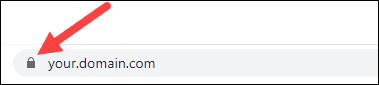
The best way to check that you have successfully installed the SSL certificate on NGINX is to connect to your server via a browser.
Open a browser of your choice and navigate to your domain using the HTTPS protocol:
https://[your.domain.com]Replace [your.domain.com] with your actual address.
You should see a locked padlock verifying that the SSL certificate is now set up on your server, as in the image below:
Conclusion
This article showed how to install an SSL Certificate on your NGINX server. Make sure to install separate certificates on each machine if you have multiple NGINX servers.
Next, secure your NGINX server with Let's Encrypt, a free certificate authority that lets you set up SSL/TLS protection.