Docker integration for Visual Studio Code (VSC) helps you streamline VSC development workflow. Installing a VSC extension allows you to execute Docker commands and perform all the necessary operations on Docker images and containers straight from your VSC environment.
This article shows how to install the Docker VSC extension, create a container image, and run the Docker container in VSC.
Prerequisites
- Docker installed.
- VS Code installed.
- Node.js and NPM installed for packaging a Node.js app or the relevant dependencies for other platforms/stacks.
Install Docker Extension in VSC
Docker integrates with Visual Studio Code via the official Microsoft-verified extension. Follow the steps below to install the extension in VSC:
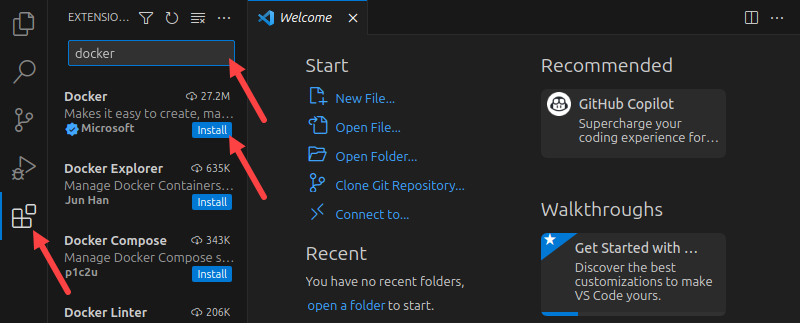
1. Select the Extensions button from the pane on the left side of the VSC window.
2. Type Docker in the search box. The list of Docker-related extensions appears below.
3. Select the Install button next to the Docker extension. Once the extension is active, the Docker button appears.
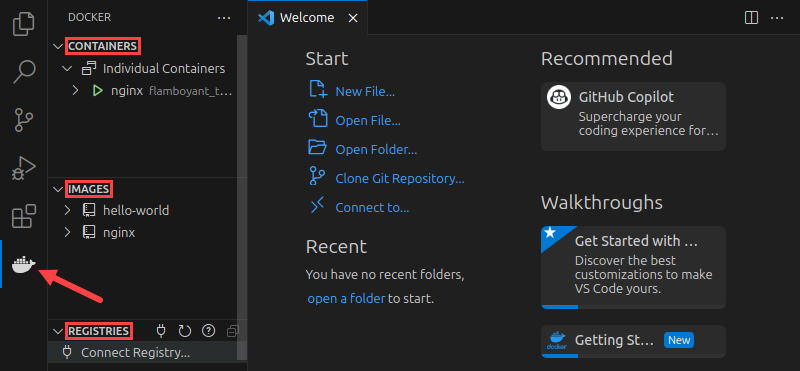
4. Select the Docker button in the menu on the left side of the screen. This button loads the Docker pane with three sections:
- Containers. Expand this section to see all the containers created on the system.
- Images. This section lists all the images available locally.
- Registries. If you connected your Docker installation with a registry, it will show up in this section.
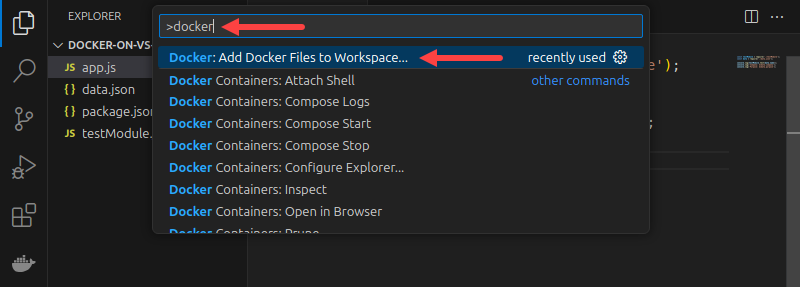
Another feature of the Docker extension for VSC is the access to Docker commands via the Control Palette. Open the palette by pressing Ctrl + Shift + P. Type Docker in the search bar to display the available Docker commands.

Create Dockerfile Using VSC
If you have an application folder open in VSC, use the Docker extension to automatically populate that folder with the Dockerfile and other files necessary to create a Docker image.
The following steps describe the procedure for creating Docker files for a Node.js app:
1. Press Ctrl + Shift + P to open the Control Palette.
2. Type Docker into the search box.
3. Select Docker: Add Docker Files to Workspace... from the search results list.
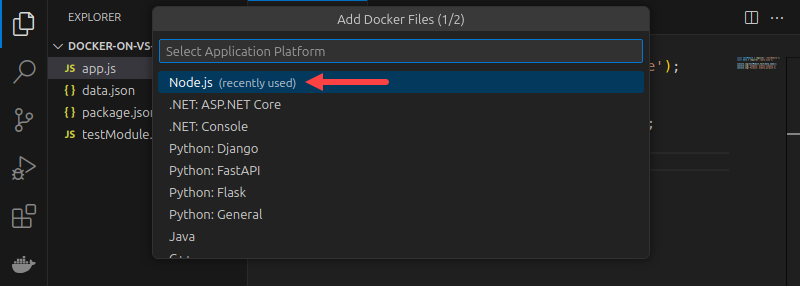
4. Choose the stack/platform you used to develop the app. The example uses Node.js.
5. Type the number of the port your application listens on. Leave the field empty if the app does not expose a port.

6. Choose whether to include Docker Compose files.

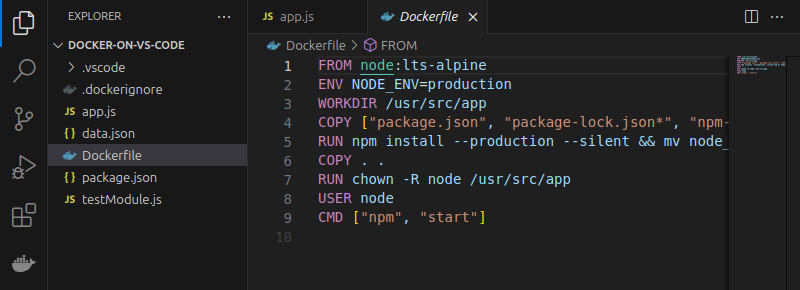
VSC checks the files' syntax and creates the necessary Docker files. In the example below, the extension creates .dockerignore and Dockerfile. The Dockerfile contains the instructions for creating a container image of the Node.js app.
Build and Run Docker Image
With all the files generated, you can now use Docker in VSC to create your app's Docker image and run a container using that image. Perform these actions by following the steps below:
1. Press Ctrl + Shift + P to open the Control Palette.
2. Search for and select the Docker Images: Build Image... command.

Docker reads and executes the steps from the Dockerfile and creates a Node.js app image.

3. Search for and select the Docker Images: Run command in the Control Palette to run a container based on the image.

4. Select the image to use for the container.

5. Select the image tag.

Docker successfully runs a container and prints its ID in the output.

Conclusion
After reading this article, you should know how to install the Docker extension for VSC and how to use the extension for packaging apps and running containers. By utilizing the extension, you will spend less time switching between VSC and the terminal, allowing you to better focus on your project.
If you use Docker often, save our Docker Commands Cheat Sheet for future reference.
